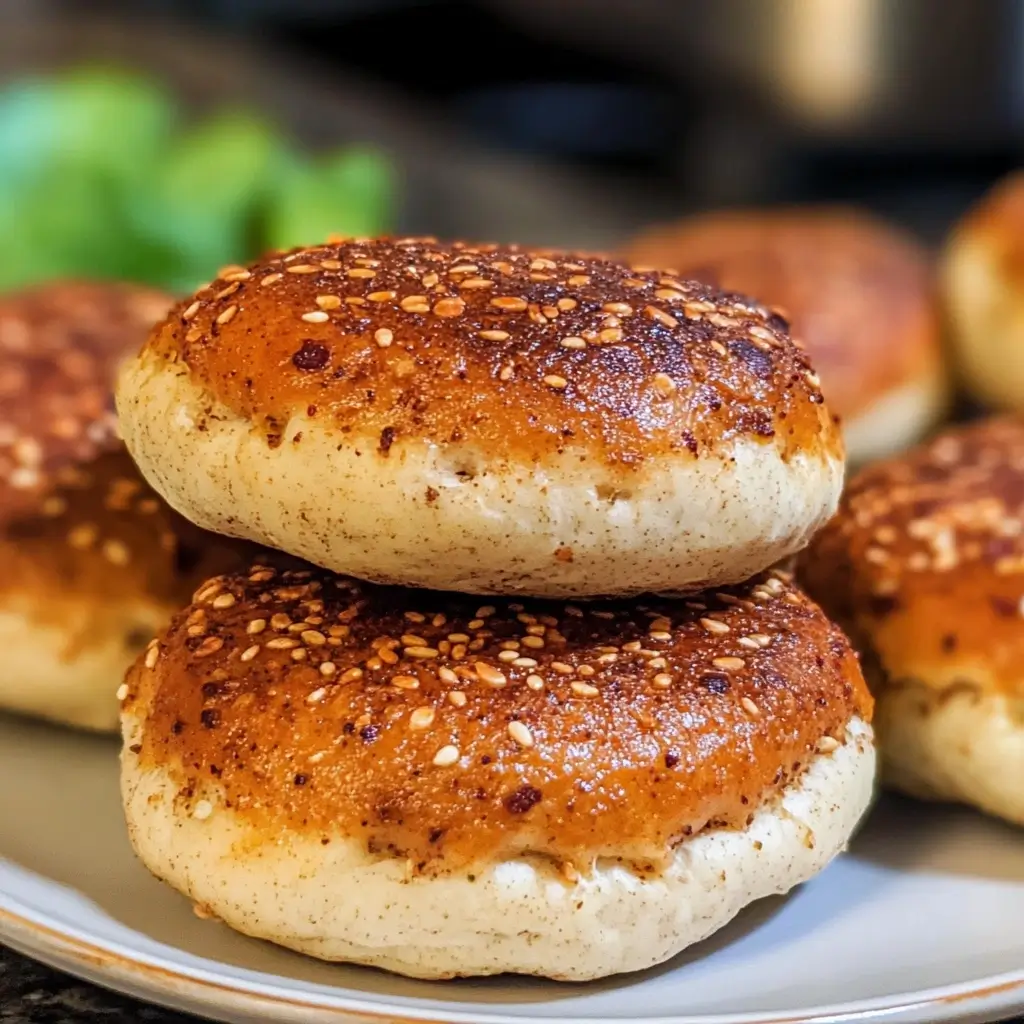
I remember the early days of my ketogenic journey like it was yesterday. The energy was fantastic, the mental clarity a revelation, but oh, how I missed bread! Not just any bread, but the simple, satisfying act of holding a burger with a proper bun, or mopping up sauce with a piece of crusty goodness. I tried countless “keto bread” recipes, and while some were okay, many were eggy, crumbly, or just plain disappointing. Then, a friend shared a ridiculously simple concept: a 5-ingredient keto bun. I was skeptical, to say the least. How could just five ingredients create something that could even remotely pass for a bun? Let me tell you, the first time I pulled these golden beauties from the oven, the aroma alone was enough to make me a believer. The texture was spot on – slightly chewy, wonderfully soft inside, and sturdy enough to handle a juicy patty. My family, initially wary of “Dad’s keto experiments,” devoured them. My kids, who are notoriously picky, even asked for them for their school lunch sandwiches! These 5-ingredient keto buns have become an absolute staple in our household, a testament to the fact that delicious, satisfying food doesn’t need to be complicated, even on a ketogenic lifestyle. They are my go-to for quick lunches, weekend BBQs, and whenever that bread craving hits.
The Magic of 5-Ingredient Keto Buns: A Recipe Unveiled
Embarking on a ketogenic diet often means saying a temporary goodbye to traditional bread, a staple in many cuisines. However, the craving for a soft, versatile bun for burgers, sandwiches, or as a side doesn’t just disappear. This is where the beauty of keto baking shines, and particularly with recipes that are both simple and effective. These 5-Ingredient Keto Buns are a game-changer. They’re not only incredibly easy to make, requiring minimal ingredients and effort, but they also deliver a texture and taste that will genuinely surprise you. Free from gluten and low in carbs, they fit seamlessly into your keto lifestyle, ensuring you don’t feel deprived. Let’s dive into what makes these buns a must-try and how you can whip them up in your own kitchen.
Ingredients You’ll Need (The Fab Five!)
The magic of this recipe lies in its simplicity and the synergy between these five core ingredients. Each plays a crucial role in achieving that perfect bun-like texture and structure.
- Almond Flour: 1 ½ cups (168g), finely ground, blanched
- Why it’s key: Almond flour is the low-carb backbone of these buns. Made from ground almonds, it’s naturally gluten-free and rich in healthy fats and protein. Using finely ground, blanched almond flour is crucial. “Blanched” means the skins have been removed before grinding, resulting in a lighter color and finer texture, which translates to a less gritty, more bread-like bun. Almond meal, which includes the skins, can make the buns denser and darker. The fine grind ensures better binding and a smoother crumb. Almond flour also imparts a subtle, slightly sweet, nutty flavor that complements both savory and (if you were to adapt it) sweeter applications.
- Psyllium Husk Powder: 3 tablespoons (27g), make sure it’s powder, not whole husks
- Why it’s key: Psyllium husk powder is the secret weapon in many keto bread recipes. Derived from the husks of Plantago ovata seeds, it’s almost entirely fiber. When mixed with liquid, it forms a gel, which provides structure, elasticity, and that characteristic “chew” that’s often missing in gluten-free, low-carb baking. It mimics gluten’s role remarkably well, preventing the buns from being overly crumbly. It’s essential to use powdered psyllium husk; whole husks won’t integrate as well and will result in a very different, often unpleasant, texture. Some brands of psyllium can occasionally lend a slightly purple hue to baked goods upon reacting with other ingredients or heat; this is generally harmless and a cosmetic issue, but something to be aware of.
- Large Eggs: 3
- Why it’s key: Eggs are the multi-taskers in this recipe. They provide binding, holding the almond flour and psyllium husk together. They also contribute to leavening, helping the buns rise and achieve a lighter texture, especially when whisked to incorporate some air. The fats in the yolks add richness and flavor, while the proteins contribute to structure. Using room temperature eggs is often recommended in baking as they incorporate more easily and fully into batters, potentially leading to a better rise.
- Baking Powder: 1 ½ teaspoons
- Why it’s key: Baking powder is the primary leavening agent here. It reacts with moisture and heat to produce carbon dioxide gas, creating air pockets that make the buns light and fluffy rather than dense and heavy. Ensure your baking powder is fresh; old baking powder loses its potency and won’t provide an adequate rise. You can test its freshness by dropping a little into hot water – if it fizzes vigorously, it’s good to go.
- Melted Unsalted Butter: 3 tablespoons (42g) (or avocado oil/coconut oil for dairy-free)
- Why it’s key: Fat is flavor, and melted butter adds a wonderful richness and classic taste to these buns. It also contributes to a softer crumb and helps with browning. For a dairy-free option, melted coconut oil (refined if you don’t want a coconut flavor) or avocado oil are excellent substitutes, maintaining the necessary fat content for texture and moisture. If using salted butter, you might want to reduce or omit any additional salt.
Optional but Highly Recommended:
- Salt: ½ teaspoon (or to taste). While technically a sixth ingredient, salt is fundamental for flavor in almost all baking, enhancing the other ingredients and preventing the buns from tasting flat.
- Apple Cider Vinegar (ACV): 1 teaspoon. Some find that a small amount of ACV can help improve the texture and slightly mask any potential “eggy” taste, as well as react with the baking powder for a bit more lift. If you have it on hand, it’s a worthy addition.
Step-by-Step Instructions to Keto Bun Perfection
Follow these instructions carefully, and you’ll be rewarded with delicious, homemade keto buns. The process is straightforward, making it perfect even for novice keto bakers.
- Preheat and Prepare:
- Preheat your oven to 350°F (175°C). This is a moderate temperature ideal for baking these buns thoroughly without burning the exterior.
- Line a large baking sheet with parchment paper or a silicone baking mat. This prevents sticking and makes cleanup a breeze. Avoid greasing the pan directly, as it can cause the bottoms of the buns to spread too much or become overly greasy.
- Combine Dry Ingredients:
- In a medium-sized mixing bowl, add the almond flour, psyllium husk powder, baking powder, and salt (if using).
- Whisk these dry ingredients together thoroughly. This step is crucial to ensure the baking powder and psyllium husk are evenly distributed throughout the almond flour. Clumps of baking powder can lead to bitter spots, and uneven psyllium can result in a patchy texture. Using a whisk helps to aerate the flour slightly as well.
- Combine Wet Ingredients:
- In a separate small bowl, crack the three large eggs.
- Add the melted butter (or your chosen oil) and apple cider vinegar (if using).
- Whisk the wet ingredients together until well combined and slightly frothy. This ensures the yolks and whites are fully incorporated, and the fat is emulsified.
- Mix Wet into Dry:
- Pour the wet ingredient mixture into the bowl containing the dry ingredients.
- Using a spatula or a wooden spoon, mix everything together until just combined and a cohesive dough starts to form. Be careful not to overmix at this stage. Overmixing can lead to tougher buns. The dough will appear quite wet and sticky initially.
- Rest the Dough (Crucial Step!):
- Let the dough sit for 5-10 minutes. This resting period is vital. It allows the psyllium husk powder to absorb the moisture and “gel up,” which thickens the dough considerably and makes it much easier to handle. You’ll notice a significant change in consistency – it will become less sticky and more pliable. Don’t skip this!
- Shape the Buns:
- After resting, the dough should be manageable. Wet your hands slightly with water. This is a key trick to prevent the sticky dough from clinging to your hands, making the shaping process much smoother.
- Divide the dough into 4 to 6 equal portions, depending on your desired bun size. For larger burger buns, aim for 4. For smaller slider buns or dinner rolls, 6 portions work well.
- Roll each portion between your wet hands to form a smooth ball, then gently flatten it into a bun shape (about ¾ to 1 inch thick) on the prepared baking sheet. Ensure they are evenly sized for consistent baking. Space them at least 2 inches apart on the baking sheet, as they will spread and puff up slightly during baking.
- Optional Toppings:
- If desired, you can brush the tops of the buns with an egg wash (1 egg beaten with 1 tablespoon of water) for a shinier, golden-brown crust.
- Sprinkle with sesame seeds, poppy seeds, everything bagel seasoning, or a pinch of coarse sea salt for extra flavor and visual appeal.
- Bake to Golden Perfection:
- Place the baking sheet in the preheated oven on the middle rack.
- Bake for 20-25 minutes, or until the buns are well-risen, golden brown on top, and feel firm to the touch. The exact baking time can vary depending on your oven and the size of your buns.
- A good indicator of doneness is when a toothpick inserted into the center of a bun comes out clean, or with very few moist crumbs attached.
- Cool Completely:
- Once baked, remove the baking sheet from the oven and carefully transfer the buns to a wire cooling rack.
- Allow them to cool completely before slicing or serving. This is important because low-carb baked goods, especially those with psyllium, continue to set and firm up as they cool. Slicing them while hot can result in a gummy interior. Patience here will be rewarded with the best texture.
Nutritional Insights: What’s in Your Keto Bun?
Understanding the nutritional profile of what you eat is paramount on a ketogenic diet. These 5-Ingredient Keto Buns are designed to be low in carbohydrates and high in healthy fats and fiber, making them an excellent choice.
Servings
This recipe yields approximately 4 large burger-style buns or 6 smaller slider/dinner roll-style buns. The nutritional information will vary based on the exact size and number of buns you create.
Calories Per Serving (Approximate)
For a batch making 6 smaller buns, each bun will contain approximately:
- Calories: Around 180-220 kcal (This can vary based on the specific brands of ingredients, especially almond flour and butter/oil).
- Net Carbohydrates: Roughly 2-3g (Total Carbs approx. 7-9g, Fiber approx. 5-6g). Net carbs are calculated by subtracting fiber from total carbohydrates. Psyllium husk is a fiber powerhouse, significantly lowering the net carb count.
- Fat: Approximately 15-19g. The majority of this comes from the almond flour and the added butter or oil, providing sustained energy.
- Protein: Approximately 6-8g. Eggs and almond flour are good sources of protein.
Why these numbers matter for Keto:
- Low Net Carbs: The low net carb count is crucial for maintaining ketosis, the metabolic state where your body burns fat for fuel instead of carbohydrates.
- High Healthy Fats: The significant fat content aligns with the macronutrient ratios required for a ketogenic diet, providing satiety and energy.
- Good Source of Fiber: Psyllium husk and almond flour contribute dietary fiber, which is important for digestive health, blood sugar regulation, and can help you feel fuller for longer.
It’s always a good idea to calculate the precise nutritional values using the specific brands and quantities of ingredients you use, especially if you are closely tracking your macros. Online nutritional calculators can be very helpful for this.
Time is Precious: Keto Bun Prep & Cook Time
One of the most appealing aspects of this 5-ingredient keto bun recipe is how quickly you can go from craving to satisfaction. It’s a relatively fast recipe, perfect for busy weekdays or when you spontaneously decide on burgers for dinner.
Preparation Time
- Active Prep Time: Approximately 10-15 minutes. This includes gathering your ingredients, mixing the dry and wet components, and shaping the buns.
- Dough Resting Time: 5-10 minutes (passive). This is essential for the psyllium husk to work its magic. You can use this time to tidy up or prepare any toppings.
Cook Time
- Baking Time: Approximately 20-25 minutes. This can vary slightly based on your oven’s calibration and the size of the buns you’ve shaped. Keep an eye on them towards the end of the baking period to achieve that perfect golden-brown color.
Total Time
- From Start to Buns Ready to Cool: Approximately 35-50 minutes.
- Cooling Time: At least 30 minutes to an hour (or until completely cool) is highly recommended for the best texture before slicing. While it adds to the overall wait, it’s a crucial step for optimal results.
So, in under an hour of active and baking time, you can have a batch of fresh, delicious keto buns ready to cool, making this a highly practical recipe for any keto enthusiast.
Elevate Your Meal: How to Serve Your Keto Buns
These versatile 5-ingredient keto buns are far more than just a vehicle for burger patties. Their neutral, slightly nutty flavor and satisfying texture open up a world of culinary possibilities. Here are some fantastic ways to serve and enjoy them:
- The Ultimate Keto Burger/Cheeseburger:
- This is the classic! Toast the buns lightly (sliced side down in a dry pan or under the broiler) for extra texture. Load them up with your favorite grass-fed beef patty, cheese (cheddar, Swiss, provolone), crispy bacon, lettuce, tomato, onion, pickles, and a generous dollop of keto-friendly mayonnaise or special sauce. The sturdiness of these buns holds up beautifully to juicy fillings.
- Sensational Keto Sandwiches:
- Breakfast Sandwich: Slice a bun, toast it, and fill with a fried or scrambled egg, cheese, and cooked bacon or sausage. A fantastic way to start your day.
- Lunchtime Deli Delight: Perfect for sliced turkey or ham, cheese, avocado, lettuce, and keto mayo. Think keto BLTs (Bacon, Lettuce, Tomato with mayo) or a classic club sandwich.
- Pulled Pork/Chicken Sliders: If you make smaller buns, they are ideal for serving with sugar-free BBQ pulled pork or shredded chicken. Add a dollop of keto coleslaw for a complete meal.
- As a Side to Soups and Stews:
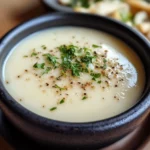
- A warm keto bun, perhaps spread with a little butter or garlic butter, is the perfect accompaniment for dipping into hearty keto soups, chilis, or stews. It adds that comforting, bready element often missed.
- Mini Keto Pizzas:
- Slice the buns in half horizontally. Top each half with a spoonful of low-carb marinara sauce, mozzarella cheese, and your favorite pizza toppings (pepperoni, mushrooms, olives). Bake or broil until the cheese is melted and bubbly. A quick and easy pizza fix!
- Garlic Bread Alternative:
- Slice the buns, spread them with garlic butter (minced garlic mixed with softened butter and a pinch of parsley), and toast them under the broiler until golden and fragrant. Serve alongside keto pasta dishes or salads.
- Simple with Butter or Cream Cheese:
- Sometimes, simplicity is best. Enjoy a warm, toasted keto bun spread with a generous pat of quality butter or a smear of cream cheese. A sprinkle of everything bagel seasoning takes this to another level.
- Open-Faced Delights:
- Use a toasted bun half as a base for an open-faced sandwich. Try tuna melt (keto tuna salad topped with cheese and broiled) or an avocado toast variation with mashed avocado, a sprinkle of chili flakes, and a fried egg.
No matter how you choose to serve them, these keto buns provide a satisfying and delicious way to enjoy your favorite meals without derailing your low-carb lifestyle.
Pro Tips for Perfecting Your 5-Ingredient Keto Buns
While this recipe is straightforward, a few extra tips can help you achieve bakery-quality keto buns every single time and allow for some creative customization.
- The Psyllium Husk Powder Precision:
- Why it’s important: The type and measurement of psyllium husk powder are critical. Always use powdered psyllium husk, not whole husks. Whole husks absorb liquid differently and will result in a dense, gritty texture. Measure accurately; too much can make the buns overly gummy or dense, while too little won’t provide enough structure. If you only have whole psyllium husks, you can grind them into a fine powder using a coffee grinder or spice grinder, but measure after grinding. Some brands of psyllium husk can also lead to a purple hue in the final product. While this doesn’t affect the taste or safety, if it bothers you, try a different brand. Those labeled “blonde” psyllium husk powder are often less prone to this.
- Don’t Dare Skip the Dough Rest:
- Why it’s important: As mentioned in the instructions, allowing the dough to rest for 5-10 minutes after mixing is non-negotiable. This rest period gives the psyllium husk powder time to fully hydrate and absorb the liquid, transforming the initially wet, sticky dough into something much more manageable and cohesive. Skipping this step will make shaping the buns a frustratingly sticky affair and can affect the final texture, leading to denser, less airy buns.
- Wet Hands for Easy Shaping:
- Why it’s important: Even after resting, the dough will still have a certain tackiness due to the psyllium. Slightly wetting your hands with water before dividing and rolling the dough is a simple yet incredibly effective trick. The thin layer of water creates a barrier, preventing the dough from sticking to your palms and fingers, allowing you to shape smooth, uniform buns with ease. Re-wet your hands as needed between shaping each bun.
- Embrace Flavor Customizations:
- Why it’s important: While these buns are delicious as is, they also serve as a fantastic blank canvas for flavor experimentation.
- Herbs & Spices: Mix in ½ to 1 teaspoon of dried herbs like rosemary, thyme, oregano, or Italian seasoning into the dry ingredients for savory, aromatic buns. A pinch of garlic powder or onion powder can also add a lovely depth.
- Cheese: Fold in ¼ cup of grated Parmesan, cheddar, or mozzarella cheese into the dough for cheesy buns. A sprinkle on top before baking also works wonders.
- Seeds & Seasonings: As mentioned for toppings, incorporating sesame seeds, poppy seeds, caraway seeds (for a rye-like flavor), or everything bagel seasoning directly into the dough can add texture and taste throughout the bun.
- Why it’s important: While these buns are delicious as is, they also serve as a fantastic blank canvas for flavor experimentation.
- Optimal Storage and Reheating for Lasting Freshness:
- Why it’s important: Proper storage extends the life of your keto buns and ensures they taste great even days later.
- Cool Completely: Always let the buns cool completely on a wire rack before storing. Storing them while warm will create condensation, leading to soggy buns.
- Airtight Container: Store cooled buns in an airtight container at room temperature for up to 2-3 days.
- Refrigeration: For longer storage (up to a week), keep them in an airtight container in the refrigerator. They may become slightly firmer when cold.
- Freezing: These buns freeze exceptionally well! Once completely cooled, wrap them individually in plastic wrap and then place them in a freezer-safe bag or container. They can be frozen for up to 2-3 months.
- Reheating: To revive refrigerated or frozen buns, you can toast them in a toaster or toaster oven, warm them in a conventional oven at a low temperature (around 300°F/150°C) for 5-10 minutes, or even briefly microwave them (though this can sometimes make them a bit chewy). Slicing and toasting in a pan with a little butter is also a delicious option.
- Why it’s important: Proper storage extends the life of your keto buns and ensures they taste great even days later.
By keeping these pro tips in mind, you’ll not only master the basic recipe but also be able to adapt it to your preferences and ensure every batch of your 5-ingredient keto buns is a resounding success.
Your Keto Bun Questions Answered: FAQ
Navigating keto baking can sometimes bring up questions. Here are answers to some frequently asked questions about these 5-Ingredient Keto Buns to help you on your baking journey.
- Q: Can I substitute coconut flour for almond flour in this recipe?
- A: It’s generally not recommended for a direct 1:1 substitution. Coconut flour and almond flour have vastly different properties. Coconut flour is much more absorbent than almond flour and requires significantly more liquid and often more eggs to prevent the final product from being dry and crumbly. If you were to substitute, you’d need to use much less coconut flour (typically about 1/3 to 1/4 the amount of almond flour) and likely adjust the liquid and egg content. This would essentially require creating a different recipe. For best results with this specific 5-ingredient recipe, stick to finely ground, blanched almond flour.
- Q: My keto buns turned out with a slightly purple or grayish hue. Why did this happen, and are they still safe to eat?
- A: This is a common occurrence when baking with certain brands of psyllium husk powder. The discoloration is usually due to a natural chemical reaction between compounds in the psyllium and other ingredients (like baking powder) or minerals in your water, especially when exposed to heat. It’s purely a cosmetic issue and does not affect the taste, texture (usually), or safety of the buns. They are perfectly safe to eat. If the color bothers you, try using a “blonde” psyllium husk powder next time, or experiment with different brands, as some are more prone to this than others. Adding a teaspoon of apple cider vinegar, as suggested in the optional ingredients, can sometimes help mitigate this.
- Q: Can I make these keto buns dairy-free?
- A: Absolutely! The recipe calls for melted butter, but you can easily make it dairy-free by substituting an equal amount of melted coconut oil (use refined if you prefer no coconut flavor) or avocado oil. Both options work very well and will maintain the necessary fat content for texture and moisture. Ensure any other additions, like optional cheese, are also dairy-free alternatives if needed.
- Q: How can I prevent my keto buns from having an “eggy” taste?
- A: An “eggy” taste can sometimes be a concern with keto baked goods that rely heavily on eggs for structure. Here are a few tips:
- Use Fresh, Quality Eggs: Older eggs can sometimes impart a stronger flavor.
- Don’t Overbake: Overbaking can concentrate flavors and lead to a drier, sometimes more eggy result. Bake until just golden and firm.
- Cool Completely: Allow the buns to cool fully, as flavors can meld and mellow out during this process.
- Apple Cider Vinegar (ACV): As mentioned in the optional ingredients, adding a teaspoon of ACV can help neutralize any potential eggy notes and also aids in leavening.
- Flavor Additions: Incorporating other flavors like herbs, spices, or cheese (as per the pro tips) can also help mask any subtle egginess.
- Ensure Wet and Dry are Well Mixed but Not Overmixed: Proper incorporation is key.
- A: An “eggy” taste can sometimes be a concern with keto baked goods that rely heavily on eggs for structure. Here are a few tips:
- Q: Can I freeze these keto buns? If so, what’s the best way to do it?
- A: Yes, these 5-ingredient keto buns freeze wonderfully, making them perfect for meal prepping!
- Cool Completely: This is the most crucial first step. Ensure the buns are at room temperature before freezing to prevent ice crystal formation and sogginess upon thawing.
- Wrap Individually: For best results and convenience, wrap each bun individually in plastic wrap or beeswax wrap. This protects them from freezer burn and allows you to thaw only as many as you need.
- Freezer Bag/Container: Place the individually wrapped buns into a larger freezer-safe zip-top bag or an airtight freezer container. Label with the date.
- Storage Time: They can be stored in the freezer for up to 2-3 months without significant loss of quality.
- Thawing & Reheating: Thaw at room temperature for a few hours or overnight in the refrigerator. To restore their fresh-baked warmth and texture, you can reheat them in a preheated oven (around 300°F/150°C) for 5-10 minutes, in a toaster oven, or sliced and toasted in a dry pan. Avoid microwaving for too long as it can make them chewy, though a very brief zap (10-15 seconds) can soften them.
- A: Yes, these 5-ingredient keto buns freeze wonderfully, making them perfect for meal prepping!
These FAQs should help address common concerns and ensure your keto bun baking experience is smooth and successful!
Print
5-Ingredient Keto Buns Recipe
Ingredients
- Almond Flour: 1 ½ cups (168g), finely ground, blanched
- Why it’s key: Almond flour is the low-carb backbone of these buns. Made from ground almonds, it’s naturally gluten-free and rich in healthy fats and protein. Using finely ground, blanched almond flour is crucial. “Blanched” means the skins have been removed before grinding, resulting in a lighter color and finer texture, which translates to a less gritty, more bread-like bun. Almond meal, which includes the skins, can make the buns denser and darker. The fine grind ensures better binding and a smoother crumb. Almond flour also imparts a subtle, slightly sweet, nutty flavor that complements both savory and (if you were to adapt it) sweeter applications.
- Psyllium Husk Powder: 3 tablespoons (27g), make sure it’s powder, not whole husks
- Why it’s key: Psyllium husk powder is the secret weapon in many keto bread recipes. Derived from the husks of Plantago ovata seeds, it’s almost entirely fiber. When mixed with liquid, it forms a gel, which provides structure, elasticity, and that characteristic “chew” that’s often missing in gluten-free, low-carb baking. It mimics gluten’s role remarkably well, preventing the buns from being overly crumbly. It’s essential to use powdered psyllium husk; whole husks won’t integrate as well and will result in a very different, often unpleasant, texture. Some brands of psyllium can occasionally lend a slightly purple hue to baked goods upon reacting with other ingredients or heat; this is generally harmless and a cosmetic issue, but something to be aware of.
- Large Eggs: 3
- Why it’s key: Eggs are the multi-taskers in this recipe. They provide binding, holding the almond flour and psyllium husk together. They also contribute to leavening, helping the buns rise and achieve a lighter texture, especially when whisked to incorporate some air. The fats in the yolks add richness and flavor, while the proteins contribute to structure. Using room temperature eggs is often recommended in baking as they incorporate more easily and fully into batters, potentially leading to a better rise.
- Baking Powder: 1 ½ teaspoons
- Why it’s key: Baking powder is the primary leavening agent here. It reacts with moisture and heat to produce carbon dioxide gas, creating air pockets that make the buns light and fluffy rather than dense and heavy. Ensure your baking powder is fresh; old baking powder loses its potency and won’t provide an adequate rise. You can test its freshness by dropping a little into hot water – if it fizzes vigorously, it’s good to go.
- Melted Unsalted Butter: 3 tablespoons (42g) (or avocado oil/coconut oil for dairy-free)
- Why it’s key: Fat is flavor, and melted butter adds a wonderful richness and classic taste to these buns. It also contributes to a softer crumb and helps with browning. For a dairy-free option, melted coconut oil (refined if you don’t want a coconut flavor) or avocado oil are excellent substitutes, maintaining the necessary fat content for texture and moisture. If using salted butter, you might want to reduce or omit any additional salt.
Instructions
- Preheat and Prepare:
- Preheat your oven to 350°F (175°C). This is a moderate temperature ideal for baking these buns thoroughly without burning the exterior.
- Line a large baking sheet with parchment paper or a silicone baking mat. This prevents sticking and makes cleanup a breeze. Avoid greasing the pan directly, as it can cause the bottoms of the buns to spread too much or become overly greasy.
- Combine Dry Ingredients:
- In a medium-sized mixing bowl, add the almond flour, psyllium husk powder, baking powder, and salt (if using).
- Whisk these dry ingredients together thoroughly. This step is crucial to ensure the baking powder and psyllium husk are evenly distributed throughout the almond flour. Clumps of baking powder can lead to bitter spots, and uneven psyllium can result in a patchy texture. Using a whisk helps to aerate the flour slightly as well.
- Combine Wet Ingredients:
- In a separate small bowl, crack the three large eggs.
- Add the melted butter (or your chosen oil) and apple cider vinegar (if using).
- Whisk the wet ingredients together until well combined and slightly frothy. This ensures the yolks and whites are fully incorporated, and the fat is emulsified.
- Mix Wet into Dry:
- Pour the wet ingredient mixture into the bowl containing the dry ingredients.
- Using a spatula or a wooden spoon, mix everything together until just combined and a cohesive dough starts to form. Be careful not to overmix at this stage. Overmixing can lead to tougher buns. The dough will appear quite wet and sticky initially.
- Rest the Dough (Crucial Step!):
- Let the dough sit for 5-10 minutes. This resting period is vital. It allows the psyllium husk powder to absorb the moisture and “gel up,” which thickens the dough considerably and makes it much easier to handle. You’ll notice a significant change in consistency – it will become less sticky and more pliable. Don’t skip this!
- Shape the Buns:
- After resting, the dough should be manageable. Wet your hands slightly with water. This is a key trick to prevent the sticky dough from clinging to your hands, making the shaping process much smoother.
- Divide the dough into 4 to 6 equal portions, depending on your desired bun size. For larger burger buns, aim for 4. For smaller slider buns or dinner rolls, 6 portions work well.
- Roll each portion between your wet hands to form a smooth ball, then gently flatten it into a bun shape (about ¾ to 1 inch thick) on the prepared baking sheet. Ensure they are evenly sized for consistent baking. Space them at least 2 inches apart on the baking sheet, as they will spread and puff up slightly during baking.
- Optional Toppings:
- If desired, you can brush the tops of the buns with an egg wash (1 egg beaten with 1 tablespoon of water) for a shinier, golden-brown crust.
- Sprinkle with sesame seeds, poppy seeds, everything bagel seasoning, or a pinch of coarse sea salt for extra flavor and visual appeal.
- Bake to Golden Perfection:
- Place the baking sheet in the preheated oven on the middle rack.
- Bake for 20-25 minutes, or until the buns are well-risen, golden brown on top, and feel firm to the touch. The exact baking time can vary depending on your oven and the size of your buns.
- A good indicator of doneness is when a toothpick inserted into the center of a bun comes out clean, or with very few moist crumbs attached.
- Cool Completely:
- Once baked, remove the baking sheet from the oven and carefully transfer the buns to a wire cooling rack.
- Allow them to cool completely before slicing or serving. This is important because low-carb baked goods, especially those with psyllium, continue to set and firm up as they cool. Slicing them while hot can result in a gummy interior. Patience here will be rewarded with the best texture.
Nutrition
- Serving Size: One Normal Portion
- Calories: 180-220
- Fat: 15-19g
- Carbohydrates: 7-9g
- Fiber: 5-6g
- Protein: 6-8g