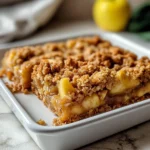
There are certain smells that instantly transport you – for me, it’s the aroma of baked apples and cinnamon swirling through the kitchen air. It’s the scent of comfort, of cozy afternoons, of fall harvests wrapped in a warm hug. That’s precisely the feeling these Apple Crisp Bars evoke every single time I make them. The first time I pulled a pan of these golden-brown beauties from the oven, my family gathered around the counter, drawn in by the irresistible fragrance. The verdict was unanimous: pure, unadulterated deliciousness. The buttery, slightly crumbly shortbread crust provides the perfect base, sturdy enough to hold the tender, perfectly spiced apple filling. And the topping? Oh, that glorious oat crumble topping – crunchy, sweet, and utterly addictive. It’s everything you love about a traditional apple crisp, transformed into a convenient, shareable bar format. They slice beautifully (once cooled!), making them ideal for potlucks, bake sales, or simply a delightful weeknight treat. They’ve become a staple in our fall baking rotation, and frankly, we find excuses to make them year-round. They capture the essence of homemade goodness in every single bite, a perfect blend of textures and familiar, heartwarming flavors.
The Ultimate Apple Crisp Bars: A Recipe Breakdown
This recipe brings together the best elements of apple pie and apple crisp into one easy-to-handle bar. The foundation is a simple shortbread-style crust that doubles (partially) as the crumble topping, streamlining the process. The filling is packed with tender apples kissed with classic autumn spices. Let’s get baking!
Ingredients You’ll Need
To create these delectable bars, you’ll need components for the crust/topping and the apple filling. Using quality ingredients will make a difference, especially with the apples and butter.
For the Crust and Crumble Topping:
- All-Purpose Flour: 3 cups (approximately 360g) – Provides structure for the crust and bulk for the topping.
- Rolled Oats: 1 ½ cups (approximately 135g) – Use old-fashioned rolled oats for the best chewy, distinct texture in the topping. Quick oats can become mushy.
- Light Brown Sugar: 1 ½ cups, packed (approximately 330g) – Adds moisture, a hint of molasses flavor, and sweetness. Packing it ensures the correct amount.
- Granulated Sugar: ½ cup (approximately 100g) – Adds further sweetness and helps with crisping the topping.
- Baking Powder: 1 ½ teaspoons – Gives a slight lift to the crust and topping, preventing it from being too dense.
- Ground Cinnamon: 2 teaspoons – The quintessential fall spice, provides warmth and depth.
- Ground Nutmeg: ½ teaspoon – Complements the cinnamon with its distinctively warm, slightly sweet flavor. A little goes a long way.
- Salt: 1 teaspoon – Balances the sweetness and enhances all the other flavors.
- Unsalted Butter: 1 ½ cups (3 sticks or 340g), cold and cut into small ½-inch cubes – Using cold butter is crucial for creating a crumbly, tender texture in both the crust and topping. Unsalted butter allows you to control the salt level precisely.
For the Apple Filling:
- Apples: About 6-7 medium apples (approx. 2.5 – 3 lbs or 1.1 – 1.4 kg), peeled, cored, and chopped into ½-inch pieces. Choose firm, tart or sweet-tart apples like Granny Smith, Honeycrisp, Braeburn, Gala, or a mix. This should yield about 6-7 cups of chopped apples.
- Granulated Sugar: ¼ cup (approximately 50g) – Adjust slightly depending on the sweetness of your apples and your preference.
- All-Purpose Flour: 2 tablespoons – Helps to thicken the juices released by the apples, preventing a watery filling.
- Lemon Juice: 1 tablespoon – Brightens the flavor of the apples and helps prevent excessive browning. Freshly squeezed is best.
- Ground Cinnamon: 1 teaspoon – Reinforces the cinnamon flavor within the filling.
- Vanilla Extract: 1 teaspoon – Adds a subtle warmth and rounds out the flavors.
Equipment Needed:
- 9×13 inch baking pan
- Large mixing bowls (at least two)
- Pastry blender, forks, or food processor (for cutting in butter)
- Measuring cups and spoons
- Spatula or large spoon
- Apple peeler and corer (optional but helpful)
- Sharp knife and cutting board
- Parchment paper (highly recommended for easy removal)
Step-by-Step Instructions for Perfect Apple Crisp Bars
Follow these instructions carefully for the best results. The key is achieving the right texture for the crust and topping and ensuring the apples are cooked perfectly.
- Preheat and Prepare: Preheat your oven to 375°F (190°C). Line a 9×13 inch baking pan with parchment paper, leaving an overhang on the two longer sides. This overhang will act as handles, making it much easier to lift the bars out of the pan once cooled. Lightly grease the parchment paper and any exposed parts of the pan, or spray with non-stick cooking spray.
- Make the Crust/Topping Mixture: In a large bowl, whisk together the 3 cups of all-purpose flour, 1 ½ cups rolled oats, 1 ½ cups packed light brown sugar, ½ cup granulated sugar, 1 ½ teaspoons baking powder, 2 teaspoons cinnamon, ½ teaspoon nutmeg, and 1 teaspoon salt. Ensure all the dry ingredients are well combined and free of lumps, especially the brown sugar.
- Cut in the Cold Butter: Add the cold, cubed butter to the dry ingredient mixture. Using a pastry blender, two forks, or your fingertips, cut the butter into the flour mixture until it resembles coarse crumbs or small peas. Some slightly larger butter pieces are okay. If using a food processor, pulse carefully, being cautious not to over-process; you want distinct crumbs, not a paste. Why cold butter? Cold butter melts during baking, creating steam pockets that result in a flakier, more tender texture compared to using melted butter, which would yield a denser, greasier result.
- Press the Crust: Measure out approximately 4 cups of the crumb mixture and press it firmly and evenly into the bottom of the prepared 9×13 inch baking pan. Use the bottom of a measuring cup or glass to help pack it down tightly. This firm base is essential for creating sturdy bars.
- Par-Bake the Crust (Optional but Recommended): Place the pan in the preheated oven and bake the crust for 12-15 minutes, or until it’s lightly golden around the edges and slightly set. This step helps prevent the crust from becoming soggy from the apple filling. Let it cool slightly on a wire rack while you prepare the filling. Keep the remaining crumb mixture aside – this will be your topping.
- Prepare the Apple Filling: In another large bowl, combine the chopped apples, ¼ cup granulated sugar, 2 tablespoons all-purpose flour, 1 tablespoon lemon juice, 1 teaspoon cinnamon, and 1 teaspoon vanilla extract. Toss gently but thoroughly until the apples are evenly coated with the sugar, flour, and spices. The flour will help thicken the juices as the apples bake.
- Assemble the Bars: Spread the apple filling evenly over the par-baked crust, reaching all the way to the edges.
- Add the Crumble Topping: Sprinkle the reserved crumb mixture evenly over the apple layer. Gently pat it down slightly, but don’t pack it as tightly as the crust. You want a distinct crumble topping.
- Bake: Place the pan back into the 375°F (190°C) oven. Bake for 35-45 minutes, or until the topping is golden brown and crisp, and the apple filling is bubbling around the edges. If the topping starts to brown too quickly, you can loosely tent the pan with aluminum foil for the last 10-15 minutes of baking. The apples should be tender when pierced gently with a fork or skewer through the topping.
- Cool Completely (Crucial Step!): This is perhaps the most important step for achieving clean-cut bars. Remove the pan from the oven and place it on a wire rack. Let the bars cool completely in the pan, which can take at least 2-3 hours at room temperature, or potentially longer. Rushing this step will result in bars that fall apart when cut. For cleaner cuts, you can even chill the cooled bars in the refrigerator for about 30-60 minutes before slicing.
- Lift and Slice: Once completely cool (and potentially chilled), use the parchment paper overhangs to carefully lift the entire slab out of the pan and onto a cutting board. Use a large, sharp knife to cut into squares or rectangles. Wipe the knife clean between cuts if necessary for the neatest edges.
- Serve and Enjoy: Serve the Apple Crisp Bars as they are, or explore the serving suggestions below!
Nutrition Facts (Estimated)
Please note that these nutritional values are estimates and can vary based on the specific ingredients used (like the type of apples, brand of butter, etc.) and the exact size of the bars cut.
- Servings: This recipe typically yields 15-20 bars, depending on how large you cut them.
- Calories per Serving (Approximate): Based on 18 servings, each bar contains roughly 380-450 calories.
This estimate includes calories from the crust, topping, and filling. They are a treat, best enjoyed in moderation as part of a balanced diet.
Time Commitment: Planning Your Bake
Understanding the time involved helps you plan when to bake these delicious bars.
Preparation Time
- Active Prep: Approximately 25-35 minutes (includes peeling/chopping apples, mixing crust/topping, assembling). This can vary depending on how fast you are with apple prep.
Baking Time
- Crust Par-Bake: 12-15 minutes
- Final Bake: 35-45 minutes
- Total Oven Time: Approximately 47-60 minutes
Cooling Time (Crucial!)
- Minimum Cooling: 2-3 hours at room temperature. Longer is often better for structure.
- Optional Chilling: Additional 30-60 minutes in the refrigerator before cutting.
Total Time
- From Start to Ready-to-Cut: Approximately 3.5 – 5 hours (largely dependent on cooling time). While the active time isn’t huge, factor in the essential cooling period.
Serving Suggestions: Elevating Your Apple Crisp Bars
These Apple Crisp Bars are fantastic on their own, but they can be easily elevated into a more decadent dessert experience. Here are some ideas:
- Classic À La Mode: Serve a slightly warmed bar with a generous scoop of high-quality vanilla bean ice cream. The contrast between the warm, spiced bar and the cold, creamy ice cream is heavenly.
- Caramel Drizzle: A drizzle of warm salted caramel sauce or traditional caramel sauce over the top adds another layer of rich sweetness that pairs perfectly with apples.
- Whipped Cream Cloud: A dollop of freshly whipped cream (perhaps lightly sweetened or even infused with a touch of cinnamon or bourbon) adds a light, airy contrast to the dense bar.
- Extra Spice Dusting: For visual appeal and a tiny flavor boost, lightly dust the bars with powdered sugar or a pinch more cinnamon just before serving.
- Flavor Variations on Ice Cream: Don’t limit yourself to vanilla! Try serving with:
- Salted Caramel Ice Cream
- Cinnamon Ice Cream
- Butter Pecan Ice Cream
- Nutty Addition: If not included in the topping, a sprinkle of toasted pecans or walnuts on top just before serving adds a welcome crunch.
- Alongside Coffee or Cider: These bars are the perfect accompaniment to a hot cup of coffee, a spiced latte, or a warm mug of apple cider on a cool day.
- Breakfast Treat: Let’s be honest, a small square can make a delightful (if indulgent) breakfast or brunch item alongside some yogurt or fruit.
- Dessert Platter: Cut into smaller, bite-sized squares to include as part of a larger fall-themed dessert platter.
Pro Tips for Apple Crisp Bar Perfection
Unlock the full potential of this recipe with these five essential tips:
- Choose the Right Apples: The type of apple significantly impacts the filling’s texture and flavor. Use firm apples that hold their shape well during baking and offer a good balance of tartness and sweetness. Granny Smith are classically tart and firm. Honeycrisp offer crispness and sweetness. Braeburn, Gala, Fuji, and Jonagold are also excellent choices. Using a mix of two or three different types often yields the most complex and interesting flavor profile. Avoid softer apples like Red Delicious or McIntosh, which can turn mushy.
- Master the Cold Butter Technique: Don’t shortcut the cold butter step for the crust and topping. The butter should be cold and cut into small cubes. Work it into the flour mixture quickly to prevent it from warming up and melting too soon. Those small pieces of butter melting in the oven are what create the desirable tender, slightly flaky texture. If your kitchen is warm, you can even chill the flour mixture and the cubed butter briefly before combining them.
- Don’t Overwork the Crust Mixture: When cutting in the butter, stop when the mixture resembles coarse crumbs with some pea-sized (and maybe slightly larger) butter pieces remaining. Overmixing can develop the gluten in the flour too much, leading to a tough crust and topping instead of a tender, crumbly one. Similarly, when pressing the crust into the pan, pack it firmly but don’t knead or rework it excessively.
- Embrace the Cooling Time: Patience is key! Allowing the bars to cool completely in the pan before attempting to lift or slice them is non-negotiable for structure. The filling needs time to set, and the crust/topping needs to firm up. Cutting into warm bars will likely result in a crumbly mess rather than defined squares. Chilling briefly after cooling can make slicing even easier and neater.
- Customize Your Spice Blend & Add-Ins: While cinnamon and nutmeg are classic, feel free to adjust the spices to your preference. Consider adding a pinch of ground ginger, cloves, or allspice for extra warmth. You can also enhance the topping by mixing in ½ cup of chopped pecans or walnuts along with the oats for added texture and nutty flavor. A handful of dried cranberries tossed with the apples can also add a nice tart chewiness.
Frequently Asked Questions (FAQ)
Here are answers to some common questions about making Apple Crisp Bars:
- Q: Can I use quick-cooking oats instead of rolled oats?
- A: While technically possible, it’s not recommended for the best texture. Rolled oats (old-fashioned oats) maintain their shape and provide a distinct chewy, crumbly texture in the topping. Quick-cooking oats are cut smaller and processed more, causing them to absorb moisture differently and potentially resulting in a softer, mushier, or pastier topping rather than a crisp crumble. Stick with rolled oats for optimal results.
- Q: Can I make these Apple Crisp Bars ahead of time? How should I store them?
- A: Yes, these bars store very well! Once completely cooled and cut, store them in an airtight container at room temperature for up to 3-4 days. If your kitchen is very warm or humid, or if you prefer them chilled, you can store them in the refrigerator for up to a week. They might soften slightly in the fridge over time. You can serve them cold, at room temperature, or gently reheated in a microwave or low oven.
- Q: Can I freeze Apple Crisp Bars?
- A: Absolutely! For best results, freeze the bars after they have cooled completely and been cut. You can flash-freeze them on a baking sheet until solid, then wrap individual bars tightly in plastic wrap and place them in a freezer-safe bag or container. Alternatively, wrap the entire uncut (but cooled) slab tightly. They can be frozen for up to 3 months. Thaw overnight in the refrigerator or at room temperature. The topping might lose some of its initial crispness after freezing and thawing, but they will still be delicious. You can try briefly reheating in an oven to help re-crisp the topping.
- Q: My apple filling seems watery. What went wrong?
- A: A few things could contribute to a watery filling. Ensure you used enough flour (2 tablespoons) tossed with the apples, as this acts as the thickener. The type of apple also matters; very juicy apples release more liquid. Make sure you baked the bars long enough for the filling to bubble and thicken properly. If you consistently have issues, you could slightly increase the flour in the filling to 2.5 or 3 tablespoons, or try adding a tablespoon of cornstarch instead of flour for extra thickening power. Also, ensure apples are chopped uniformly, not sliced too thin, which can make them cook down too much.
- Q: Can I make this recipe gluten-free?
- A: Yes, you can adapt this recipe to be gluten-free with good results. Substitute the all-purpose flour in both the crust/topping and the filling with a good quality measure-for-measure gluten-free baking flour blend (one that contains xanthan gum). Ensure your rolled oats are certified gluten-free, as regular oats can be cross-contaminated with wheat during processing. All other ingredients are typically naturally gluten-free, but always double-check labels if needed for severe allergies or celiac disease. The texture might be slightly different, but they should still be delicious.
Apple Crisp Bars Recipe
Ingredients
For the Crust and Crumble Topping:
- All-Purpose Flour: 3 cups (approximately 360g) – Provides structure for the crust and bulk for the topping.
- Rolled Oats: 1 ½ cups (approximately 135g) – Use old-fashioned rolled oats for the best chewy, distinct texture in the topping. Quick oats can become mushy.
- Light Brown Sugar: 1 ½ cups, packed (approximately 330g) – Adds moisture, a hint of molasses flavor, and sweetness. Packing it ensures the correct amount.
- Granulated Sugar: ½ cup (approximately 100g) – Adds further sweetness and helps with crisping the topping.
- Baking Powder: 1 ½ teaspoons – Gives a slight lift to the crust and topping, preventing it from being too dense.
- Ground Cinnamon: 2 teaspoons – The quintessential fall spice, provides warmth and depth.
- Ground Nutmeg: ½ teaspoon – Complements the cinnamon with its distinctively warm, slightly sweet flavor. A little goes a long way.
- Salt: 1 teaspoon – Balances the sweetness and enhances all the other flavors.
- Unsalted Butter: 1 ½ cups (3 sticks or 340g), cold and cut into small ½-inch cubes – Using cold butter is crucial for creating a crumbly, tender texture in both the crust and topping. Unsalted butter allows you to control the salt level precisely.
For the Apple Filling:
- Apples: About 6-7 medium apples (approx. 2.5 – 3 lbs or 1.1 – 1.4 kg), peeled, cored, and chopped into ½-inch pieces. Choose firm, tart or sweet-tart apples like Granny Smith, Honeycrisp, Braeburn, Gala, or a mix. This should yield about 6-7 cups of chopped apples.
- Granulated Sugar: ¼ cup (approximately 50g) – Adjust slightly depending on the sweetness of your apples and your preference.
- All-Purpose Flour: 2 tablespoons – Helps to thicken the juices released by the apples, preventing a watery filling.
- Lemon Juice: 1 tablespoon – Brightens the flavor of the apples and helps prevent excessive browning. Freshly squeezed is best.
- Ground Cinnamon: 1 teaspoon – Reinforces the cinnamon flavor within the filling.
- Vanilla Extract: 1 teaspoon – Adds a subtle warmth and rounds out the flavors.
Instructions
- Preheat and Prepare: Preheat your oven to 375°F (190°C). Line a 9×13 inch baking pan with parchment paper, leaving an overhang on the two longer sides. This overhang will act as handles, making it much easier to lift the bars out of the pan once cooled. Lightly grease the parchment paper and any exposed parts of the pan, or spray with non-stick cooking spray.
- Make the Crust/Topping Mixture: In a large bowl, whisk together the 3 cups of all-purpose flour, 1 ½ cups rolled oats, 1 ½ cups packed light brown sugar, ½ cup granulated sugar, 1 ½ teaspoons baking powder, 2 teaspoons cinnamon, ½ teaspoon nutmeg, and 1 teaspoon salt. Ensure all the dry ingredients are well combined and free of lumps, especially the brown sugar.
- Cut in the Cold Butter: Add the cold, cubed butter to the dry ingredient mixture. Using a pastry blender, two forks, or your fingertips, cut the butter into the flour mixture until it resembles coarse crumbs or small peas. Some slightly larger butter pieces are okay. If using a food processor, pulse carefully, being cautious not to over-process; you want distinct crumbs, not a paste. Why cold butter? Cold butter melts during baking, creating steam pockets that result in a flakier, more tender texture compared to using melted butter, which would yield a denser, greasier result.
- Press the Crust: Measure out approximately 4 cups of the crumb mixture and press it firmly and evenly into the bottom of the prepared 9×13 inch baking pan. Use the bottom of a measuring cup or glass to help pack it down tightly. This firm base is essential for creating sturdy bars.
- Par-Bake the Crust (Optional but Recommended): Place the pan in the preheated oven and bake the crust for 12-15 minutes, or until it’s lightly golden around the edges and slightly set. This step helps prevent the crust from becoming soggy from the apple filling. Let it cool slightly on a wire rack while you prepare the filling. Keep the remaining crumb mixture aside – this will be your topping.
- Prepare the Apple Filling: In another large bowl, combine the chopped apples, ¼ cup granulated sugar, 2 tablespoons all-purpose flour, 1 tablespoon lemon juice, 1 teaspoon cinnamon, and 1 teaspoon vanilla extract. Toss gently but thoroughly until the apples are evenly coated with the sugar, flour, and spices. The flour will help thicken the juices as the apples bake.
- Assemble the Bars: Spread the apple filling evenly over the par-baked crust, reaching all the way to the edges.
- Add the Crumble Topping: Sprinkle the reserved crumb mixture evenly over the apple layer. Gently pat it down slightly, but don’t pack it as tightly as the crust. You want a distinct crumble topping.
- Bake: Place the pan back into the 375°F (190°C) oven. Bake for 35-45 minutes, or until the topping is golden brown and crisp, and the apple filling is bubbling around the edges. If the topping starts to brown too quickly, you can loosely tent the pan with aluminum foil for the last 10-15 minutes of baking. The apples should be tender when pierced gently with a fork or skewer through the topping.
- Cool Completely (Crucial Step!): This is perhaps the most important step for achieving clean-cut bars. Remove the pan from the oven and place it on a wire rack. Let the bars cool completely in the pan, which can take at least 2-3 hours at room temperature, or potentially longer. Rushing this step will result in bars that fall apart when cut. For cleaner cuts, you can even chill the cooled bars in the refrigerator for about 30-60 minutes before slicing.
- Lift and Slice: Once completely cool (and potentially chilled), use the parchment paper overhangs to carefully lift the entire slab out of the pan and onto a cutting board. Use a large, sharp knife to cut into squares or rectangles. Wipe the knife clean between cuts if necessary for the neatest edges.
- Serve and Enjoy: Serve the Apple Crisp Bars as they are, or explore the serving suggestions below!
Nutrition
- Serving Size: One Normal Portion
- Calories: 380-450