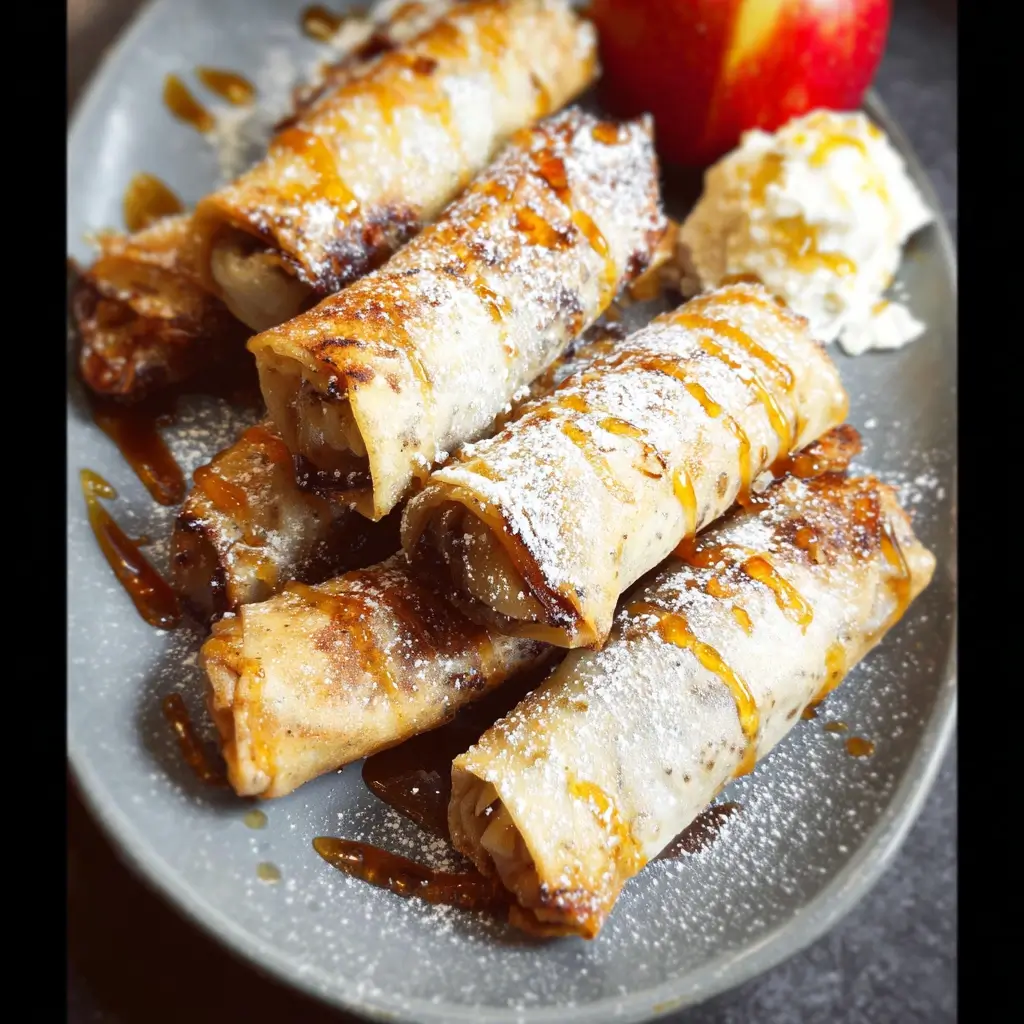
I remember the exact moment the idea for these Apple Pie Spring Rolls struck me. It was a crisp autumn afternoon, the kind where the air smells of woodsmoke and fallen leaves. My family was craving apple pie, a seasonal staple in our home, but I was looking for something… different. Something that captured all the nostalgic, comforting flavors of a classic apple pie but with a modern, exciting twist. I wanted a dessert that was handheld, shareable, and possessed an unforgettable texture. That’s when my mind wandered to the shatteringly crisp, golden-brown perfection of a spring roll wrapper. Could it work? The experiment that followed resulted in what has become a legendary dessert in our house. The first bite was a revelation: an earth-shattering crunch gives way to a warm, gooey, cinnamon-spiced apple filling that tastes exactly like the heart of the best apple pie you’ve ever had. They were an instant hit, disappearing from the plate in minutes, and now, they are the most requested treat for family gatherings, movie nights, and holiday celebrations.
This recipe is more than just a novelty; it’s a brilliant fusion of textures and familiar flavors. It takes the soul-warming essence of American comfort food and wraps it in a delicate, crispy package inspired by Asian cuisine. They are surprisingly simple to make, endlessly customizable, and guaranteed to wow anyone who tries them. Whether you’re a seasoned baker or a kitchen novice, I promise you can master these. Get ready to create a dessert that will have your friends and family begging for the recipe.
Apple Pie Spring Rolls: The Ultimate Crispy Dessert
This recipe breaks down how to create the most delicious dessert spring rolls imaginable. We’ll cover everything from creating a perfectly balanced, thick apple pie filling that won’t make your wrappers soggy, to the art of rolling them tightly, and finally, three different cooking methods (deep-frying, air frying, and baking) to suit your preference.
Complete Recipe Ingredients
The magic of this recipe lies in using fresh, quality ingredients to build layers of flavor. Here’s exactly what you’ll need to make approximately 16-20 spring rolls.
For the Apple Pie Filling:
- Apples: 3 medium-sized, firm baking apples (about 1.5 lbs or 680g), peeled, cored, and finely diced (about ¼-inch cubes). Granny Smith, Honeycrisp, or Braeburn are excellent choices.
- Unsalted Butter: 2 tablespoons
- Brown Sugar: ¼ cup, packed (light or dark both work)
- Granulated Sugar: 2 tablespoons
- Lemon Juice: 1 tablespoon, freshly squeezed
- Ground Cinnamon: 1 ½ teaspoons
- Ground Nutmeg: ¼ teaspoon
- Pinch of Ground Cloves: (Optional, but recommended for authentic pie flavor)
- Salt: ¼ teaspoon
- Cornstarch: 1 tablespoon
- Cold Water: 2 tablespoons
- Vanilla Extract: 1 teaspoon
For Assembly and Cooking:
- Spring Roll Wrappers: 1 package (approx. 20 sheets), thawed if frozen.
- Small Bowl of Water: For sealing the wrappers.
- Neutral Oil for Frying: 3-4 cups, such as canola, vegetable, or peanut oil (if deep-frying).
- Cooking Spray: If air frying or baking.
For the Cinnamon-Sugar Topping (Optional but Highly Recommended):
- Granulated Sugar: ¼ cup
- Ground Cinnamon: 1 teaspoon
Step-by-Step Instructions
Follow these detailed instructions carefully to ensure your spring rolls are perfectly crisp on the outside and gloriously gooey on the inside. The most critical step is allowing the filling to cool completely!
Part 1: Preparing the Perfect Apple Pie Filling
- Prep the Apples: Peel, core, and dice your apples into small, uniform ¼-inch cubes. Smaller pieces ensure they cook quickly and fit neatly into the wrappers. As you dice them, place them in a bowl and toss with the fresh lemon juice to prevent them from browning.
- Sauté the Apples: In a medium saucepan or skillet, melt the 2 tablespoons of unsalted butter over medium heat. Once the butter is melted and foamy, add the diced apples, brown sugar, granulated sugar, ground cinnamon, nutmeg, cloves (if using), and salt.
- Cook the Filling: Stir everything together to coat the apples evenly. Cook, stirring occasionally, for 8-10 minutes. The apples will start to soften and release their juices, and the sugar will create a beautiful syrup.
- Thicken the Filling: While the apples are cooking, prepare your cornstarch slurry. In a small bowl, whisk together the 1 tablespoon of cornstarch and 2 tablespoons of cold water until completely smooth and free of lumps.
- Finish the Filling: Pour the cornstarch slurry into the saucepan with the apples. Continue to stir constantly for another 1-2 minutes. The filling will thicken up significantly into a jam-like consistency. This is crucial for preventing a watery filling that could tear the wrappers.
- Cool Completely: Remove the saucepan from the heat and stir in the 1 teaspoon of vanilla extract. Transfer the apple filling to a shallow bowl or plate and spread it out to cool down faster. You must let the filling cool to room temperature, or even chill it in the refrigerator for 30 minutes. Hot filling will steam and tear the delicate spring roll wrappers.
Part 2: How to Fold Apple Pie Spring Rolls
Folding spring rolls is an art, but it’s easy once you get the hang of it. Think of it like folding a small burrito or an envelope.
- Prepare Your Workstation: Set up an assembly line on a clean, dry surface. You’ll need your bowl of cooled apple filling, your stack of spring roll wrappers (keep them under a damp paper towel to prevent them from drying out), and a small bowl of water.
- Position the Wrapper: Place one spring roll wrapper on your work surface in a diamond shape, with one corner pointing towards you.
- Add the Filling: Spoon about 1.5 to 2 tablespoons of the cooled apple filling onto the bottom third of the wrapper, forming it into a small, tight log. Be careful not to overfill, as this can cause the wrapper to tear.
- The First Fold: Take the corner closest to you and fold it up and over the filling, tucking it in snugly.
- Fold the Sides: Fold the left and right corners in towards the center, creating a shape that looks like an open envelope.
- Roll it Up: Tightly roll the entire package away from you towards the final top corner. Keep the roll as tight as possible to prevent oil from seeping in during frying.
- Seal the Edge: Just before you reach the end, dip your finger in the small bowl of water and moisten the edges of the final corner. Press it firmly to seal the spring roll closed.
- Repeat: Place the finished spring roll on a parchment-lined baking sheet and continue the process with the remaining wrappers and filling. Ensure the finished rolls don’t touch each other to prevent sticking.
Part 3: Cooking the Spring Rolls (3 Methods)
Choose your preferred cooking method. Frying yields the most classic, bubbly, and crispy result, but the air fryer and oven methods are fantastic, healthier alternatives.
Method 1: Deep-Frying (The Classic)
- Heat the Oil: In a large, heavy-bottomed pot or Dutch oven, pour in about 3-4 inches of neutral oil. Heat the oil over medium-high heat until it reaches 350-375°F (175-190°C). Use a kitchen thermometer for accuracy. If you don’t have one, a small piece of a wrapper should sizzle and turn golden in about 30 seconds.
- Fry in Batches: Carefully place 3-4 spring rolls into the hot oil, ensuring not to overcrowd the pot. Frying in small batches keeps the oil temperature stable.
- Cook to Perfection: Fry for 3-5 minutes, turning them occasionally with tongs, until they are deep golden brown and crispy on all sides.
- Drain and Rest: Use a spider strainer or tongs to remove the spring rolls from the oil, allowing excess oil to drip off. Transfer them to a wire rack set over a baking sheet to drain. Do not place them on paper towels, as this can make them soggy.
Method 2: Air Frying (A Healthier Crunch)
- Preheat the Air Fryer: Preheat your air fryer to 380°F (195°C).
- Prepare the Rolls: Arrange the spring rolls in a single layer in the air fryer basket, making sure they are not touching.
- Spray with Oil: Lightly spray the tops of the spring rolls with cooking spray. This helps them achieve a golden color and extra crispiness.
- Air Fry: Cook for 8-12 minutes, flipping the spring rolls halfway through the cooking time. They are done when they are golden brown and crisp.
Method 3: Baking in the Oven (The Easiest Method)
- Preheat the Oven: Preheat your oven to 400°F (200°C). Line a large baking sheet with parchment paper.
- Arrange the Rolls: Place the spring rolls in a single layer on the prepared baking sheet.
- Brush with Oil: Brush the tops and sides of each spring roll with a little bit of melted butter or spray them generously with cooking spray.
- Bake: Bake for 15-20 minutes, flipping them over after 10 minutes, until they are golden brown, crisp, and bubbling.
Part 4: The Finishing Touch
While the spring rolls are still warm, prepare the cinnamon-sugar mixture. In a shallow dish, combine the ¼ cup of sugar and 1 teaspoon of cinnamon. Roll each warm spring roll in the mixture until it’s generously coated. The warmth will help the sugar stick. Serve immediately!
Nutrition Facts
- Servings: 16-20 spring rolls
- Calories Per Serving: Approximately 145-180 kcal per spring roll (This is an estimate and will vary significantly based on the cooking method. Deep-frying will be on the higher end, while baking and air frying will be lower.)
Preparation Time
- Prep Time: 25 minutes (includes making the filling and cooling time)
- Rolling Time: 15 minutes
- Cook Time: 10-15 minutes
- Total Time: Approximately 50-60 minutes
How to Serve Your Apple Pie Spring Rolls
These versatile treats are fantastic on their own, but they become a truly decadent dessert experience when paired with the right accompaniments. Here are some delicious ways to serve them:
- With a Dipping Sauce: A warm dipping sauce is the ultimate companion.
- Classic Caramel Sauce: A thick, buttery caramel dip is a perfect match. You can use store-bought or make a quick version by melting butter, brown sugar, and a splash of heavy cream.
- Vanilla Bean Glaze: Whisk together powdered sugar, a splash of milk, and the seeds from a vanilla bean for a simple, sweet glaze.
- Chocolate Sauce: For a richer, more indulgent twist, serve with a warm dark or milk chocolate sauce.
- A La Mode Style:
- Serve two warm spring rolls alongside a generous scoop of high-quality vanilla bean ice cream. The contrast between the hot, crispy roll and the cold, creamy ice cream is divine.
- Cinnamon or salted caramel ice cream also works wonderfully.
- With a Dollop of Cream:
- A simple dollop of freshly whipped cream adds a light, airy contrast to the rich filling.
- For a bit of tang, try serving them with crème fraîche or a scoop of mascarpone cheese.
- As Part of a Dessert Platter:
- Arrange them on a large board with other small treats like fresh berries, chocolate-covered pretzels, and a variety of the dipping sauces mentioned above for a fun, interactive dessert experience.
Additional Tips for Success
Here are five expert tips to ensure your Apple Pie Spring Rolls are flawless every time.
- The Cooler, The Better: I cannot stress this enough: your apple filling must be completely cool before you start rolling. Warm filling creates steam, which will make the delicate wrappers wet, weak, and prone to tearing during rolling and frying. Patience is your best friend here.
- Don’t Crowd the Pan (or Basket): Whether you’re frying, air frying, or baking, always cook in a single layer and leave space between each spring roll. Overcrowding lowers the temperature of the oil or the air, leading to a longer cooking time and a final product that is greasy and soggy instead of light and crispy.
- Make-Ahead and Freezing Instructions: These are perfect for making ahead! Assemble the spring rolls completely but do not cook them. Place them in a single layer on a parchment-lined baking sheet and freeze until solid. Once frozen, transfer them to a zip-top freezer bag. They can be stored for up to 3 months. Cook them directly from frozen, adding a few extra minutes to the cooking time.
- Master the Seal: A poor seal is the number one cause of spring rolls bursting open while cooking. Use a good amount of water on the final corner and press firmly. When you place the finished rolls on your tray, make sure they are seam-side down to help reinforce the seal.
- Customize Your Filling: Don’t be afraid to get creative! Elevate the filling by adding other ingredients. A handful of chopped toasted pecans or walnuts adds a wonderful crunch. A tablespoon of dried cranberries or raisins can provide a chewy, tart contrast. You could even add a splash of bourbon or rum to the filling (cooking it off with the apples) for a more adult-friendly version.
Frequently Asked Questions (FAQ)
Q1: Can I use canned apple pie filling to save time?
A: Yes, you can use canned apple pie filling as a shortcut, but with a major caveat. Canned filling is often much wetter and has larger chunks of apple than our homemade version. To use it successfully, you should first chop the apple pieces into smaller bits and then cook the filling down in a saucepan for a few minutes to thicken it further, perhaps with a little extra cornstarch. This will prevent it from making your spring rolls soggy. While it works in a pinch, the flavor and texture of the homemade filling are far superior.
Q2: What is the difference between spring roll wrappers and egg roll wrappers?
A: This is a great question! While they can sometimes be used interchangeably, they are different. Spring roll wrappers (often found in the refrigerated or frozen section of Asian markets or larger grocery stores) are very thin, delicate, and made from a flour-and-water dough. They fry up to be light, bubbly, and shatteringly crisp. Egg roll wrappers are thicker, sturdier, and usually contain egg in the dough. They result in a chewier, more bubbly, and more substantial crust. For this recipe, spring roll wrappers are highly recommended for the signature delicate crunch.
Q3: How do I store and reheat leftover Apple Pie Spring Rolls?
A: Leftovers can be stored in an airtight container in the refrigerator for up to 3 days. However, they will lose their crispiness. The best way to reheat them and bring back the crunch is in an air fryer or oven. Preheat your air fryer or oven to 350°F (175°C) and heat the rolls for 3-5 minutes until warmed through and crispy again. Avoid reheating them in the microwave, as this will make them soft and chewy.
Q4: My spring rolls turned out greasy. What did I do wrong?
A: Greasy spring rolls are almost always a result of the oil temperature being too low. If the oil isn’t hot enough when you add the rolls, they absorb the oil instead of instantly searing and crisping on the outside. Be sure your oil is at a steady 350-375°F (175-190°C). Another culprit can be overcrowding the pot, which causes the oil temperature to drop dramatically. Fry in small batches to maintain heat and ensure a perfectly crispy, non-greasy result.
Q5: Can I make this recipe gluten-free?
A: Absolutely! To make gluten-free Apple Pie Spring Rolls, you will need to find gluten-free spring roll wrappers. These are becoming more widely available and are typically made from rice flour or a gluten-free flour blend. You can find them in the freezer section of well-stocked grocery stores or online. The filling itself is naturally gluten-free; just ensure your vanilla extract and other ingredients are certified GF if you are highly sensitive. The cooking process remains the same.

Apple Pie Spring Rolls Recipe
Ingredients
For the Apple Pie Filling:
- Apples: 3 medium-sized, firm baking apples (about 1.5 lbs or 680g), peeled, cored, and finely diced (about ¼-inch cubes). Granny Smith, Honeycrisp, or Braeburn are excellent choices.
- Unsalted Butter: 2 tablespoons
- Brown Sugar: ¼ cup, packed (light or dark both work)
- Granulated Sugar: 2 tablespoons
- Lemon Juice: 1 tablespoon, freshly squeezed
- Ground Cinnamon: 1 ½ teaspoons
- Ground Nutmeg: ¼ teaspoon
- Pinch of Ground Cloves: (Optional, but recommended for authentic pie flavor)
- Salt: ¼ teaspoon
- Cornstarch: 1 tablespoon
- Cold Water: 2 tablespoons
- Vanilla Extract: 1 teaspoon
For Assembly and Cooking:
- Spring Roll Wrappers: 1 package (approx. 20 sheets), thawed if frozen.
- Small Bowl of Water: For sealing the wrappers.
- Neutral Oil for Frying: 3-4 cups, such as canola, vegetable, or peanut oil (if deep-frying).
- Cooking Spray: If air frying or baking.
For the Cinnamon-Sugar Topping (Optional but Highly Recommended):
- Granulated Sugar: ¼ cup
- Ground Cinnamon: 1 teaspoon
Instructions
Part 1: Preparing the Perfect Apple Pie Filling
- Prep the Apples: Peel, core, and dice your apples into small, uniform ¼-inch cubes. Smaller pieces ensure they cook quickly and fit neatly into the wrappers. As you dice them, place them in a bowl and toss with the fresh lemon juice to prevent them from browning.
- Sauté the Apples: In a medium saucepan or skillet, melt the 2 tablespoons of unsalted butter over medium heat. Once the butter is melted and foamy, add the diced apples, brown sugar, granulated sugar, ground cinnamon, nutmeg, cloves (if using), and salt.
- Cook the Filling: Stir everything together to coat the apples evenly. Cook, stirring occasionally, for 8-10 minutes. The apples will start to soften and release their juices, and the sugar will create a beautiful syrup.
- Thicken the Filling: While the apples are cooking, prepare your cornstarch slurry. In a small bowl, whisk together the 1 tablespoon of cornstarch and 2 tablespoons of cold water until completely smooth and free of lumps.
- Finish the Filling: Pour the cornstarch slurry into the saucepan with the apples. Continue to stir constantly for another 1-2 minutes. The filling will thicken up significantly into a jam-like consistency. This is crucial for preventing a watery filling that could tear the wrappers.
- Cool Completely: Remove the saucepan from the heat and stir in the 1 teaspoon of vanilla extract. Transfer the apple filling to a shallow bowl or plate and spread it out to cool down faster. You must let the filling cool to room temperature, or even chill it in the refrigerator for 30 minutes. Hot filling will steam and tear the delicate spring roll wrappers.
Part 2: How to Fold Apple Pie Spring Rolls
Folding spring rolls is an art, but it’s easy once you get the hang of it. Think of it like folding a small burrito or an envelope.
- Prepare Your Workstation: Set up an assembly line on a clean, dry surface. You’ll need your bowl of cooled apple filling, your stack of spring roll wrappers (keep them under a damp paper towel to prevent them from drying out), and a small bowl of water.
- Position the Wrapper: Place one spring roll wrapper on your work surface in a diamond shape, with one corner pointing towards you.
- Add the Filling: Spoon about 1.5 to 2 tablespoons of the cooled apple filling onto the bottom third of the wrapper, forming it into a small, tight log. Be careful not to overfill, as this can cause the wrapper to tear.
- The First Fold: Take the corner closest to you and fold it up and over the filling, tucking it in snugly.
- Fold the Sides: Fold the left and right corners in towards the center, creating a shape that looks like an open envelope.
- Roll it Up: Tightly roll the entire package away from you towards the final top corner. Keep the roll as tight as possible to prevent oil from seeping in during frying.
- Seal the Edge: Just before you reach the end, dip your finger in the small bowl of water and moisten the edges of the final corner. Press it firmly to seal the spring roll closed.
- Repeat: Place the finished spring roll on a parchment-lined baking sheet and continue the process with the remaining wrappers and filling. Ensure the finished rolls don’t touch each other to prevent sticking.
Part 3: Cooking the Spring Rolls (3 Methods)
Choose your preferred cooking method. Frying yields the most classic, bubbly, and crispy result, but the air fryer and oven methods are fantastic, healthier alternatives.
Method 1: Deep-Frying (The Classic)
- Heat the Oil: In a large, heavy-bottomed pot or Dutch oven, pour in about 3-4 inches of neutral oil. Heat the oil over medium-high heat until it reaches 350-375°F (175-190°C). Use a kitchen thermometer for accuracy. If you don’t have one, a small piece of a wrapper should sizzle and turn golden in about 30 seconds.
- Fry in Batches: Carefully place 3-4 spring rolls into the hot oil, ensuring not to overcrowd the pot. Frying in small batches keeps the oil temperature stable.
- Cook to Perfection: Fry for 3-5 minutes, turning them occasionally with tongs, until they are deep golden brown and crispy on all sides.
- Drain and Rest: Use a spider strainer or tongs to remove the spring rolls from the oil, allowing excess oil to drip off. Transfer them to a wire rack set over a baking sheet to drain. Do not place them on paper towels, as this can make them soggy.
Method 2: Air Frying (A Healthier Crunch)
- Preheat the Air Fryer: Preheat your air fryer to 380°F (195°C).
- Prepare the Rolls: Arrange the spring rolls in a single layer in the air fryer basket, making sure they are not touching.
- Spray with Oil: Lightly spray the tops of the spring rolls with cooking spray. This helps them achieve a golden color and extra crispiness.
- Air Fry: Cook for 8-12 minutes, flipping the spring rolls halfway through the cooking time. They are done when they are golden brown and crisp.
Method 3: Baking in the Oven (The Easiest Method)
- Preheat the Oven: Preheat your oven to 400°F (200°C). Line a large baking sheet with parchment paper.
- Arrange the Rolls: Place the spring rolls in a single layer on the prepared baking sheet.
- Brush with Oil: Brush the tops and sides of each spring roll with a little bit of melted butter or spray them generously with cooking spray.
- Bake: Bake for 15-20 minutes, flipping them over after 10 minutes, until they are golden brown, crisp, and bubbling.
Part 4: The Finishing Touch
While the spring rolls are still warm, prepare the cinnamon-sugar mixture. In a shallow dish, combine the ¼ cup of sugar and 1 teaspoon of cinnamon. Roll each warm spring roll in the mixture until it’s generously coated. The warmth will help the sugar stick. Serve immediately!
Nutrition
- Serving Size: One Normal Portion
- Calories: 145-180 kcal