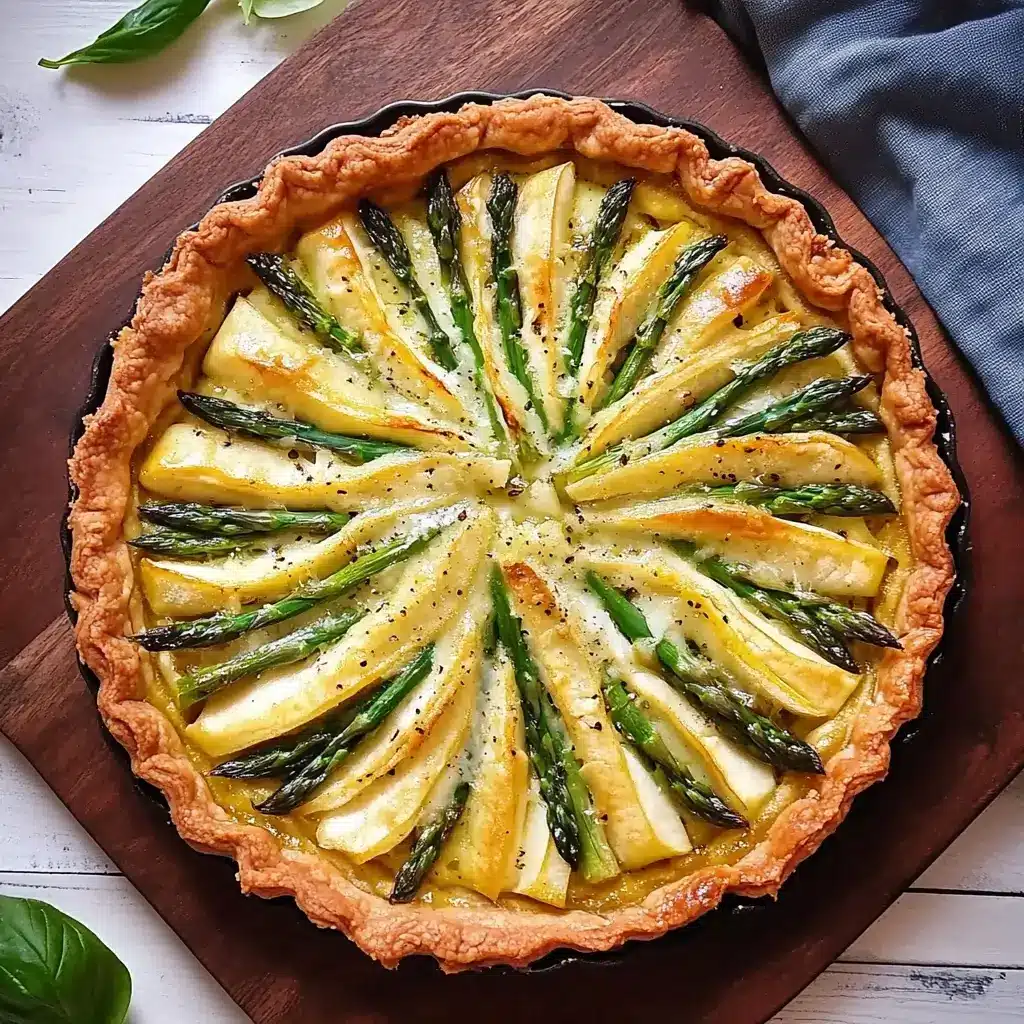

Every spring, as the first tender spears of asparagus peek through the earth, our kitchen transforms into a haven of vibrant green and savory aromas. While we adore asparagus simply roasted or grilled, there’s one dish that truly captures the essence of the season and consistently earns rave reviews from my family – the Asparagus Tart. It’s more than just a recipe; it’s a tradition, a celebration of fresh, seasonal ingredients, and a dish that effortlessly elevates any meal, from a casual brunch to an elegant dinner party. The flaky, golden crust, the creamy, cheesy filling, and the bright, slightly sweet asparagus – it’s a harmonious blend of textures and flavors that is simply irresistible. Even my notoriously picky eaters devour this tart without a single complaint, often requesting seconds (and thirds!). This Asparagus Tart isn’t just delicious; it’s become a cherished part of our springtime rituals, and I’m thrilled to share this recipe with you, hoping it brings as much joy to your table as it does to ours. Prepare to be captivated by the simplicity and elegance of this culinary masterpiece.
Ingredients
To create this delightful Asparagus Tart, you’ll need a selection of fresh, high-quality ingredients. The beauty of this recipe lies in its simplicity, so choosing the best ingredients will truly make a difference in the final flavor and texture. Here’s a comprehensive list of everything you’ll need, along with some notes on ingredient selection and potential substitutions:
For the Crust (Homemade or Store-Bought):
- 1 ½ cups All-Purpose Flour: This forms the base of our flaky crust. For a slightly nuttier flavor, you can substitute up to ½ cup of whole wheat flour. Ensure your flour is fresh for the best gluten development.
- ½ teaspoon Salt: Salt enhances the flavors of the crust and balances the sweetness of the filling. Use fine sea salt or kosher salt.
- ½ cup (1 stick) Unsalted Butter, chilled and cubed: Cold butter is crucial for creating a flaky crust. Make sure your butter is very cold before you start, and keep it cold throughout the process. You can also use vegetable shortening for a slightly different texture, or a combination of butter and shortening.
- ¼ cup Ice Water: Ice water keeps the dough cold and helps to bind it together without overworking it. Add the water gradually until the dough just comes together.
- (Optional) 1 tablespoon Apple Cider Vinegar or Lemon Juice: A touch of acidity can help to tenderize the dough and inhibit gluten development, resulting in a more tender crust.
Alternatively, for a quicker option:
- 1 box (14.1 oz) Refrigerated Pie Crusts: Store-bought pie crusts are a convenient and perfectly acceptable shortcut. Choose a good quality brand for the best flavor and texture. You’ll typically need one crust for the bottom of the tart.
For the Filling:
- 1 pound Asparagus, trimmed: Fresh asparagus is the star of the show! Look for firm, bright green spears with tightly closed tips. The thickness of the asparagus is a matter of preference; thinner spears will cook faster and be more tender, while thicker spears will have a more pronounced asparagus flavor. For this tart, medium to thin spears work best.
- 4 large Eggs: Eggs are the binding agent for the filling and contribute to its richness and creaminess. Use large, fresh eggs for optimal results.
- 1 cup Heavy Cream or Half-and-Half: Heavy cream will create a richer, more decadent filling, while half-and-half will result in a slightly lighter texture. You can also use whole milk for a lighter option, but the tart may be slightly less creamy.
- 1 cup Shredded Cheese (such as Gruyère, Parmesan, Fontina, or a blend): Cheese adds flavor, richness, and a beautiful melted texture to the tart. Gruyère is a classic choice for asparagus tart due to its nutty and slightly sweet flavor. Parmesan adds a salty, savory note. Fontina is a milder, meltier option. Feel free to experiment with different cheese combinations to find your favorite blend. Pre-shredded cheese is convenient, but freshly grated cheese will melt more smoothly and have a better flavor.
- 2 cloves Garlic, minced: Garlic adds a subtle savory depth to the filling. Use fresh garlic for the best flavor; garlic powder can be used in a pinch, but fresh garlic is highly recommended.
- 1 tablespoon Fresh Thyme leaves (or ½ teaspoon dried thyme): Thyme pairs beautifully with asparagus and adds a lovely herbaceous note to the tart. Fresh thyme is preferred, but dried thyme can be substituted. Other herbs like chives, parsley, or tarragon can also be used.
- Salt and freshly ground Black Pepper, to taste: Seasoning is crucial for bringing out the flavors of all the ingredients. Use both salt and freshly ground black pepper to taste. Taste the filling before pouring it into the crust and adjust seasoning as needed.
- (Optional) 1 tablespoon Olive Oil: Used for sautéing the asparagus if you prefer to pre-cook it slightly. Olive oil adds a subtle fruity flavor.
- (Optional) Red Pepper Flakes, for a touch of heat: A pinch of red pepper flakes can add a subtle kick to the tart, if desired.
This detailed ingredient list ensures you have everything you need to create a truly exceptional Asparagus Tart. Remember, using high-quality, fresh ingredients is key to unlocking the full potential of this delicious recipe.
Instructions
Crafting this Asparagus Tart is a rewarding culinary journey. Follow these step-by-step instructions to create a masterpiece that will impress your family and friends. Whether you choose to make your own crust or use a store-bought option, the process is straightforward and yields delicious results.
Step 1: Prepare the Crust (If Making Homemade)
- Combine Dry Ingredients: In a large bowl, whisk together the flour and salt. This ensures the salt is evenly distributed throughout the dough.
- Incorporate Cold Butter: Add the cold, cubed butter to the flour mixture. Using a pastry blender, your fingertips, or a food processor, cut the butter into the flour until the mixture resembles coarse crumbs with some pea-sized pieces of butter remaining. The goal is to keep the butter cold and in small pieces, which will create flaky layers in the crust. If using your fingertips, work quickly to prevent the butter from melting. If using a food processor, pulse in short bursts to avoid over-processing.
- Add Ice Water and Vinegar (Optional): Gradually add the ice water, one tablespoon at a time, mixing gently after each addition. If using vinegar or lemon juice, add it along with the first tablespoon of ice water. Mix until the dough just comes together and forms a shaggy ball. Be careful not to overmix, as this will develop the gluten and result in a tough crust.
- Form and Chill the Dough: Turn the dough out onto a lightly floured surface and gently gather it into a disc. Wrap the disc tightly in plastic wrap and refrigerate for at least 30 minutes, or up to 2 hours. Chilling allows the gluten to relax, making the dough easier to roll out and preventing it from shrinking during baking.
Step 2: Prepare the Asparagus and Filling
- Prepare the Asparagus: Wash the asparagus thoroughly and snap off the tough woody ends. You can snap them off naturally, or trim about the bottom inch of each spear. Cut the asparagus spears into 1-2 inch pieces. Smaller pieces will be easier to arrange in the tart and will cook more evenly.
- (Optional) Sauté the Asparagus: For a slightly more tender asparagus and to enhance its flavor, you can sauté it briefly. Heat olive oil in a skillet over medium heat. Add the minced garlic and cook for about 30 seconds until fragrant, being careful not to burn it. Add the asparagus and sauté for 2-3 minutes, until it turns bright green and is slightly tender-crisp. Season with salt and pepper. This step is optional; you can also use raw asparagus in the tart, which will retain a bit more of its crisp texture.
- Whisk the Eggs and Cream: In a medium bowl, whisk together the eggs, heavy cream (or half-and-half), shredded cheese, thyme, salt, and pepper. Whisk until the mixture is well combined and smooth. Taste and adjust seasoning as needed.
Step 3: Assemble and Bake the Tart
- Preheat Oven and Prepare Tart Pan: Preheat oven to 375°F (190°C). Lightly grease a 9-inch tart pan with a removable bottom. This ensures the tart releases easily after baking.
- Roll Out the Crust (If Homemade): On a lightly floured surface, roll out the chilled dough into a 12-inch circle, about ⅛ inch thick. Gently transfer the dough to the prepared tart pan, pressing it into the bottom and up the sides. Trim any excess dough hanging over the edge. You can crimp the edges for a decorative look, or simply leave them as is.
- Blind Bake the Crust (Optional but Recommended for a Crisp Crust): For a particularly crisp crust, especially if using a homemade crust, blind bake it before adding the filling. Line the crust with parchment paper and fill with pie weights or dried beans. Bake for 15 minutes. Remove the parchment paper and weights and bake for another 5-7 minutes, until the crust is lightly golden brown. Blind baking pre-cooks the crust, preventing it from becoming soggy when the wet filling is added.
- Arrange Asparagus in Crust: Arrange the asparagus pieces evenly over the bottom of the tart crust. If you sautéed the asparagus, distribute it evenly. If using raw asparagus, arrange it in a decorative pattern, if desired.
- Pour Filling Over Asparagus: Pour the egg and cheese mixture evenly over the asparagus in the crust. Ensure the filling is distributed throughout the tart.
- Bake the Tart: Bake in the preheated oven for 30-40 minutes, or until the crust is golden brown and the filling is set and lightly golden on top. A toothpick inserted into the center should come out clean, and the filling should no longer jiggle.
- Cool and Serve: Let the tart cool in the pan for at least 10-15 minutes before removing the sides of the tart pan. This allows the filling to set further and makes it easier to slice and serve. Serve warm or at room temperature.
Following these detailed instructions will guide you through each step of creating a beautiful and delicious Asparagus Tart. Enjoy the process and the incredible flavors you’ll create!
Nutrition Facts
This Asparagus Tart is not only delicious but also offers a good balance of nutrients. Please note that these are approximate values and can vary based on specific ingredients and portion sizes.
Servings: 8 slices
Approximate Nutrition per Serving:
- Calories: 350-450 kcal (depending on crust and cheese choices)
- Protein: 12-15 grams
- Fat: 25-35 grams
- Saturated Fat: 15-20 grams (depending on cheese and cream choices)
- Cholesterol: 150-200 mg
- Sodium: 300-400 mg
- Carbohydrates: 20-25 grams
- Fiber: 2-3 grams
- Sugar: 2-3 grams
- Vitamin K: High (from asparagus)
- Folate: Good source (from asparagus and eggs)
- Vitamin A: Moderate source (from eggs and cheese)
- Calcium: Moderate source (from cheese and dairy)
Important Notes:
- These values are estimates and can vary. Using lower-fat cheese and half-and-half instead of heavy cream will reduce fat and calories.
- Asparagus is a good source of vitamins and minerals, contributing to the nutritional value of this tart.
- Portion control is important for managing calorie intake.
This nutritional information provides a general overview of what you can expect per serving of Asparagus Tart. Enjoy it in moderation as part of a balanced diet.
Preparation Time
The preparation time for this Asparagus Tart is relatively straightforward, especially if using a store-bought crust. Here’s a breakdown to help you plan:
Prep Time (if making homemade crust):
- Dough Preparation: 20-30 minutes (including mixing and chilling time)
- Filling Preparation: 15-20 minutes (including asparagus prep and sautéing, if chosen)
- Assembly: 10-15 minutes (rolling crust, arranging asparagus, pouring filling)
Prep Time (if using store-bought crust):
- Filling Preparation: 15-20 minutes (including asparagus prep and sautéing, if chosen)
- Assembly: 5-10 minutes (arranging asparagus, pouring filling into store-bought crust)
Cook Time: 30-40 minutes
Total Time (Homemade Crust): Approximately 1 hour 5 minutes to 1 hour 45 minutes (including chilling time)
Total Time (Store-Bought Crust): Approximately 45 minutes to 1 hour
Make-Ahead Tips:
- Crust: Homemade crust can be made a day or two ahead and stored in the refrigerator, wrapped tightly in plastic wrap.
- Filling: The filling can be prepared a few hours ahead and stored in the refrigerator.
- Assembled Tart (Unbaked): The assembled tart can be prepared a few hours ahead and stored, unbaked, in the refrigerator. Add a few minutes to the baking time if baking directly from the refrigerator.
This time breakdown helps you plan your cooking schedule and allows for flexibility, especially if you want to prepare components of the tart in advance.
How to Serve
Asparagus Tart is incredibly versatile and can be served in a variety of ways, making it perfect for different occasions. Here are some serving suggestions:
- Brunch Star:
- Serve warm or at room temperature as part of a brunch spread.
- Pair it with fresh fruit salad, yogurt parfait, or a side of breakfast meats like bacon or sausage.
- Offer alongside mimosas, coffee, and tea for a celebratory brunch.
- Light Lunch or Dinner:
- Enjoy a slice of Asparagus Tart as a satisfying light lunch or dinner.
- Serve with a fresh green salad dressed with a vinaigrette.
- Consider adding a simple soup, such as a creamy tomato soup or a light vegetable broth, to create a complete meal.
- Appetizer or Starter:
- Cut the tart into smaller squares or wedges to serve as an elegant appetizer at a party.
- Arrange on a platter with other appetizers like olives, cheeses, and cured meats.
- Offer with a glass of crisp white wine or a light aperitif.
- Side Dish for a Main Course:
- Serve alongside grilled chicken, roasted fish, or a vegetarian main course.
- The savory flavors of the tart complement a variety of proteins.
- Consider pairing it with a light and fresh main course to balance the richness of the tart.
- Picnic or Potluck Favorite:
- Asparagus Tart travels well and is delicious served at room temperature, making it ideal for picnics or potlucks.
- Wrap securely and transport in a container to maintain its shape.
- Pairs well with other picnic fare like sandwiches, salads, and fruit.
Garnishing Ideas:
- Fresh Herbs: Sprinkle with fresh thyme, parsley, or chives before serving for added flavor and visual appeal.
- Lemon Zest: A grating of fresh lemon zest adds a bright, citrusy touch.
- Red Pepper Flakes: A pinch of red pepper flakes adds a subtle hint of heat.
- Shaved Parmesan: A few shavings of Parmesan cheese can enhance the cheesy flavor and add a decorative element.
No matter how you choose to serve it, Asparagus Tart is sure to be a crowd-pleaser. Its delicious flavors and elegant presentation make it a perfect dish for any occasion.
Additional Tips for the Perfect Asparagus Tart
To elevate your Asparagus Tart from delicious to extraordinary, consider these helpful tips gleaned from years of baking experience:
- Use Cold Butter for a Flaky Crust: The secret to a truly flaky and tender crust is keeping your butter cold. Cold butter creates pockets of steam during baking, resulting in those desirable layers. Ensure your butter is thoroughly chilled before you begin, and work quickly to prevent it from warming up too much during the dough-making process. If your kitchen is warm, consider chilling your bowl and pastry blender or food processor bowl as well.
- Don’t Overwork the Dough: Overmixing the dough develops the gluten in the flour, which can lead to a tough crust. Mix the dough just until it comes together. It’s okay if it looks a little shaggy. Gentle handling is key. When rolling out the dough, avoid excessive pressure and try to roll it out evenly.
- Blind Bake for a Crisp Bottom Crust: Blind baking the crust, especially if you are making a homemade crust and want to ensure a perfectly crisp bottom, is a worthwhile step. The moisture from the filling can sometimes make the bottom crust soggy. Blind baking pre-cooks the crust, creating a barrier against moisture. Use pie weights or dried beans to prevent the crust from puffing up during blind baking.
- Pre-cook Asparagus for Enhanced Flavor and Texture: While you can use raw asparagus in the tart, briefly sautéing or roasting it beforehand can enhance its flavor and texture. Sautéing with garlic adds a layer of savory depth. Pre-cooking also ensures that the asparagus is tender-crisp and not too crunchy in the finished tart. However, be careful not to overcook the asparagus at this stage, as it will continue to cook in the oven.
- Experiment with Cheese Combinations: Gruyère is a classic choice, but don’t be afraid to experiment with different cheese combinations to create your own signature Asparagus Tart. Consider adding Fontina for extra meltiness, Parmesan for sharpness, or even a touch of goat cheese for tanginess. A blend of two or three cheeses can add complexity and depth of flavor. Ensure your cheeses complement each other and the asparagus.
By following these additional tips, you’ll be well on your way to creating an Asparagus Tart that is not only delicious but also perfectly textured and full of flavor. These small refinements can make a big difference in the final result.
FAQ Section: Your Asparagus Tart Questions Answered
Here are answers to some frequently asked questions about making Asparagus Tart, to help you navigate any potential challenges and ensure baking success:
Q1: Can I make Asparagus Tart ahead of time?
A: Yes, you can definitely make Asparagus Tart ahead of time, which makes it a great dish for entertaining. You have a few options:
- Make the crust ahead: Homemade crust dough can be made and refrigerated for up to 2 days or frozen for up to a month. Thaw frozen dough in the refrigerator overnight before rolling out.
- Prepare the filling ahead: The egg and cheese filling can be whisked together and refrigerated for up to 24 hours.
- Assemble the tart ahead (unbaked): You can assemble the entire unbaked tart and refrigerate it for a few hours before baking. Add a few extra minutes to the baking time if baking directly from the refrigerator.
- Bake the tart ahead: The fully baked tart can be made up to a day ahead and stored in the refrigerator. Reheat gently in a low oven (300°F/150°C) or serve at room temperature. Keep in mind that the crust may lose some of its crispness if stored overnight.
Q2: Can I use frozen asparagus?
A: While fresh asparagus is highly recommended for the best flavor and texture, you can use frozen asparagus in a pinch. However, be sure to thaw the frozen asparagus completely and squeeze out as much excess water as possible before adding it to the tart. Frozen asparagus tends to be softer than fresh asparagus, so it might not hold its shape as well. If using frozen asparagus, sautéing it before adding to the tart is highly recommended to remove excess moisture and improve texture.
Q3: Can I substitute the cheese in the recipe?
A: Absolutely! Feel free to experiment with different cheeses based on your preferences and what you have available. Good substitutes for Gruyère or Parmesan include:
- Fontina: Melts beautifully and has a mild, slightly nutty flavor.
- Monterey Jack: Mild and creamy, a good all-purpose melting cheese.
- Cheddar (mild or sharp): Adds a sharper, more pronounced cheesy flavor.
- Goat Cheese: Crumbled goat cheese adds a tangy and creamy element.
- Swiss Cheese: Similar to Gruyère, with a nutty and slightly sweet flavor.
- Provolone: Mild and slightly tangy, melts well.
You can use a single cheese or a blend of cheeses to create your desired flavor profile.
Q4: My crust is shrinking when I bake it. What am I doing wrong?
A: Crust shrinkage can be frustrating, but it’s a common issue. Here are some potential causes and solutions:
- Overworked Dough: Overmixing the dough develops gluten, which can cause shrinkage. Be gentle and mix just until combined.
- Not Chilling the Dough: Chilling the dough is crucial for relaxing the gluten and preventing shrinkage. Ensure you chill the dough for at least 30 minutes.
- Rolling Out Too Thinly: Rolling the dough too thin can make it more prone to shrinking. Aim for about ⅛ inch thickness.
- Not Blind Baking Properly: If blind baking, ensure you use sufficient pie weights or dried beans to weigh down the crust and prevent it from shrinking.
- Oven Temperature: Ensure your oven temperature is accurate. Too high of a temperature can cause the crust to shrink quickly.
Q5: Can I make this tart dairy-free or gluten-free?
A: Yes, with some substitutions, you can adapt this recipe for dietary restrictions:
- Dairy-Free:
- Use a dairy-free pie crust (many store-bought options are available).
- Substitute the heavy cream with full-fat coconut milk (the thick part from a chilled can) or a plant-based cream alternative.
- Use a dairy-free shredded cheese alternative. Nut-based cheeses or coconut-based cheeses can work well.
- Gluten-Free:
- Use a gluten-free pie crust recipe or a store-bought gluten-free pie crust.
- Ensure all other ingredients are gluten-free (most are naturally gluten-free in this recipe).
By addressing these common questions, you’ll be better equipped to tackle any challenges and create a flawless Asparagus Tart. Happy baking!
Print
Asparagus Tart Recipe
Ingredients
For the Crust (Homemade or Store-Bought):
- 1 ½ cups All-Purpose Flour: This forms the base of our flaky crust. For a slightly nuttier flavor, you can substitute up to ½ cup of whole wheat flour. Ensure your flour is fresh for the best gluten development.
- ½ teaspoon Salt: Salt enhances the flavors of the crust and balances the sweetness of the filling. Use fine sea salt or kosher salt.
- ½ cup (1 stick) Unsalted Butter, chilled and cubed: Cold butter is crucial for creating a flaky crust. Make sure your butter is very cold before you start, and keep it cold throughout the process. You can also use vegetable shortening for a slightly different texture, or a combination of butter and shortening.
- ¼ cup Ice Water: Ice water keeps the dough cold and helps to bind it together without overworking it. Add the water gradually until the dough just comes together.
- (Optional) 1 tablespoon Apple Cider Vinegar or Lemon Juice: A touch of acidity can help to tenderize the dough and inhibit gluten development, resulting in a more tender crust.
Alternatively, for a quicker option:
- 1 box (14.1 oz) Refrigerated Pie Crusts: Store-bought pie crusts are a convenient and perfectly acceptable shortcut. Choose a good quality brand for the best flavor and texture. You’ll typically need one crust for the bottom of the tart.
For the Filling:
- 1 pound Asparagus, trimmed: Fresh asparagus is the star of the show! Look for firm, bright green spears with tightly closed tips. The thickness of the asparagus is a matter of preference; thinner spears will cook faster and be more tender, while thicker spears will have a more pronounced asparagus flavor. For this tart, medium to thin spears work best.
- 4 large Eggs: Eggs are the binding agent for the filling and contribute to its richness and creaminess. Use large, fresh eggs for optimal results.
- 1 cup Heavy Cream or Half-and-Half: Heavy cream will create a richer, more decadent filling, while half-and-half will result in a slightly lighter texture. You can also use whole milk for a lighter option, but the tart may be slightly less creamy.
- 1 cup Shredded Cheese (such as Gruyère, Parmesan, Fontina, or a blend): Cheese adds flavor, richness, and a beautiful melted texture to the tart. Gruyère is a classic choice for asparagus tart due to its nutty and slightly sweet flavor. Parmesan adds a salty, savory note. Fontina is a milder, meltier option. Feel free to experiment with different cheese combinations to find your favorite blend. Pre-shredded cheese is convenient, but freshly grated cheese will melt more smoothly and have a better flavor.
- 2 cloves Garlic, minced: Garlic adds a subtle savory depth to the filling. Use fresh garlic for the best flavor; garlic powder can be used in a pinch, but fresh garlic is highly recommended.
- 1 tablespoon Fresh Thyme leaves (or ½ teaspoon dried thyme): Thyme pairs beautifully with asparagus and adds a lovely herbaceous note to the tart. Fresh thyme is preferred, but dried thyme can be substituted. Other herbs like chives, parsley, or tarragon can also be used.
- Salt and freshly ground Black Pepper, to taste: Seasoning is crucial for bringing out the flavors of all the ingredients. Use both salt and freshly ground black pepper to taste. Taste the filling before pouring it into the crust and adjust seasoning as needed.
- (Optional) 1 tablespoon Olive Oil: Used for sautéing the asparagus if you prefer to pre-cook it slightly. Olive oil adds a subtle fruity flavor.
- (Optional) Red Pepper Flakes, for a touch of heat: A pinch of red pepper flakes can add a subtle kick to the tart, if desired.
Instructions
Step 1: Prepare the Crust (If Making Homemade)
- Combine Dry Ingredients: In a large bowl, whisk together the flour and salt. This ensures the salt is evenly distributed throughout the dough.
- Incorporate Cold Butter: Add the cold, cubed butter to the flour mixture. Using a pastry blender, your fingertips, or a food processor, cut the butter into the flour until the mixture resembles coarse crumbs with some pea-sized pieces of butter remaining. The goal is to keep the butter cold and in small pieces, which will create flaky layers in the crust. If using your fingertips, work quickly to prevent the butter from melting. If using a food processor, pulse in short bursts to avoid over-processing.
- Add Ice Water and Vinegar (Optional): Gradually add the ice water, one tablespoon at a time, mixing gently after each addition. If using vinegar or lemon juice, add it along with the first tablespoon of ice water. Mix until the dough just comes together and forms a shaggy ball. Be careful not to overmix, as this will develop the gluten and result in a tough crust.
- Form and Chill the Dough: Turn the dough out onto a lightly floured surface and gently gather it into a disc. Wrap the disc tightly in plastic wrap and refrigerate for at least 30 minutes, or up to 2 hours. Chilling allows the gluten to relax, making the dough easier to roll out and preventing it from shrinking during baking.
Step 2: Prepare the Asparagus and Filling
- Prepare the Asparagus: Wash the asparagus thoroughly and snap off the tough woody ends. You can snap them off naturally, or trim about the bottom inch of each spear. Cut the asparagus spears into 1-2 inch pieces. Smaller pieces will be easier to arrange in the tart and will cook more evenly.
- (Optional) Sauté the Asparagus: For a slightly more tender asparagus and to enhance its flavor, you can sauté it briefly. Heat olive oil in a skillet over medium heat. Add the minced garlic and cook for about 30 seconds until fragrant, being careful not to burn it. Add the asparagus and sauté for 2-3 minutes, until it turns bright green and is slightly tender-crisp. Season with salt and pepper. This step is optional; you can also use raw asparagus in the tart, which will retain a bit more of its crisp texture.
- Whisk the Eggs and Cream: In a medium bowl, whisk together the eggs, heavy cream (or half-and-half), shredded cheese, thyme, salt, and pepper. Whisk until the mixture is well combined and smooth. Taste and adjust seasoning as needed.
Step 3: Assemble and Bake the Tart
- Preheat Oven and Prepare Tart Pan: Preheat oven to 375°F (190°C). Lightly grease a 9-inch tart pan with a removable bottom. This ensures the tart releases easily after baking.
- Roll Out the Crust (If Homemade): On a lightly floured surface, roll out the chilled dough into a 12-inch circle, about ⅛ inch thick. Gently transfer the dough to the prepared tart pan, pressing it into the bottom and up the sides. Trim any excess dough hanging over the edge. You can crimp the edges for a decorative look, or simply leave them as is.
- Blind Bake the Crust (Optional but Recommended for a Crisp Crust): For a particularly crisp crust, especially if using a homemade crust, blind bake it before adding the filling. Line the crust with parchment paper and fill with pie weights or dried beans. Bake for 15 minutes. Remove the parchment paper and weights and bake for another 5-7 minutes, until the crust is lightly golden brown. Blind baking pre-cooks the crust, preventing it from becoming soggy when the wet filling is added.
- Arrange Asparagus in Crust: Arrange the asparagus pieces evenly over the bottom of the tart crust. If you sautéed the asparagus, distribute it evenly. If using raw asparagus, arrange it in a decorative pattern, if desired.
- Pour Filling Over Asparagus: Pour the egg and cheese mixture evenly over the asparagus in the crust. Ensure the filling is distributed throughout the tart.
- Bake the Tart: Bake in the preheated oven for 30-40 minutes, or until the crust is golden brown and the filling is set and lightly golden on top. A toothpick inserted into the center should come out clean, and the filling should no longer jiggle.
- Cool and Serve: Let the tart cool in the pan for at least 10-15 minutes before removing the sides of the tart pan. This allows the filling to set further and makes it easier to slice and serve. Serve warm or at room temperature.
Nutrition
- Serving Size: one normal portion
- Calories: 350-450
- Sugar: 2-3 grams
- Sodium: 300-400 mg
- Fat: 25-35 grams
- Saturated Fat: 15-20 grams
- Carbohydrates: 20-25 grams
- Fiber: 2-3 grams
- Protein: 12-15 grams
- Cholesterol: 150-200 mg