This Arabic Biryani recipe has become an absolute legend in our household. The first time I made it, the aroma alone had everyone drifting into the kitchen, eyes wide with anticipation. It wasn’t just the fragrant spices or the tender chicken; it was the whole experience – the layers of flavor, the perfectly cooked rice, and the festive feel it brought to a simple weeknight dinner. My kids, who can be notoriously picky, devoured their portions and even asked for seconds. My partner, a self-proclaimed biryani connoisseur, declared it one of the best he’s ever had, praising its authentic taste and the delightful balance of spices. It’s since become our go-to for special occasions, family gatherings, or even when we just crave something truly comforting and spectacular. The beauty of this recipe lies in its ability to transport you, to fill your home with an intoxicating scent, and to bring smiles to the faces of everyone who tastes it. It’s more than just a meal; it’s a celebration in a pot.
The Allure of Authentic Arabic Biryani
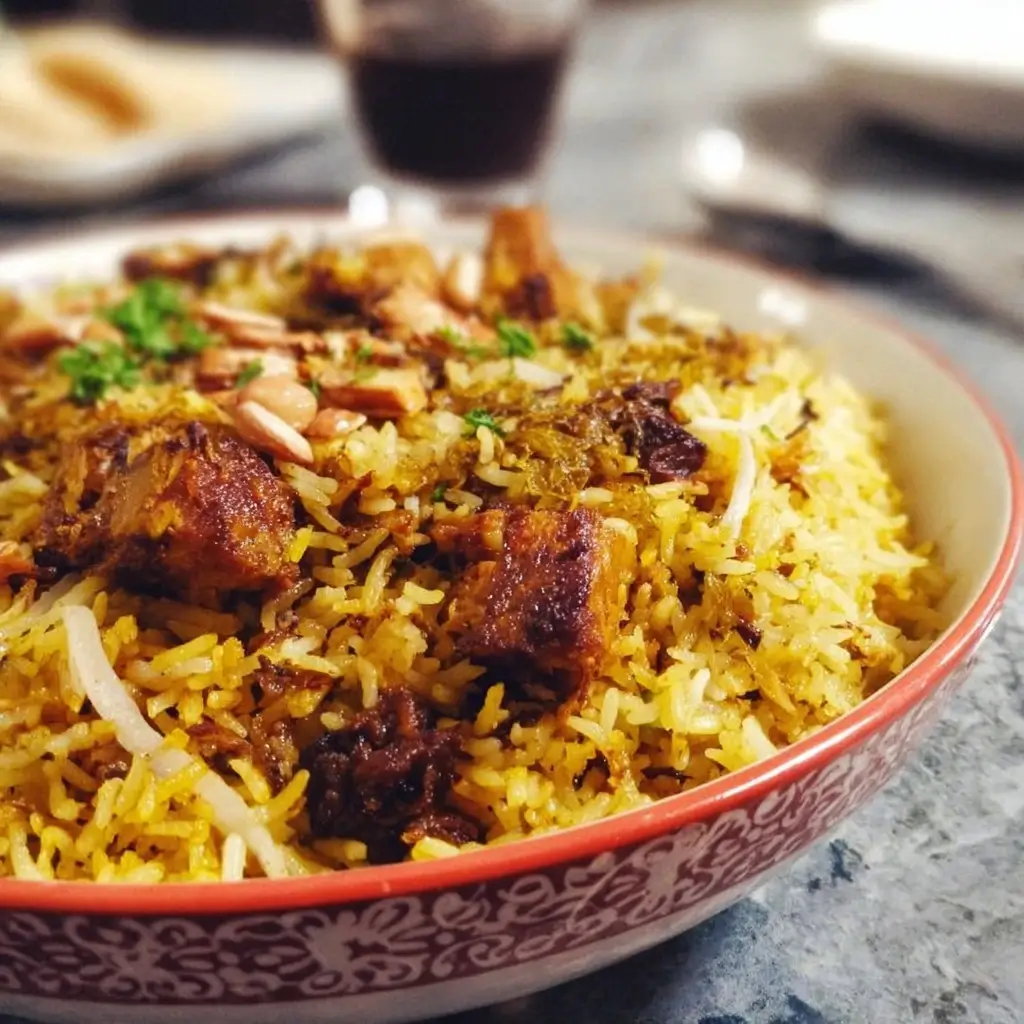
Arabic Biryani, while sharing a common ancestry with its South Asian counterparts, carves its own unique identity in the culinary world. It’s a dish celebrated across the Middle East, with regional variations adding subtle yet distinct nuances. What generally sets Arabic Biryani apart is its often milder, yet deeply aromatic spice profile, relying on fragrant whole spices like cardamom, cloves, and cinnamon, often complemented by the warmth of black pepper and the subtle sweetness of allspice or a traditional Baharat blend. Saffron, the king of spices, plays a pivotal role, imparting its luxurious golden hue and unmistakable fragrance to the long-grain Basmati rice.
Unlike some fiery biryanis, the Arabic version tends to focus on a harmonious blend of flavors where no single spice overpowers another. The chicken or lamb is typically marinated in yogurt and spices, ensuring it’s succulent and flavorful, melting in your mouth with each bite. The layering technique, crucial to any biryani, is artfully employed, allowing the rice to steam cook in the aromatic chicken gravy, absorbing all the delicious essences. Garnishes often include toasted nuts like almonds or cashews, and sweet raisins or dates, adding delightful textural contrasts and a touch of Middle Eastern sweetness. This dish is not just food; it’s an experience, a testament to the rich culinary heritage of the Arab world, often gracing tables during festive occasions, family gatherings, and celebrations.
Ingredients for Your Culinary Masterpiece
This recipe aims for a balanced, aromatic, and deeply satisfying Arabic Biryani.
H3: For the Chicken Marinade:
- 1.5 kg whole chicken, cut into 8-10 pieces (skin on or off, as preferred)
- 1 cup plain yogurt (full fat recommended)
- 2 tablespoons ginger-garlic paste (freshly made is best)
- 1 tablespoon lemon juice
- 1 teaspoon turmeric powder
- 1 teaspoon red chili powder (adjust to your spice preference)
- 1 tablespoon ground coriander
- 1 teaspoon ground cumin
- 1/2 teaspoon black pepper powder
- 1 teaspoon salt (or to taste)
- 2 tablespoons Arabic Baharat spice blend (see below if making your own)
H3: For the Arabic Baharat (Spice Blend – if not using pre-made):
- 1 tablespoon black peppercorns
- 1 tablespoon cumin seeds
- 1 tablespoon coriander seeds
- 1 teaspoon cloves
- 1 teaspoon cardamom seeds (from green pods)
- 1/2 teaspoon nutmeg, freshly grated
- 1 small cinnamon stick (about 2 inches), broken
- (Optional: 1/2 teaspoon paprika for color and mildness)
Grind all these together to a fine powder.
H3: For the Rice:
- 3 cups premium quality long-grain Basmati rice
- 6 cups water (for boiling rice)
- 2-3 green cardamom pods
- 2-3 cloves
- 1 small cinnamon stick (1 inch)
- 1 bay leaf
- 1 teaspoon salt
- 1 tablespoon vegetable oil or ghee
H3: For the Biryani Gravy & Layering:
- 4 tablespoons ghee or vegetable oil
- 3 large onions, thinly sliced (about 3 cups)
- 2 medium tomatoes, finely chopped or pureed
- 1/2 cup chopped fresh coriander (cilantro)
- 1/4 cup chopped fresh mint leaves
- 2-3 green chilies, slit lengthwise (optional, for extra heat)
- 1/4 cup warm milk
- A generous pinch of saffron strands (about 1/2 teaspoon)
- 1 tablespoon rose water or kewra water (optional, for fragrance)
- Juice of 1/2 lemon
H3: For Garnish (Optional but Recommended):
- 1/4 cup fried onions (Birista)
- 2 tablespoons slivered almonds, toasted
- 2 tablespoons cashews, toasted
- 2 tablespoons golden raisins
- Extra chopped fresh coriander and mint
Step-by-Step Guide to Perfection: Crafting Your Arabic Biryani
Patience and attention to detail are key to a phenomenal biryani. Follow these steps closely.
H3: 1. Marinating the Chicken (Minimum 2 hours, preferably 4-6 hours or overnight)
- In a large bowl, combine the chicken pieces with all the marinade ingredients: yogurt, ginger-garlic paste, lemon juice, turmeric powder, red chili powder, ground coriander, ground cumin, black pepper powder, salt, and the Arabic Baharat spice blend.
- Mix thoroughly, ensuring each chicken piece is well-coated.
- Cover the bowl with plastic wrap and refrigerate for at least 2 hours. For best results, marinate for 4-6 hours or even overnight. This allows the flavors to penetrate deep into the chicken, making it incredibly tender and flavorful.
H3: 2. Preparing the Rice (Soaking and Parboiling)
- Gently wash the Basmati rice in several changes of cold water until the water runs relatively clear. Be careful not to break the grains.
- Soak the washed rice in ample cold water for at least 30-45 minutes. This step is crucial for achieving long, separate grains.
- While the rice is soaking, prepare the saffron milk. Add the saffron strands to 1/4 cup of warm milk. Stir gently and set aside to allow the saffron to infuse its color and aroma.
- After soaking, drain the rice completely.
- In a large pot, bring 6 cups of water to a rolling boil. Add the whole spices for the rice (green cardamom pods, cloves, cinnamon stick, bay leaf), salt, and 1 tablespoon of oil or ghee.
- Add the drained soaked rice to the boiling water. Cook for about 5-7 minutes, or until the rice is 70-80% cooked. The grains should still have a slight bite to them (al dente) and should not be fully soft. They will finish cooking during the steaming (dum) process.
- Carefully drain the parboiled rice into a colander and set aside. You can remove the whole spices if you wish, or leave them in for added fragrance. Gently spread the rice on a tray to cool slightly and prevent further cooking.
H3: 3. Cooking the Chicken and Onions (Building the Flavor Base)
- In a large, heavy-bottomed pot or Dutch oven (the one you’ll assemble the biryani in), heat 4 tablespoons of ghee or vegetable oil over medium heat.
- Add the thinly sliced onions and fry them patiently, stirring frequently, until they turn a deep golden brown. This can take 15-20 minutes. Don’t rush this step, as caramelized onions form the flavor backbone of the biryani. Remove about 1/4 cup of these fried onions and set aside for garnish (this is your homemade Birista if not using store-bought).
- To the remaining onions in the pot, add the marinated chicken pieces along with all the marinade.
- Cook the chicken on medium-high heat for 7-10 minutes, stirring occasionally, until it’s lightly browned on all sides and the yogurt mixture starts to thicken.
- Add the chopped tomatoes (or puree) and slit green chilies (if using). Cook for another 5-7 minutes, stirring, until the tomatoes soften and the oil begins to separate from the masala.
- Stir in the chopped fresh coriander and mint leaves. Reduce the heat to low, cover the pot, and let the chicken simmer for 15-20 minutes, or until it is about 80-90% cooked and the gravy has thickened. Check occasionally and add a splash of water if it seems too dry. The chicken should be tender but not falling off the bone yet.
H3: 4. Assembling the Biryani (The Art of Layering)
- Once the chicken is almost cooked and the gravy is thick, it’s time to layer. If your pot is very full, you can transfer half the chicken masala to a separate bowl. Otherwise, gently spread the chicken masala evenly at the bottom of the pot.
- Sprinkle a little chopped coriander, mint, and some of the reserved fried onions over the chicken layer.
- Spread half of the parboiled Basmati rice evenly over the chicken layer.
- Drizzle half of the saffron-infused milk and half of the rose water/kewra water (if using) over this rice layer. Sprinkle a little more fried onions.
- If you removed some chicken masala, add it back now as a second chicken layer. Otherwise, proceed to the next rice layer.
- Spread the remaining parboiled rice evenly on top.
- Drizzle the remaining saffron-infused milk, rose water/kewra water, and the juice of 1/2 lemon over the top layer of rice.
- Garnish with the remaining fried onions, toasted slivered almonds, toasted cashews, and golden raisins (if using). You can also dot the top with a few small pieces of ghee for extra richness (optional).
H3: 5. The Dum (Steaming to Perfection)
- “Dum” is the process of slow-steaming the biryani, allowing the flavors to meld and the rice to finish cooking in the aromatic steam.
- Tightly cover the pot with a lid. To ensure a good seal, you can line the rim of the pot with a clean, damp kitchen towel before placing the lid, or use aluminum foil to cover the pot mouth and then place the lid on top. Some traditional methods involve sealing the lid to the pot with a dough made from flour and water.
- Place the sealed pot on a tawa (flat griddle) over low heat. If you don’t have a tawa, use the lowest possible heat setting on your stove. The tawa helps distribute the heat evenly and prevents the bottom layer from scorching.
- Cook on dum for 20-25 minutes. You should hear a gentle simmer and see steam trying to escape if the seal is good. The aroma will intensify.
H3: 6. Final Touches and Resting
- After the dum period, turn off the heat and let the biryani rest, still covered, for at least 15-20 minutes. This resting period is crucial. It allows the flavors to settle, the rice grains to firm up further, and prevents them from breaking when you serve.
- To serve, gently fluff the biryani from the sides of the pot using a large, flat spoon or spatula. Try to get a mix of the rice and chicken in each serving, ensuring the layers remain somewhat distinct.
Nutritional Snapshot: What’s in a Serving?
- Servings: This recipe generously serves 6-8 people.
- Calories per serving (approximate): 650-800 kcal.
Disclaimer: Nutritional values are approximate and can vary significantly based on specific ingredient brands, portion sizes, and optional additions like nuts and extra ghee. This estimate is for one serving out of eight.
Time Investment: From Prep to Plate
Good biryani takes time, but the results are well worth the effort!
H3: Preparation Time:
- Chicken Marinade: 15 minutes (plus 2-6 hours or overnight for marination)
- Rice Soaking: 30-45 minutes
- Vegetable Chopping & Other Prep: 30 minutes
- Total Active Prep Time: Approximately 1 hour 15 minutes (excluding marination and soaking time)
H3: Cooking Time:
- Frying Onions: 15-20 minutes
- Cooking Chicken: 25-30 minutes
- Parboiling Rice: 5-7 minutes
- Assembly: 10 minutes
- Dum Cooking: 20-25 minutes
- Resting Time: 15-20 minutes
- Total Cooking & Resting Time: Approximately 1 hour 30 minutes to 1 hour 50 minutes
H3: Overall Time (excluding marination): Approximately 2 hours 45 minutes to 3 hours.
Serving Suggestions: Elevating Your Arabic Biryani Experience
Arabic Biryani is a majestic dish on its own, but these accompaniments can enhance the experience:
- Cooling Raita:
- Cucumber Raita: Grated cucumber, yogurt, roasted cumin powder, a pinch of salt, and chopped mint.
- Plain Yogurt: A simple bowl of chilled plain yogurt provides a lovely contrast.
- Fresh Salads:
- Shirazi Salad (Persian Cucumber & Tomato Salad): Finely diced cucumbers, tomatoes, and red onions, dressed with lemon juice, olive oil, and dried mint.
- Simple Green Salad: Lettuce, cucumber, tomatoes with a light vinaigrette.
- Pickles (Achar):
- A side of Middle Eastern pickles (like pickled turnips or mixed vegetables) can add a tangy kick.
- Garnish:
- Always serve with extra fresh coriander and mint leaves on top.
- A sprinkle of sumac can add a zesty, lemony note.
- Drinks:
- Laban (savory yogurt drink) is a traditional accompaniment.
- Fresh mint lemonade.
Pro Tips for an Unforgettable Arabic Biryani
- Quality of Rice is Key: Always use high-quality, aged long-grain Basmati rice. The length and fragrance of the grains make a significant difference. Don’t skip the soaking process!
- Patience with Onions: The deep golden brown (not burnt!) color of your fried onions (Birista) is crucial for the flavor and color of the biryani. Fry them slowly and evenly.
- Don’t Overcook the Rice (Initially): Parboil the rice to only 70-80% doneness. It will absorb moisture from the chicken gravy and finish cooking perfectly during the “dum” process. Overcooked rice will turn mushy.
- The “Dum” is Sacred: Ensure a tight seal for the dum cooking. This slow steaming process is what melds the flavors and cooks the rice to fluffy perfection. Don’t be tempted to open the lid frequently.
- Resting is Not Optional: Allowing the biryani to rest for at least 15-20 minutes after dum cooking is vital. This allows the steam to distribute, flavors to settle, and the delicate rice grains to firm up, preventing them from breaking when you serve.
Frequently Asked Questions (FAQ) about Arabic Biryani
Q1: Can I make Arabic Biryani with lamb or beef instead of chicken?
A1: Absolutely! Lamb is a very popular choice for Arabic Biryani. Use bone-in lamb pieces (like shoulder or leg) and increase the initial simmering time for the meat until it’s tender before layering. For beef, use stewing cuts and ensure it’s cooked until tender, which might take longer than chicken or lamb. Adjust marination and cooking times accordingly.
Q2: How can I make this biryani vegetarian?
A2: For a vegetarian version, replace the chicken with a medley of robust vegetables like potatoes, carrots, cauliflower, green beans, and peas. You can also add paneer (Indian cheese) or chickpeas. Marinate the vegetables (especially potatoes and cauliflower) in the same yogurt-spice mixture for at least 30 minutes. The cooking time for the vegetable masala will likely be shorter.
Q3: My biryani rice sometimes gets mushy. How can I avoid this?
A3: The main culprits for mushy rice are overcooking during the parboiling stage, using too much liquid in the chicken gravy, or not soaking the rice properly. Ensure you only cook the rice to 70-80% doneness. The gravy for layering should be thick, not watery. Soaking the rice helps it cook evenly without becoming sticky.
Q4: What is Arabic Baharat, and can I substitute it?
A4: Arabic Baharat is a traditional Middle Eastern all-purpose spice blend. Its composition can vary slightly by region, but it typically includes black pepper, cumin, coriander, cloves, cinnamon, nutmeg, and cardamom. If you can’t find it or make the blend provided, you can use a good quality Garam Masala as a close substitute, though the flavor profile will be slightly different (often more intense). Alternatively, ensure you are generous with the individual whole and ground spices listed.
Q5: Can I prepare any parts of the Arabic Biryani in advance?
A5: Yes! To save time:
* Marinate the chicken overnight.
* Fry the onions (Birista) a day or two ahead and store them in an airtight container at room temperature.
* Chop vegetables like onions, tomatoes, coriander, and mint a few hours ahead and refrigerate.
* The saffron can be soaked in milk an hour or two in advance.
Assembling and dum cooking are best done just before serving for the freshest taste and aroma.

Authentic Arabic Biryani Recipe
Ingredients
H3: For the Chicken Marinade:
- 1.5 kg whole chicken, cut into 8-10 pieces (skin on or off, as preferred)
- 1 cup plain yogurt (full fat recommended)
- 2 tablespoons ginger-garlic paste (freshly made is best)
- 1 tablespoon lemon juice
- 1 teaspoon turmeric powder
- 1 teaspoon red chili powder (adjust to your spice preference)
- 1 tablespoon ground coriander
- 1 teaspoon ground cumin
- 1/2 teaspoon black pepper powder
- 1 teaspoon salt (or to taste)
- 2 tablespoons Arabic Baharat spice blend (see below if making your own)
H3: For the Arabic Baharat (Spice Blend – if not using pre-made):
- 1 tablespoon black peppercorns
- 1 tablespoon cumin seeds
- 1 tablespoon coriander seeds
- 1 teaspoon cloves
- 1 teaspoon cardamom seeds (from green pods)
- 1/2 teaspoon nutmeg, freshly grated
- 1 small cinnamon stick (about 2 inches), broken
- (Optional: 1/2 teaspoon paprika for color and mildness)
Grind all these together to a fine powder.
H3: For the Rice:
- 3 cups premium quality long-grain Basmati rice
- 6 cups water (for boiling rice)
- 2–3 green cardamom pods
- 2–3 cloves
- 1 small cinnamon stick (1 inch)
- 1 bay leaf
- 1 teaspoon salt
- 1 tablespoon vegetable oil or ghee
H3: For the Biryani Gravy & Layering:
- 4 tablespoons ghee or vegetable oil
- 3 large onions, thinly sliced (about 3 cups)
- 2 medium tomatoes, finely chopped or pureed
- 1/2 cup chopped fresh coriander (cilantro)
- 1/4 cup chopped fresh mint leaves
- 2–3 green chilies, slit lengthwise (optional, for extra heat)
- 1/4 cup warm milk
- A generous pinch of saffron strands (about 1/2 teaspoon)
- 1 tablespoon rose water or kewra water (optional, for fragrance)
- Juice of 1/2 lemon
Instructions
H3: 1. Marinating the Chicken (Minimum 2 hours, preferably 4-6 hours or overnight)
- In a large bowl, combine the chicken pieces with all the marinade ingredients: yogurt, ginger-garlic paste, lemon juice, turmeric powder, red chili powder, ground coriander, ground cumin, black pepper powder, salt, and the Arabic Baharat spice blend.
- Mix thoroughly, ensuring each chicken piece is well-coated.
- Cover the bowl with plastic wrap and refrigerate for at least 2 hours. For best results, marinate for 4-6 hours or even overnight. This allows the flavors to penetrate deep into the chicken, making it incredibly tender and flavorful.
H3: 2. Preparing the Rice (Soaking and Parboiling)
- Gently wash the Basmati rice in several changes of cold water until the water runs relatively clear. Be careful not to break the grains.
- Soak the washed rice in ample cold water for at least 30-45 minutes. This step is crucial for achieving long, separate grains.
- While the rice is soaking, prepare the saffron milk. Add the saffron strands to 1/4 cup of warm milk. Stir gently and set aside to allow the saffron to infuse its color and aroma.
- After soaking, drain the rice completely.
- In a large pot, bring 6 cups of water to a rolling boil. Add the whole spices for the rice (green cardamom pods, cloves, cinnamon stick, bay leaf), salt, and 1 tablespoon of oil or ghee.
- Add the drained soaked rice to the boiling water. Cook for about 5-7 minutes, or until the rice is 70-80% cooked. The grains should still have a slight bite to them (al dente) and should not be fully soft. They will finish cooking during the steaming (dum) process.
- Carefully drain the parboiled rice into a colander and set aside. You can remove the whole spices if you wish, or leave them in for added fragrance. Gently spread the rice on a tray to cool slightly and prevent further cooking.
H3: 3. Cooking the Chicken and Onions (Building the Flavor Base)
- In a large, heavy-bottomed pot or Dutch oven (the one you’ll assemble the biryani in), heat 4 tablespoons of ghee or vegetable oil over medium heat.
- Add the thinly sliced onions and fry them patiently, stirring frequently, until they turn a deep golden brown. This can take 15-20 minutes. Don’t rush this step, as caramelized onions form the flavor backbone of the biryani. Remove about 1/4 cup of these fried onions and set aside for garnish (this is your homemade Birista if not using store-bought).
- To the remaining onions in the pot, add the marinated chicken pieces along with all the marinade.
- Cook the chicken on medium-high heat for 7-10 minutes, stirring occasionally, until it’s lightly browned on all sides and the yogurt mixture starts to thicken.
- Add the chopped tomatoes (or puree) and slit green chilies (if using). Cook for another 5-7 minutes, stirring, until the tomatoes soften and the oil begins to separate from the masala.
- Stir in the chopped fresh coriander and mint leaves. Reduce the heat to low, cover the pot, and let the chicken simmer for 15-20 minutes, or until it is about 80-90% cooked and the gravy has thickened. Check occasionally and add a splash of water if it seems too dry. The chicken should be tender but not falling off the bone yet.
H3: 4. Assembling the Biryani (The Art of Layering)
- Once the chicken is almost cooked and the gravy is thick, it’s time to layer. If your pot is very full, you can transfer half the chicken masala to a separate bowl. Otherwise, gently spread the chicken masala evenly at the bottom of the pot.
- Sprinkle a little chopped coriander, mint, and some of the reserved fried onions over the chicken layer.
- Spread half of the parboiled Basmati rice evenly over the chicken layer.
- Drizzle half of the saffron-infused milk and half of the rose water/kewra water (if using) over this rice layer. Sprinkle a little more fried onions.
- If you removed some chicken masala, add it back now as a second chicken layer. Otherwise, proceed to the next rice layer.
- Spread the remaining parboiled rice evenly on top.
- Drizzle the remaining saffron-infused milk, rose water/kewra water, and the juice of 1/2 lemon over the top layer of rice.
- Garnish with the remaining fried onions, toasted slivered almonds, toasted cashews, and golden raisins (if using). You can also dot the top with a few small pieces of ghee for extra richness (optional).
H3: 5. The Dum (Steaming to Perfection)
- “Dum” is the process of slow-steaming the biryani, allowing the flavors to meld and the rice to finish cooking in the aromatic steam.
- Tightly cover the pot with a lid. To ensure a good seal, you can line the rim of the pot with a clean, damp kitchen towel before placing the lid, or use aluminum foil to cover the pot mouth and then place the lid on top. Some traditional methods involve sealing the lid to the pot with a dough made from flour and water.
- Place the sealed pot on a tawa (flat griddle) over low heat. If you don’t have a tawa, use the lowest possible heat setting on your stove. The tawa helps distribute the heat evenly and prevents the bottom layer from scorching.
- Cook on dum for 20-25 minutes. You should hear a gentle simmer and see steam trying to escape if the seal is good. The aroma will intensify.
H3: 6. Final Touches and Resting
- After the dum period, turn off the heat and let the biryani rest, still covered, for at least 15-20 minutes. This resting period is crucial. It allows the flavors to settle, the rice grains to firm up further, and prevents them from breaking when you serve.
- To serve, gently fluff the biryani from the sides of the pot using a large, flat spoon or spatula. Try to get a mix of the rice and chicken in each serving, ensuring the layers remain somewhat distinct.
Nutrition
- Serving Size: One Normal Portion
- Calories: 650-800