


Taco night is practically a sacred ritual in our house, a guaranteed way to bring smiles to everyone’s faces after a long week. For years, it meant the familiar sizzle of ground beef and the slightly chaotic assembly line of soft tortillas. But then, everything changed when I stumbled upon the idea of baked chicken tacos. Honestly, I was skeptical at first. Would they be dry? Would they lack that satisfying crunch? Let me tell you, the first time I pulled that sheet pan out of the oven, filled with perfectly golden, crispy-edged tacos stuffed with juicy, flavorful shredded chicken, I knew we’d found a new family favorite. The kids devoured them, my partner asked for seconds (and thirds!), and the cleanup? Infinitely easier than the usual taco explosion zone. These baked chicken tacos aren’t just a meal; they’re a weeknight game-changer – easy, relatively mess-free, endlessly customizable, and unbelievably delicious. They deliver all the taco joy with a delightful textural twist that makes them feel special every single time.
Ingredients for Perfect Baked Chicken Tacos
Making exceptional baked chicken tacos starts with quality ingredients. While you can certainly make substitutions based on your preferences or what you have on hand, this combination provides a fantastic balance of flavor and texture. Remember that the quality of your chicken and seasoning will significantly impact the final taste.
For the Chicken Filling:
- Chicken: 1.5 lbs (approx. 680g) boneless, skinless chicken breasts or thighs (thighs tend to be juicier, but breasts work great too)
- Olive Oil: 1 tablespoon
- Taco Seasoning: 2.5 tablespoons (use a good quality store-bought packet or your favorite homemade blend – see tips for a simple homemade version)
- Chicken Broth or Water: 1/4 cup (30ml) – helps create steam for cooking and adds moisture
- Lime Juice: 1 tablespoon (from about half a lime) – brightens the flavor after cooking
For Assembling the Tacos:
- Taco Shells: 12-15 Stand ‘n Stuff style hard taco shells OR 12-15 corn or small flour tortillas (if using tortillas, you’ll shape them during baking – see instructions)
- Refried Beans (Optional but Recommended): 1 can (approx. 15 oz / 425g), warmed. This acts as a delicious “glue” to hold the chicken in and adds flavor. Use black bean refried beans for a variation.
- Shredded Cheese: 1.5 – 2 cups (approx. 170-225g) Mexican blend, Cheddar, Monterey Jack, or Colby Jack. Choose a good melting cheese.
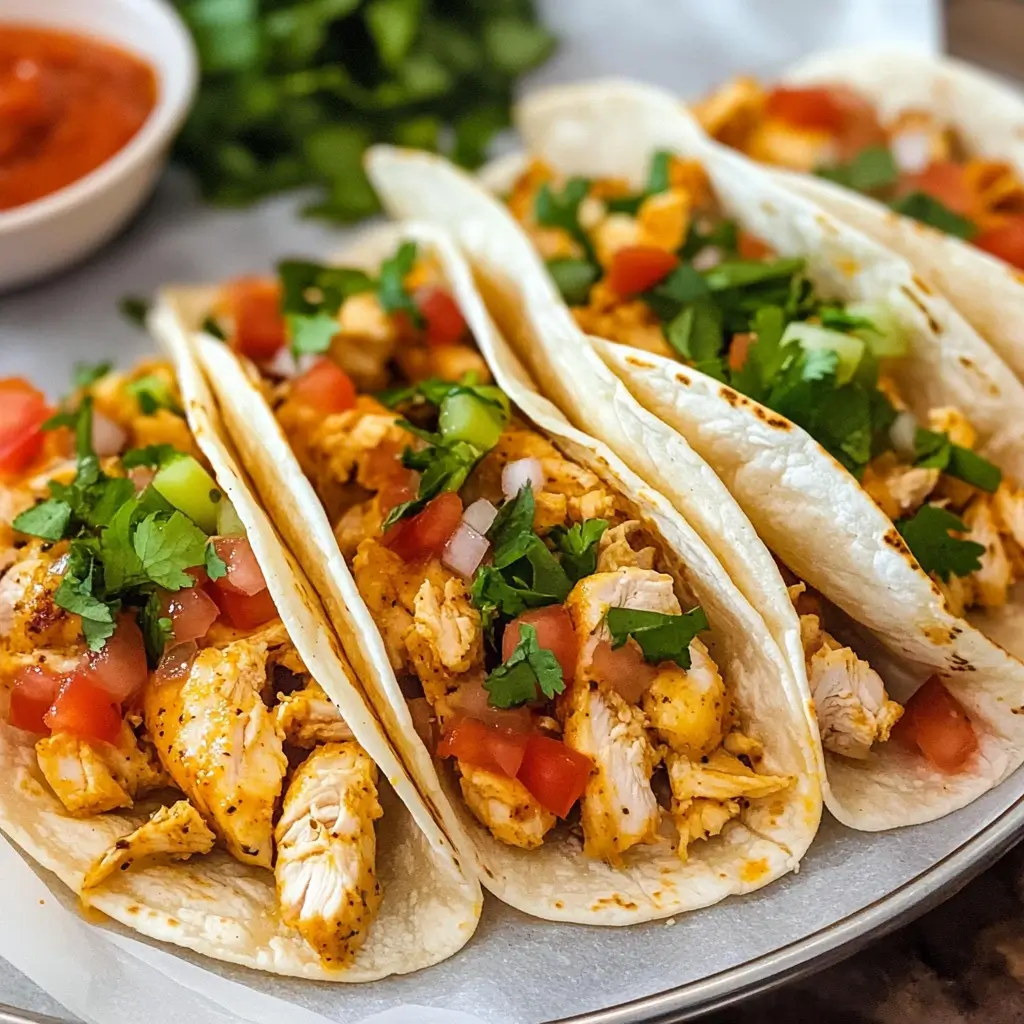
For Toppings (Suggestions – Choose your favorites!):
- Shredded Lettuce (Iceberg or Romaine)
- Diced Tomatoes
- Diced Red Onion or Sliced Green Onions
- Chopped Fresh Cilantro
- Salsa (mild, medium, hot, pico de gallo, salsa verde – variety is key!)
- Sour Cream or Plain Greek Yogurt
- Guacamole or Diced Avocado
- Pickled Jalapeños
- Black Olives, Sliced
- Cotija Cheese or Queso Fresco (for crumbling on top)
- Hot Sauce
Step-by-Step Instructions for Baking Chicken Tacos
Follow these detailed steps to ensure your baked chicken tacos are crispy, flavorful, and cooked to perfection. The process involves cooking and shredding the chicken first, then assembling and baking the tacos.
Part 1: Cooking and Shredding the Chicken
- Preheat Oven (for chicken): Preheat your oven to 400°F (200°C).
- Prepare Chicken: Pat the chicken breasts or thighs completely dry with paper towels. This helps the seasoning adhere better and promotes better searing if you choose to pan-sear first (optional). If the chicken pieces are very thick, you can slice them horizontally or pound them slightly thinner for more even cooking.
- Season Chicken: Place the chicken in a baking dish or on a rimmed baking sheet. Drizzle with the 1 tablespoon of olive oil. Sprinkle the taco seasoning evenly over all sides of the chicken, rubbing it in gently.
- Add Liquid: Pour the 1/4 cup of chicken broth or water into the bottom of the baking dish, around (not directly over) the chicken. This creates steam, helping the chicken cook through without drying out.
- Bake Chicken: Place the baking dish in the preheated oven. Bake for 20-30 minutes, or until the chicken is cooked through. The internal temperature should reach 165°F (74°C) when measured with a meat thermometer in the thickest part. Cooking time will vary depending on the thickness of the chicken pieces. Chicken thighs might take slightly longer than breasts.
- Rest Chicken: Once cooked, remove the chicken from the oven and let it rest in the baking dish for 5-10 minutes. This crucial step allows the juices to redistribute, resulting in more tender and flavorful meat. Don’t skip it!
- Shred Chicken: Transfer the rested chicken to a cutting board. Using two forks, shred the chicken into bite-sized pieces. Alternatively, you can use a stand mixer fitted with the paddle attachment on low speed for quick shredding (let it cool slightly first).
- Combine & Flavor: Place the shredded chicken back into the baking dish with any accumulated juices. Add the 1 tablespoon of fresh lime juice and toss everything together to combine. Taste and add a pinch more salt or taco seasoning if needed. Set the shredded chicken aside.
Part 2: Assembling and Baking the Tacos
- Adjust Oven Temperature: Reduce the oven temperature to 375°F (190°C).
- Prepare Baking Sheet: Line a large, rimmed baking sheet with parchment paper or aluminum foil for easier cleanup.
- Prepare Taco Shells/Tortillas:
- If using Stand ‘n Stuff Hard Shells: Arrange them standing up on the prepared baking sheet, leaving a little space between each shell. You might need two baking sheets depending on the size.
- If using Corn or Flour Tortillas: Warm the tortillas slightly first to make them pliable (wrap in damp paper towels and microwave for 20-30 seconds, or warm briefly in a dry skillet). Drape each tortilla over two bars of your oven rack for a few minutes before preheating for the tacos (or while the chicken cooks) until they just start to hold a U-shape, OR carefully fold them in half and arrange them nestled against each other on the baking sheet so they hold a taco shape. Baking them directly on the sheet from flat might make assembly harder. Another method is to use a specialized taco baking rack if you have one. Note: Baking tortillas into crispy shells takes practice; pre-formed hard shells are easier for beginners.
- Warm Refried Beans (if using): Gently warm the refried beans in a small saucepan over medium-low heat or in the microwave until spreadable.
- Assemble the Tacos:
- Bean Layer (Optional): If using refried beans, spread a thin layer (about 1-2 tablespoons) on the bottom inside surface of each taco shell or shaped tortilla. This creates a barrier and helps prevent the bottom from getting soggy, while also adding flavor.
- Chicken Layer: Generously spoon the shredded chicken mixture over the beans (or directly into the shell if not using beans), filling each shell about halfway to two-thirds full. Don’t overstuff, as this can make them hard to handle and prevent even crisping.
- Cheese Layer: Sprinkle a generous amount of shredded cheese over the chicken filling in each taco. Ensure some cheese reaches the edges, as it will melt and help seal the taco slightly while adding delicious crispy bits.
- Bake the Tacos: Carefully place the baking sheet(s) with the assembled tacos into the preheated 375°F (190°C) oven. Bake for 8-12 minutes. You’re looking for the shells to be heated through and slightly more golden, the cheese to be completely melted and bubbly, and the edges perhaps slightly browned. Keep a close eye on them during the last few minutes to prevent burning, especially the edges of the shells.
- Cool Slightly: Remove the baking sheet from the oven. Let the tacos cool for a minute or two before attempting to move them, as they will be very hot, and the cheese needs a moment to set slightly.
Nutritional Information (Estimated)
Please note that these values are estimates and can vary significantly based on the specific ingredients used (e.g., type of chicken, amount of cheese, type of tortilla/shell, brand of taco seasoning, added toppings).
- Servings: This recipe typically makes 12-15 tacos. Assuming 3 tacos per serving, it yields 4-5 servings.
- Calories Per Serving (Approx. 3 Tacos, Filling & Cheese Only): 450-550 calories.
- This estimate primarily accounts for the chicken, seasoning, oil, beans (if used), and cheese within the baked taco itself. Toppings will add additional calories, fat, carbohydrates, and nutrients. Lean chicken breasts, less cheese, and skipping the refried beans will lower the calorie count. Using chicken thighs and more cheese will increase it.
Preparation and Cooking Time
Understanding the time commitment helps plan your meal, especially on busy weeknights.
- Preparation Time: 20 minutes (Includes seasoning chicken, preparing shells/tortillas, shredding cheese if not pre-shredded, warming beans, assembling tacos)
- Cooking Time:
- Chicken Baking: 20-30 minutes
- Chicken Resting: 5-10 minutes
- Taco Baking: 8-12 minutes
- Total Time: Approximately 55 minutes to 1 hour 15 minutes (depending on chicken cooking time and efficiency)
How to Serve Your Delicious Baked Chicken Tacos
Serving these tacos is half the fun! Presentation and accompaniment choices can elevate the entire meal. Here’s how to make your baked chicken taco night a memorable experience:
- The Taco Bar Approach: This is the most interactive and crowd-pleasing method.
- Carefully transfer the hot baked tacos from the baking sheet to a platter or arrange them back on the (cooled slightly) baking sheet for serving.
- Set up a “toppings bar” with small bowls filled with all your chosen toppings. Arrange them logically (e.g., lettuce, tomatoes, onions first, followed by sauces, creams, and extras).
- Provide serving spoons for each topping.
- Let everyone customize their own tacos right before eating. This ensures toppings stay fresh and tacos don’t get soggy sitting around.
- Essential Toppings (Suggestions):
- Cool & Fresh: Shredded iceberg or romaine lettuce, diced ripe tomatoes, finely diced red onion, chopped fresh cilantro.
- Creamy & Rich: Sour cream, plain Greek yogurt (a lighter alternative), guacamole, or simple mashed avocado with lime and salt.
- Sauces & Spice: Your favorite salsa (pico de gallo, roasted tomato salsa, salsa verde), pickled jalapeños (sliced), your preferred hot sauce.
- Cheesy Extras: Crumbled Cotija cheese or queso fresco adds a salty, authentic finish.
- Other Fun Additions: Sliced black olives, corn salsa (canned corn, black beans, red onion, cilantro, lime juice), quick-pickled red onions.
- Perfect Side Dishes: While the tacos are hearty, a few sides round out the meal beautifully.
- Mexican Rice: A classic pairing. Make your own or use a quality store-bought mix.
- Beans: Refried beans (if not used inside the tacos) or simple black beans seasoned with cumin and lime juice.
- Cilantro-Lime Slaw: A bright, crunchy slaw offers a refreshing contrast to the rich tacos.
- Mexican Street Corn Salad (Esquites): A creamy, cheesy, tangy corn salad is always a hit.
- Simple Green Salad: A light salad with a vinaigrette dressing.
- Chips and Dips: Tortilla chips served with extra salsa, guacamole, or queso dip.
- Drinks:
- Classic: Margaritas (on the rocks or frozen), Mexican beers (like Corona, Modelo, Dos Equis) served with a lime wedge.
- Non-Alcoholic: Agua Frescas (like horchata or Jamaica), sparkling water with lime, Mexican Coca-Cola.
Pro Tips for Even Better Baked Chicken Tacos
Take your baked chicken tacos from great to absolutely amazing with these simple tips:
- Don’t Skip the Rest: Letting the chicken rest after baking before shredding is crucial. It allows the juices to redistribute throughout the meat. Shredding immediately forces the moisture out, potentially resulting in drier chicken, even if cooked perfectly.
- Homemade Taco Seasoning Power: While store-bought packets are convenient, making your own taco seasoning allows you to control the salt level and flavor profile. A simple blend: combine 2 tbsp chili powder, 1 tbsp cumin, 1 tsp smoked paprika, 1 tsp garlic powder, 1 tsp onion powder, 1/2 tsp oregano, 1/4-1/2 tsp cayenne pepper (optional), 1 tsp salt, and 1/2 tsp black pepper. Adjust to your taste! Make a larger batch and store it in an airtight container.
- The Refried Bean Barrier: Using that thin layer of warmed refried beans inside the shell before adding the chicken does wonders for preventing sogginess. It creates a moisture barrier between the juicy chicken and the crispy shell, helping the bottom stay crispier for longer. Black bean refried beans work just as well.
- Cheese Placement Matters: Don’t just dump the cheese in the middle. Make sure to sprinkle it evenly over the chicken and allow some to reach the edges of the taco shell. As it melts, it creates little crispy, cheesy bits (“frico”) on the edges and helps hold the filling together slightly.
- Warm Your Tortillas (if using soft): If you’re opting to bake soft corn or flour tortillas into shape instead of using pre-formed hard shells, warming them first is essential. Cold tortillas will crack and break when you try to fold or shape them. A quick zap in the microwave (wrapped in damp paper towels) or a few seconds in a warm skillet makes them pliable and much easier to work with.
Frequently Asked Questions (FAQ) about Baked Chicken Tacos
Here are answers to some common questions about making this delicious baked chicken taco recipe:
- Can I use a different type of meat?
- Absolutely! This baking method works well with other ground or shredded meats. Try shredded beef (chuck roast cooked low and slow with Mexican spices), shredded pork (carnitas style), or even seasoned ground turkey or ground beef (browned first, then drained). For a vegetarian option, use seasoned black beans, lentils, or a crumbled plant-based ground substitute mixed with sautéed vegetables like peppers and onions. Adjust cooking times as needed for different proteins.
- How do I prevent the tacos from getting soggy?
- Several things help: Use the refried bean layer as a barrier. Don’t overstuff the tacos. Ensure the chicken filling isn’t overly wet (drain any excess liquid if necessary before assembling). Bake until the shells are truly crisp and the cheese is well-melted. Serve immediately after baking, and set up a toppings bar so toppings are added just before eating. Avoid adding very wet toppings like salsa inside the taco before baking.
- Can I make these ahead of time?
- You can definitely prepare components ahead! Cook and shred the chicken up to 2-3 days in advance and store it in an airtight container in the refrigerator. You can also pre-chop toppings like lettuce, tomato, and onion. However, it’s best to assemble and bake the tacos just before serving to maintain maximum crispiness. Reheating fully assembled and baked tacos often results in a less crispy texture. If you must reheat, use an oven or air fryer at around 350°F (175°C) until warmed through, but manage expectations regarding crispness.
- What’s the best kind of tortilla/shell to use?
- For the easiest and most reliably crispy result, “Stand ‘n Stuff” style hard taco shells (the ones with the flat bottom) are excellent because they stand up on their own on the baking sheet. Regular U-shaped hard shells also work but might need support. If using soft tortillas (corn or small flour), corn tortillas tend to yield a slightly crispier, more authentic result when baked, but they need to be warmed first to become pliable. Flour tortillas will become slightly chewy-crisp. Choose based on your preference and willingness to shape them.
- How can I adjust the spice level?
- You have several points of control:
- Taco Seasoning: Use a mild store-bought packet or adjust the amount of chili powder and cayenne pepper in a homemade blend. Start with less heat and you can always add more.
- Chicken: Add a pinch of cayenne or red pepper flakes to the chicken while seasoning it before baking.
- Toppings: Offer hot salsa, fresh or pickled jalapeños, or your favorite hot sauce on the side for those who like extra heat, allowing everyone to customize their own spice level. This is often the easiest way to cater to different preferences.
- You have several points of control:

Baked Chicken Tacos Recipe
Ingredients
For the Chicken Filling:
- Chicken: 1.5 lbs (approx. 680g) boneless, skinless chicken breasts or thighs (thighs tend to be juicier, but breasts work great too)
- Olive Oil: 1 tablespoon
- Taco Seasoning: 2.5 tablespoons (use a good quality store-bought packet or your favorite homemade blend – see tips for a simple homemade version)
- Chicken Broth or Water: 1/4 cup (30ml) – helps create steam for cooking and adds moisture
- Lime Juice: 1 tablespoon (from about half a lime) – brightens the flavor after cooking
For Assembling the Tacos:
- Taco Shells: 12-15 Stand ‘n Stuff style hard taco shells OR 12-15 corn or small flour tortillas (if using tortillas, you’ll shape them during baking – see instructions)
- Refried Beans (Optional but Recommended): 1 can (approx. 15 oz / 425g), warmed. This acts as a delicious “glue” to hold the chicken in and adds flavor. Use black bean refried beans for a variation.
- Shredded Cheese: 1.5 – 2 cups (approx. 170-225g) Mexican blend, Cheddar, Monterey Jack, or Colby Jack. Choose a good melting cheese.
Instructions
Part 1: Cooking and Shredding the Chicken
- Preheat Oven (for chicken): Preheat your oven to 400°F (200°C).
- Prepare Chicken: Pat the chicken breasts or thighs completely dry with paper towels. This helps the seasoning adhere better and promotes better searing if you choose to pan-sear first (optional). If the chicken pieces are very thick, you can slice them horizontally or pound them slightly thinner for more even cooking.
- Season Chicken: Place the chicken in a baking dish or on a rimmed baking sheet. Drizzle with the 1 tablespoon of olive oil. Sprinkle the taco seasoning evenly over all sides of the chicken, rubbing it in gently.
- Add Liquid: Pour the 1/4 cup of chicken broth or water into the bottom of the baking dish, around (not directly over) the chicken. This creates steam, helping the chicken cook through without drying out.
- Bake Chicken: Place the baking dish in the preheated oven. Bake for 20-30 minutes, or until the chicken is cooked through. The internal temperature should reach 165°F (74°C) when measured with a meat thermometer in the thickest part. Cooking time will vary depending on the thickness of the chicken pieces. Chicken thighs might take slightly longer than breasts.
- Rest Chicken: Once cooked, remove the chicken from the oven and let it rest in the baking dish for 5-10 minutes. This crucial step allows the juices to redistribute, resulting in more tender and flavorful meat. Don’t skip it!
- Shred Chicken: Transfer the rested chicken to a cutting board. Using two forks, shred the chicken into bite-sized pieces. Alternatively, you can use a stand mixer fitted with the paddle attachment on low speed for quick shredding (let it cool slightly first).
- Combine & Flavor: Place the shredded chicken back into the baking dish with any accumulated juices. Add the 1 tablespoon of fresh lime juice and toss everything together to combine. Taste and add a pinch more salt or taco seasoning if needed. Set the shredded chicken aside.
Part 2: Assembling and Baking the Tacos
- Adjust Oven Temperature: Reduce the oven temperature to 375°F (190°C).
- Prepare Baking Sheet: Line a large, rimmed baking sheet with parchment paper or aluminum foil for easier cleanup.
- Prepare Taco Shells/Tortillas:
- If using Stand ‘n Stuff Hard Shells: Arrange them standing up on the prepared baking sheet, leaving a little space between each shell. You might need two baking sheets depending on the size.
- If using Corn or Flour Tortillas: Warm the tortillas slightly first to make them pliable (wrap in damp paper towels and microwave for 20-30 seconds, or warm briefly in a dry skillet). Drape each tortilla over two bars of your oven rack for a few minutes before preheating for the tacos (or while the chicken cooks) until they just start to hold a U-shape, OR carefully fold them in half and arrange them nestled against each other on the baking sheet so they hold a taco shape. Baking them directly on the sheet from flat might make assembly harder. Another method is to use a specialized taco baking rack if you have one. Note: Baking tortillas into crispy shells takes practice; pre-formed hard shells are easier for beginners.
- Warm Refried Beans (if using): Gently warm the refried beans in a small saucepan over medium-low heat or in the microwave until spreadable.
- Assemble the Tacos:
- Bean Layer (Optional): If using refried beans, spread a thin layer (about 1-2 tablespoons) on the bottom inside surface of each taco shell or shaped tortilla. This creates a barrier and helps prevent the bottom from getting soggy, while also adding flavor.
- Chicken Layer: Generously spoon the shredded chicken mixture over the beans (or directly into the shell if not using beans), filling each shell about halfway to two-thirds full. Don’t overstuff, as this can make them hard to handle and prevent even crisping.
- Cheese Layer: Sprinkle a generous amount of shredded cheese over the chicken filling in each taco. Ensure some cheese reaches the edges, as it will melt and help seal the taco slightly while adding delicious crispy bits.
- Bake the Tacos: Carefully place the baking sheet(s) with the assembled tacos into the preheated 375°F (190°C) oven. Bake for 8-12 minutes. You’re looking for the shells to be heated through and slightly more golden, the cheese to be completely melted and bubbly, and the edges perhaps slightly browned. Keep a close eye on them during the last few minutes to prevent burning, especially the edges of the shells.
- Cool Slightly: Remove the baking sheet from the oven. Let the tacos cool for a minute or two before attempting to move them, as they will be very hot, and the cheese needs a moment to set slightly.
Nutrition
- Serving Size: one normal portion
- Calories: 450-550


