


There are certain meals that just scream “cozy family dinner,” and for the longest time, stuffed peppers were at the top of that list for me. However, I always had a little problem with them. As our family started leaning towards healthier, lower-carb meals, the traditional rice-heavy filling became a sticking point. The rice often felt like a filler, sometimes coming out a bit gummy or, worse, undercooked. I wanted all the savory, cheesy goodness of a classic stuffed pepper but with a filling that was packed with flavor, protein, and vegetables, not just starchy carbs. After several attempts, tweaking seasonings, and experimenting with different fillers, I finally landed on this recipe. This is, without a doubt, the one. The secret? Finely riced cauliflower. It perfectly mimics the texture of rice, soaking up all the delicious juices from the meat and tomatoes without adding heaviness. The first time I served these, I didn’t even mention the absence of rice. My husband, a notorious comfort food purist, took one bite and his eyes lit up. He declared them the best stuffed peppers he’d ever had. The kids cleaned their plates without a single complaint. It was a massive win, and now this recipe is a permanent fixture in our monthly meal rotation. It’s hearty, incredibly flavorful, and secretly packed with extra veggies, making it a dish you can feel genuinely good about serving.
The Best Stuffed Peppers Without Rice
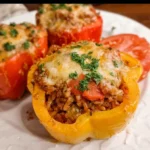
This recipe transforms a classic comfort food into a modern, healthy, and incredibly satisfying meal. By swapping traditional rice for cauliflower rice and loading the filling with savory ground beef, rich tomato sauce, and melted cheese, you get a dish that’s both keto-friendly and universally loved.
Ingredients
- Bell Peppers: 6 large, uniform-sized bell peppers (a mix of colors like red, yellow, and orange works best for sweetness and visual appeal)
- Ground Beef: 2 lbs (900g) lean ground beef (90/10 or 85/15)
- Olive Oil: 2 tablespoons, extra virgin
- Onion: 1 large yellow onion, finely chopped
- Garlic: 4 cloves, minced
- Cauliflower: 1 medium head of cauliflower, riced (about 4 cups of cauliflower rice), or one 16 oz bag of frozen riced cauliflower
- Diced Tomatoes: 1 can (15 oz / 425g), drained
- Tomato Sauce: 1 can (8 oz / 225g)
- Italian Seasoning: 2 teaspoons, dried
- Smoked Paprika: 1 teaspoon
- Salt: 1 ½ teaspoons, or to taste
- Black Pepper: 1 teaspoon, freshly ground
- Worcestershire Sauce: 1 tablespoon (optional, but adds great depth)
- Cheese: 2 cups shredded mozzarella or an Italian cheese blend, divided
- Fresh Parsley: ¼ cup, chopped, for garnish (optional)
Instructions
Follow these detailed steps to create perfectly cooked, flavorful stuffed peppers every time. The key is to build layers of flavor from the very beginning.
Step 1: Prepare the Bell Peppers
- Preheat Oven: Adjust your oven rack to the middle position and preheat to 400°F (200°C).
- Cut and Clean: Slice the bell peppers in half lengthwise, from stem to bottom. Use a small knife to carefully remove the seeds and white membranes from each half. The goal is to create 12 stable “boats” for your filling.
- Pre-Bake the Peppers: Place the pepper halves, cut side up, in a large 9×13 inch baking dish or on a baking sheet. Drizzle them lightly with about 1 tablespoon of olive oil and sprinkle with a pinch of salt and pepper. Bake for 15-20 minutes. This pre-baking step is crucial—it softens the peppers so they become tender and sweet, and it helps prevent the final dish from becoming watery. Once done, remove them from the oven and set them aside. Reduce the oven temperature to 375°F (190°C).
Step 2: Create the Savory Filling
- Sauté Aromatics: While the peppers are pre-baking, heat the remaining 1 tablespoon of olive oil in a large skillet or Dutch oven over medium-high heat. Add the finely chopped onion and cook for 5-7 minutes, stirring occasionally, until it becomes soft and translucent. Add the minced garlic and cook for another minute until fragrant.
- Brown the Meat: Add the ground beef to the skillet. Use a wooden spoon or spatula to break it up into smaller crumbles. Cook until the beef is fully browned and no pink remains, which should take about 8-10 minutes. Drain off any excess grease from the pan.
- Incorporate Vegetables and Seasonings: Add the riced cauliflower to the skillet with the beef and onions. Cook for 5-7 minutes, stirring frequently, until the cauliflower has softened and released some of its moisture. This step is important for developing flavor and preventing a soggy filling.
- Add Sauces and Spices: Stir in the drained diced tomatoes, tomato sauce, Italian seasoning, smoked paprika, salt, pepper, and Worcestershire sauce (if using). Bring the mixture to a simmer and let it cook for about 5 minutes, allowing the flavors to meld together. The filling should be thick and savory.
- Stir in the Cheese: Remove the skillet from the heat. Stir in 1 cup of the shredded mozzarella cheese. This makes the filling extra rich and helps it bind together beautifully. Taste the filling and adjust seasonings if needed—it should be well-seasoned and delicious on its own.
Step 3: Assemble and Bake
- Fill the Peppers: Carefully drain any water that may have collected in the bottom of the pre-baked pepper halves. Arrange them snugly in your 9×13 inch baking dish. Generously spoon the meat and cauliflower mixture into each pepper half, mounding it slightly on top.
- Add Topping: If you have any leftover tomato sauce, you can pour a thin layer into the bottom of the baking dish around the peppers to keep them moist. Sprinkle the remaining 1 cup of shredded cheese evenly over the tops of all the stuffed peppers.
- Bake to Perfection: Cover the baking dish loosely with aluminum foil. This prevents the cheese from burning before the peppers are heated through. Bake at 375°F (190°C) for 20-25 minutes.
- Brown the Cheese: Remove the foil and continue to bake for another 10-15 minutes, or until the filling is bubbly and heated through, and the cheese on top is melted, golden, and slightly browned. For an extra crispy, browned top, you can place the dish under the broiler for 1-2 minutes at the very end—watch it carefully to prevent burning!
- Rest and Garnish: Let the stuffed peppers rest for at least 5-10 minutes before serving. This allows them to set up and makes them easier to serve. Garnish with fresh chopped parsley for a pop of color and freshness.
Nutrition Facts
- Servings: 6 (2 pepper halves per serving)
- Calories per serving: Approximately 520 kcal
Disclaimer: The nutritional information provided is an estimate and can vary based on the specific ingredients used, such as the lean-to-fat ratio of the ground beef and the type of cheese.
Preparation Time
- Prep Time: 25 minutes
- Cook Time: 50 minutes
- Total Time: 1 hour 15 minutes
How to Serve Your Stuffed Peppers
These low-carb stuffed peppers are so hearty they can easily stand as a complete meal on their own. However, if you want to round out your dinner table, here are some excellent serving suggestions that complement the dish perfectly.
- For a Light, Fresh Pairing:
- Simple Green Salad: A crisp salad with leafy greens, cucumber, and cherry tomatoes tossed in a light lemon vinaigrette or a tangy balsamic glaze provides a refreshing contrast to the rich, savory peppers.
- Steamed Green Beans: A side of simple steamed or blanched green beans tossed with a little butter, lemon zest, and toasted almonds adds a wonderful crunch and a touch of elegance.
- For a Hearty, Comforting Meal:
- Cauliflower Mash: To stick with the low-carb theme, serve the peppers alongside a creamy garlic and herb cauliflower mash. It’s the perfect keto-friendly substitute for mashed potatoes and is fantastic for soaking up any extra sauce.
- Roasted Vegetables: A medley of roasted root vegetables (if not strictly low-carb) or other keto-friendly options like roasted broccoli, asparagus, or Brussels sprouts brings out even more caramelized, sweet flavors that pair beautifully with the peppers.
- For Garnishes and Toppings:
- Sour Cream or Greek Yogurt: A dollop of full-fat sour cream or plain Greek yogurt on top adds a cool, creamy tang that balances the warmth and richness of the filling.
- Extra Fresh Herbs: In addition to parsley, a sprinkle of fresh basil or chives right before serving can elevate the flavors even more.
- A Drizzle of High-Quality Olive Oil: A final, light drizzle of extra virgin olive oil over the top just before serving adds a touch of fruity, peppery brightness.
Additional Tips for Stuffed Pepper Perfection
Take your rice-free stuffed peppers from great to absolutely unforgettable with these five expert tips.
- Don’t Skip Pre-Baking the Peppers: This is arguably the most important tip for avoiding the two most common stuffed pepper pitfalls: watery results and crunchy, undercooked peppers. Roasting the peppers for 15-20 minutes before filling does two things. First, it begins the cooking process, ensuring they will be perfectly tender and soft by the end. Second, it allows them to release some of their natural water content, which you can then drain away. This concentrates their sweet flavor and prevents that dreaded pool of water from forming at the bottom of your baking dish.
- Choose the Right Peppers and Cut Them Correctly: For the most stable and easy-to-fill peppers, look for large, blocky bell peppers with a relatively flat bottom. Red, yellow, and orange peppers are generally sweeter and contain less water than green peppers, making them ideal for this recipe. When you slice them in half lengthwise (from stem to base), you create a wider, more stable “boat” that holds more filling and sits upright in the pan better than peppers that are hollowed out from the top.
- Taste and Season the Filling Aggressively: The filling is the heart of the dish. Remember that its flavor will be slightly diluted once it’s baked inside the milder bell pepper. Therefore, it’s crucial to taste the filling after you’ve mixed everything together but before you stuff the peppers. It should taste boldly seasoned and delicious enough to eat with a spoon right out of the skillet. Don’t be shy with the salt, pepper, and Italian seasoning. If it tastes a little bland in the pan, it will definitely taste bland in the final dish.
- Master the Make-Ahead Method for Easy Weeknights: These stuffed peppers are a meal prepper’s dream. You can fully assemble them a day or two in advance. Just prepare the peppers and the filling, stuff them, place them in the baking dish, cover tightly with plastic wrap, and refrigerate. When you’re ready to eat, simply remove the plastic wrap, cover with foil, and add about 10-15 minutes to the initial baking time. You can also freeze them for a future meal. See the FAQ below for detailed freezing instructions.
- Achieve the Perfect Cheesy Crust: For that glorious, golden-brown, bubbly cheese topping, timing and technique matter. Don’t add all the cheese at the beginning of the bake. Instead, mix half of it into the filling to make it creamy and use the other half for the topping. Cover the dish with foil for the first 20-25 minutes of baking to gently heat everything through without burning the cheese. Then, remove the foil for the last 10-15 minutes to allow the cheese to melt and turn golden. If you love a slightly crispy, browned top, switch the oven to the high broil setting for the last 1-2 minutes of cooking. Watch it like a hawk, as it can go from golden to burnt in seconds!
Frequently Asked Questions (FAQ)
Here are answers to some of the most common questions about making stuffed peppers without rice.
1. Can I make these stuffed peppers vegetarian or vegan?
Absolutely! This recipe is incredibly versatile. For a vegetarian version, you can replace the 2 lbs of ground beef with a hearty plant-based alternative. Excellent options include:
- Lentils: Use 2 cups of cooked brown or green lentils.
- Mushrooms: Finely chop 16 oz of cremini mushrooms and sauté them until they release their liquid and start to brown.
- Plant-Based Ground: Use your favorite brand of plant-based meat crumbles.
For a fully vegan version, simply use one of the vegetarian options above and substitute the mozzarella with your favorite dairy-free shredded cheese.
2. Why are my stuffed peppers watery, and how can I prevent it?
Watery stuffed peppers are a common issue, usually caused by the high water content in the bell peppers themselves. There are two key steps in this recipe designed to prevent this. First, pre-baking the peppers allows them to release a significant amount of water, which you can then pour out before filling them. Second, cooking the cauliflower rice in the skillet with the meat before adding the sauce helps cook off its moisture as well. Following these two steps will result in a rich, thick filling and perfectly tender, not watery, peppers.
3. How do I properly store and reheat leftovers?
Leftover stuffed peppers store beautifully and often taste even better the next day!
- Storage: Allow the peppers to cool completely, then place them in an airtight container in the refrigerator for up to 4 days.
- Reheating in the Oven (Recommended): Place the peppers in a small baking dish, cover with foil, and reheat in a 350°F (175°C) oven for about 15-20 minutes, or until heated through.
- Reheating in the Microwave: For a quicker option, place a pepper half on a microwave-safe plate and heat for 2-3 minutes, or until hot. The texture will be slightly softer than when reheated in the oven.
4. Can I freeze stuffed peppers?
Yes, these are fantastic for freezing! You have two options:
- Freezing Uncooked: Assemble the peppers completely but do not bake them. Place the stuffed peppers on a baking sheet and flash-freeze for 1-2 hours until solid. Then, transfer them to a freezer-safe bag or container. They can be frozen for up to 3 months. To cook, bake from frozen, covering with foil and adding about 30-40 minutes to the total baking time.
- Freezing Cooked: Allow the baked peppers to cool completely. Freeze them using the same flash-freezing method described above. To reheat, thaw them overnight in the refrigerator and then bake at 350°F (175°C) for 20-25 minutes until heated through.
5. Is this recipe strictly keto-friendly?
Yes, this recipe was designed to be low-carb and keto-friendly. Bell peppers, onions, and tomatoes do contain some natural carbs, but when distributed across six servings, the net carb count remains low. The filling uses cauliflower rice instead of a grain, and the main components are protein and fat from the beef and cheese. To ensure it fits your specific macros, use a 90/10 or 85/15 ground beef, full-fat cheese, and be mindful of the sugar content in your chosen tomato sauce (look for brands with no added sugar). This dish is a perfect example of how to enjoy a satisfying, classic comfort food while adhering to a ketogenic lifestyle.
Best Stuffed Peppers Without Rice Recipe
Ingredients
- Bell Peppers: 6 large, uniform-sized bell peppers (a mix of colors like red, yellow, and orange works best for sweetness and visual appeal)
- Ground Beef: 2 lbs (900g) lean ground beef (90/10 or 85/15)
- Olive Oil: 2 tablespoons, extra virgin
- Onion: 1 large yellow onion, finely chopped
- Garlic: 4 cloves, minced
- Cauliflower: 1 medium head of cauliflower, riced (about 4 cups of cauliflower rice), or one 16 oz bag of frozen riced cauliflower
- Diced Tomatoes: 1 can (15 oz / 425g), drained
- Tomato Sauce: 1 can (8 oz / 225g)
- Italian Seasoning: 2 teaspoons, dried
- Smoked Paprika: 1 teaspoon
- Salt: 1 ½ teaspoons, or to taste
- Black Pepper: 1 teaspoon, freshly ground
- Worcestershire Sauce: 1 tablespoon (optional, but adds great depth)
- Cheese: 2 cups shredded mozzarella or an Italian cheese blend, divided
- Fresh Parsley: ¼ cup, chopped, for garnish (optional)
Instructions
Step 1: Prepare the Bell Peppers
- Preheat Oven: Adjust your oven rack to the middle position and preheat to 400°F (200°C).
- Cut and Clean: Slice the bell peppers in half lengthwise, from stem to bottom. Use a small knife to carefully remove the seeds and white membranes from each half. The goal is to create 12 stable “boats” for your filling.
- Pre-Bake the Peppers: Place the pepper halves, cut side up, in a large 9×13 inch baking dish or on a baking sheet. Drizzle them lightly with about 1 tablespoon of olive oil and sprinkle with a pinch of salt and pepper. Bake for 15-20 minutes. This pre-baking step is crucial—it softens the peppers so they become tender and sweet, and it helps prevent the final dish from becoming watery. Once done, remove them from the oven and set them aside. Reduce the oven temperature to 375°F (190°C).
Step 2: Create the Savory Filling
- Sauté Aromatics: While the peppers are pre-baking, heat the remaining 1 tablespoon of olive oil in a large skillet or Dutch oven over medium-high heat. Add the finely chopped onion and cook for 5-7 minutes, stirring occasionally, until it becomes soft and translucent. Add the minced garlic and cook for another minute until fragrant.
- Brown the Meat: Add the ground beef to the skillet. Use a wooden spoon or spatula to break it up into smaller crumbles. Cook until the beef is fully browned and no pink remains, which should take about 8-10 minutes. Drain off any excess grease from the pan.
- Incorporate Vegetables and Seasonings: Add the riced cauliflower to the skillet with the beef and onions. Cook for 5-7 minutes, stirring frequently, until the cauliflower has softened and released some of its moisture. This step is important for developing flavor and preventing a soggy filling.
- Add Sauces and Spices: Stir in the drained diced tomatoes, tomato sauce, Italian seasoning, smoked paprika, salt, pepper, and Worcestershire sauce (if using). Bring the mixture to a simmer and let it cook for about 5 minutes, allowing the flavors to meld together. The filling should be thick and savory.
- Stir in the Cheese: Remove the skillet from the heat. Stir in 1 cup of the shredded mozzarella cheese. This makes the filling extra rich and helps it bind together beautifully. Taste the filling and adjust seasonings if needed—it should be well-seasoned and delicious on its own.
Step 3: Assemble and Bake
- Fill the Peppers: Carefully drain any water that may have collected in the bottom of the pre-baked pepper halves. Arrange them snugly in your 9×13 inch baking dish. Generously spoon the meat and cauliflower mixture into each pepper half, mounding it slightly on top.
- Add Topping: If you have any leftover tomato sauce, you can pour a thin layer into the bottom of the baking dish around the peppers to keep them moist. Sprinkle the remaining 1 cup of shredded cheese evenly over the tops of all the stuffed peppers.
- Bake to Perfection: Cover the baking dish loosely with aluminum foil. This prevents the cheese from burning before the peppers are heated through. Bake at 375°F (190°C) for 20-25 minutes.
- Brown the Cheese: Remove the foil and continue to bake for another 10-15 minutes, or until the filling is bubbly and heated through, and the cheese on top is melted, golden, and slightly browned. For an extra crispy, browned top, you can place the dish under the broiler for 1-2 minutes at the very end—watch it carefully to prevent burning!
- Rest and Garnish: Let the stuffed peppers rest for at least 5-10 minutes before serving. This allows them to set up and makes them easier to serve. Garnish with fresh chopped parsley for a pop of color and freshness.
Nutrition
- Serving Size: One Normal Portion
- Calories: 520 kcal


