
There are certain recipes that become legends in a family’s dinner rotation, and in my house, this Beef Burrito Casserole is the reigning champion. I still remember the first time I made it on a chaotic Tuesday night. I was scrambling for something that would be quick, satisfying, and—most importantly—something my kids would actually eat without complaint. I had ground beef, a can of beans, some tortillas, and a block of cheese. What started as a “let’s see what happens” experiment quickly transformed into a bubbling, cheesy, flavor-packed masterpiece that had everyone asking for seconds. The aroma of seasoned beef and melting cheese filled the kitchen, and when I pulled that golden-brown casserole from the oven, I knew I had a winner. It has all the comforting, savory flavors of a classic beef burrito, but deconstructed into an easy-to-serve, shareable dish that has since become our go-to for potlucks, game days, and those busy weeknights when you need a guaranteed win.
Why This Beef Burrito Casserole Will Become Your Favorite
Before we dive into the details, let’s talk about why this recipe is a cut above the rest. It’s more than just a meal; it’s a solution for busy families and a crowd-pleaser for any occasion.
- Incredibly Easy to Make: This is a one-pan-and-one-casserole-dish recipe. You brown the meat and create the filling in a single skillet, then layer it all into a baking dish. The cleanup is minimal, and the steps are straightforward enough for even beginner cooks.
- Packed with Flavor: We’re not just browning beef here. We build layers of flavor with savory onions, garlic, a rich blend of spices, tangy enchilada sauce, and hearty beans. Every single bite is a flavor explosion.
- Completely Customizable: This recipe is a fantastic template. You can swap the protein, add vegetables, adjust the spice level, or use different types of cheese and tortillas. I’ll provide plenty of ideas for variations further down!
- Perfect for Meal Prep: This casserole is a meal-prepper’s dream. You can assemble it completely a day or two in advance and just pop it in the oven when you’re ready to eat. It also freezes beautifully, making it perfect for stocking your freezer with homemade meals.
- A Certified Crowd-Pleaser: Whether you’re feeding picky kids or a group of hungry adults, this dish is always a hit. The combination of seasoned beef, soft tortillas, and gooey, melted cheese is universally loved.
Complete Recipe: The Ultimate Beef Burrito Casserole
Here is the full list of ingredients with precise amounts to ensure your casserole comes out perfectly every time.
Ingredients:
- For the Beef Filling:
- 1.5 lbs lean ground beef (85/15 or 90/10 works best)
- 1 large yellow onion, finely chopped
- 3-4 cloves garlic, minced
- 1 (15-ounce) can black beans, rinsed and drained
- 1 (15-ounce) can pinto beans, rinsed and drained (or use two cans of black beans)
- 1 (10-ounce) can red enchilada sauce (mild or medium, your preference)
- 1 (4-ounce) can diced green chiles, undrained
- 2 tablespoons olive oil
- For the Taco Seasoning (or 1 packet of store-bought):
- 1 tablespoon chili powder
- 1.5 teaspoons ground cumin
- 1 teaspoon smoked paprika
- 1 teaspoon dried oregano
- 1/2 teaspoon onion powder
- 1/2 teaspoon garlic powder
- 1/4 teaspoon cayenne pepper (optional, for a little heat)
- 1 teaspoon salt
- 1/2 teaspoon black pepper
- For Assembly:
- 8-10 large flour tortillas (8-inch or “burrito size”)
- 4 cups shredded Mexican cheese blend (a mix of Monterey Jack, Cheddar, and Colby)
- For Garnish (Optional but Recommended):
- Sour cream or plain Greek yogurt
- Chopped fresh cilantro
- Diced tomatoes
- Sliced jalapeños
- Sliced green onions
- Guacamole or diced avocado
Step-by-Step Instructions for Perfect Casserole
Follow these detailed instructions to guide you through creating this mouthwatering dish. The key is to build flavor at every stage.
Step 1: Prepare Your Pan and Aromatics
First, preheat your oven to 375°F (190°C). Lightly grease a 9×13-inch baking dish with non-stick spray or a thin layer of butter. This crucial step prevents the tortillas from sticking and makes cleanup much easier.
In a large skillet or Dutch oven, heat the olive oil over medium-high heat. Once the oil shimmers, add the finely chopped yellow onion. Sauté for 5-7 minutes, stirring occasionally, until the onion softens and becomes translucent. This isn’t just about cooking the onion; it’s about releasing its natural sweetness, which will form the flavor base of our entire dish. Once the onions are soft, add the minced garlic and cook for another minute until fragrant. Be careful not to burn the garlic, as it can become bitter.
Step 2: Brown the Beef and Add Spices
Add the ground beef to the skillet with the onions and garlic. Use a wooden spoon or spatula to break the meat apart into smaller crumbles. Cook for 8-10 minutes, or until the beef is fully browned and no pink remains. The browning process, known as the Maillard reaction, is essential for developing a deep, savory, and meaty flavor. Don’t rush this step!
Once the beef is browned, drain off any excess grease from the skillet. If you’re using leaner beef like 90/10, you may have very little grease to drain. Return the skillet to the heat. Now, it’s time for the spices. Sprinkle the chili powder, cumin, smoked paprika, oregano, onion powder, garlic powder, salt, pepper, and optional cayenne over the beef. Stir everything together until the meat is evenly coated. Let the spices toast with the meat for about 60 seconds. This wakes up the oils in the spices and makes their flavor much more vibrant and aromatic.
Step 3: Create the Hearty Filling
With your beef perfectly seasoned, it’s time to turn it into a saucy, irresistible filling. Pour the entire can of red enchilada sauce into the skillet. Add the rinsed and drained black beans, pinto beans, and the can of diced green chiles (with their liquid). The liquid from the chiles adds a subtle tang and moisture.
Stir everything together until well combined. Bring the mixture to a gentle simmer and let it cook for 3-5 minutes. This allows all the flavors to meld together beautifully. The sauce will thicken slightly, creating the perfect consistency for our casserole layers. Taste the filling at this point and adjust the seasoning if necessary. You might want a little more salt or an extra pinch of chili powder.
Step 4: Assemble the Casserole Layers
Now for the fun part: assembly! This is where the “burrito” aspect comes to life in casserole form.
- First Layer: Place a layer of tortillas on the bottom of your prepared 9×13-inch baking dish. You may need to cut or tear 3-4 tortillas to create an even layer that covers the entire bottom surface. Don’t worry about it looking perfect; it will all meld together in the oven.
- Second Layer: Spoon half of the beef and bean mixture evenly over the tortilla layer. Spread it out to the edges.
- Third Layer: Sprinkle approximately 1.5 cups of the shredded Mexican cheese blend over the beef filling.
- Repeat: Create another layer of tortillas on top of the cheese. Again, cut or overlap them as needed to cover the surface. Spoon the remaining half of the beef mixture over the tortillas and spread it evenly.
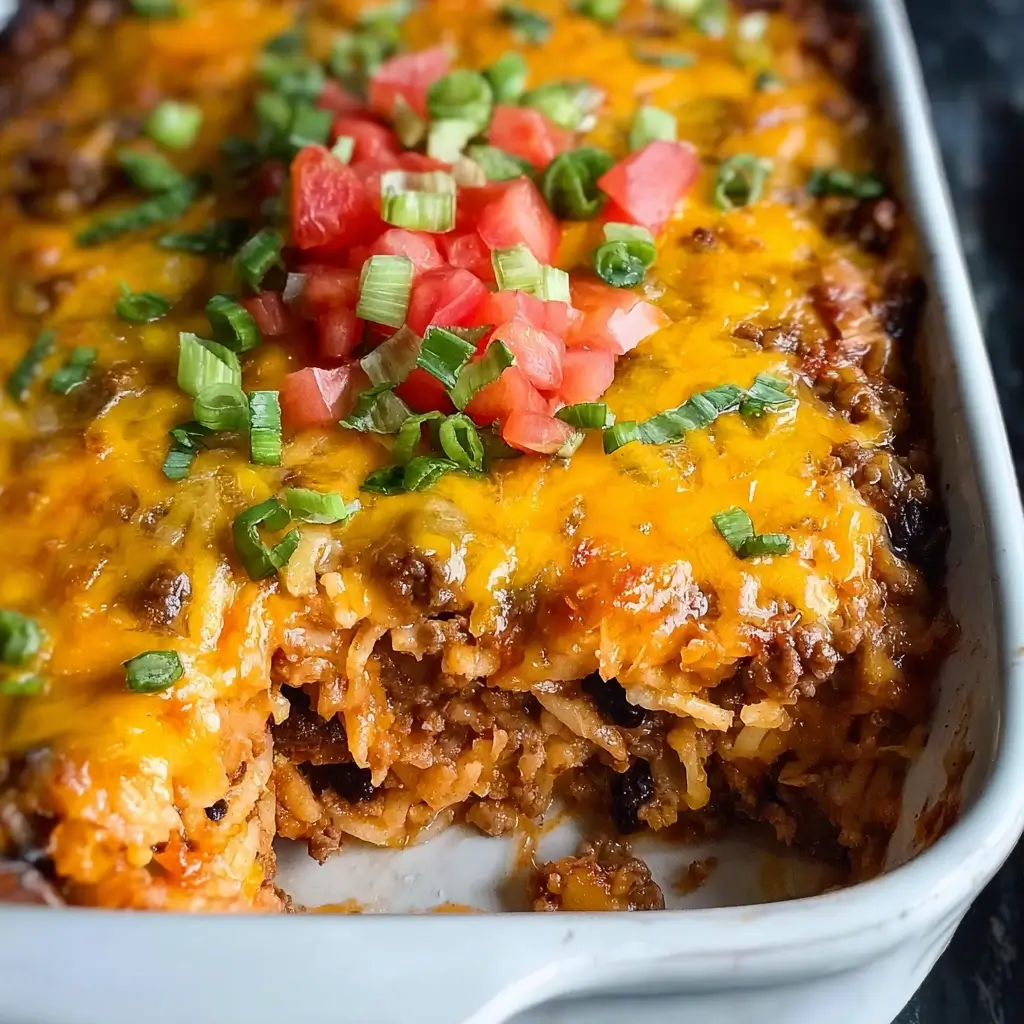
- Final Topping: Sprinkle the remaining 2.5 cups of cheese over the top, making sure to cover the entire surface right to the edges. This generous top layer will melt into a glorious, golden-brown, bubbly crust.
Step 5: Bake to Cheesy Perfection
Place the assembled casserole into your preheated 375°F (190°C) oven. Bake, uncovered, for 20-25 minutes. You’ll know it’s ready when the cheese on top is fully melted, bubbly, and starting to turn golden brown around the edges. The sauce may be bubbling up the sides of the dish—this is a very good sign!
Once baked, carefully remove the casserole from the oven. This is an important step: let it rest on a cooling rack for at least 10-15 minutes before serving. This resting period allows the casserole to set, making it much easier to cut into clean slices. If you cut into it immediately, the layers will be too molten and will fall apart.
Nutrition Facts
- Servings: 8 hearty servings
- Calories Per Serving: Approximately 580-620 kcal
Disclaimer: The nutritional information provided is an estimate and can vary based on the specific ingredients used (e.g., fat content of the beef, brand of enchilada sauce, and type of cheese).
Preparation Time
- Prep Time: 20 minutes (chopping vegetables, browning meat)
- Cook Time: 25 minutes (baking in the oven)
- Total Time: 45 minutes
How to Serve Your Beef Burrito Casserole
This casserole is a meal in itself, but serving it with a variety of toppings and simple side dishes elevates it from a simple dinner to a true feast. Think of it as a “toppings bar” experience.
Essential Toppings (Set them out in small bowls for everyone to customize their own serving):
- Cool & Creamy: A dollop of full-fat sour cream or plain Greek yogurt provides a cool, tangy contrast to the rich, savory casserole.
- Fresh & Zesty: Freshly chopped cilantro adds a bright, herbaceous note that cuts through the richness. A squeeze of fresh lime juice over the top also works wonders.
- Fresh Veggies: Diced Roma tomatoes, finely sliced green onions, or shredded iceberg lettuce add a refreshing crunch and texture.
- A Little Heat: For those who like it spicy, offer sliced fresh or pickled jalapeños.
- The Ultimate Extra: A scoop of guacamole or freshly diced avocado adds another layer of creamy, delicious flavor.
Perfect Side Dishes to Pair:
- Mexican Rice or Cilantro Lime Rice: A scoop of seasoned rice on the side is a classic pairing that helps soak up any extra sauce.
- Simple Corn Salad: A salad of corn kernels (fresh or frozen), diced red onion, bell pepper, cilantro, and a lime vinaigrette is a light and refreshing counterpoint.
- Refried Beans: While there are beans in the casserole, a side of creamy refried beans topped with a sprinkle of cotija cheese is always welcome.
- A Light Green Salad: A simple salad with a zesty cilantro-lime dressing can balance the heartiness of the main dish.
5 Additional Tips for Casserole Success
These expert tips will help you perfect your casserole and troubleshoot common issues.
- The Secret to No Soggy Tortillas: The key is to not use too much liquid. The enchilada sauce and the liquid from the chiles provide just enough moisture. If your beef filling seems overly “soupy,” let it simmer for a few extra minutes to allow more of the liquid to evaporate before assembling. This ensures the tortillas soften perfectly without turning to mush.
- Level Up Your Spices: The homemade taco seasoning blend is a game-changer. For an even deeper, smokier flavor, try substituting regular paprika with smoked sweet paprika and adding a pinch of chipotle chili powder for a smoky heat. Toasting the spices in the pan with the meat before adding liquids is a non-negotiable step for maximum flavor.
- Make-Ahead Magic: This recipe is ideal for preparing in advance. You can assemble the entire casserole, cover it tightly with plastic wrap or foil, and refrigerate it for up to 48 hours. When you’re ready to bake, remove it from the fridge for 30 minutes to take the chill off, then bake as directed, adding 5-10 minutes to the total baking time.
- Cheese is Key (Choose Wisely!): While a pre-shredded Mexican blend is convenient, shredding your own cheese from a block will yield a much better melt. Pre-shredded cheeses are coated in starches to prevent clumping, which can result in a slightly grainy texture when melted. A combination of sharp cheddar for flavor and Monterey Jack for its superior melting quality is a perfect choice.
- Don’t Skip the Rest: I mentioned it in the instructions, but it bears repeating. Letting the casserole rest for 10-15 minutes after baking is crucial. It allows the molten cheese and sauce to set, so when you slice into it, you get beautiful, distinct layers instead of a soupy pile. Patience will be rewarded with perfect servings.
Frequently Asked Questions (FAQ)
Here are answers to some of the most common questions about making Beef Burrito Casserole.
1. Can I make this casserole ahead of time and freeze it?
Absolutely! This casserole freezes exceptionally well. To freeze, assemble it completely in a freezer-safe baking dish (aluminum foil pans work great for this). Do not bake it. Cover it tightly with a layer of plastic wrap, followed by a layer of heavy-duty aluminum foil. Label it with the date and baking instructions. It can be frozen for up to 3 months. To bake, you can either thaw it in the refrigerator overnight and bake as directed, or bake it directly from frozen. If baking from frozen, cover with foil and bake at 375°F (190°C) for 45-50 minutes, then uncover and bake for another 15-20 minutes until hot and bubbly.
2. Is this recipe spicy? How can I adjust the heat level?
As written, this recipe is mild to medium, depending on your enchilada sauce. The heat comes primarily from the optional cayenne pepper and the diced green chiles (which are typically mild).
- To make it spicier: Use a medium or hot enchilada sauce, add a full teaspoon of cayenne pepper or a teaspoon of chipotle powder to the meat, and/or add a finely diced jalapeño (with seeds for more heat) to the skillet along with the onion.
- To make it milder: Use a mild enchilada sauce, omit the cayenne pepper entirely, and ensure your green chiles are labeled “mild.”
3. My casserole came out watery. What did I do wrong?
A watery casserole is usually caused by too much liquid in the filling. Here are the most common culprits:
- Not draining the beef: If you use beef with a higher fat content (like 80/20), it’s essential to drain off all the excess grease after browning.
- Not draining the beans: Make sure you rinse and drain your canned beans thoroughly. The liquid they are packed in can add unnecessary water.
- Sauce was too thin: If your enchilada sauce is particularly thin, or if you didn’t let the filling simmer long enough to thicken, the final result can be watery. Let the filling simmer for a few extra minutes on the stove before assembling.
4. What kind of tortillas are best for this casserole? Can I use corn tortillas?
Large flour tortillas (8-inch or burrito-size) are ideal for this recipe. They are pliable and hold up well to the sauce, softening into tender, noodle-like layers without disintegrating. You can certainly use corn tortillas for a more authentic, enchilada-style flavor and a gluten-free option. If using corn tortillas, it’s a good idea to lightly warm them first to make them more pliable and prevent cracking. You will also need more of them (around 16-18) to create the layers.
5. Can I make this low-carb or keto-friendly?
Yes, with a few smart substitutions, you can easily adapt this recipe. The main sources of carbs are the beans and tortillas.
- To make it low-carb: Omit the beans entirely. You can replace the volume with more ground beef or add low-carb vegetables like chopped mushrooms, bell peppers, or zucchini to the filling. Instead of flour tortillas, use low-carb or keto-friendly tortillas, which are widely available in most grocery stores. Layer them just as you would with regular tortillas. Be sure to use a sugar-free enchilada sauce. With these changes, you can create a delicious and satisfying low-carb version.

Cheesy Beef Burrito Casserole Recipe
Ingredients
- For the Beef Filling:
- 1.5 lbs lean ground beef (85/15 or 90/10 works best)
- 1 large yellow onion, finely chopped
- 3–4 cloves garlic, minced
- 1 (15-ounce) can black beans, rinsed and drained
- 1 (15-ounce) can pinto beans, rinsed and drained (or use two cans of black beans)
- 1 (10-ounce) can red enchilada sauce (mild or medium, your preference)
- 1 (4-ounce) can diced green chiles, undrained
- 2 tablespoons olive oil
- For the Taco Seasoning (or 1 packet of store-bought):
- 1 tablespoon chili powder
- 1.5 teaspoons ground cumin
- 1 teaspoon smoked paprika
- 1 teaspoon dried oregano
- 1/2 teaspoon onion powder
- 1/2 teaspoon garlic powder
- 1/4 teaspoon cayenne pepper (optional, for a little heat)
- 1 teaspoon salt
- 1/2 teaspoon black pepper
- For Assembly:
- 8–10 large flour tortillas (8-inch or “burrito size”)
- 4 cups shredded Mexican cheese blend (a mix of Monterey Jack, Cheddar, and Colby)
- For Garnish (Optional but Recommended):
- Sour cream or plain Greek yogurt
- Chopped fresh cilantro
- Diced tomatoes
- Sliced jalapeños
- Sliced green onions
- Guacamole or diced avocado
Instructions
Step 1: Prepare Your Pan and Aromatics
First, preheat your oven to 375°F (190°C). Lightly grease a 9×13-inch baking dish with non-stick spray or a thin layer of butter. This crucial step prevents the tortillas from sticking and makes cleanup much easier.
In a large skillet or Dutch oven, heat the olive oil over medium-high heat. Once the oil shimmers, add the finely chopped yellow onion. Sauté for 5-7 minutes, stirring occasionally, until the onion softens and becomes translucent. This isn’t just about cooking the onion; it’s about releasing its natural sweetness, which will form the flavor base of our entire dish. Once the onions are soft, add the minced garlic and cook for another minute until fragrant. Be careful not to burn the garlic, as it can become bitter.
Step 2: Brown the Beef and Add Spices
Add the ground beef to the skillet with the onions and garlic. Use a wooden spoon or spatula to break the meat apart into smaller crumbles. Cook for 8-10 minutes, or until the beef is fully browned and no pink remains. The browning process, known as the Maillard reaction, is essential for developing a deep, savory, and meaty flavor. Don’t rush this step!
Once the beef is browned, drain off any excess grease from the skillet. If you’re using leaner beef like 90/10, you may have very little grease to drain. Return the skillet to the heat. Now, it’s time for the spices. Sprinkle the chili powder, cumin, smoked paprika, oregano, onion powder, garlic powder, salt, pepper, and optional cayenne over the beef. Stir everything together until the meat is evenly coated. Let the spices toast with the meat for about 60 seconds. This wakes up the oils in the spices and makes their flavor much more vibrant and aromatic.
Step 3: Create the Hearty Filling
With your beef perfectly seasoned, it’s time to turn it into a saucy, irresistible filling. Pour the entire can of red enchilada sauce into the skillet. Add the rinsed and drained black beans, pinto beans, and the can of diced green chiles (with their liquid). The liquid from the chiles adds a subtle tang and moisture.
Stir everything together until well combined. Bring the mixture to a gentle simmer and let it cook for 3-5 minutes. This allows all the flavors to meld together beautifully. The sauce will thicken slightly, creating the perfect consistency for our casserole layers. Taste the filling at this point and adjust the seasoning if necessary. You might want a little more salt or an extra pinch of chili powder.
Step 4: Assemble the Casserole Layers
Now for the fun part: assembly! This is where the “burrito” aspect comes to life in casserole form.
- First Layer: Place a layer of tortillas on the bottom of your prepared 9×13-inch baking dish. You may need to cut or tear 3-4 tortillas to create an even layer that covers the entire bottom surface. Don’t worry about it looking perfect; it will all meld together in the oven.
- Second Layer: Spoon half of the beef and bean mixture evenly over the tortilla layer. Spread it out to the edges.
- Third Layer: Sprinkle approximately 1.5 cups of the shredded Mexican cheese blend over the beef filling.
- Repeat: Create another layer of tortillas on top of the cheese. Again, cut or overlap them as needed to cover the surface. Spoon the remaining half of the beef mixture over the tortillas and spread it evenly.
- Final Topping: Sprinkle the remaining 2.5 cups of cheese over the top, making sure to cover the entire surface right to the edges. This generous top layer will melt into a glorious, golden-brown, bubbly crust.
Step 5: Bake to Cheesy Perfection
Place the assembled casserole into your preheated 375°F (190°C) oven. Bake, uncovered, for 20-25 minutes. You’ll know it’s ready when the cheese on top is fully melted, bubbly, and starting to turn golden brown around the edges. The sauce may be bubbling up the sides of the dish—this is a very good sign!
Once baked, carefully remove the casserole from the oven. This is an important step: let it rest on a cooling rack for at least 10-15 minutes before serving. This resting period allows the casserole to set, making it much easier to cut into clean slices. If you cut into it immediately, the layers will be too molten and will fall apart.
Nutrition
- Serving Size: One Normal Portion
- Calories: 580-620