


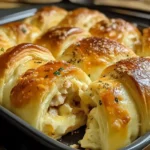
These Cheesy Chicken Crescent Rolls have become an absolute legend in my household. I still remember the first time I made them; I was scrambling for a quick weeknight dinner that wouldn’t involve hours in the kitchen but would still feel like a treat. Skeptical at first, my kids’ eyes lit up as they took their first bite of the golden, flaky crust giving way to that warm, gooey, cheesy chicken filling. My husband, usually a man of few words when it comes to food praise beyond a simple “good,” actually asked, “What IS this? It’s amazing!” Since then, they’ve become a regular rotation, perfect for those busy evenings, a surprise hit at potlucks, and even a fantastic game-day snack. They are deceptively simple to make, yet they deliver a comforting, savory punch that satisfies everyone. The aroma alone, as they bake to a perfect golden brown, is enough to get an “Mmm, what’s cooking?” from anyone within smelling distance. Trust me, once you try these, they’ll be a beloved staple for you too.
Ingredients for Cheesy Chicken Crescent Rolls
To create these irresistible bites of comfort, you’ll need a handful of simple yet flavorful ingredients. Precision is key for the perfect balance of cheesy, chicken-y goodness encased in that delightful crescent dough.
- Refrigerated Crescent Roll Dough: 2 cans (8 ounces each) of original crescent rolls (each can typically makes 8 rolls, for a total of 16 rolls). Pillsbury is a classic choice, but any good quality brand will work. Ensure it’s kept chilled until ready to use for easier handling.
- Cooked Chicken: 2 cups, cooked and shredded or finely diced. This is approximately what you’d get from 2 medium boneless, skinless chicken breasts (about 1 pound raw). Rotisserie chicken is a fantastic time-saver here!
- Cream Cheese: 8 ounces (1 block) full-fat cream cheese, softened to room temperature. This is crucial for easy mixing and a creamy texture. Low-fat can be used, but full-fat yields the best results.
- Shredded Cheddar Cheese: 1 cup, sharp or mild, depending on your preference. Freshly shredded cheese melts better than pre-shredded, which often contains anti-caking agents. Colby Jack, Monterey Jack, or a Mexican blend would also be delicious.
- Milk or Heavy Cream: 2 tablespoons. This helps to create a smoother, more luscious filling.
- Garlic Powder: 1 teaspoon. Adds a lovely aromatic depth.
- Onion Powder: 1/2 teaspoon. Complements the garlic and adds savory notes.
- Dried Parsley Flakes: 1 teaspoon (or 1 tablespoon fresh, chopped). For a hint of color and freshness.
- Salt: 1/2 teaspoon, or to taste. Adjust based on the saltiness of your chicken and cheese.
- Black Pepper: 1/4 teaspoon, or to taste. Freshly ground is always best.
- Optional Egg Wash: 1 large egg, beaten with 1 tablespoon of water or milk. This gives the crescent rolls a beautiful golden-brown, glossy finish.
- Optional Topping: A sprinkle of extra shredded cheese or a brush of melted butter mixed with garlic powder after baking.
Step-by-Step Instructions for Making Cheesy Chicken Crescent Rolls
Follow these simple instructions to create perfectly golden and delicious Cheesy Chicken Crescent Rolls every time. The process is straightforward, making it an ideal recipe for cooks of all skill levels.
- Preheat and Prepare:
- Preheat your oven to 375°F (190°C).
- Line a large baking sheet (or two smaller ones) with parchment paper for easy cleanup and to prevent sticking. If you don’t have parchment paper, a light greasing of the baking sheet will also work.
- Prepare the Chicken (if not using pre-cooked):
- If you’re starting with raw chicken breasts, you can boil, bake, or pan-sear them until cooked through (internal temperature reaches 165°F or 74°C).
- Allow the chicken to cool slightly, then shred it using two forks or finely dice it. For super quick shredding, you can use a stand mixer with the paddle attachment on low speed while the chicken is still warm. Set the 2 cups of shredded chicken aside.
- Make the Cheesy Chicken Filling:
- In a medium-sized mixing bowl, combine the softened cream cheese, 1 cup of shredded cheddar cheese, milk or heavy cream, garlic powder, onion powder, dried parsley, salt, and black pepper.
- Using a spatula or a sturdy spoon, mix these ingredients thoroughly until well combined and the cream cheese is smooth. There should be no large lumps of cream cheese remaining.
- Add the 2 cups of cooked, shredded chicken to the cream cheese mixture. Stir gently but thoroughly, ensuring the chicken is evenly coated with the cheesy mixture. Taste a tiny bit (if you’re comfortable with cooked chicken) and adjust seasonings if necessary.
- Assemble the Crescent Rolls:
- Carefully open one can of crescent roll dough. Unroll the dough onto a clean, lightly floured work surface (or directly onto the parchment paper if you prefer).
- The dough will typically be perforated into 8 triangles. Separate the triangles along these perforations.
- Take one triangle of dough. If the wide end seems too thick, you can gently stretch it a bit wider.
- Spoon a portion of the cheesy chicken filling onto the wide end of the crescent dough triangle. A common amount is about 2 tablespoons per roll, but this can vary based on the size of your dough triangles. Be careful not to overfill, as this can cause the filling to ooze out during baking and make rolling difficult.
- Starting from the wide end with the filling, carefully roll the dough up towards the pointed end. Try to keep the roll fairly snug.
- Place the rolled crescent onto the prepared baking sheet, with the pointed tip tucked underneath to prevent it from uncurling during baking.
- Repeat this process with the remaining dough triangles from the first can, and then with the second can of crescent dough, until all the filling and dough are used. Arrange the rolls about 1-2 inches apart on the baking sheet to allow for even baking and browning.
- Optional Egg Wash:
- If using, whisk together the egg and 1 tablespoon of water or milk in a small bowl.
- Lightly brush the tops of each crescent roll with the egg wash. This step is optional but highly recommended for a beautiful, shiny, golden-brown crust.
- Bake the Crescent Rolls:
- Place the baking sheet(s) into the preheated 375°F (190°C) oven.
- Bake for 12-17 minutes, or until the crescent rolls are a deep golden brown on top and the filling is heated through and bubbly (you might see a little cheese peeking out, which is perfectly fine and delicious!). Baking time can vary slightly depending on your oven and the exact thickness of your rolls. Keep an eye on them during the last few minutes to prevent burning.
- Cool and Serve:
- Once baked, carefully remove the baking sheet from the oven.
- If desired, you can brush the tops of the hot crescent rolls with a little melted butter (perhaps mixed with a pinch of garlic powder or parsley) or sprinkle with a tiny bit more shredded cheese while they are still hot.
- Let the Cheesy Chicken Crescent Rolls cool on the baking sheet for at least 5-10 minutes before serving. The filling will be very hot. This cooling period also helps them firm up slightly, making them easier to handle.
- Serve warm and enjoy the cheesy, flaky goodness!
Nutrition Facts
Understanding the nutritional aspect of what we eat is important. Please note that these are estimates and can vary based on specific brands of ingredients used and exact portion sizes.
- Servings: This recipe makes approximately 16 crescent rolls.
- Serving Size: 1 crescent roll.
- Calories per serving (1 crescent roll): Approximately 200-280 calories.
Breakdown (Estimated):
- Total Fat: 15-20g (largely from cheese, crescent dough, and cream cheese)
- Saturated Fat: 7-10g
- Cholesterol: 30-45mg
- Sodium: 400-550mg (can vary significantly based on crescent dough brand and added salt)
- Total Carbohydrates: 12-16g (primarily from the crescent dough)
- Dietary Fiber: <1g
- Sugars: 3-5g
- Protein: 8-12g (mainly from chicken and cheese)
For a more precise nutritional calculation, you can use online recipe nutrition calculators and input your specific ingredients and quantities. Remember that using low-fat cream cheese or leaner chicken could slightly alter these values.
Preparation Time
Knowing how long a recipe takes from start to finish helps in planning your meals, especially on busy days.
- Active Preparation Time: 20-25 minutes (This assumes you are using pre-cooked chicken. If you need to cook and shred chicken, add an additional 20-30 minutes to this time). This includes mixing the filling and assembling the rolls.
- Baking Time: 12-17 minutes.
- Cooling Time (Recommended): 5-10 minutes.
- Total Time: Approximately 40-55 minutes (using pre-cooked chicken). If cooking chicken from scratch, total time would be closer to 1 hour and 5 minutes to 1 hour and 25 minutes.
This relatively short total time makes Cheesy Chicken Crescent Rolls an excellent choice for a quick weeknight dinner, an easy appetizer for gatherings, or a satisfying snack.
How to Serve Cheesy Chicken Crescent Rolls
Cheesy Chicken Crescent Rolls are wonderfully versatile and can be served in various ways, fitting different occasions and meal types. Here are some ideas:
As a Main Course (Dinner or Lunch):
- With a Fresh Salad:
- A crisp garden salad with a light vinaigrette.
- A Caesar salad for a richer pairing.
- A simple arugula salad with lemon juice and olive oil.
- With Steamed or Roasted Vegetables:
- Steamed broccoli florets or green beans.
- Roasted asparagus spears or Brussels sprouts.
- A colorful medley of roasted bell peppers and zucchini.
- With a Light Soup:
- Creamy tomato soup.
- A simple vegetable broth-based soup.
- Chicken noodle soup for an extra comforting meal.
- With Simple Sides:
- A side of fruit salad for a refreshing contrast.
- Sweet potato fries or regular French fries for a more indulgent meal.
- Coleslaw for a creamy, tangy accompaniment.
As an Appetizer or Party Food:
- On a Platter: Arrange them neatly on a serving platter. For smaller, bite-sized appetizers, you can cut the baked rolls in half diagonally before serving.
- With Dipping Sauces: Offer a variety of sauces on the side.
- Ranch dressing (classic choice).
- Honey mustard sauce.
- Marinara sauce.
- Buffalo sauce (if you like a bit of spice, or add it to the filling!).
- A garlic aioli.
- For Specific Occasions:
- Game Day: Perfect finger food for watching sports.
- Potlucks: Easy to transport and always a crowd-pleaser.
- Holiday Gatherings: A warm, savory appetizer before a big meal.
- Brunches: A savory addition to a brunch spread.
- Kids’ Parties: Generally very kid-friendly.
Presentation Tips:
- Garnish the serving platter with fresh parsley or chives for a pop of color.
- If serving warm, consider placing them in a cloth-lined basket to help retain heat.
No matter how you choose to serve them, these Cheesy Chicken Crescent Rolls are sure to be a hit! Their comforting flavors and satisfying texture make them suitable for almost any occasion.
Additional Tips for Perfect Cheesy Chicken Crescent Rolls
To elevate your Cheesy Chicken Crescent Roll game from great to absolutely phenomenal, consider these five expert tips:
- Don’t Skimp on Softening the Cream Cheese: This might seem like a small detail, but it’s crucial. Cream cheese that isn’t properly softened to room temperature will be lumpy and difficult to mix smoothly with the other filling ingredients. You’ll end up with pockets of plain cream cheese instead of a homogenous, creamy chicken filling. To soften it quickly, you can cut the block into smaller cubes and let it sit out for about 30-60 minutes, or microwave it on a very low power setting (or defrost setting) in short 10-15 second intervals, being careful not to melt it.
- Use Freshly Shredded Cheese for Optimal Melt: While pre-shredded cheese is convenient, it often contains cellulose powder or other anti-caking agents that can prevent it from melting as smoothly and creamily as freshly shredded cheese. Taking a few extra minutes to shred a block of cheddar (or your cheese of choice) will result in a gooier, more satisfying cheese pull and a better overall texture in your filling.
- Achieve Perfectly Cooked Chicken: The quality of your chicken significantly impacts the final dish. If you’re not using rotisserie chicken, ensure your chicken is cooked through but still moist. Overcooked chicken will be dry and stringy. Poaching or baking chicken breasts gently are great methods. Season the chicken while it cooks for an extra layer of flavor. Once cooked, shred it while it’s still warm for easier shredding, then let it cool slightly before mixing with the cream cheese to prevent the filling from becoming too loose.
- Seal the Edges (Gently!): While rolling the crescents, try to gently pinch or press the seams, especially if you see any filling peeking out from the sides. This isn’t about creating an airtight seal like a dumpling, but a little attention here can help prevent excessive filling leakage during baking. Don’t press too hard, or you might tear the delicate dough. The point at the end of the triangle should be tucked under the roll on the baking sheet.
- Experiment with Seasonings and Add-Ins: Don’t be afraid to customize the filling!
- Herbs: Fresh chives, dill, or a pinch of thyme can add wonderful fresh notes.
- Spices: A dash of smoked paprika can add a lovely smoky depth. A pinch of cayenne pepper or a few dashes of your favorite hot sauce can introduce a gentle kick of heat.
- Vegetables: Finely chopped and sautéed onions, bell peppers, or even well-drained spinach can be incorporated into the filling for added flavor, texture, and nutrition. Ensure any added vegetables are cooked and excess moisture is removed to prevent a soggy filling.
- Bacon: Cooked and crumbled bacon bits are a decadent and delicious addition to the chicken and cheese mixture.
By keeping these tips in mind, you’ll ensure your Cheesy Chicken Crescent Rolls are consistently delicious, with a perfectly creamy filling and a beautifully golden, flaky crust.
FAQ: Your Cheesy Chicken Crescent Roll Questions Answered
Here are answers to some frequently asked questions about making Cheesy Chicken Crescent Rolls:
- Q: Can I use leftover chicken or rotisserie chicken for this recipe?
- A: Absolutely! Using leftover cooked chicken or store-bought rotisserie chicken is a fantastic time-saver and a great way to make this recipe even quicker. Just make sure the chicken is shredded or finely diced, and you have about 2 cups worth. If the chicken is already seasoned, you might want to adjust the salt in the filling accordingly.
- Q: Can I prepare these Cheesy Chicken Crescent Rolls ahead of time?
- A: Yes, you have a couple of options for making them ahead:
- Prepare Filling: You can make the cheesy chicken filling up to 24 hours in advance. Store it in an airtight container in the refrigerator. When ready to bake, let it sit at room temperature for about 15-20 minutes to soften slightly for easier spreading.
- Assemble and Refrigerate: You can assemble the crescent rolls, place them on the baking sheet, cover tightly with plastic wrap, and refrigerate for up to 4-6 hours before baking. You might need to add a couple of extra minutes to the baking time if baking directly from cold. For best results with the dough, it’s often preferred to bake them sooner rather than later after assembly.
- A: Yes, you have a couple of options for making them ahead:
- Q: My filling sometimes leaks out during baking. How can I prevent this?
- A: A little leakage is normal and often delicious (crispy cheese!), but to minimize it:
- Don’t Overfill: Use only about 1.5 to 2 tablespoons of filling per roll. Overfilling is the most common cause of leakage.
- Seal Well: As you roll, try to keep it relatively snug. Ensure the tip of the crescent is tucked underneath the roll on the baking sheet. You can also gently pinch any side seams if you see large gaps.
- Chill Dough: Ensure your crescent dough is cold when you work with it. Warm dough is stickier and harder to manage.
- Thick Filling: Make sure your filling isn’t too runny. If you’ve added vegetables with high water content, ensure they are well-drained or sautéed to remove excess moisture.
- A: A little leakage is normal and often delicious (crispy cheese!), but to minimize it:
- Q: Can I make these spicy? What are some good additions for a kick?
- A: Yes, making them spicy is easy and delicious! Here are some ideas:
- Hot Sauce: Add 1-2 teaspoons (or more to taste) of your favorite hot sauce (like Frank’s RedHot or sriracha) to the cream cheese mixture.
- Cayenne Pepper: Mix in 1/4 to 1/2 teaspoon of cayenne pepper with the other seasonings.
- Jalapeños: Add 1-2 tablespoons of finely diced fresh or pickled jalapeños (seeds removed for less heat) to the filling.
- Red Pepper Flakes: A pinch or two of red pepper flakes will add a subtle warmth.
- Spicy Cheese: Use a shredded Pepper Jack cheese instead of or in addition to the cheddar.
- A: Yes, making them spicy is easy and delicious! Here are some ideas:
- Q: Are these Cheesy Chicken Crescent Rolls freezer-friendly?
- A: Yes, they can be frozen, either baked or unbaked, though unbaked often yields slightly better results upon baking.
- To Freeze Unbaked: Assemble the rolls but do not apply an egg wash. Place them on a baking sheet not touching each other and “flash freeze” until solid (about 1-2 hours). Then, transfer them to a freezer-safe bag or container. They can be frozen for up to 2-3 months. To bake, you can bake from frozen, adding about 5-10 minutes to the original baking time, or thaw them in the refrigerator overnight and bake as directed. Apply egg wash just before baking if desired.
- To Freeze Baked: Let the baked rolls cool completely. Wrap them individually in plastic wrap, then place them in a freezer-safe bag or container. Freeze for up to 2-3 months. To reheat, thaw in the refrigerator and then warm in an oven at 350°F (175°C) for about 10-15 minutes, or until heated through. An air fryer also works well for reheating. Avoid microwaving if you want to maintain a crispy crust.
- A: Yes, they can be frozen, either baked or unbaked, though unbaked often yields slightly better results upon baking.
Cheesy Chicken Crescent Rolls Recipe
Ingredients
- Refrigerated Crescent Roll Dough: 2 cans (8 ounces each) of original crescent rolls (each can typically makes 8 rolls, for a total of 16 rolls). Pillsbury is a classic choice, but any good quality brand will work. Ensure it’s kept chilled until ready to use for easier handling.
- Cooked Chicken: 2 cups, cooked and shredded or finely diced. This is approximately what you’d get from 2 medium boneless, skinless chicken breasts (about 1 pound raw). Rotisserie chicken is a fantastic time-saver here!
- Cream Cheese: 8 ounces (1 block) full-fat cream cheese, softened to room temperature. This is crucial for easy mixing and a creamy texture. Low-fat can be used, but full-fat yields the best results.
- Shredded Cheddar Cheese: 1 cup, sharp or mild, depending on your preference. Freshly shredded cheese melts better than pre-shredded, which often contains anti-caking agents. Colby Jack, Monterey Jack, or a Mexican blend would also be delicious.
- Milk or Heavy Cream: 2 tablespoons. This helps to create a smoother, more luscious filling.
- Garlic Powder: 1 teaspoon. Adds a lovely aromatic depth.
- Onion Powder: 1/2 teaspoon. Complements the garlic and adds savory notes.
- Dried Parsley Flakes: 1 teaspoon (or 1 tablespoon fresh, chopped). For a hint of color and freshness.
- Salt: 1/2 teaspoon, or to taste. Adjust based on the saltiness of your chicken and cheese.
- Black Pepper: 1/4 teaspoon, or to taste. Freshly ground is always best.
- Optional Egg Wash: 1 large egg, beaten with 1 tablespoon of water or milk. This gives the crescent rolls a beautiful golden-brown, glossy finish.
- Optional Topping: A sprinkle of extra shredded cheese or a brush of melted butter mixed with garlic powder after baking.
Instructions
- Preheat and Prepare:
- Preheat your oven to 375°F (190°C).
- Line a large baking sheet (or two smaller ones) with parchment paper for easy cleanup and to prevent sticking. If you don’t have parchment paper, a light greasing of the baking sheet will also work.
- Prepare the Chicken (if not using pre-cooked):
- If you’re starting with raw chicken breasts, you can boil, bake, or pan-sear them until cooked through (internal temperature reaches 165°F or 74°C).
- Allow the chicken to cool slightly, then shred it using two forks or finely dice it. For super quick shredding, you can use a stand mixer with the paddle attachment on low speed while the chicken is still warm. Set the 2 cups of shredded chicken aside.
- Make the Cheesy Chicken Filling:
- In a medium-sized mixing bowl, combine the softened cream cheese, 1 cup of shredded cheddar cheese, milk or heavy cream, garlic powder, onion powder, dried parsley, salt, and black pepper.
- Using a spatula or a sturdy spoon, mix these ingredients thoroughly until well combined and the cream cheese is smooth. There should be no large lumps of cream cheese remaining.
- Add the 2 cups of cooked, shredded chicken to the cream cheese mixture. Stir gently but thoroughly, ensuring the chicken is evenly coated with the cheesy mixture. Taste a tiny bit (if you’re comfortable with cooked chicken) and adjust seasonings if necessary.
- Assemble the Crescent Rolls:
- Carefully open one can of crescent roll dough. Unroll the dough onto a clean, lightly floured work surface (or directly onto the parchment paper if you prefer).
- The dough will typically be perforated into 8 triangles. Separate the triangles along these perforations.
- Take one triangle of dough. If the wide end seems too thick, you can gently stretch it a bit wider.
- Spoon a portion of the cheesy chicken filling onto the wide end of the crescent dough triangle. A common amount is about 2 tablespoons per roll, but this can vary based on the size of your dough triangles. Be careful not to overfill, as this can cause the filling to ooze out during baking and make rolling difficult.
- Starting from the wide end with the filling, carefully roll the dough up towards the pointed end. Try to keep the roll fairly snug.
- Place the rolled crescent onto the prepared baking sheet, with the pointed tip tucked underneath to prevent it from uncurling during baking.
- Repeat this process with the remaining dough triangles from the first can, and then with the second can of crescent dough, until all the filling and dough are used. Arrange the rolls about 1-2 inches apart on the baking sheet to allow for even baking and browning.
- Optional Egg Wash:
- If using, whisk together the egg and 1 tablespoon of water or milk in a small bowl.
- Lightly brush the tops of each crescent roll with the egg wash. This step is optional but highly recommended for a beautiful, shiny, golden-brown crust.
- Bake the Crescent Rolls:
- Place the baking sheet(s) into the preheated 375°F (190°C) oven.
- Bake for 12-17 minutes, or until the crescent rolls are a deep golden brown on top and the filling is heated through and bubbly (you might see a little cheese peeking out, which is perfectly fine and delicious!). Baking time can vary slightly depending on your oven and the exact thickness of your rolls. Keep an eye on them during the last few minutes to prevent burning.
- Cool and Serve:
- Once baked, carefully remove the baking sheet from the oven.
- If desired, you can brush the tops of the hot crescent rolls with a little melted butter (perhaps mixed with a pinch of garlic powder or parsley) or sprinkle with a tiny bit more shredded cheese while they are still hot.
- Let the Cheesy Chicken Crescent Rolls cool on the baking sheet for at least 5-10 minutes before serving. The filling will be very hot. This cooling period also helps them firm up slightly, making them easier to handle.
- Serve warm and enjoy the cheesy, flaky goodness!
Nutrition
- Serving Size: One Normal Portion
- Calories: 200-280
- Sugar: 3-5g
- Sodium: 400-550mg
- Fat: 15-20g
- Saturated Fat: 7-10g
- Carbohydrates: 12-16g
- Fiber: <1g
- Protein: 8-12g
- Cholesterol: 30-45mg


