


There are some meals that just scream comfort, speed, and universal appeal, and for my family, homemade Chicken Quesadillas are right at the top of that list. I can’t tell you how many chaotic Tuesday evenings have been rescued by the promise of crispy tortillas packed with juicy, seasoned chicken and rivers of molten cheese. The kids’ eyes light up, my husband actually puts down his phone, and for a blissful twenty minutes, there’s nothing but the happy crunch and satisfied “mmms” around the dinner table. This isn’t just a recipe; it’s our go-to for a delicious, fuss-free win. It’s incredibly versatile – perfect for using up leftover rotisserie chicken, but equally fantastic when you take a few extra minutes to season and cook chicken specifically for it. The beauty lies in its simplicity and the joy it brings, making it a staple I’m thrilled to share.
The Ultimate Chicken Quesadilla Recipe: Your New Weeknight Hero
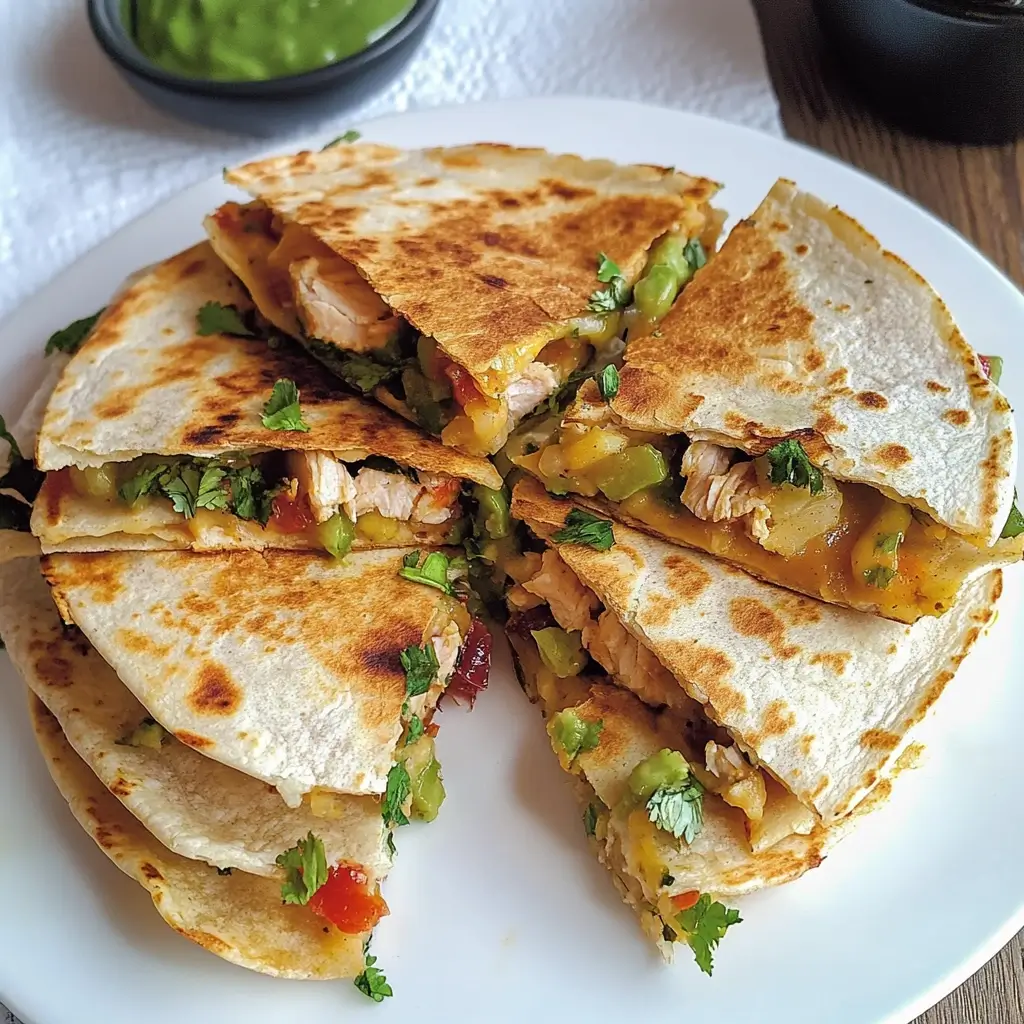
This recipe focuses on creating deeply flavorful chicken and achieving that perfect golden-brown, crispy tortilla exterior with a gooey, cheesy interior. It’s designed to be straightforward enough for a weeknight but delicious enough for guests.
Ingredients for Perfect Chicken Quesadillas
Crafting the perfect chicken quesadilla starts with quality ingredients. Each component plays a crucial role, from the succulent chicken to the melty cheese and the sturdy yet tender tortilla. Here’s what you’ll need, with specific amounts to ensure success:
- For the Chicken & Marinade/Seasoning:
- Chicken: 1.5 lbs (approx. 680g) boneless, skinless chicken breasts or thighs, trimmed of excess fat. Thighs will offer more flavor and moisture, while breasts are leaner.
- Olive Oil: 2 tablespoons, for cooking the chicken.
- Lime Juice: 2 tablespoons, freshly squeezed (about 1 lime), to tenderize and add brightness.
- Chili Powder: 1 tablespoon. Choose a good quality one for depth of flavor.
- Cumin Powder: 1.5 teaspoons. Its earthy notes are classic in Mexican-inspired dishes.
- Smoked Paprika: 1 teaspoon. This adds a lovely smoky dimension.
- Garlic Powder: 1 teaspoon.
- Onion Powder: 1 teaspoon.
- Dried Oregano: 1/2 teaspoon, preferably Mexican oregano if you have it.
- Salt: 3/4 teaspoon, or to taste.
- Black Pepper: 1/2 teaspoon, freshly ground, or to taste.
- For Assembling the Quesadillas:
- Large Flour Tortillas: 8 (10-inch size recommended). Using good quality tortillas makes a significant difference in texture and flavor. Look for ones that are pliable and not too thin.
- Shredded Cheese: 3 cups (approx. 12 oz or 340g) of a good melting cheese. A Mexican blend is fantastic. Alternatively, Monterey Jack, Colby Jack, Cheddar, or a mix of these work wonderfully. Grating your own cheese from a block will yield the best melt.
- Red Onion: 1/2 medium, finely diced. This adds a sharp, fresh bite. (Optional, but recommended)
- Bell Pepper: 1 medium (any color, red or green are great), finely diced. (Optional, but adds sweetness and crunch)
- Cilantro: 1/4 cup, freshly chopped (for mixing into the filling, plus more for garnish).
- Butter or Light Olive Oil: For cooking the quesadillas (approx. 1-2 tablespoons total, or as needed). This helps achieve that desirable golden, crispy exterior.
- Optional Add-ins (to mix with chicken and cheese):
- Canned Black Beans: 1/2 cup, rinsed and drained.
- Canned Corn: 1/2 cup, drained.
- Diced Jalapeños: 1-2 tablespoons, fresh or pickled, for a spicy kick.
- For Serving (Suggestions):
- Sour Cream or Greek Yogurt
- Salsa (Pico de Gallo, Salsa Roja, Salsa Verde)
- Guacamole or Sliced Avocado
- Extra Chopped Cilantro
- Lime Wedges
Step-by-Step Instructions: Crafting Your Cheesy Masterpiece
Follow these detailed instructions to ensure your chicken quesadillas are cooked to perfection every time. We’ll break it down into preparing the chicken, assembling the quesadillas, and cooking them.
Part 1: Prepare and Cook the Chicken
- Dice the Chicken: If using chicken breasts or thighs that aren’t already cooked, dice them into small, bite-sized pieces (about 1/2-inch cubes). Uniformity in size ensures even cooking. Pat the chicken dry with paper towels; this helps it brown better.
- Season the Chicken: In a medium bowl, combine the diced chicken with 1 tablespoon of olive oil, fresh lime juice, chili powder, cumin, smoked paprika, garlic powder, onion powder, dried oregano, salt, and black pepper. Toss thoroughly to ensure every piece of chicken is well-coated. For best results, you can let the chicken marinate for at least 15-20 minutes at room temperature, or up to 4 hours covered in the refrigerator. This allows the flavors to penetrate deeply.
- Cook the Chicken: Heat the remaining 1 tablespoon of olive oil in a large skillet or frying pan over medium-high heat. Once the oil is shimmering, add the seasoned chicken to the hot pan. Spread it in a single layer and avoid overcrowding the pan (cook in batches if necessary). Cook for 5-7 minutes, stirring occasionally, until the chicken is cooked through and nicely browned on all sides. The internal temperature should reach 165°F (74°C).
- Shred or Dice Further (Optional): Once cooked, remove the chicken from the skillet and let it rest for a few minutes. You can then either leave it as diced, or shred it with two forks if you prefer that texture in your quesadillas. For a finer filling, you can also give it a rough chop.
- Sauté Vegetables (If Using): If you’re adding diced red onion and bell pepper, you can add them to the same skillet used for the chicken (add a touch more oil if needed). Sauté over medium heat for 3-5 minutes until slightly softened. Then, combine them with the cooked chicken.
Part 2: Assemble the Quesadillas
- Prepare Your Workspace: Set up an assembly line. Have your cooked chicken mixture, shredded cheese, chopped cilantro (if using in the filling), and tortillas ready.
- Combine Filling (Optional): In a bowl, you can mix the cooked chicken, sautéed vegetables (if used), and any optional add-ins like black beans, corn, or jalapeños, along with about half of the chopped cilantro. This ensures an even distribution of ingredients. Alternatively, you can layer them individually.
- Layer the Quesadilla: Lay one tortilla flat on a clean surface.
- Sprinkle about 1/4 to 1/3 cup of shredded cheese evenly over one half of the tortilla, leaving a small (about 1/2-inch) border around the edge.
- Spread a layer of the chicken mixture (about 1/3 to 1/2 cup, depending on how full you like them) over the cheese.
- Sprinkle another small layer of cheese (about 2-3 tablespoons) on top of the chicken. This top layer of cheese helps “glue” the tortilla halves together.
- Fold the other half of the tortilla over the filling to create a half-moon shape. Gently press down.
Part 3: Cook the Quesadillas
- Heat the Pan: Wipe out the skillet you used for the chicken (or use a clean large skillet, griddle, or comal). Place it over medium heat. Low to medium heat is key here – too high, and the tortilla will burn before the cheese melts.
- Add Fat (Optional but Recommended): Once the pan is warm, you can either lightly brush the outside of the assembled quesadilla with melted butter or a very thin layer of oil, OR add about 1/2 teaspoon of butter or a drizzle of oil directly to the hot pan for each quesadilla. Butter adds flavor and helps achieve a beautiful golden-brown crust.
- Cook the First Side: Carefully place the assembled quesadilla into the warm skillet. Cook for 2-4 minutes on the first side, or until the bottom is golden brown and crispy, and the cheese along the edges begins to melt. You can gently press down on the quesadilla with a spatula to help it cook evenly and ensure good contact with the pan.
- Flip and Cook the Second Side: Carefully flip the quesadilla using a wide spatula. Cook for another 2-4 minutes on the second side, until it’s also golden brown and crispy, and the cheese inside is completely melted and gooey.
- Rest and Cut: Remove the cooked quesadilla from the skillet and place it on a cutting board. Let it rest for a minute or two before cutting. This allows the cheese to set slightly, making it less messy to cut. Cut the half-moon quesadillas into 2 or 3 wedges. If you made a full-round quesadilla, cut it into 4 or 6 wedges, like a pizza.
- Repeat: Repeat the cooking process with the remaining quesadillas, adding a little more butter or oil to the pan as needed for each one. Keep cooked quesadillas warm in a low oven (around 200°F or 90°C) on a baking sheet if you’re making a large batch, though they are best served immediately.
Nutrition Facts (Per Serving)
- Servings: This recipe makes approximately 4 large quesadillas (when folded in half, effectively 8 servings if one half-moon is a serving). If considering one full 10-inch tortilla packed with filling as a single large serving, then it’s 4 servings. For the purpose of these nutrition facts, we’ll assume a serving is one half of a large, fully assembled quesadilla (i.e., one wedge from a half-moon, or 1/8th of a double-tortilla “sincronizada” if making 4 large ones). This recipe would then yield approximately 8 such servings.
- Calories per serving (approximate): Around 350-450 calories.
Please note: This is an estimation. The exact nutritional values will vary based on:
- The specific brands of tortillas and cheese used.
- The leanness of the chicken (breasts vs. thighs).
- The amount of oil or butter used for cooking.
- Any optional add-ins like beans or corn.
- Serving sizes – if you eat a whole folded quesadilla, double the calories.
For a more precise calculation, you would need to input all your specific ingredients and their quantities into a nutritional calculator. The estimate above provides a general idea for a standard chicken and cheese quesadilla made following this recipe.
Preparation & Cook Time
Understanding the time commitment helps in planning your meal, especially on busy days.
- Preparation Time:
- Chopping vegetables & chicken (if raw): 15-20 minutes
- Seasoning/Marinating chicken: 5 minutes (plus optional 15+ minutes marinating time)
- Assembling quesadillas: 10-15 minutes (for all 8)
- Total Active Prep Time: Approximately 30-40 minutes (excluding marinating time)
- Cook Time:
- Cooking chicken: 5-7 minutes
- Cooking each quesadilla: 4-8 minutes per quesadilla. If cooking one at a time in a single pan, this can take 16-32 minutes for 4 large folded quesadillas. Using two pans or a large griddle significantly speeds this up.
- Estimated Total Cook Time for Quesadillas (sequential): 20-35 minutes
- Total Time (Active Prep + Sequential Cooking): Approximately 50 minutes to 1 hour 15 minutes. This can be reduced if you use pre-cooked chicken or cook quesadillas in parallel.
If using pre-cooked/rotisserie chicken, you can shave off about 15-20 minutes from the total time.
How to Serve Your Delicious Chicken Quesadillas
Chicken quesadillas are fantastic on their own, but the right accompaniments can elevate them from a simple snack to a full, satisfying meal. Here’s how to serve them for maximum enjoyment:
- Classic Toppings (Offer a “Toppings Bar”):
- Sour Cream: A cool, tangy dollop is a must for many.
- Greek Yogurt: A healthier, protein-packed alternative to sour cream.
- Salsa:
- Pico de Gallo: Fresh, chunky, and vibrant.
- Salsa Roja (Red Salsa): Cooked or roasted, offering deeper flavors.
- Salsa Verde (Green Salsa): Tangy and often mildly spicy, made with tomatillos.
- Guacamole: Creamy, rich, and always a crowd-pleaser.
- Sliced or Diced Avocado: For a simpler creamy element.
- Freshly Chopped Cilantro: Adds a burst of freshness.
- Pickled or Fresh Jalapeños: For those who like an extra kick of heat.
- Lime Wedges: A squeeze of fresh lime juice brightens all the flavors.
- Hot Sauce: Let everyone choose their favorite brand and heat level.
- Complementary Side Dishes:
- Mexican Rice (Spanish Rice): A classic pairing that makes the meal more substantial.
- Cilantro Lime Rice: A brighter, fresher rice option.
- Black Beans or Refried Beans: Seasoned beans add protein and fiber.
- Simple Green Salad: A light salad with a vinaigrette dressing can balance the richness of the quesadillas. Consider a corn and black bean salsa salad.
- Grilled Corn on the Cob (Elote): Especially good in the summer.
- Fruit Salad: A refreshing side, particularly with mango or pineapple.
- Presentation & Serving Style:
- Family Style: Arrange the cut quesadilla wedges on a large platter, surrounded by small bowls of the various toppings. This allows everyone to customize their plate.
- Individual Plates: Serve 2-3 wedges per person with a dollop of their favorite toppings and a side dish.
- Appetizer Portions: Cut the quesadillas into smaller, bite-sized wedges for parties or as an appetizer.
- Keep them Warm: If serving a crowd, keep cooked quesadillas warm in a 200°F (90°C) oven on a baking sheet lined with parchment paper until ready to serve. Avoid stacking them too much, or they can become soggy.
- Drinks:
- Agua Frescas: Light and refreshing fruit-infused waters (like watermelon, lime, or hibiscus).
- Mexican Lager Beer: A classic pairing for adults.
- Margaritas or Palomas: For a festive occasion.
- Horchata: A sweet, cinnamon-spiced rice milk drink.
By offering a variety of toppings and a well-chosen side, you can turn simple chicken quesadillas into a memorable and complete meal experience.
Pro Tips for Quesadilla Perfection
Achieving quesadilla nirvana is easy with these five expert tips:
- Don’t Overstuff: It’s tempting to load up your tortilla with heaps of chicken and cheese, but resist the urge! Overstuffing makes the quesadilla difficult to flip, leads to ingredients spilling out, and can result in a soggy center if the fillings don’t heat through evenly. A balanced layer is key for a crispy exterior and perfectly melted interior.
- Shred Your Own Cheese: While pre-shredded cheese is convenient, it often contains anti-caking agents (like cellulose powder) that can prevent it from melting as smoothly and beautifully as freshly grated cheese. For the gooiest, most satisfying cheese pull, buy a block of your favorite melting cheese (Monterey Jack, Cheddar, Oaxaca, Asadero) and shred it yourself. The difference is noticeable!
- Medium Heat is Your Friend: Cooking quesadillas over too high heat will result in a burnt tortilla before the cheese inside has a chance to fully melt. Conversely, too low heat can dry out the tortilla. Aim for a consistent medium heat. This allows the tortilla to slowly turn golden brown and crispy while giving the cheese ample time to become perfectly molten and gooey.
- Pre-Cook & Season Chicken Well: The chicken is a star component. Ensure it’s not only cooked through but also well-seasoned. Using the marinade/spice blend in this recipe adds significant flavor. If using leftover chicken, consider tossing it with a bit of taco seasoning or some of the spices mentioned to liven it up before adding it to the quesadilla.
- Experiment with Tortillas and Fat: While large flour tortillas are standard, don’t be afraid to try different types. Whole wheat tortillas can add a nuttier flavor, and corn tortillas (though smaller and more prone to cracking if not handled carefully) offer an authentic taste. For the cooking fat, butter provides excellent flavor and browning. Light olive oil or even bacon grease (for a smoky touch) can also be used. A thin layer is all you need for crispiness.
Frequently Asked Questions (FAQ) About Chicken Quesadillas
Here are answers to some common questions about making the best chicken quesadillas:
Q1: What’s the best cheese to use for chicken quesadillas?
A1: The best cheeses are those that melt well and have good flavor. Popular choices include:
* Monterey Jack: Melts beautifully and has a mild, buttery flavor.
* Cheddar (Medium or Sharp): Adds a tangier flavor; often mixed with Monterey Jack.
* Mexican Blend: Usually a mix of Monterey Jack, Cheddar, Asadero, and/or Oaxaca cheese, designed for melting.
* Oaxaca Cheese: A traditional Mexican string cheese that melts exceptionally well, similar to mozzarella but with more flavor.
* Asadero Cheese: Another Mexican melting cheese with a mild, tangy flavor.
Avoid hard, aged cheeses like Parmesan or very dry cheeses, as they won’t give you that desirable gooey melt. For the ultimate melt, grate cheese from a block rather than using pre-shredded.
Q2: Can I use corn tortillas instead of flour tortillas?
A2: Yes, you absolutely can use corn tortillas for a more traditional Mexican flavor and a gluten-free option (ensure your corn tortillas are certified gluten-free if needed). However, corn tortillas are generally smaller and more delicate than flour tortillas. They can crack more easily when folded. To make them more pliable, warm them slightly before assembling (e.g., quickly on the skillet, in a microwave wrapped in a damp paper towel, or in a tortilla warmer). You might find it easier to make “mulitas” or “sincronizadas” with corn tortillas – using two whole tortillas with the filling sandwiched between them, rather than folding one.
Q3: How do I reheat leftover chicken quesadillas so they stay crispy?
A3: The best way to reheat quesadillas and maintain crispiness is in a dry skillet or on a griddle over medium-low heat for a few minutes per side until warmed through and re-crisped. You can also use an oven or toaster oven: preheat to 350°F (175°C) and bake on a baking sheet for 5-10 minutes, or until heated and crispy. Microwaving is the least ideal method as it tends to make the tortillas soft and sometimes chewy, though it’s quick if you’re in a pinch. If microwaving, do so in short bursts and consider finishing in a hot pan for a moment to crisp it up.
Q4: Can I make chicken quesadillas ahead of time?
A4: Yes, you can do some prep work ahead:
* Chicken: Cook and shred/dice the chicken mixture up to 2-3 days in advance and store it in an airtight container in the refrigerator.
* Cheese: Shred cheese and store it.
* Vegetables: Chop onions, peppers, etc., and store them.
* Assembled (Uncooked): You can assemble the quesadillas, wrap them individually in plastic wrap or aluminum foil, and refrigerate for up to 24 hours. Cook them just before serving. They might not be quite as crispy as freshly assembled ones, as the tortilla can absorb some moisture, but they will still be delicious.
* Cooked & Frozen: You can cook quesadillas, let them cool completely, wrap them individually in plastic wrap and then foil (or place in freezer bags), and freeze for up to 2-3 months. Reheat from frozen in a skillet, oven, or air fryer until hot and crispy.
Q5: What are some good vegetarian filling options for quesadillas?
A5: Quesadillas are incredibly versatile for vegetarian fillings! Some great options include:
* Beans & Cheese: Black beans or refried pinto beans are classic. Season them well.
* Roasted Vegetables: Roasted sweet potatoes, bell peppers, zucchini, corn, and onions make a flavorful filling.
* Sautéed Mushrooms & Spinach: Cook down mushrooms with garlic and wilted spinach. Add some goat cheese or feta for extra tang.
* Corn & Zucchini: Sautéed fresh corn (or roasted canned corn) with diced zucchini and poblano peppers.
* Spiced Sweet Potato & Black Bean: Roasted or mashed sweet potato mixed with black beans and chili spices.
Remember to always include plenty of your favorite melting cheese to bind it all together!
This detailed guide should equip you to make absolutely sensational chicken quesadillas that will have everyone asking for seconds! Enjoy the process and the delicious results.
Print
Chicken Quesadilla Recipe
Ingredients
- For the Chicken & Marinade/Seasoning:
- Chicken: 1.5 lbs (approx. 680g) boneless, skinless chicken breasts or thighs, trimmed of excess fat. Thighs will offer more flavor and moisture, while breasts are leaner.
- Olive Oil: 2 tablespoons, for cooking the chicken.
- Lime Juice: 2 tablespoons, freshly squeezed (about 1 lime), to tenderize and add brightness.
- Chili Powder: 1 tablespoon. Choose a good quality one for depth of flavor.
- Cumin Powder: 1.5 teaspoons. Its earthy notes are classic in Mexican-inspired dishes.
- Smoked Paprika: 1 teaspoon. This adds a lovely smoky dimension.
- Garlic Powder: 1 teaspoon.
- Onion Powder: 1 teaspoon.
- Dried Oregano: 1/2 teaspoon, preferably Mexican oregano if you have it.
- Salt: 3/4 teaspoon, or to taste.
- Black Pepper: 1/2 teaspoon, freshly ground, or to taste.
- For Assembling the Quesadillas:
- Large Flour Tortillas: 8 (10-inch size recommended). Using good quality tortillas makes a significant difference in texture and flavor. Look for ones that are pliable and not too thin.
- Shredded Cheese: 3 cups (approx. 12 oz or 340g) of a good melting cheese. A Mexican blend is fantastic. Alternatively, Monterey Jack, Colby Jack, Cheddar, or a mix of these work wonderfully. Grating your own cheese from a block will yield the best melt.
- Red Onion: 1/2 medium, finely diced. This adds a sharp, fresh bite. (Optional, but recommended)
- Bell Pepper: 1 medium (any color, red or green are great), finely diced. (Optional, but adds sweetness and crunch)
- Cilantro: 1/4 cup, freshly chopped (for mixing into the filling, plus more for garnish).
- Butter or Light Olive Oil: For cooking the quesadillas (approx. 1-2 tablespoons total, or as needed). This helps achieve that desirable golden, crispy exterior.
- Optional Add-ins (to mix with chicken and cheese):
- Canned Black Beans: 1/2 cup, rinsed and drained.
- Canned Corn: 1/2 cup, drained.
- Diced Jalapeños: 1-2 tablespoons, fresh or pickled, for a spicy kick.
- For Serving (Suggestions):
- Sour Cream or Greek Yogurt
- Salsa (Pico de Gallo, Salsa Roja, Salsa Verde)
- Guacamole or Sliced Avocado
- Extra Chopped Cilantro
- Lime Wedges
Instructions
Part 1: Prepare and Cook the Chicken
- Dice the Chicken: If using chicken breasts or thighs that aren’t already cooked, dice them into small, bite-sized pieces (about 1/2-inch cubes). Uniformity in size ensures even cooking. Pat the chicken dry with paper towels; this helps it brown better.
- Season the Chicken: In a medium bowl, combine the diced chicken with 1 tablespoon of olive oil, fresh lime juice, chili powder, cumin, smoked paprika, garlic powder, onion powder, dried oregano, salt, and black pepper. Toss thoroughly to ensure every piece of chicken is well-coated. For best results, you can let the chicken marinate for at least 15-20 minutes at room temperature, or up to 4 hours covered in the refrigerator. This allows the flavors to penetrate deeply.
- Cook the Chicken: Heat the remaining 1 tablespoon of olive oil in a large skillet or frying pan over medium-high heat. Once the oil is shimmering, add the seasoned chicken to the hot pan. Spread it in a single layer and avoid overcrowding the pan (cook in batches if necessary). Cook for 5-7 minutes, stirring occasionally, until the chicken is cooked through and nicely browned on all sides. The internal temperature should reach 165°F (74°C).
- Shred or Dice Further (Optional): Once cooked, remove the chicken from the skillet and let it rest for a few minutes. You can then either leave it as diced, or shred it with two forks if you prefer that texture in your quesadillas. For a finer filling, you can also give it a rough chop.
- Sauté Vegetables (If Using): If you’re adding diced red onion and bell pepper, you can add them to the same skillet used for the chicken (add a touch more oil if needed). Sauté over medium heat for 3-5 minutes until slightly softened. Then, combine them with the cooked chicken.
Part 2: Assemble the Quesadillas
- Prepare Your Workspace: Set up an assembly line. Have your cooked chicken mixture, shredded cheese, chopped cilantro (if using in the filling), and tortillas ready.
- Combine Filling (Optional): In a bowl, you can mix the cooked chicken, sautéed vegetables (if used), and any optional add-ins like black beans, corn, or jalapeños, along with about half of the chopped cilantro. This ensures an even distribution of ingredients. Alternatively, you can layer them individually.
- Layer the Quesadilla: Lay one tortilla flat on a clean surface.
- Sprinkle about 1/4 to 1/3 cup of shredded cheese evenly over one half of the tortilla, leaving a small (about 1/2-inch) border around the edge.
- Spread a layer of the chicken mixture (about 1/3 to 1/2 cup, depending on how full you like them) over the cheese.
- Sprinkle another small layer of cheese (about 2-3 tablespoons) on top of the chicken. This top layer of cheese helps “glue” the tortilla halves together.
- Fold the other half of the tortilla over the filling to create a half-moon shape. Gently press down.
Alternatively, for a full-round quesadilla (often called a “sincronizada” in some regions): Sprinkle cheese over the entire surface of one tortilla. Top with the chicken mixture, then more cheese. Place a second tortilla on top and press gently. This method is great for larger appetites or when cutting into wedges for sharing.
Part 3: Cook the Quesadillas
- Heat the Pan: Wipe out the skillet you used for the chicken (or use a clean large skillet, griddle, or comal). Place it over medium heat. Low to medium heat is key here – too high, and the tortilla will burn before the cheese melts.
- Add Fat (Optional but Recommended): Once the pan is warm, you can either lightly brush the outside of the assembled quesadilla with melted butter or a very thin layer of oil, OR add about 1/2 teaspoon of butter or a drizzle of oil directly to the hot pan for each quesadilla. Butter adds flavor and helps achieve a beautiful golden-brown crust.
- Cook the First Side: Carefully place the assembled quesadilla into the warm skillet. Cook for 2-4 minutes on the first side, or until the bottom is golden brown and crispy, and the cheese along the edges begins to melt. You can gently press down on the quesadilla with a spatula to help it cook evenly and ensure good contact with the pan.
- Flip and Cook the Second Side: Carefully flip the quesadilla using a wide spatula. Cook for another 2-4 minutes on the second side, until it’s also golden brown and crispy, and the cheese inside is completely melted and gooey.
- Rest and Cut: Remove the cooked quesadilla from the skillet and place it on a cutting board. Let it rest for a minute or two before cutting. This allows the cheese to set slightly, making it less messy to cut. Cut the half-moon quesadillas into 2 or 3 wedges. If you made a full-round quesadilla, cut it into 4 or 6 wedges, like a pizza.
- Repeat: Repeat the cooking process with the remaining quesadillas, adding a little more butter or oil to the pan as needed for each one. Keep cooked quesadillas warm in a low oven (around 200°F or 90°C) on a baking sheet if you’re making a large batch, though they are best served immediately.
Nutrition
- Serving Size: One Normal Portion
- Calories: 350-450


