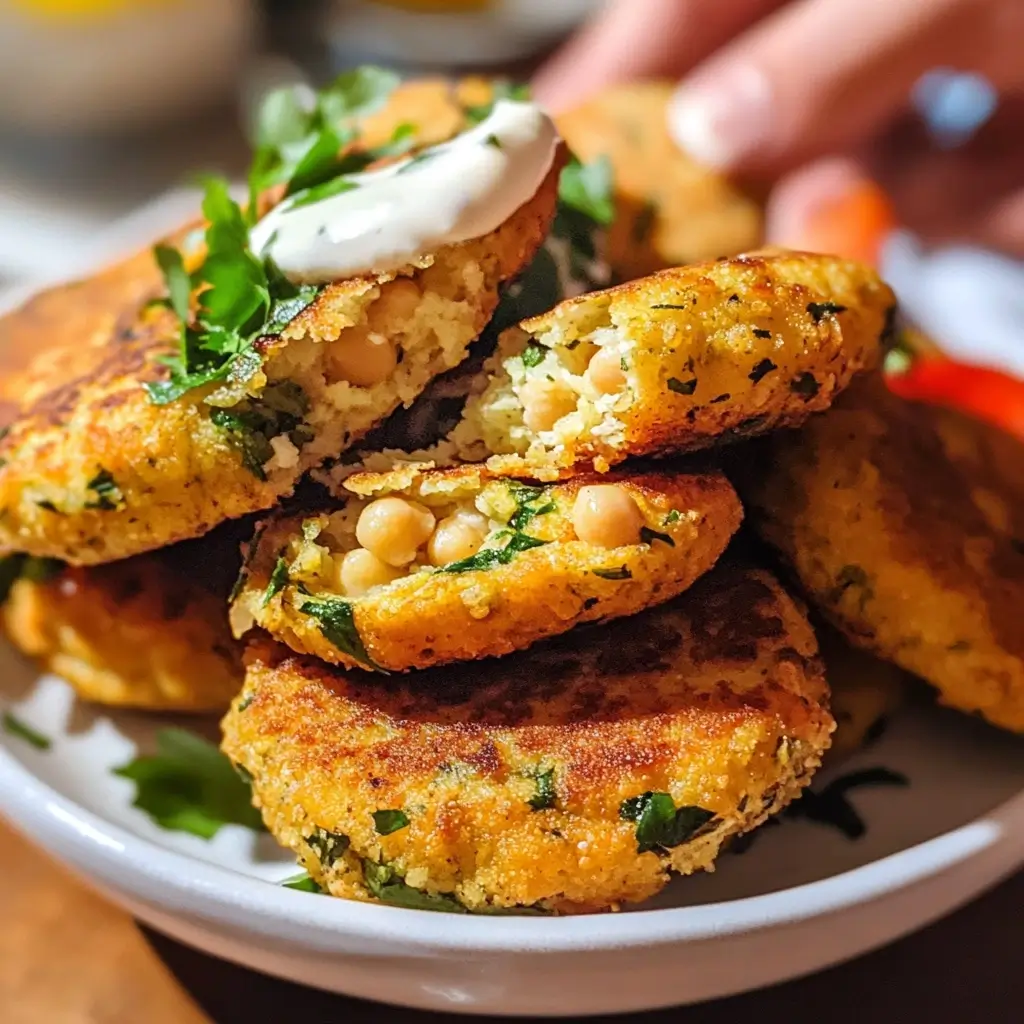
These chickpea fritters have become an absolute revelation in our household, a true culinary chameleon that adapts to any mealtime whim. Initially, I was searching for a healthier, plant-based alternative to our usual snack rotation, something satisfying yet not too heavy. The first time I made them, the aroma alone – a delightful blend of warm spices and fresh herbs wafting from the kitchen – had everyone intrigued. My kids, usually skeptical of anything overtly “healthy,” were instantly won over by the crispy, golden exterior and the surprisingly tender, flavorful inside. My partner, a lover of bold tastes, appreciated the depth the spices brought. We’ve since enjoyed them as appetizers with a zesty yogurt dip, tucked into pitas with fresh veggies for a quick lunch, and even as a hearty component of a larger vegetarian dinner spread. They’re remarkably easy to whip up, forgiving for novice cooks, and endlessly customizable. This recipe isn’t just about making food; it’s about creating a dish that consistently brings smiles and satisfies cravings, proving that simple, wholesome ingredients can indeed create something truly special.
The Perfect Chickpea Fritters: Ingredients You’ll Need
Here’s what you’ll need to create these delectable bites:
- Chickpeas: 2 (15-ounce) cans, rinsed and drained (or about 3 cups cooked chickpeas)
- Aromatics:
- 1 small red onion, roughly chopped (about ½ cup)
- 3-4 cloves garlic, roughly chopped
- Fresh Herbs:
- ½ cup packed fresh parsley, roughly chopped
- ¼ cup packed fresh cilantro, roughly chopped (optional, can use more parsley)
- Binder & Texture:
- ⅓ cup all-purpose flour (or chickpea flour for gluten-free)
- 1 teaspoon baking powder (helps with a lighter texture)
- Spices:
- 1 ½ teaspoons ground cumin
- 1 teaspoon ground coriander
- ½ teaspoon smoked paprika (or sweet paprika)
- ¼ teaspoon cayenne pepper (or more, to taste, for a kick)
- 1 teaspoon salt (or to taste)
- ½ teaspoon black pepper (or to taste)
- Flavor Enhancer:
- 1 tablespoon fresh lemon juice
- For Frying:
- ¼ to ⅓ cup olive oil or vegetable oil, for pan-frying (enough for a shallow layer)
Instructions: Crafting Your Crispy Chickpea Fritters
Follow these steps for fritter perfection:
- Prepare the Chickpeas: Thoroughly rinse and drain the canned chickpeas. If you have a moment, pat them dry with a paper towel. This helps remove excess moisture, which is key to achieving a good texture and preventing them from becoming too mushy.
- Process Aromatics & Herbs: In a food processor, add the chopped red onion, garlic, fresh parsley, and cilantro (if using). Pulse a few times until finely minced but not pureed. You want small, distinct pieces to distribute flavor evenly. Scrape down the sides of the bowl as needed.
- Add Chickpeas & Pulse: Add the drained and rinsed chickpeas to the food processor with the minced aromatics and herbs. Pulse several times until the chickpeas are broken down and the mixture starts to come together. Be careful not to over-process; you want some texture, not a smooth hummus-like paste. Some small chickpea chunks are perfectly fine and add character.
- Incorporate Dry Ingredients & Lemon Juice: Add the flour, baking powder, ground cumin, ground coriander, smoked paprika, cayenne pepper, salt, and black pepper to the food processor. Drizzle in the fresh lemon juice. Pulse again just until everything is well combined and forms a coarse, slightly sticky mixture. Again, avoid over-mixing.
- Taste and Adjust Seasoning (Optional but Recommended): Carefully (as it contains raw flour) taste a tiny bit of the mixture and adjust salt, pepper, or spices if needed. This is your last chance to perfect the flavor profile before cooking.
- Chill the Mixture (Crucial Step!): Transfer the chickpea mixture to a bowl, cover it with plastic wrap, and refrigerate for at least 30 minutes, or up to an hour. Chilling helps the flour absorb moisture, making the mixture easier to handle and less likely to fall apart during frying. It also allows the flavors to meld.
- Form the Fritters: Once chilled, remove the mixture from the refrigerator. Using your hands (lightly moistened if the mixture is too sticky), scoop out portions of the mixture (about 2 tablespoons each for medium-sized fritters, or 1 tablespoon for smaller, appetizer-sized ones). Roll into balls and then gently flatten into small patties, about ½-inch thick. Place the formed fritters on a parchment-lined baking sheet or plate.
- Pan-Fry the Fritters:
- Heat the olive oil or vegetable oil in a large, heavy-bottomed skillet (cast iron works wonderfully) over medium heat. You should have enough oil to create a shallow layer, about ⅛ to ¼ inch deep.
- To test if the oil is ready, drop a tiny piece of the chickpea mixture into the skillet. If it sizzles gently and starts to brown, the oil is at the right temperature. If it sizzles too aggressively or smokes, reduce the heat. If it doesn’t sizzle, the oil is not hot enough.
- Carefully place the fritters into the hot oil, ensuring not to overcrowd the pan. Work in batches if necessary. Overcrowding will lower the oil temperature, resulting in soggy, greasy fritters.
- Fry for about 3-5 minutes per side, or until they are beautifully golden brown and crispy. Adjust the heat as needed to prevent burning while ensuring they cook through.
- Drain and Serve: Once cooked, use a slotted spoon or spatula to carefully remove the fritters from the skillet. Transfer them to a plate lined with paper towels to drain any excess oil. This step is important for maintaining crispiness.
- Serve Warm: Chickpea fritters are best enjoyed warm, when their exterior is at its crispiest and the interior is tender and flavorful.
Nutrition Facts
- Servings: This recipe makes approximately 16-20 medium-sized fritters. Let’s consider a serving size of 4 fritters.
- Calories per serving (4 fritters): Approximately 280-350 calories.
Disclaimer: Nutritional information is an estimate and can vary depending on the exact ingredients used, portion sizes, and cooking methods. The amount of oil absorbed during frying can significantly impact the calorie count.
Preparation Time
- Preparation Time (Active): 20-25 minutes (chopping, processing, forming patties)
- Chilling Time: 30-60 minutes
- Cooking Time: 15-20 minutes (in batches)
- Total Time: Approximately 1 hour 5 minutes to 1 hour 45 minutes (including chilling)
How to Serve Your Delicious Chickpea Fritters
These versatile fritters can be dressed up or down for almost any occasion. Here are some fantastic ways to serve them:
- As an Appetizer or Snack:
- Serve them warm with a variety of dipping sauces. Classic choices include:
- Tahini Sauce: A creamy, nutty sauce made from tahini paste, lemon juice, garlic, and water.
- Yogurt-Dill Sauce: Greek yogurt mixed with fresh dill, lemon juice, garlic, and a pinch of salt.
- Spicy Mayo: Mayonnaise mixed with sriracha or your favorite hot sauce.
- Hummus: For a double chickpea delight!
- Tzatziki: A refreshing cucumber and yogurt dip.
- Arrange on a platter with fresh vegetable sticks like carrots, cucumbers, and bell peppers.
- Include them as part of a larger mezze platter with olives, feta cheese, pita bread, and other small bites.
- Serve them warm with a variety of dipping sauces. Classic choices include:
- For a Light Lunch or Dinner:
- Pita Pockets: Stuff warm pita bread with 2-3 fritters, shredded lettuce, sliced tomatoes, cucumbers, red onions, and a drizzle of your chosen sauce. This creates a satisfying and portable meal, similar to a falafel sandwich.
- Salad Topper: Crumble a few fritters over a fresh green salad or a hearty grain salad (like quinoa or couscous salad) for added protein, texture, and flavor.
- Veggie Burgers: Make larger patties and serve them in burger buns with all your favorite toppings – lettuce, tomato, onion, pickles, and sauce.
- Bowls: Create a vibrant grain bowl with a base of quinoa or brown rice, topped with chickpea fritters, roasted vegetables, fresh greens, and a flavorful dressing.
- As a Side Dish:
- Serve alongside grilled meats or fish for a textured and flavorful accompaniment.
- Pair with roasted vegetables like bell peppers, zucchini, and eggplant.
- Garnishes for Extra Flair:
- Sprinkle with extra fresh chopped parsley or cilantro just before serving.
- Serve with lemon wedges on the side for a fresh squeeze of citrus.
- A light dusting of smoked paprika can add visual appeal and a hint of smoky flavor.
No matter how you choose to serve them, these chickpea fritters are sure to be a hit! Their versatility is one of their greatest strengths, allowing you to adapt them to your cravings and the ingredients you have on hand.
Additional Tips for Fritter Success
Unlock the full potential of your chickpea fritters with these five expert tips:
- Don’t Over-Process the Chickpeas: The key to a great fritter texture is avoiding a paste-like consistency. You want some small, recognizable pieces of chickpeas to remain. Over-processing can lead to dense, gummy fritters rather than light and slightly crumbly ones. Pulse the food processor in short bursts and check the texture frequently.
- The Chill is Thrill (Don’t Skip Chilling!): Chilling the fritter mixture in the refrigerator for at least 30 minutes is a game-changer. This step allows the flour to hydrate properly and the mixture to firm up. Well-chilled mixture is significantly easier to shape into patties and, more importantly, it helps the fritters hold their shape and not disintegrate during the frying process. The flavors also get a chance to meld beautifully.
- Master Your Oil Temperature: For perfectly crispy, golden-brown fritters that aren’t greasy, the oil temperature is crucial. If the oil is too cool, the fritters will absorb too much oil and become soggy. If it’s too hot, the outside will burn before the inside is cooked through. Aim for medium heat. A good test is to drop a tiny piece of the mixture into the oil; it should sizzle gently and steadily. Adjust the heat throughout the cooking process if needed, especially between batches.
- Embrace Ingredient Customization: This recipe is a fantastic base for experimentation.
- Flour Power: For a gluten-free version, substitute the all-purpose flour with chickpea flour (besan) or a good quality gluten-free all-purpose blend. Chickpea flour also adds a subtle nutty flavor.
- Herb Heaven: Don’t have parsley or cilantro? Try fresh dill, mint, or even a bit of dried oregano or thyme.
- Spice it Up (or Down): Adjust the cayenne pepper to your heat preference. You can also add other spices like turmeric for color and earthy notes, or a pinch of garam masala for an Indian-inspired twist.
- Add Veggies: Finely grated carrots or zucchini (squeeze out excess moisture) can be incorporated into the mixture for added nutrients and flavor.
- Consider Baking for a Healthier Option: While pan-frying yields the crispiest results, baking is a great alternative if you’re looking to reduce oil. Preheat your oven to 400°F (200°C). Lightly grease a baking sheet or line it with parchment paper. Arrange the formed fritters on the sheet, perhaps lightly spraying or brushing them with oil for better browning. Bake for 20-25 minutes, flipping halfway through, until golden brown and firm. They won’t be as crispy as fried, but still delicious and much lighter. An air fryer also works exceptionally well for a crispy, lower-oil version.
FAQ: Your Chickpea Fritter Questions Answered
Q1: Why are my chickpea fritters falling apart when I fry them?
- A: This is a common issue with a few potential causes:
- Mixture too wet: Chickpeas might not have been drained or dried sufficiently, or you might have added too much liquid. Ensure chickpeas are well-drained and patted dry.
- Not chilled enough: Chilling the mixture is crucial for it to firm up and bind. Don’t skip this step!
- Not enough binder: If you’ve significantly altered the flour quantity or used very wet additions, you might need a bit more flour to help bind everything.
- Over-processing: If the mixture is too smooth like hummus, it can be more prone to falling apart. Aim for a coarser texture.
- Oil temperature too low or overcrowding the pan: If the oil isn’t hot enough, the fritters sit in it too long before forming a crust. Overcrowding also lowers oil temperature. Fry in batches in properly heated oil.
Q2: Can I use dried chickpeas instead of canned?
- A: Absolutely! Using dried chickpeas that you’ve cooked yourself often results in a superior flavor and texture. You’ll need to soak about 1 to 1.5 cups of dried chickpeas overnight, then cook them until tender (but not mushy) before proceeding with the recipe. Ensure they are well-drained after cooking. One cup of dried chickpeas typically yields about 3 cups cooked.
Q3: How can I make these chickpea fritters gluten-free?
- A: It’s very simple! Substitute the all-purpose flour with a gluten-free alternative. Chickpea flour (also known as besan or gram flour) is an excellent choice as it complements the flavor profile naturally and binds well. A good quality all-purpose gluten-free flour blend would also work. Ensure your baking powder is also certified gluten-free if celiac disease is a concern.
Q4: How do I store leftover chickpea fritters, and how can I reheat them?
- A: Store leftover cooked fritters in an airtight container in the refrigerator for up to 3-4 days. To reheat and regain some of their crispiness:
- Oven/Toaster Oven: Preheat to 350°F (175°C) and bake for 10-15 minutes until heated through and crisped up.
- Air Fryer: Reheat at 350-375°F (175-190°C) for 5-7 minutes. This is often the best method for restoring crispiness.
- Skillet: Lightly oil a skillet and reheat over medium heat for a few minutes per side.
- Avoid microwaving if you want to maintain crispiness, as it tends to make them soft.
Q5: Can I freeze chickpea fritters?
- A: Yes, chickpea fritters freeze very well, either cooked or uncooked.
- Freezing Uncooked Fritters: Form the patties, place them on a parchment-lined baking sheet in a single layer, and freeze until solid. Then, transfer them to a freezer-safe bag or container. They can be cooked directly from frozen; just add a few extra minutes to the frying or baking time.
- Freezing Cooked Fritters: Allow the cooked fritters to cool completely. Then, arrange them in a single layer on a baking sheet to flash-freeze. Once solid, transfer to a freezer-safe bag or container. Reheat from frozen using one of the methods mentioned in Q4, adding extra time as needed. They can be stored in the freezer for up to 2-3 months.

Chickpea Fritters Recipe
Ingredients
- Chickpeas: 2 (15-ounce) cans, rinsed and drained (or about 3 cups cooked chickpeas)
- Aromatics:
- 1 small red onion, roughly chopped (about ½ cup)
- 3–4 cloves garlic, roughly chopped
- Fresh Herbs:
- ½ cup packed fresh parsley, roughly chopped
- ¼ cup packed fresh cilantro, roughly chopped (optional, can use more parsley)
- Binder & Texture:
- ⅓ cup all-purpose flour (or chickpea flour for gluten-free)
- 1 teaspoon baking powder (helps with a lighter texture)
- Spices:
- 1 ½ teaspoons ground cumin
- 1 teaspoon ground coriander
- ½ teaspoon smoked paprika (or sweet paprika)
- ¼ teaspoon cayenne pepper (or more, to taste, for a kick)
- 1 teaspoon salt (or to taste)
- ½ teaspoon black pepper (or to taste)
- Flavor Enhancer:
- 1 tablespoon fresh lemon juice
- For Frying:
- ¼ to ⅓ cup olive oil or vegetable oil, for pan-frying (enough for a shallow layer)
Instructions
- Prepare the Chickpeas: Thoroughly rinse and drain the canned chickpeas. If you have a moment, pat them dry with a paper towel. This helps remove excess moisture, which is key to achieving a good texture and preventing them from becoming too mushy.
- Process Aromatics & Herbs: In a food processor, add the chopped red onion, garlic, fresh parsley, and cilantro (if using). Pulse a few times until finely minced but not pureed. You want small, distinct pieces to distribute flavor evenly. Scrape down the sides of the bowl as needed.
- Add Chickpeas & Pulse: Add the drained and rinsed chickpeas to the food processor with the minced aromatics and herbs. Pulse several times until the chickpeas are broken down and the mixture starts to come together. Be careful not to over-process; you want some texture, not a smooth hummus-like paste. Some small chickpea chunks are perfectly fine and add character.
- Incorporate Dry Ingredients & Lemon Juice: Add the flour, baking powder, ground cumin, ground coriander, smoked paprika, cayenne pepper, salt, and black pepper to the food processor. Drizzle in the fresh lemon juice. Pulse again just until everything is well combined and forms a coarse, slightly sticky mixture. Again, avoid over-mixing.
- Taste and Adjust Seasoning (Optional but Recommended): Carefully (as it contains raw flour) taste a tiny bit of the mixture and adjust salt, pepper, or spices if needed. This is your last chance to perfect the flavor profile before cooking.
- Chill the Mixture (Crucial Step!): Transfer the chickpea mixture to a bowl, cover it with plastic wrap, and refrigerate for at least 30 minutes, or up to an hour. Chilling helps the flour absorb moisture, making the mixture easier to handle and less likely to fall apart during frying. It also allows the flavors to meld.
- Form the Fritters: Once chilled, remove the mixture from the refrigerator. Using your hands (lightly moistened if the mixture is too sticky), scoop out portions of the mixture (about 2 tablespoons each for medium-sized fritters, or 1 tablespoon for smaller, appetizer-sized ones). Roll into balls and then gently flatten into small patties, about ½-inch thick. Place the formed fritters on a parchment-lined baking sheet or plate.
- Pan-Fry the Fritters:
- Heat the olive oil or vegetable oil in a large, heavy-bottomed skillet (cast iron works wonderfully) over medium heat. You should have enough oil to create a shallow layer, about ⅛ to ¼ inch deep.
- To test if the oil is ready, drop a tiny piece of the chickpea mixture into the skillet. If it sizzles gently and starts to brown, the oil is at the right temperature. If it sizzles too aggressively or smokes, reduce the heat. If it doesn’t sizzle, the oil is not hot enough.
- Carefully place the fritters into the hot oil, ensuring not to overcrowd the pan. Work in batches if necessary. Overcrowding will lower the oil temperature, resulting in soggy, greasy fritters.
- Fry for about 3-5 minutes per side, or until they are beautifully golden brown and crispy. Adjust the heat as needed to prevent burning while ensuring they cook through.
- Drain and Serve: Once cooked, use a slotted spoon or spatula to carefully remove the fritters from the skillet. Transfer them to a plate lined with paper towels to drain any excess oil. This step is important for maintaining crispiness.
- Serve Warm: Chickpea fritters are best enjoyed warm, when their exterior is at its crispiest and the interior is tender and flavorful.
Nutrition
- Serving Size: One Normal Portion
- Calories: 280-350