


Honestly, finding a weeknight dinner that excites the whole family can feel like searching for a unicorn sometimes. I remember the first time I whipped up this Chili Lime Chicken – I was skeptical if the tangy lime and the warm chili spice would win over my notoriously picky eaters. The aroma filling the kitchen as it sizzled on the pan was promising, a bright, zesty scent mixed with a hint of smokiness. The verdict? An overwhelming success! My husband, usually reserved in his culinary praise, declared it “restaurant-worthy,” and the kids actually asked for seconds (a minor miracle!). The chicken was incredibly juicy, bursting with flavor that was vibrant but not overpoweringly spicy, and the lime cut through everything beautifully. It’s become a regular rotation in our household, loved for its simplicity, speed, and that knockout flavor combination that wakes up the taste buds. It’s proof that delicious doesn’t have to be complicated, and this recipe is my go-to whenever I need a guaranteed crowd-pleaser.
**The Ultimate Chili Lime Chicken Recipe: A Flavor Explosion**
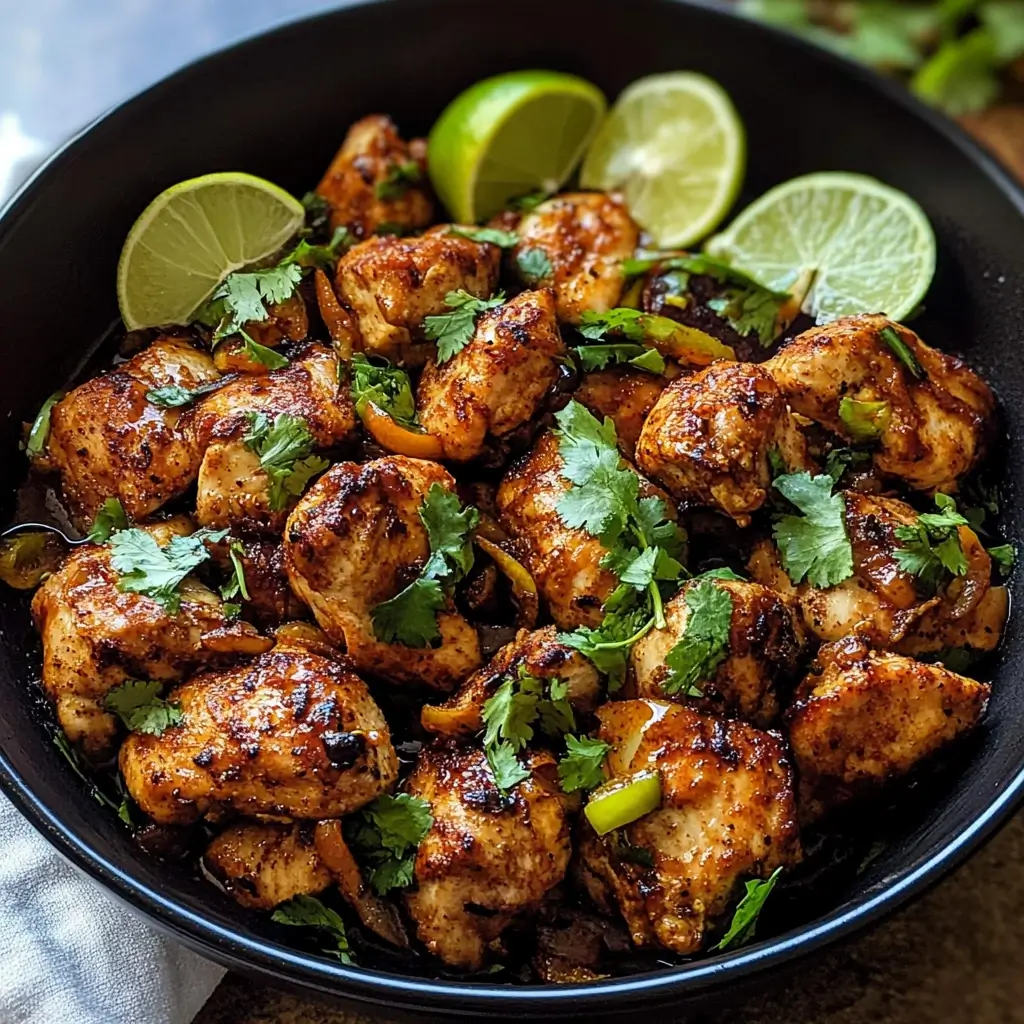
This Chili Lime Chicken isn’t just another chicken recipe; it’s an experience. It balances the zesty punch of fresh lime juice with the warm, complex heat of chili powder, complemented by garlic, cumin, and paprika. The result is tender, juicy chicken coated in a flavorful crust that’s slightly caramelized from the cooking process. Whether you grill it, pan-sear it, or bake it, this recipe delivers consistently delicious results that are perfect for tacos, salads, bowls, or simply served alongside your favorite sides. It’s versatile, relatively quick to prepare (especially if you marinate ahead), and packed with flavors that feel both comforting and exciting. Get ready to add a new favorite to your recipe collection!
**Ingredients for Perfect Chili Lime Chicken**
Gathering the right ingredients is the first step towards chili-lime perfection. Using fresh components, especially lime juice and garlic, makes a significant difference in the final flavor profile.
- Chicken: 1.5 lbs (approx. 680g) Boneless, Skinless Chicken Breasts or Thighs (about 3-4 medium breasts or 5-6 thighs)
- Lime Juice: 1/4 cup Freshly Squeezed Lime Juice (from about 2-3 medium limes)
- Lime Zest: 1 tablespoon Fresh Lime Zest (from 1-2 limes, zest before juicing!)
- Olive Oil: 3 tablespoons Extra Virgin Olive Oil (or Avocado Oil)
- Chili Powder: 1.5 tablespoons (use a good quality blend; adjust to your heat preference)
- Smoked Paprika: 1 teaspoon (adds a lovely smoky depth)
- Ground Cumin: 1 teaspoon
- Garlic Powder: 1/2 teaspoon
- Onion Powder: 1/2 teaspoon
- Garlic: 3-4 cloves, finely minced or grated
- Honey or Agave Nectar: 1 teaspoon (Optional, but helps balance acidity and aids browning)
- Salt: 1 teaspoon (adjust to taste)
- Black Pepper: 1/2 teaspoon freshly ground
- Red Pepper Flakes: 1/4 – 1/2 teaspoon (Optional, for extra heat)
- Fresh Cilantro: 1/4 cup chopped, divided (optional, for marinade and garnish)
Ingredient Notes:
- Chicken: Both breasts and thighs work beautifully. Thighs tend to be more forgiving and stay juicier due to their higher fat content, while breasts are leaner. If using breasts, consider pounding them to an even thickness (about 3/4 inch) for more consistent cooking.
- Lime Juice: Fresh is absolutely key here. Bottled juice lacks the bright, vibrant flavor essential for this dish. Zesting the lime before juicing captures the aromatic oils in the peel, adding another layer of citrus flavor.
- Chili Powder: This refers to the standard American chili powder blend, which typically includes ancho chili, cumin, oregano, and garlic powder. Feel free to experiment with specific chili powders like ancho or chipotle for different flavor profiles.
- Oil: Olive oil adds flavor, but a neutral oil like avocado oil has a higher smoke point, which is beneficial for pan-searing at higher temperatures.
- Sweetener: The small amount of honey or agave is optional but recommended. It doesn’t make the chicken sweet but subtly balances the lime’s tartness and helps achieve beautiful caramelization during cooking.
**Step-by-Step Instructions**
Follow these simple steps to create incredibly flavorful Chili Lime Chicken. The key is allowing enough time for the marinade to work its magic!
- Prepare the Chicken: If using chicken breasts, place them between two sheets of plastic wrap or parchment paper. Using a meat mallet or heavy rolling pin, gently pound the thicker parts of the breasts until they are an even thickness (around 3/4 inch). This ensures even cooking. If using thighs, you can skip this step, but trimming any excess fat is recommended. Pat the chicken dry with paper towels; this helps the marinade adhere better and promotes better searing.
- Make the Marinade: In a medium-sized bowl (large enough to hold the chicken later, or use a separate bowl and transfer), whisk together the fresh lime juice, lime zest, olive oil, chili powder, smoked paprika, ground cumin, garlic powder, onion powder, minced garlic, optional honey/agave, salt, black pepper, optional red pepper flakes, and about half of the chopped fresh cilantro (if using). Whisk until well combined and the salt has dissolved. Taste and adjust seasoning if needed (e.g., more salt, more chili powder).
- Marinate the Chicken: Add the prepared chicken pieces to the bowl with the marinade. Toss gently but thoroughly to ensure every piece is evenly coated. Alternatively, place the chicken and marinade in a large zip-top bag, press out the excess air, and seal. Massage the bag gently to distribute the marinade.
- Chill Time: Cover the bowl or ensure the zip-top bag is sealed tightly. Place the chicken in the refrigerator to marinate for at least 30 minutes. For best results and deeper flavor penetration, aim for 2 to 4 hours. Important: Due to the acidity of the lime juice, avoid marinating for longer than 6-8 hours, as the acid can start to “cook” the chicken and negatively affect its texture, making it mushy.
- Prepare for Cooking: Remove the chicken from the refrigerator about 15-20 minutes before you plan to cook it. This allows it to come closer to room temperature, promoting more even cooking.
- Choose Your Cooking Method:
- Grilling (Recommended for smoky flavor): Preheat your grill to medium-high heat (around 400-450°F or 200-230°C). Clean and lightly oil the grill grates to prevent sticking. Remove the chicken from the marinade, letting any excess drip off (don’t wipe it clean). Place the chicken on the hot grill. Cook for 5-8 minutes per side, depending on thickness. Look for nice grill marks and an internal temperature of 165°F (74°C). Avoid moving the chicken too much initially to allow sear marks to form.
- Pan-Searing (Great for a delicious crust): Heat a large skillet (cast iron works wonderfully) over medium-high heat. Add a tablespoon of olive oil or avocado oil (even if oil is in the marinade, a little in the hot pan helps). Once the oil shimmers, carefully place the chicken pieces in the hot skillet, ensuring not to overcrowd the pan (cook in batches if necessary). Sear for 5-7 minutes per side, until golden brown, cooked through, and the internal temperature reaches 165°F (74°C). Adjust heat as needed to prevent burning the marinade’s spices.
- Baking (Easy, hands-off option): Preheat your oven to 400°F (200°C). Arrange the marinated chicken pieces in a single layer in a baking dish or on a baking sheet lined with parchment paper. Bake for 20-25 minutes, or until cooked through and the internal temperature reaches 165°F (74°C). For better browning, you can switch to the broiler for the last 1-2 minutes (watch carefully to prevent burning).
- Rest the Chicken: This step is crucial! Once cooked, transfer the chicken to a clean cutting board or plate. Tent loosely with foil and let it rest for 5-10 minutes before slicing or serving. Resting allows the juices to redistribute throughout the meat, ensuring a tender and moist result. Skipping this step often leads to drier chicken.
- Serve: Slice the rested chicken against the grain (if applicable, mainly for breasts). Garnish generously with the remaining fresh chopped cilantro and serve immediately. A final squeeze of fresh lime juice over the top just before serving can add an extra pop of brightness.
**Nutritional Information (Approximate)**
Please note that these values are estimates and can vary based on the specific ingredients used (e.g., chicken cut, exact oil amount absorbed) and serving size. This calculation assumes the recipe yields 4 servings using 1.5 lbs of boneless, skinless chicken breast.
- Servings: 4
- Calories per Serving: Approximately 350-420 kcal
Breakdown:
- Protein: The primary component comes from the chicken, making this a high-protein dish (likely 35-45g per serving).
- Fat: Primarily from the olive oil and the chicken itself (thighs will have more fat than breasts). Estimated 15-25g per serving.
- Carbohydrates: Minimal, mainly from the lime juice, spices, optional sweetener, and garlic (likely under 5-7g net carbs per serving).
- Sodium: Primarily from the added salt. Can be adjusted based on dietary needs.
This recipe is generally considered healthy, fitting well into low-carb, keto (especially without the sweetener), and high-protein diets. The focus is on lean protein and healthy fats (from olive oil), flavored naturally with spices and citrus.
**Preparation and Cook Time**
Understanding the time commitment helps plan your meal prep effectively.
- Preparation Time: 15 minutes (includes preparing chicken, zesting/juicing limes, mixing marinade)
- Marinating Time: 30 minutes (minimum) to 4 hours (recommended). Up to 6-8 hours maximum.
- Cook Time: 12-25 minutes (depending on chicken thickness and cooking method)
- Resting Time: 5-10 minutes
- Total Active Time (Prep + Cook): Approximately 30-40 minutes
- Total Time (Including 2-hour Marination + Rest): Approximately 2 hours 55 minutes
While the marinating time adds to the overall duration, the active hands-on time is relatively short, making this feasible even for busier days if you plan ahead for the marinating step. You can easily prepare the marinade and get the chicken soaking in the morning or the night before (within the safe time limits).
**How to Serve Your Delicious Chili Lime Chicken**
This versatile chicken shines in many different culinary settings. Here are some fantastic ways to serve it:
- Classic Plate:
- Serve whole or sliced chicken breasts/thighs alongside your favorite sides.
- Side Ideas: Cilantro-lime rice, quinoa, roasted sweet potatoes, black beans, corn on the cob, grilled asparagus, roasted broccoli, or a simple green salad.
- Flavorful Tacos:
- Slice or shred the cooked chicken.
- Serve in warm corn or flour tortillas.
- Toppings: Chopped cilantro, diced onions, crumbled cotija cheese or queso fresco, salsa (pico de gallo, corn salsa, or salsa verde), avocado slices or guacamole, sour cream or Greek yogurt.
- Vibrant Salads:
- Slice the chicken and serve it warm or cold over a bed of mixed greens or romaine lettuce.
- Salad Components: Add black beans, corn, cherry tomatoes, red onion, avocado, crushed tortilla strips, and perhaps some mango or pineapple for sweetness.
- Dressing: A cilantro-lime vinaigrette or a creamy avocado dressing pairs perfectly.
- Satisfying Bowls:
- Create a base of rice (white, brown, or cilantro-lime), quinoa, or cauliflower rice.
- Top with the sliced chili lime chicken.
- Bowl Add-ins: Include components like black beans, corn salsa, fajita-style sautéed peppers and onions, pico de gallo, avocado, shredded lettuce, and a drizzle of a creamy sauce (like a chipotle aioli or avocado crema).
- Easy Wraps or Sandwiches:
- Slice the chicken and tuck it into large tortillas or pita bread with lettuce, tomato, onion, and a creamy dressing.
- Serve sliced on crusty bread with melted pepper jack cheese, avocado, and lettuce for a zesty chicken sandwich.
- Simple Skewers:
- Cut the chicken into 1-inch cubes before marinating.
- Thread onto skewers (soak wooden skewers first) with chunks of bell pepper and red onion.
- Grill or bake until cooked through, turning occasionally.
**Pro Tips for Elevating Your Chili Lime Chicken**
Take your chili lime chicken from great to absolutely unforgettable with these simple tips:
- Don’t Skip the Zest: The lime zest contains aromatic oils that provide a much deeper and more fragrant citrus flavor than the juice alone. Zest your limes before juicing them for maximum impact. Use a microplane or the fine side of a box grater.
- Achieve the Perfect Sear: Whether grilling or pan-searing, ensure your cooking surface is properly preheated before adding the chicken. Don’t move the chicken too soon; allow it to develop a nice crust or grill marks before flipping. Patting the chicken dry before marinating also helps achieve a better sear. Avoid overcrowding the pan or grill, as this lowers the temperature and causes the chicken to steam rather than sear.
- Master the Marinade Timing: While marinating is key for flavor, over-marinating in acidic ingredients like lime juice can break down the protein structure too much, leading to a mushy texture. Stick to the recommended window: 30 minutes minimum, 2-4 hours ideal, 6-8 hours absolute maximum for best results.
- Rest is Best: Always let your cooked chicken rest for 5-10 minutes before slicing. This allows the internal juices, which migrate to the center during cooking, to redistribute throughout the meat. Slicing immediately results in lost moisture and drier chicken. Tent loosely with foil to keep it warm.
- Fresh Finish: Elevate the final dish with a fresh garnish just before serving. A generous sprinkle of fresh chopped cilantro adds herbaceous brightness, and an extra squeeze of fresh lime juice over the sliced chicken wakes up all the flavors beautifully. A dollop of avocado crema or a sprinkle of flaky sea salt can also add a final touch of finesse.
**Frequently Asked Questions (FAQ) about Chili Lime Chicken**
Here are answers to some common questions about making this delicious recipe:
- Q: Can I use frozen chicken?
- A: Yes, you can use frozen chicken, but it must be fully thawed before marinating and cooking. Thaw it safely in the refrigerator overnight for best results. Do not attempt to marinate or cook chicken directly from frozen, as it will cook unevenly and the marinade won’t penetrate properly. Ensure it’s patted dry after thawing.
- Q: How spicy is this recipe? Can I adjust the heat level?
- A: The spiciness level is moderate and comes primarily from the standard chili powder blend and the optional red pepper flakes. It’s designed to have a pleasant warmth rather than intense heat. You can easily adjust it:
- For Less Spice: Reduce or omit the red pepper flakes. Use a mild chili powder blend.
- For More Spice: Increase the red pepper flakes, add a pinch of cayenne pepper, or use a spicier chili powder like chipotle powder (which also adds smokiness). You could even add finely minced jalapeño (seeds removed for less heat) to the marinade.
- A: The spiciness level is moderate and comes primarily from the standard chili powder blend and the optional red pepper flakes. It’s designed to have a pleasant warmth rather than intense heat. You can easily adjust it:
- Q: Can I make Chili Lime Chicken ahead of time?
- A: Yes, portions of it can be made ahead. You can mix the marinade up to 2-3 days in advance and store it in an airtight container in the refrigerator. You can also marinate the chicken within the recommended time frame (e.g., marinate in the morning for dinner). Cooked chicken stores well in the refrigerator for 3-4 days, making it great for meal prep. Reheat gently in a skillet, oven, or microwave until warmed through (be careful not to overcook during reheating).
- Q: What if I don’t have a grill? What’s the best alternative?
- A: Pan-searing in a heavy skillet (especially cast iron) is an excellent alternative that yields a fantastic crust. Baking is another option, though it won’t provide the same level of browning unless you use the broiler briefly at the end. You could also use an indoor grill pan on the stovetop for grill marks without an outdoor grill. All methods outlined in the instructions will produce delicious results.
- Q: Can I use bottled lime juice instead of fresh?
- A: While you can use bottled lime juice in a pinch, freshly squeezed lime juice is highly recommended for this recipe. Fresh juice has a much brighter, more vibrant, and less harsh flavor profile that is central to the dish’s character. Bottled juice often has preservatives that can alter the taste. If you must use bottled, ensure it’s 100% lime juice, but be aware the final flavor won’t be quite as dynamic. You also won’t be able to get fresh lime zest from a bottle, which adds significant flavor.

Chili Lime Chicken Recipe
Ingredients
- Chicken: 1.5 lbs (approx. 680g) Boneless, Skinless Chicken Breasts or Thighs (about 3-4 medium breasts or 5-6 thighs)
- Lime Juice: 1/4 cup Freshly Squeezed Lime Juice (from about 2-3 medium limes)
- Lime Zest: 1 tablespoon Fresh Lime Zest (from 1-2 limes, zest before juicing!)
- Olive Oil: 3 tablespoons Extra Virgin Olive Oil (or Avocado Oil)
- Chili Powder: 1.5 tablespoons (use a good quality blend; adjust to your heat preference)
- Smoked Paprika: 1 teaspoon (adds a lovely smoky depth)
- Ground Cumin: 1 teaspoon
- Garlic Powder: 1/2 teaspoon
- Onion Powder: 1/2 teaspoon
- Garlic: 3-4 cloves, finely minced or grated
- Honey or Agave Nectar: 1 teaspoon (Optional, but helps balance acidity and aids browning)
- Salt: 1 teaspoon (adjust to taste)
- Black Pepper: 1/2 teaspoon freshly ground
- Red Pepper Flakes: 1/4 – 1/2 teaspoon (Optional, for extra heat)
- Fresh Cilantro: 1/4 cup chopped, divided (optional, for marinade and garnish)
Instructions
- Prepare the Chicken: If using chicken breasts, place them between two sheets of plastic wrap or parchment paper. Using a meat mallet or heavy rolling pin, gently pound the thicker parts of the breasts until they are an even thickness (around 3/4 inch). This ensures even cooking. If using thighs, you can skip this step, but trimming any excess fat is recommended. Pat the chicken dry with paper towels; this helps the marinade adhere better and promotes better searing.
- Make the Marinade: In a medium-sized bowl (large enough to hold the chicken later, or use a separate bowl and transfer), whisk together the fresh lime juice, lime zest, olive oil, chili powder, smoked paprika, ground cumin, garlic powder, onion powder, minced garlic, optional honey/agave, salt, black pepper, optional red pepper flakes, and about half of the chopped fresh cilantro (if using). Whisk until well combined and the salt has dissolved. Taste and adjust seasoning if needed (e.g., more salt, more chili powder).
- Marinate the Chicken: Add the prepared chicken pieces to the bowl with the marinade. Toss gently but thoroughly to ensure every piece is evenly coated. Alternatively, place the chicken and marinade in a large zip-top bag, press out the excess air, and seal. Massage the bag gently to distribute the marinade.
- Chill Time: Cover the bowl or ensure the zip-top bag is sealed tightly. Place the chicken in the refrigerator to marinate for at least 30 minutes. For best results and deeper flavor penetration, aim for 2 to 4 hours. Important: Due to the acidity of the lime juice, avoid marinating for longer than 6-8 hours, as the acid can start to “cook” the chicken and negatively affect its texture, making it mushy.
- Prepare for Cooking: Remove the chicken from the refrigerator about 15-20 minutes before you plan to cook it. This allows it to come closer to room temperature, promoting more even cooking.
- Choose Your Cooking Method:
- Grilling (Recommended for smoky flavor): Preheat your grill to medium-high heat (around 400-450°F or 200-230°C). Clean and lightly oil the grill grates to prevent sticking. Remove the chicken from the marinade, letting any excess drip off (don’t wipe it clean). Place the chicken on the hot grill. Cook for 5-8 minutes per side, depending on thickness. Look for nice grill marks and an internal temperature of 165°F (74°C). Avoid moving the chicken too much initially to allow sear marks to form.
- Pan-Searing (Great for a delicious crust): Heat a large skillet (cast iron works wonderfully) over medium-high heat. Add a tablespoon of olive oil or avocado oil (even if oil is in the marinade, a little in the hot pan helps). Once the oil shimmers, carefully place the chicken pieces in the hot skillet, ensuring not to overcrowd the pan (cook in batches if necessary). Sear for 5-7 minutes per side, until golden brown, cooked through, and the internal temperature reaches 165°F (74°C). Adjust heat as needed to prevent burning the marinade’s spices.
- Baking (Easy, hands-off option): Preheat your oven to 400°F (200°C). Arrange the marinated chicken pieces in a single layer in a baking dish or on a baking sheet lined with parchment paper. Bake for 20-25 minutes, or until cooked through and the internal temperature reaches 165°F (74°C). For better browning, you can switch to the broiler for the last 1-2 minutes (watch carefully to prevent burning).
- Rest the Chicken: This step is crucial! Once cooked, transfer the chicken to a clean cutting board or plate. Tent loosely with foil and let it rest for 5-10 minutes before slicing or serving. Resting allows the juices to redistribute throughout the meat, ensuring a tender and moist result. Skipping this step often leads to drier chicken.
- Serve: Slice the rested chicken against the grain (if applicable, mainly for breasts). Garnish generously with the remaining fresh chopped cilantro and serve immediately. A final squeeze of fresh lime juice over the top just before serving can add an extra pop of brightness.
Nutrition
- Serving Size: One Normal Portion
- Calories: 350-420
- Fat: 15-25g
- Carbohydrates: 5-7g
- Protein: 35-45g


