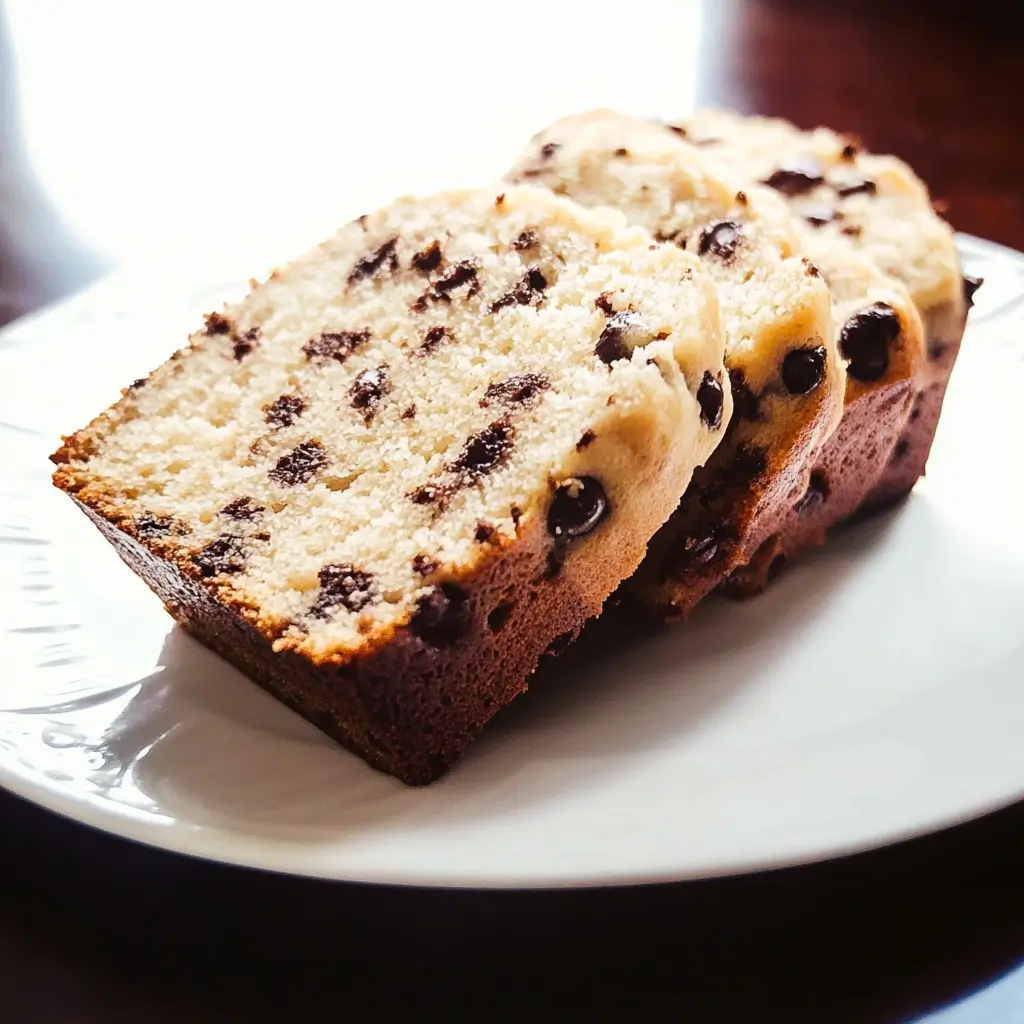
There’s something truly magical about the smell of freshly baked bread wafting through your home. It’s a scent that wraps you in warmth, comfort, and the promise of something delicious to come. For my family, that scent has become synonymous with Julie Blanner’s Chocolate Chip Bread. From the moment I first stumbled upon this recipe, it was love at first bake. This isn’t just any bread; it’s a sweet, tender loaf studded with melty chocolate chips, incredibly easy to whip up, and utterly irresistible. Weekends in our house now often start with the happy murmur of the mixer and the anticipation of that first warm slice, slathered with butter or enjoyed simply on its own. If you’re searching for a baking project that’s guaranteed to bring smiles and fill your kitchen with happiness, look no further. This chocolate chip bread is your answer – a simple yet sublime treat that’s perfect for any occasion, or simply for brightening an ordinary day. Get ready to experience the joy of homemade goodness with this foolproof recipe that’s quickly become a beloved staple in our home and, I’m sure, will become one in yours too!
Ingredients: Your Pantry Essentials for Chocolate Chip Bread Bliss
The beauty of this chocolate chip bread lies not only in its taste but also in its simplicity. You likely already have most, if not all, of these ingredients in your pantry. Let’s break down each component and explore why they are essential to creating the perfect loaf:
- 1 cup White Granulated Sugar or Light Brown Sugar: Sugar is the heart of this sweet bread, providing both sweetness and moisture. You have the delightful option of choosing between white granulated sugar or light brown sugar, each lending a slightly different nuance to the final product.
- White Granulated Sugar: This is your classic sweetener, providing a clean, straightforward sweetness that allows the chocolate chips and other flavors to shine. It contributes to a lighter crumb and a slightly crisper crust.
- Light Brown Sugar: Opting for light brown sugar introduces a touch of molasses flavor, adding depth and warmth to the bread. Brown sugar also contributes to a more moist and tender crumb, thanks to its hygroscopic nature (meaning it attracts and retains moisture). If you enjoy a richer, slightly caramel-like note in your bread, brown sugar is the way to go.
- 2 cups All-Purpose Flour: The foundation of our bread, all-purpose flour provides structure and texture. It’s the workhorse of the baking world, offering a balance of protein and starch that results in a tender yet sturdy loaf.
- Why All-Purpose? All-purpose flour strikes a perfect balance, making it versatile for a wide range of baking projects, including quick breads like this one. It contains enough gluten-forming proteins to give the bread structure without becoming too tough.
- Measuring Flour Correctly: For accurate results, it’s crucial to measure flour correctly. Avoid scooping flour directly from the bag, as this can compact it and lead to using too much. Instead, use the “spoon and level” method: lightly spoon flour into your measuring cup until it’s overflowing, then level off the excess with a straight edge (like the back of a knife). This ensures you’re using the correct amount of flour, which is vital for the bread’s texture.
- 1 tablespoon Baking Powder: Our leavening agent, baking powder is what makes this bread rise and become light and airy. It’s a chemical leavener, meaning it reacts with moisture and heat to produce carbon dioxide gas, creating those beautiful air pockets within the bread.
- Double-Acting Baking Powder: Most baking powders are double-acting, meaning they react twice – once when mixed with liquid and again when heated in the oven. This ensures a good rise and prevents the bread from being dense.
- Freshness Matters: Baking powder has a shelf life, and its effectiveness diminishes over time. For best results, use fresh baking powder. You can test its freshness by placing a teaspoon in a ½ cup of hot water. If it fizzes vigorously, it’s still good to use.
- ½ teaspoon Salt: Salt is a seemingly small ingredient, but it plays a crucial role in baking. It enhances the flavors of all the other ingredients, balances the sweetness, and controls the activity of the yeast (in yeast breads, but still important for flavor in quick breads).
- Table Salt vs. Kosher Salt: You can use either table salt or kosher salt in this recipe. If using kosher salt, be aware that its coarser crystals mean you might need to use slightly more by volume to achieve the same saltiness as table salt. However, for this recipe, the difference is negligible.
- Don’t Skip the Salt! It might seem tempting to omit salt, especially if you’re watching your sodium intake, but it’s a critical component for flavor development in baked goods. Without salt, the bread will taste flat and bland.
- 1 Large Egg: Eggs contribute moisture, richness, and binding to the bread. The protein in the egg helps to create structure, while the fat adds tenderness and flavor.
- Large Eggs at Room Temperature: While not strictly essential for this recipe, using room-temperature eggs can help them incorporate more smoothly into the batter, resulting in a more even texture. If you forgot to take your egg out of the fridge, you can quickly warm it by placing it in a bowl of warm (not hot) water for a few minutes.
- Grade A Large Eggs: “Large” refers to a specific size category for eggs. Using large eggs ensures you have the correct amount of liquid and binding power for the recipe.
- 1 cup Milk (Vitamin D, Whole, 2%, or Almond): Milk provides liquid to the batter, contributing to moisture and tenderness. It also adds a subtle richness and flavor. Julie Blanner’s recipe wisely offers flexibility in milk choices.
- Vitamin D Milk: Vitamin D milk is simply milk fortified with Vitamin D, an essential nutrient. It doesn’t significantly impact the flavor or texture of the bread.
- Whole Milk: Whole milk, with its higher fat content, will result in the richest and most tender bread.
- 2% Milk: 2% milk is a good middle-ground option, offering a balance of richness and lightness.
- Almond Milk: For a dairy-free option, almond milk works beautifully. Unsweetened almond milk is recommended to avoid adding extra sweetness to the bread. Other plant-based milks like soy milk or oat milk would also likely work well.
- ⅓ cup Vegetable Oil: Vegetable oil adds moisture and tenderness to the bread, contributing to its soft crumb. It also helps to keep the bread moist for longer.
- Neutral Flavor Oils: Vegetable oil, canola oil, or even melted coconut oil (refined, for a neutral flavor) are all suitable choices. The key is to use an oil with a neutral flavor that won’t overpower the other ingredients.
- Oil vs. Butter: While butter can be used in quick breads, oil often results in a more consistently moist crumb. Butter can sometimes make quick breads slightly denser if not used correctly. For this easy and foolproof recipe, vegetable oil is a reliable choice.
- 1 ½ cups Chocolate Chips (Semi-Sweet, Milk Chocolate, or Dark Chocolate): The star of the show! Chocolate chips bring bursts of chocolatey goodness to every slice. Again, Julie Blanner’s recipe gives you the freedom to customize based on your chocolate preferences.
- Semi-Sweet Chocolate Chips: A classic choice, semi-sweet chocolate chips offer a balanced sweetness and chocolate intensity that complements the bread perfectly.
- Milk Chocolate Chips: For a sweeter and milkier chocolate flavor, milk chocolate chips are a delightful option. They melt beautifully and create pockets of creamy chocolate within the bread.
- Dark Chocolate Chips: If you prefer a more intense and slightly bitter chocolate flavor, dark chocolate chips are your best bet. They provide a sophisticated contrast to the sweetness of the bread.
- Mix and Match! Don’t be afraid to get creative! You could use a combination of different types of chocolate chips, or even add chopped chocolate chunks for a more rustic and decadent texture. Consider using mini chocolate chips for more even distribution or large chocolate chips for bigger pools of melted chocolate.
With these simple yet carefully chosen ingredients, you’re well on your way to baking a truly exceptional chocolate chip bread.
Instructions: Baking Your Way to Chocolate Chip Bread Perfection
Now, let’s walk through the step-by-step instructions to bring this delightful chocolate chip bread to life. The process is straightforward and beginner-friendly, making it a perfect recipe for bakers of all levels.
- Preheat Oven to 350°F (175°C). Grease a 1-pound Loaf Pan.
- Preheating is Key: Preheating your oven is crucial for even baking. It ensures that the oven is at the correct temperature when you place the bread in, allowing it to rise properly and bake evenly. Use an oven thermometer to verify your oven’s temperature for the most accurate results.
- Greasing the Loaf Pan: Properly greasing your loaf pan prevents the bread from sticking and ensures easy removal after baking. You can use cooking spray, butter, or shortening to grease the pan. Make sure to grease all sides and corners thoroughly. For extra insurance against sticking, you can also dust the greased pan with flour.
- Loaf Pan Size: A 1-pound loaf pan is the standard size for this recipe. If you don’t have a 1-pound pan, you can use a slightly larger or smaller pan, but baking times may need to be adjusted. If using a larger pan, the bread will be shallower and may bake faster. If using a smaller pan, it will be taller and may require a longer baking time.
- In a Medium Mixing Bowl, Whisk to Combine Sugar, Flour, Baking Powder, and Salt. Set Aside.
- Dry Ingredients First: Combining the dry ingredients in a separate bowl ensures they are evenly distributed before being added to the wet ingredients. This prevents clumps of baking powder or salt in the batter, which can lead to uneven rising or salty spots.
- Whisking for Aeration: Whisking the dry ingredients not only combines them but also aerates the flour and baking powder. This helps to create a lighter and more tender crumb in the finished bread. Don’t over-whisk at this stage; just whisk until the ingredients are evenly combined.
- In a Large Mixing Bowl or Stand Mixer, Beat Egg, Milk, and Oil Until Combined.
- Wet Ingredients Next: In a separate, larger bowl, combine the wet ingredients. Using a larger bowl is important because you’ll eventually be adding the dry ingredients to this bowl.
- Mixing Wet Ingredients: Beat the egg, milk, and oil together until they are just combined. You can use a whisk, hand mixer, or stand mixer for this step. Don’t over-mix at this stage; you just want to ensure the ingredients are blended. Over-mixing wet ingredients is less of a concern than over-mixing after adding the flour, but gentle mixing is always good practice for quick breads.
- Gradually Add Dry Mixture to Wet Mixture, Stirring Together Until Just Moistened.
- Gradual Addition: Adding the dry ingredients to the wet ingredients gradually, rather than all at once, helps to prevent clumps from forming and ensures a smoother batter. Add the dry mixture in two or three additions, mixing gently after each addition.
- “Just Moistened” is Key: This is the most crucial step for achieving a tender chocolate chip bread. Mix the batter only until the dry ingredients are just moistened and incorporated into the wet ingredients. A few streaks of flour are perfectly acceptable at this stage. Over-mixing at this point will develop the gluten in the flour, resulting in a tough and dense bread. Stop mixing as soon as everything is almost combined.
- Fold in Chocolate Chips, Reserving ¼ cup for the Top of the Loaf.
- Folding in Chocolate Chips: Once the batter is just moistened, gently fold in the chocolate chips using a spatula. Folding is a gentle mixing technique that helps to incorporate ingredients without over-mixing the batter. Use a sweeping motion, scraping along the bottom of the bowl and bringing the spatula up and over the batter.
- Reserving Chocolate Chips: Reserving a portion of the chocolate chips to sprinkle on top of the loaf before baking creates a visually appealing and extra chocolatey topping. This also ensures that you have visible chocolate chips on the surface of the bread.
- Pour Batter into Loaf Pan Filled Just ⅔ Full. Top with Remaining Chocolate Chips. Bake in the Center of the Oven for 50-60 Minutes, or Until a Toothpick Inserted into the Center Comes Out Clean.
- Filling the Loaf Pan: Pour the batter into the prepared loaf pan, filling it about two-thirds full. This leaves room for the bread to rise in the oven without overflowing.
- Topping with Chocolate Chips: Sprinkle the reserved chocolate chips evenly over the top of the batter.
- Baking Time and Temperature: Bake the bread in the center rack of the preheated oven for 50-60 minutes, or until a toothpick inserted into the center comes out clean. Baking times can vary slightly depending on your oven and the size of your loaf pan.
- Toothpick Test: The toothpick test is the best way to determine if the bread is done. Insert a toothpick or wooden skewer into the center of the loaf. If it comes out clean or with a few moist crumbs attached, the bread is done. If it comes out with wet batter, the bread needs to bake longer.
- Browning Too Quickly? If the top of the bread starts to brown too quickly before the center is fully baked, you can loosely tent a piece of aluminum foil over the loaf to prevent over-browning.
- Allow to Cool in Pan for 10 Minutes Before Slicing.
- Cooling in Pan: Allowing the bread to cool in the pan for 10 minutes before slicing makes it easier to handle and prevents it from crumbling. During this time, the bread continues to set and firm up.
- Slicing and Serving: After 10 minutes of cooling in the pan, gently loosen the edges of the bread with a knife or spatula and invert it onto a wire rack to cool completely. However, let’s be honest, warm chocolate chip bread is incredibly tempting! You can slice and serve it warm after the initial 10-minute cooling period, or let it cool completely for easier slicing and storage.
Following these detailed instructions will guide you to baking a perfect loaf of chocolate chip bread every time. Enjoy the process and the delicious results!
Nutrition Facts: A Sweet Treat in Moderation
While chocolate chip bread is undeniably delicious, it’s important to be mindful of its nutritional content, especially if you are watching your calorie or sugar intake. Here’s a general overview of the nutrition facts per serving (approximately 1 slice, based on 12 servings per loaf). Please note that these are estimates and can vary depending on the specific ingredients used and the size of your slices.
- Servings: 12 slices
- Estimated Calories per Serving: 250-350 calories (This can vary based on sugar and chocolate chip type and amount, and milk fat content)
- Macronutrients (approximate per serving):
- Fat: 10-15 grams
- Saturated Fat: 3-5 grams (depending on chocolate chip type and milk fat)
- Cholesterol: 20-30mg
- Sodium: 150-200mg
- Carbohydrates: 35-45 grams
- Sugar: 20-25 grams (depending on sugar type and amount, and chocolate chip type)
- Protein: 3-5 grams
- Fiber: 1-2 grams
- Macronutrients (approximate per serving):
Important Note: These are rough estimates. For precise nutritional information, you can use online nutrition calculators and input the exact ingredients and quantities you used in the recipe.
Chocolate chip bread is best enjoyed as an occasional treat. Pair it with a piece of fruit or a glass of milk for a more balanced snack or breakfast.
Preparation Time: Quick Bread, Quick Joy!
One of the greatest advantages of this chocolate chip bread recipe is its speed and ease of preparation. Perfect for when you crave a homemade treat without spending hours in the kitchen!
- Prep Time: 10 minutes
- Cook Time: 50-60 minutes
- Total Time: Approximately 1 hour to 1 hour 10 minutes
From gathering your ingredients to pulling a warm, fragrant loaf from the oven, the entire process is remarkably efficient. The active prep time is minimal, mostly involving measuring and mixing, leaving you more time to relax and enjoy the aroma filling your home while it bakes.
How to Serve: Endless Ways to Enjoy Your Chocolate Chip Bread
Chocolate chip bread is incredibly versatile and can be enjoyed in a multitude of ways, making it perfect for breakfast, snacks, desserts, or even a simple afternoon treat. Here are some delicious serving suggestions:
- Warm with Butter: The classic and arguably the best way to enjoy freshly baked chocolate chip bread! A pat of melting butter enhances the flavor and adds a touch of richness.
- Toasted with Cream Cheese: For a slightly more decadent breakfast or brunch option, toast a slice of chocolate chip bread and spread it with cream cheese. The warmth and slight tanginess of the cream cheese complement the sweetness of the bread beautifully.
- Alongside a Hot Beverage: Pair a slice of chocolate chip bread with a cup of coffee, tea, or hot chocolate for a cozy and comforting treat. The warm bread and hot drink create a perfect moment of indulgence.
- As a Dessert with Ice Cream: Elevate chocolate chip bread to dessert status by serving it warm with a scoop of vanilla ice cream or your favorite flavor. The warm bread and cold ice cream create a delightful contrast of temperatures and textures.
- French Toast Style: Transform leftover chocolate chip bread into a luxurious French toast. Dip slices in an egg and milk mixture and pan-fry until golden brown. Serve with syrup, fruit, or whipped cream for an extra special breakfast or brunch.
- Grilled Cheese Style (Sweet and Savory!): Get adventurous and create a sweet and savory grilled cheese sandwich using chocolate chip bread and a mild cheese like brie or cheddar. The combination of sweet bread, melty cheese, and a hint of savory is surprisingly delicious.
- Simply on its Own: Sometimes, the best way to enjoy chocolate chip bread is simply on its own, warm or at room temperature. The flavor is so satisfying that it needs no accompaniment.
Additional Tips for Chocolate Chip Bread Baking Success
To ensure your chocolate chip bread turns out perfectly every time, here are five additional tips to keep in mind:
- Don’t Over-Mix the Batter: This tip bears repeating! Over-mixing is the biggest culprit for tough, dense quick breads. Mix the batter only until the dry ingredients are just moistened. A few lumps are okay.
- Use Room Temperature Ingredients (Ideally): While not absolutely crucial, room temperature eggs and milk incorporate more easily into the batter, resulting in a smoother texture.
- Check for Doneness Early: Start checking for doneness with a toothpick around 45 minutes, even if the recipe says 50-60 minutes. Ovens vary, and you don’t want to over-bake the bread, which can make it dry.
- Cool Completely Before Storing (Unless Serving Warm): If you’re not serving the bread immediately, allow it to cool completely on a wire rack before storing it in an airtight container. This prevents moisture from building up and making the bread soggy.
- Experiment with Chocolate Chips and Add-Ins: Don’t be afraid to customize this recipe to your liking! Try different types of chocolate chips, add nuts (walnuts, pecans), dried fruit (raisins, cranberries), or a sprinkle of cinnamon or nutmeg to the batter for variations in flavor and texture.
FAQ: Your Chocolate Chip Bread Questions Answered
Baking can sometimes bring up questions, especially for those new to it. Here are answers to five frequently asked questions about making chocolate chip bread:
Q1: Can I use self-rising flour instead of all-purpose flour and baking powder?
A: No, it’s not recommended to directly substitute self-rising flour in this recipe. Self-rising flour already contains baking powder and salt, but the ratios are different from what this recipe calls for. Using self-rising flour might result in a bread that rises too much or has an off-balance flavor. If you must use self-rising flour, omit the baking powder and salt from the recipe, but be aware that the results may vary. It’s always best to use all-purpose flour and baking powder as specified for the intended outcome.
Q2: My chocolate chip bread is dry. What did I do wrong?
A: Dry chocolate chip bread is often a result of over-baking or using too much flour. Make sure you’re measuring your flour correctly using the spoon and level method (avoid scooping). Also, check for doneness starting at the earlier end of the baking time range (around 45 minutes) and remove the bread from the oven as soon as a toothpick inserted into the center comes out clean. Over-baking dries out the bread. Another possible cause is using too little oil or milk. Double-check your measurements of wet ingredients.
Q3: Can I freeze chocolate chip bread?
A: Yes, chocolate chip bread freezes beautifully! Allow the bread to cool completely, then wrap it tightly in plastic wrap and then in aluminum foil or place it in a freezer-safe bag. Freeze for up to 2-3 months. To thaw, simply let it sit at room temperature for a few hours or overnight. You can also reheat slices in a toaster or oven for a warm, freshly baked taste.
Q4: Can I make this recipe in muffin tins instead of a loaf pan?
A: Yes, you can definitely make chocolate chip muffins using this batter! Grease or line muffin tins and fill each cup about two-thirds full. Bake at 350°F (175°C) for approximately 20-25 minutes, or until a toothpick inserted into the center of a muffin comes out clean. Muffins will bake much faster than a loaf, so keep a close eye on them.
Q5: Can I reduce the amount of sugar in this recipe?
A: While you can slightly reduce the sugar, it’s important to understand that sugar not only provides sweetness but also contributes to the bread’s moisture and texture. Reducing the sugar too drastically might result in a bread that is less tender and less flavorful. You could try reducing the sugar by ¼ cup initially and see if you are happy with the result. If using brown sugar, reducing it might also make the bread slightly less moist.
With these tips and answers to common questions, you’re fully equipped to bake a truly delightful and successful chocolate chip bread. Happy baking!
Print
Chocolate Chip Bread Recipe
Ingredients
- 1 cup White Granulated Sugar or Light Brown Sugar: Sugar is the heart of this sweet bread, providing both sweetness and moisture. You have the delightful option of choosing between white granulated sugar or light brown sugar, each lending a slightly different nuance to the final product.
- White Granulated Sugar: This is your classic sweetener, providing a clean, straightforward sweetness that allows the chocolate chips and other flavors to shine. It contributes to a lighter crumb and a slightly crisper crust.
- Light Brown Sugar: Opting for light brown sugar introduces a touch of molasses flavor, adding depth and warmth to the bread. Brown sugar also contributes to a more moist and tender crumb, thanks to its hygroscopic nature (meaning it attracts and retains moisture). If you enjoy a richer, slightly caramel-like note in your bread, brown sugar is the way to go.
Ultimately, the choice is yours! Feel free to experiment and discover your family’s preference. You can even try using half white and half brown sugar for a balanced sweetness and flavor profile.
- 2 cups All-Purpose Flour: The foundation of our bread, all-purpose flour provides structure and texture. It’s the workhorse of the baking world, offering a balance of protein and starch that results in a tender yet sturdy loaf.
- Why All-Purpose? All-purpose flour strikes a perfect balance, making it versatile for a wide range of baking projects, including quick breads like this one. It contains enough gluten-forming proteins to give the bread structure without becoming too tough.
- Measuring Flour Correctly: For accurate results, it’s crucial to measure flour correctly. Avoid scooping flour directly from the bag, as this can compact it and lead to using too much. Instead, use the “spoon and level” method: lightly spoon flour into your measuring cup until it’s overflowing, then level off the excess with a straight edge (like the back of a knife). This ensures you’re using the correct amount of flour, which is vital for the bread’s texture.
- 1 tablespoon Baking Powder: Our leavening agent, baking powder is what makes this bread rise and become light and airy. It’s a chemical leavener, meaning it reacts with moisture and heat to produce carbon dioxide gas, creating those beautiful air pockets within the bread.
- Double-Acting Baking Powder: Most baking powders are double-acting, meaning they react twice – once when mixed with liquid and again when heated in the oven. This ensures a good rise and prevents the bread from being dense.
- Freshness Matters: Baking powder has a shelf life, and its effectiveness diminishes over time. For best results, use fresh baking powder. You can test its freshness by placing a teaspoon in a ½ cup of hot water. If it fizzes vigorously, it’s still good to use.
- ½ teaspoon Salt: Salt is a seemingly small ingredient, but it plays a crucial role in baking. It enhances the flavors of all the other ingredients, balances the sweetness, and controls the activity of the yeast (in yeast breads, but still important for flavor in quick breads).
- Table Salt vs. Kosher Salt: You can use either table salt or kosher salt in this recipe. If using kosher salt, be aware that its coarser crystals mean you might need to use slightly more by volume to achieve the same saltiness as table salt. However, for this recipe, the difference is negligible.
- Don’t Skip the Salt! It might seem tempting to omit salt, especially if you’re watching your sodium intake, but it’s a critical component for flavor development in baked goods. Without salt, the bread will taste flat and bland.
- 1 Large Egg: Eggs contribute moisture, richness, and binding to the bread. The protein in the egg helps to create structure, while the fat adds tenderness and flavor.
- Large Eggs at Room Temperature: While not strictly essential for this recipe, using room-temperature eggs can help them incorporate more smoothly into the batter, resulting in a more even texture. If you forgot to take your egg out of the fridge, you can quickly warm it by placing it in a bowl of warm (not hot) water for a few minutes.
- Grade A Large Eggs: “Large” refers to a specific size category for eggs. Using large eggs ensures you have the correct amount of liquid and binding power for the recipe.
- 1 cup Milk (Vitamin D, Whole, 2%, or Almond): Milk provides liquid to the batter, contributing to moisture and tenderness. It also adds a subtle richness and flavor. Julie Blanner’s recipe wisely offers flexibility in milk choices.
- Vitamin D Milk: Vitamin D milk is simply milk fortified with Vitamin D, an essential nutrient. It doesn’t significantly impact the flavor or texture of the bread.
- Whole Milk: Whole milk, with its higher fat content, will result in the richest and most tender bread.
- 2% Milk: 2% milk is a good middle-ground option, offering a balance of richness and lightness.
- Almond Milk: For a dairy-free option, almond milk works beautifully. Unsweetened almond milk is recommended to avoid adding extra sweetness to the bread. Other plant-based milks like soy milk or oat milk would also likely work well.
Choose the milk that best suits your dietary needs and preferences. The recipe is forgiving and adaptable.
- ⅓ cup Vegetable Oil: Vegetable oil adds moisture and tenderness to the bread, contributing to its soft crumb. It also helps to keep the bread moist for longer.
- Neutral Flavor Oils: Vegetable oil, canola oil, or even melted coconut oil (refined, for a neutral flavor) are all suitable choices. The key is to use an oil with a neutral flavor that won’t overpower the other ingredients.
- Oil vs. Butter: While butter can be used in quick breads, oil often results in a more consistently moist crumb. Butter can sometimes make quick breads slightly denser if not used correctly. For this easy and foolproof recipe, vegetable oil is a reliable choice.
- 1 ½ cups Chocolate Chips (Semi-Sweet, Milk Chocolate, or Dark Chocolate): The star of the show! Chocolate chips bring bursts of chocolatey goodness to every slice. Again, Julie Blanner’s recipe gives you the freedom to customize based on your chocolate preferences.
- Semi-Sweet Chocolate Chips: A classic choice, semi-sweet chocolate chips offer a balanced sweetness and chocolate intensity that complements the bread perfectly.
- Milk Chocolate Chips: For a sweeter and milkier chocolate flavor, milk chocolate chips are a delightful option. They melt beautifully and create pockets of creamy chocolate within the bread.
- Dark Chocolate Chips: If you prefer a more intense and slightly bitter chocolate flavor, dark chocolate chips are your best bet. They provide a sophisticated contrast to the sweetness of the bread.
- Mix and Match! Don’t be afraid to get creative! You could use a combination of different types of chocolate chips, or even add chopped chocolate chunks for a more rustic and decadent texture. Consider using mini chocolate chips for more even distribution or large chocolate chips for bigger pools of melted chocolate.
Instructions
- Preheat Oven to 350°F (175°C). Grease a 1-pound Loaf Pan.
- Preheating is Key: Preheating your oven is crucial for even baking. It ensures that the oven is at the correct temperature when you place the bread in, allowing it to rise properly and bake evenly. Use an oven thermometer to verify your oven’s temperature for the most accurate results.
- Greasing the Loaf Pan: Properly greasing your loaf pan prevents the bread from sticking and ensures easy removal after baking. You can use cooking spray, butter, or shortening to grease the pan. Make sure to grease all sides and corners thoroughly. For extra insurance against sticking, you can also dust the greased pan with flour.
- Loaf Pan Size: A 1-pound loaf pan is the standard size for this recipe. If you don’t have a 1-pound pan, you can use a slightly larger or smaller pan, but baking times may need to be adjusted. If using a larger pan, the bread will be shallower and may bake faster. If using a smaller pan, it will be taller and may require a longer baking time.
- In a Medium Mixing Bowl, Whisk to Combine Sugar, Flour, Baking Powder, and Salt. Set Aside.
- Dry Ingredients First: Combining the dry ingredients in a separate bowl ensures they are evenly distributed before being added to the wet ingredients. This prevents clumps of baking powder or salt in the batter, which can lead to uneven rising or salty spots.
- Whisking for Aeration: Whisking the dry ingredients not only combines them but also aerates the flour and baking powder. This helps to create a lighter and more tender crumb in the finished bread. Don’t over-whisk at this stage; just whisk until the ingredients are evenly combined.
(Image Description: A white mixing bowl with flour, sugar, baking powder, and salt, with a whisk resting inside. The bowl is placed on a clean marble countertop, with natural light illuminating the scene. The focus is on the texture of the dry ingredients and the whisk, suggesting the action of combining them.)
- In a Large Mixing Bowl or Stand Mixer, Beat Egg, Milk, and Oil Until Combined.
- Wet Ingredients Next: In a separate, larger bowl, combine the wet ingredients. Using a larger bowl is important because you’ll eventually be adding the dry ingredients to this bowl.
- Mixing Wet Ingredients: Beat the egg, milk, and oil together until they are just combined. You can use a whisk, hand mixer, or stand mixer for this step. Don’t over-mix at this stage; you just want to ensure the ingredients are blended. Over-mixing wet ingredients is less of a concern than over-mixing after adding the flour, but gentle mixing is always good practice for quick breads.
(Image Description: A large mixing bowl containing a mixture of egg, milk, and vegetable oil. A hand mixer is shown partially submerged in the mixture, indicating the action of beating the wet ingredients. The bowl is clear glass, allowing the viewer to see the liquid mixture. The background is blurred, drawing attention to the mixing process.)
- Gradually Add Dry Mixture to Wet Mixture, Stirring Together Until Just Moistened.
- Gradual Addition: Adding the dry ingredients to the wet ingredients gradually, rather than all at once, helps to prevent clumps from forming and ensures a smoother batter. Add the dry mixture in two or three additions, mixing gently after each addition.
- “Just Moistened” is Key: This is the most crucial step for achieving a tender chocolate chip bread. Mix the batter only until the dry ingredients are just moistened and incorporated into the wet ingredients. A few streaks of flour are perfectly acceptable at this stage. Over-mixing at this point will develop the gluten in the flour, resulting in a tough and dense bread. Stop mixing as soon as everything is almost combined.
(Image Description: A glass mixing bowl with flour and other dry ingredients being slowly poured into a larger bowl containing the wet ingredients. A spatula is gently folding the dry ingredients into the wet ingredients. The focus is on the gradual addition and gentle folding, emphasizing the importance of not over-mixing.)
- Fold in Chocolate Chips, Reserving ¼ cup for the Top of the Loaf.
- Folding in Chocolate Chips: Once the batter is just moistened, gently fold in the chocolate chips using a spatula. Folding is a gentle mixing technique that helps to incorporate ingredients without over-mixing the batter. Use a sweeping motion, scraping along the bottom of the bowl and bringing the spatula up and over the batter.
- Reserving Chocolate Chips: Reserving a portion of the chocolate chips to sprinkle on top of the loaf before baking creates a visually appealing and extra chocolatey topping. This also ensures that you have visible chocolate chips on the surface of the bread.
(Image Description: Close-up shot of chocolate chips being folded into chocolate chip bread batter within a clear glass mixing bowl. A spatula is gently incorporating the chocolate chips, ensuring even distribution. The batter is thick and studded with chocolate chips. The focus is on the folding motion and the abundance of chocolate chips.)
- Pour Batter into Loaf Pan Filled Just ⅔ Full. Top with Remaining Chocolate Chips. Bake in the Center of the Oven for 50-60 Minutes, or Until a Toothpick Inserted into the Center Comes Out Clean.
- Filling the Loaf Pan: Pour the batter into the prepared loaf pan, filling it about two-thirds full. This leaves room for the bread to rise in the oven without overflowing.
- Topping with Chocolate Chips: Sprinkle the reserved chocolate chips evenly over the top of the batter.
- Baking Time and Temperature: Bake the bread in the center rack of the preheated oven for 50-60 minutes, or until a toothpick inserted into the center comes out clean. Baking times can vary slightly depending on your oven and the size of your loaf pan.
- Toothpick Test: The toothpick test is the best way to determine if the bread is done. Insert a toothpick or wooden skewer into the center of the loaf. If it comes out clean or with a few moist crumbs attached, the bread is done. If it comes out with wet batter, the bread needs to bake longer.
- Browning Too Quickly? If the top of the bread starts to brown too quickly before the center is fully baked, you can loosely tent a piece of aluminum foil over the loaf to prevent over-browning.
- Allow to Cool in Pan for 10 Minutes Before Slicing.
- Cooling in Pan: Allowing the bread to cool in the pan for 10 minutes before slicing makes it easier to handle and prevents it from crumbling. During this time, the bread continues to set and firm up.
- Slicing and Serving: After 10 minutes of cooling in the pan, gently loosen the edges of the bread with a knife or spatula and invert it onto a wire rack to cool completely. However, let’s be honest, warm chocolate chip bread is incredibly tempting! You can slice and serve it warm after the initial 10-minute cooling period, or let it cool completely for easier slicing and storage.
Nutrition
- Serving Size: One Normal Portion
- Calories: 250-350
- Sugar: 20-25 grams
- Sodium: 150-200mg
- Fat: 10-15 grams
- Saturated Fat: 3-5 grams
- Carbohydrates: 35-45 grams
- Fiber: 1-2 grams
- Protein: 3-5 grams
- Cholesterol: 20-30mg