There are moments in the kitchen that feel like pure alchemy, where simple ingredients transform into something utterly magical. My first encounter with making Chocolate Peanut Butter Banana Cups was one such moment. I’d been searching for a healthier, yet still indulgent, treat that my whole family would enjoy – something to satisfy those persistent sweet cravings without resorting to overly processed store-bought options. When I stumbled upon the concept, the classic trio of chocolate, peanut butter, and banana immediately sang to me. The first batch I made disappeared within hours. My kids, usually picky about “healthy” snacks, were clamoring for more, their faces smeared with chocolate and delight. My husband, a self-proclaimed dessert connoisseur, declared them “dangerously good.” Since then, these little cups of joy have become a staple in our home. They are remarkably easy to whip up, require no baking (a huge plus in warmer months or when oven space is prime real estate!), and offer that perfect balance of creamy, sweet, and salty. The natural sweetness from the ripe bananas means you don’t need a ton of added sugar, and the combination of healthy fats from peanut butter and antioxidants from dark chocolate makes them a treat you can feel genuinely good about. They’re perfect for an after-school snack, a post-dinner indulgence, or even a little pick-me-up with a cup of coffee. I’ve tweaked and perfected this recipe over time, and I’m thrilled to share my go-to version with you. Prepare to fall in love!
Ingredients
Here’s what you’ll need to create these irresistible Chocolate Peanut Butter Banana Cups. I’ve found these specific amounts yield a perfect balance of flavors and textures for about 12 standard-sized cups.
- For the Chocolate Layers:
- 1 ½ cups (approx. 250-270g) good quality semi-sweet or dark chocolate chips (or chopped chocolate bar – use at least 60-70% cacao for a richer flavor)
- 2 tablespoons coconut oil (optional, but helps create a smoother, glossier chocolate that’s easier to bite into when frozen)
- For the Peanut Butter Banana Filling:
- 2 large ripe bananas (the riper, the sweeter and easier to mash – look for ones with plenty of brown spots)
- ¾ cup creamy peanut butter (natural, unsweetened is great, but regular creamy works too; adjust for salt if using salted peanut butter)
- 2 tablespoons maple syrup or honey (optional, for added sweetness – taste your banana mixture first)
- 1 teaspoon vanilla extract
- A pinch of salt (if using unsalted peanut butter)
- Optional Garnishes:
- Flaky sea salt
- Chopped peanuts
- Mini chocolate chips
- A thin slice of banana (add just before serving if not freezing for long, as it can brown)
- Equipment:
- 12-cup standard muffin tin
- Paper or silicone muffin liners
Instructions
Follow these simple steps to create your own batch of delightful Chocolate Peanut Butter Banana Cups. The process is straightforward and quite fun!
- Prepare the Muffin Tin: Line a 12-cup standard muffin tin with paper or silicone liners. This prevents sticking and makes for easy removal and serving. Set aside.
- Melt the Chocolate (First Layer):
- In a microwave-safe bowl, combine 1 cup of the chocolate chips (or chopped chocolate) with 1 tablespoon of the coconut oil (if using).
- Microwave in 30-second intervals, stirring well after each interval, until the chocolate is almost completely melted. Continue stirring until smooth. Be careful not to overheat, as chocolate can seize.
- Alternatively, melt the chocolate and coconut oil in a heatproof bowl set over a saucepan of simmering water (double boiler method), ensuring the bottom of the bowl doesn’t touch the water. Stir until smooth.
- Create the Bottom Chocolate Layer: Spoon approximately 1 to 1.5 teaspoons of the melted chocolate into the bottom of each muffin liner. Use the back of the spoon to spread it evenly, creating a base layer. You want enough to cover the bottom but not make it too thick.
- Chill the Base: Place the muffin tin in the freezer for about 10-15 minutes, or in the refrigerator for 20-30 minutes, until the chocolate base is firm. This prevents the filling from mixing with the bottom chocolate layer.
- Prepare the Peanut Butter Banana Filling:
- While the chocolate bases are chilling, prepare the filling. In a medium bowl, mash the ripe bananas thoroughly with a fork until mostly smooth (a few small lumps are okay).
- Add the peanut butter, maple syrup or honey (if using), vanilla extract, and a pinch of salt (if your peanut butter is unsalted) to the mashed bananas.
- Stir everything together until well combined and creamy. Taste the mixture and adjust sweetness if desired.
- Add the Filling Layer: Once the chocolate bases are set, remove the muffin tin from the freezer/refrigerator. Spoon the peanut butter banana filling evenly over the chocolate base in each cup. Aim for about 1-2 tablespoons per cup, or until it’s about two-thirds full, leaving some space for the top chocolate layer. Smooth the top of the filling gently with the back of a spoon.
- Melt the Remaining Chocolate (Top Layer):
- In the same (or a clean) microwave-safe bowl, combine the remaining ½ cup of chocolate chips (or chopped chocolate) with the remaining 1 tablespoon of coconut oil (if using).
- Melt using the same method as before (microwave in 30-second intervals, stirring, or double boiler) until smooth and glossy.
- Create the Top Chocolate Layer: Carefully spoon the melted chocolate over the peanut butter banana filling in each cup, ensuring the filling is completely covered. Use the back of the spoon to spread it smoothly.
- Garnish (Optional): If desired, while the top chocolate layer is still wet, sprinkle with flaky sea salt, chopped peanuts, or mini chocolate chips. This adds a lovely visual appeal and textural contrast.
- Final Chill: Place the muffin tin back into the refrigerator for at least 1-2 hours, or into the freezer for 30-60 minutes, until the cups are completely firm and the chocolate is set. For a firmer, more ice-cream-like texture, freezing is recommended.
- Serve and Store: Once fully set, gently remove the cups from the muffin tin by pulling on the edges of the liners. Peel away the liner before enjoying. Store leftover cups in an airtight container in the refrigerator for up to 5 days or in the freezer for up to 2-3 months. If frozen, let them sit at room temperature for 5-10 minutes before eating for the best texture.
Nutrition Facts
- Servings: This recipe makes approximately 12 standard-sized cups.
- Calories per serving (estimated): Approximately 180-250 calories per cup.
Disclaimer: The nutritional information provided is an estimate and can vary significantly based on the specific ingredients used (e.g., type of chocolate, brand of peanut butter, added sweeteners) and exact portion sizes. For precise nutritional data, it’s recommended to use an online nutrition calculator with your specific ingredients.
Preparation Time
- Active Preparation Time: 20-25 minutes (includes melting chocolate, mashing bananas, assembling layers)
- Chilling Time (Inactive):
- Initial chill for base: 10-15 minutes (freezer) or 20-30 minutes (refrigerator)
- Final chill: 30-60 minutes (freezer) or 1-2 hours (refrigerator)
- Total Time: Approximately 1 hour to 2 hours 55 minutes (largely dependent on chilling method and time)
How to Serve
These Chocolate Peanut Butter Banana Cups are wonderfully versatile. Here are some delightful ways to serve and enjoy them:
- Straight from the Fridge/Freezer:
- Enjoy them as a quick, chilled snack directly from the refrigerator.
- For a firmer, more ice cream-like treat, serve them straight from the freezer. Let them sit at room temperature for 5-10 minutes to soften slightly for easier biting.
- As a Dessert:
- Arrange them on a platter for an easy and impressive no-bake dessert option at parties or gatherings.
- Serve one or two cups alongside a scoop of vanilla bean ice cream or a dollop of whipped coconut cream for a more decadent experience.
- Pair with a cup of hot coffee, tea, or a cold glass of milk.
- With Toppings (Beyond the Initial Garnish):
- Drizzle with extra melted peanut butter or a caramel sauce just before serving.
- Sprinkle with toasted shredded coconut or hemp seeds for added texture and nutrition.
- Top with a fresh raspberry or a thin slice of strawberry for a pop of color and contrasting flavor.
- For Special Occasions:
- Use mini muffin tins and mini liners to create bite-sized versions, perfect for canapé-style desserts or kids’ parties.
- Package them in small cellophane bags tied with a ribbon for a thoughtful homemade gift or party favor.
- Deconstructed Style:
- Crumble a cup over a bowl of Greek yogurt or oatmeal for a delicious and more substantial breakfast or snack.
Additional Tips
To ensure your Chocolate Peanut Butter Banana Cups turn out perfectly every time and to explore some fun variations, consider these additional tips:
- Choosing Your Chocolate: The quality and type of chocolate you use will significantly impact the final flavor.
- Dark Chocolate (60-77% cacao): Offers a rich, intense flavor that beautifully balances the sweetness of the banana and richness of the peanut butter. It also tends to have more health benefits.
- Semi-Sweet Chocolate (40-60% cacao): A classic choice that provides a good balance of sweetness and chocolate flavor. Great if you prefer a slightly sweeter cup.
- Milk Chocolate: Will result in a much sweeter cup. If using, you might want to reduce or omit the maple syrup/honey in the filling.
- Vegan Chocolate: Ensure you use dairy-free chocolate chips or bars to keep the recipe vegan.
- Coconut Oil Magic: Adding coconut oil to the chocolate not only helps it melt smoother but also creates a “magic shell” effect that snaps a bit when cold but isn’t rock-hard, making the cups easier to bite into, especially if stored in the freezer.
- Peanut Butter Perfection:
- Natural vs. Conventional: Natural peanut butter (just peanuts and salt) will give a more intense peanut flavor and might require a bit more stirring if separated. Conventional peanut butter is smoother and often sweeter. Adjust added sweeteners accordingly.
- Creamy vs. Crunchy: Creamy peanut butter is traditional for the filling, providing a smooth texture. However, using crunchy peanut butter can add a delightful textural surprise.
- Other Nut/Seed Butters: Feel free to experiment! Almond butter, cashew butter, or even sunflower seed butter (for a nut-free option) can be delicious substitutes, though they will alter the flavor profile.
- Banana Ripeness is Key: The riper your bananas, the better. Overripe bananas (with lots of brown spots or even mostly brown skin, as long as they’re not moldy) are naturally much sweeter and softer, making them easier to mash into a smooth consistency. This natural sweetness can reduce or even eliminate the need for added sweeteners like maple syrup or honey in the filling. If your bananas are less ripe, you might need a touch more sweetener.
- Customization and Flavor Boosters: Don’t be afraid to get creative!
- Spices: A pinch of cinnamon, nutmeg, or even a tiny dash of cardamom in the banana filling can add warmth and complexity.
- Extracts: While vanilla is classic, a drop of almond extract or even a hint of coffee extract in the chocolate could be interesting.
- Texture: Consider adding a tablespoon of finely chopped nuts (like pecans or walnuts) or a tablespoon of rolled oats (or quick oats) directly into the peanut butter banana filling for extra texture and a slight nutritional boost.
- Layers: For an even more decadent treat, consider adding a thin layer of crushed graham crackers or Oreo crumbs mixed with a little melted butter as the very first layer in the muffin cups, before the chocolate.
- Storage and Thawing:
- Refrigerator: These cups will keep well in an airtight container in the refrigerator for up to 5 days. The banana filling may slightly darken over time due to oxidation, but this doesn’t affect the taste.
- Freezer: For longer storage (up to 2-3 months), place them in a freezer-safe airtight container. They are delicious frozen!
- Thawing: If eating from frozen, let them sit at room temperature for about 5-10 minutes. This softens them just enough to make them easier to bite into and allows the flavors to meld beautifully. Avoid microwaving to thaw, as the chocolate can melt unevenly and the banana can become mushy.
FAQ Section
Here are answers to some frequently asked questions about making Chocolate Peanut Butter Banana Cups:
- Q: Can I make these cups vegan?
- A: Absolutely! It’s very easy to make these vegan. Simply ensure you use dairy-free chocolate chips or a vegan chocolate bar. For the sweetener in the filling, opt for maple syrup instead of honey. Most natural peanut butters are vegan, but always double-check the label. Coconut oil is also vegan-friendly.
- Q: How can I make these gluten-free?
- A: The core recipe (chocolate, peanut butter, banana) is naturally gluten-free. Just ensure your chocolate and peanut butter brands are certified gluten-free if you have celiac disease or severe sensitivity, as some can have cross-contamination risks. If you decide to add a crusty base (like graham crackers, as mentioned in the tips), be sure to use gluten-free graham crackers or gluten-free cookies.
- Q: My chocolate seized while melting! What did I do wrong, and can I fix it?
- A: Chocolate seizes (becomes thick, grainy, and unworkable) when it comes into contact with even a tiny amount of water or if it’s overheated.
- Prevention: When using a double boiler, ensure no steam or water droplets get into the chocolate. When microwaving, use short intervals and stir frequently.
- Fixing (Sometimes Possible): If it’s only mildly seized, you can sometimes rescue it by vigorously stirring in a very small amount (about 1 teaspoon at a time) of neutral-flavored oil (like more coconut oil or vegetable oil) or melted butter/shortening until it smooths out. However, this may alter the texture slightly. If it’s badly seized, it’s often best to start over for this recipe, as the texture is crucial.
- A: Chocolate seizes (becomes thick, grainy, and unworkable) when it comes into contact with even a tiny amount of water or if it’s overheated.
- Q: Can I use a different type of nut butter or make it nut-free?
- A: Yes! While peanut butter is classic, almond butter, cashew butter, or tahini can create delicious variations. For a completely nut-free version, sunflower seed butter (SunButter) is an excellent alternative and pairs surprisingly well with banana and chocolate. The taste will, of course, be different, but equally delightful in its own way.
- Q: Why do my cups get soft quickly at room temperature? How can I prevent this?
- A: The filling contains fresh banana and peanut butter, which are naturally softer at room temperature, and the coconut oil in the chocolate also has a lower melting point. These cups are designed to be enjoyed chilled or frozen.
- Storage: Always store them in the refrigerator or freezer.
- Serving: If serving at a party, try to put them out in smaller batches or just before guests are ready for dessert. You can also place the serving platter over a bed of ice to keep them cooler for longer.
- Omitting Coconut Oil: If you plan to serve them primarily from the fridge and want a slightly harder chocolate shell that stays firm longer at cool room temperatures, you can omit the coconut oil from the chocolate. However, the chocolate will be harder to bite into, especially if frozen.
- A: The filling contains fresh banana and peanut butter, which are naturally softer at room temperature, and the coconut oil in the chocolate also has a lower melting point. These cups are designed to be enjoyed chilled or frozen.
Enjoy making and, more importantly, eating these wonderfully satisfying Chocolate Peanut Butter Banana Cups! They are a testament to how simple, wholesome ingredients can come together to create something truly special.
Print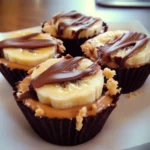
Chocolate Peanut Butter Banana Cups Recipe
Ingredients
- For the Chocolate Layers:
- 1 ½ cups (approx. 250-270g) good quality semi-sweet or dark chocolate chips (or chopped chocolate bar – use at least 60-70% cacao for a richer flavor)
- 2 tablespoons coconut oil (optional, but helps create a smoother, glossier chocolate that’s easier to bite into when frozen)
- For the Peanut Butter Banana Filling:
- 2 large ripe bananas (the riper, the sweeter and easier to mash – look for ones with plenty of brown spots)
- ¾ cup creamy peanut butter (natural, unsweetened is great, but regular creamy works too; adjust for salt if using salted peanut butter)
- 2 tablespoons maple syrup or honey (optional, for added sweetness – taste your banana mixture first)
- 1 teaspoon vanilla extract
- A pinch of salt (if using unsalted peanut butter)
- Optional Garnishes:
- Flaky sea salt
- Chopped peanuts
- Mini chocolate chips
- A thin slice of banana (add just before serving if not freezing for long, as it can brown)
Instructions
- Prepare the Muffin Tin: Line a 12-cup standard muffin tin with paper or silicone liners. This prevents sticking and makes for easy removal and serving. Set aside.
- Melt the Chocolate (First Layer):
- In a microwave-safe bowl, combine 1 cup of the chocolate chips (or chopped chocolate) with 1 tablespoon of the coconut oil (if using).
- Microwave in 30-second intervals, stirring well after each interval, until the chocolate is almost completely melted. Continue stirring until smooth. Be careful not to overheat, as chocolate can seize.
- Alternatively, melt the chocolate and coconut oil in a heatproof bowl set over a saucepan of simmering water (double boiler method), ensuring the bottom of the bowl doesn’t touch the water. Stir until smooth.
- Create the Bottom Chocolate Layer: Spoon approximately 1 to 1.5 teaspoons of the melted chocolate into the bottom of each muffin liner. Use the back of the spoon to spread it evenly, creating a base layer. You want enough to cover the bottom but not make it too thick.
- Chill the Base: Place the muffin tin in the freezer for about 10-15 minutes, or in the refrigerator for 20-30 minutes, until the chocolate base is firm. This prevents the filling from mixing with the bottom chocolate layer.
- Prepare the Peanut Butter Banana Filling:
- While the chocolate bases are chilling, prepare the filling. In a medium bowl, mash the ripe bananas thoroughly with a fork until mostly smooth (a few small lumps are okay).
- Add the peanut butter, maple syrup or honey (if using), vanilla extract, and a pinch of salt (if your peanut butter is unsalted) to the mashed bananas.
- Stir everything together until well combined and creamy. Taste the mixture and adjust sweetness if desired.
- Add the Filling Layer: Once the chocolate bases are set, remove the muffin tin from the freezer/refrigerator. Spoon the peanut butter banana filling evenly over the chocolate base in each cup. Aim for about 1-2 tablespoons per cup, or until it’s about two-thirds full, leaving some space for the top chocolate layer. Smooth the top of the filling gently with the back of a spoon.
- Melt the Remaining Chocolate (Top Layer):
- In the same (or a clean) microwave-safe bowl, combine the remaining ½ cup of chocolate chips (or chopped chocolate) with the remaining 1 tablespoon of coconut oil (if using).
- Melt using the same method as before (microwave in 30-second intervals, stirring, or double boiler) until smooth and glossy.
- Create the Top Chocolate Layer: Carefully spoon the melted chocolate over the peanut butter banana filling in each cup, ensuring the filling is completely covered. Use the back of the spoon to spread it smoothly.
- Garnish (Optional): If desired, while the top chocolate layer is still wet, sprinkle with flaky sea salt, chopped peanuts, or mini chocolate chips. This adds a lovely visual appeal and textural contrast.
- Final Chill: Place the muffin tin back into the refrigerator for at least 1-2 hours, or into the freezer for 30-60 minutes, until the cups are completely firm and the chocolate is set. For a firmer, more ice-cream-like texture, freezing is recommended.
- Serve and Store: Once fully set, gently remove the cups from the muffin tin by pulling on the edges of the liners. Peel away the liner before enjoying. Store leftover cups in an airtight container in the refrigerator for up to 5 days or in the freezer for up to 2-3 months. If frozen, let them sit at room temperature for 5-10 minutes before eating for the best texture.
Nutrition
- Serving Size: One Normal Portion
- Calories: 180-250