


Okay, let’s dive into the delicious world of Chocolate Peanut Butter Banana Cups! These little bites of heaven have become an absolute staple in our household. The first time I made them, I was looking for a healthier treat that would satisfy my sweet cravings without the guilt, and boy, did these deliver! My kids, who can be notoriously picky, gobbled them up and immediately asked when I’d be making them again. My husband, a self-proclaimed peanut butter fanatic, declared them “the perfect dessert.” They’re that magical combination of creamy, chocolatey, fruity, and just a little bit salty – an explosion of textures and flavors that’s simply irresistible. The best part? They are surprisingly easy to make, requiring no baking and minimal effort, yet they look and taste incredibly gourmet. Whether you’re looking for a quick snack, a party treat, or a healthier dessert option, these Chocolate Peanut Butter Banana Cups are sure to become a favorite in your home too.
Why You’ll Fall in Love with These Chocolate Peanut Butter Banana Cups
Before we even get to the nuts and bolts of making these delightful treats, let’s talk about why they’re so exceptionally good and why they deserve a permanent spot in your recipe repertoire.
- Irresistible Flavor Combination: Chocolate, peanut butter, and banana are a classic trio for a reason. The rich, slightly bitter notes of dark chocolate perfectly complement the creamy, salty-sweetness of peanut butter, while the ripe banana adds a natural sweetness and soft, yielding texture. It’s a symphony of flavors that dances on your palate.
- Texture Heaven: These cups offer a delightful textural experience. You get the satisfying snap of the chocolate shell, followed by the smooth, luscious peanut butter, and then the soft, slightly chewy banana. Each bite is an adventure.
- No-Bake Wonder: In the heat of summer or when you simply don’t want to turn on the oven, no-bake recipes are a lifesaver. These cups come together with just a bit of melting and chilling, making them incredibly convenient.
- Surprisingly Healthy (ish!): While still a treat, these cups pack some nutritional punches. Dark chocolate is rich in antioxidants, peanut butter provides protein and healthy fats, and bananas are a great source of potassium and fiber. You can control the sugar content by choosing your chocolate and peanut butter wisely.
- Customizable: As you’ll see in our tips and variations, this recipe is wonderfully adaptable. You can swap nut butters, add toppings, or adjust the sweetness to your liking.
- Portion Control Perfection: Made in individual muffin cups, these treats are naturally portion-controlled. This helps to satisfy your sweet tooth without overindulging (though, be warned, they’re so good it’s hard to stop at one!).
- Kid-Friendly and Adult-Approved: Kids love the familiar flavors, and adults appreciate the more sophisticated taste, especially if using good quality dark chocolate. They’re a hit with all age groups.
- Perfect for Any Occasion: Whether you need a quick afternoon pick-me-up, a dessert for a dinner party, a treat for a potluck, or a healthy-ish snack for the kids’ lunchboxes (if nut-free alternatives are used for school), these cups fit the bill.
- Visually Appealing: Let’s be honest, they look gorgeous! The layered effect and the glossy chocolate top make them look like they came from a fancy chocolatier.
These Chocolate Peanut Butter Banana Cups are more than just a recipe; they’re a small moment of joy, a simple pleasure that can brighten any day. Their ease of preparation combined with their outstanding taste makes them a true winner.
Ingredients for Chocolate Peanut Butter Banana Cups
Here’s what you’ll need to create approximately 12 delicious cups:
- For the Chocolate Layers:
- 1 ½ cups (approx. 270g or 9.5 oz) good quality dark chocolate chips or chopped dark chocolate (at least 60-70% cacao recommended for best flavor and less sugar)
- 2 tablespoons coconut oil (unrefined for a slight coconutty hint, or refined for neutral flavor), divided
- For the Peanut Butter Layer:
- ¾ cup creamy peanut butter (natural, unsweetened is great, or your favorite brand)
- 1 tablespoon maple syrup or honey (optional, adjust to taste, especially if using unsweetened peanut butter)
- ½ teaspoon vanilla extract
- Pinch of sea salt (especially if your peanut butter is unsalted)
- For the Banana Layer:
- 2 medium ripe but firm bananas (not overly mushy)
- Optional for Topping:
- Flaky sea salt
- Chopped peanuts
- Mini chocolate chips
- A drizzle of extra melted peanut butter
A Note on Ingredients:
- Chocolate: The quality of your chocolate will significantly impact the final taste. Using a good dark chocolate (60-70% cacao) provides a rich flavor that balances the sweetness of the banana and peanut butter. Milk chocolate can be used if you prefer a sweeter treat, but it will alter the flavor profile.
- Coconut Oil: This is crucial for helping the chocolate melt smoothly and creating a slightly softer shell that’s easier to bite into. It also helps the chocolate set nicely.
- Peanut Butter: Creamy peanut butter works best for a smooth layer. Natural peanut butter (just peanuts and salt) is a healthier option, but you might want to add a touch more sweetener. If your natural peanut butter is very runny, it might mix more with the chocolate; if it’s very stiff, it might be harder to spread. Aim for a good, stir-able consistency.
- Bananas: Choose bananas that are ripe (yellow with a few brown spots for sweetness) but still firm enough to slice neatly. Overripe, mushy bananas will be difficult to work with and can make the cups watery.
- Sweetener: The maple syrup or honey in the peanut butter layer is optional. Taste your peanut butter first; if it’s already sweetened or if you prefer a less sweet treat, you can omit it or reduce the amount.
Step-by-Step Instructions to Craft Your Cups
Making these Chocolate Peanut Butter Banana Cups is a simple layering process. Follow these steps for perfect results every time!
1. Prepare Your Muffin Tin:
- Line a standard 12-cup muffin tin with paper or silicone liners. Silicone liners are fantastic as they peel away cleanly, but paper liners work well too. Set aside.
2. Melt the First Chocolate Layer:
- In a microwave-safe bowl, combine ¾ cup (approx. 135g) of the chocolate chips and 1 tablespoon of the coconut oil.
- Microwave in 30-second intervals, stirring well after each interval, until the chocolate is almost completely melted.
- Remove from the microwave and stir continuously until smooth and fully melted. Be careful not to overheat the chocolate, as it can become grainy or seize.
- Alternatively, you can melt the chocolate and coconut oil in a heatproof bowl set over a saucepan of simmering water (double boiler method), ensuring the bottom of the bowl doesn’t touch the water.
3. Create the Chocolate Base:
- Spoon approximately 1 to 1.5 tablespoons of the melted chocolate mixture into the bottom of each muffin liner.
- Use the back of the spoon to spread the chocolate evenly to cover the base of each liner. You can also gently tilt and swirl the muffin tin to help the chocolate spread.
- Place the muffin tin in the freezer for 10-15 minutes, or in the refrigerator for 20-30 minutes, until the chocolate base is firm.
4. Prepare the Peanut Butter Filling:
- While the chocolate bases are chilling, prepare the peanut butter layer. In a small bowl, combine the ¾ cup creamy peanut butter, optional maple syrup or honey, vanilla extract, and pinch of sea salt.
- Stir well until everything is thoroughly combined and smooth. If your peanut butter is very stiff, you can warm it slightly in the microwave for 10-15 seconds to make it easier to stir and spread.
5. Prepare the Banana Slices:
- Peel the bananas and slice them into rounds about ¼ to ⅓ inch thick. You’ll want 12 slices that fit nicely into the muffin cups, or you can use 2-3 smaller slices per cup if your bananas are thinner.
6. Assemble the Layers:
- Once the chocolate bases are firm, remove the muffin tin from the freezer/refrigerator.
- Place one or two banana slices on top of the chocolate base in each cup.
- Spoon or pipe about 1 tablespoon of the peanut butter mixture over the banana slices in each cup. Use the back of a small spoon to gently spread it into an even layer, covering the banana.
7. Melt the Second Chocolate Layer:
- In a clean microwave-safe bowl (or the same one, washed and dried), combine the remaining ¾ cup (approx. 135g) of chocolate chips and the remaining 1 tablespoon of coconut oil.
- Melt using the same method as in Step 2 (microwave in 30-second intervals or use a double boiler) until smooth.
8. Top with Chocolate:
- Carefully spoon the remaining melted chocolate over the peanut butter layer in each cup, ensuring the peanut butter is completely covered. Aim for about 1 to 1.5 tablespoons of chocolate per cup.
- Gently spread the chocolate to the edges to seal the cup.
9. Add Optional Toppings (If Using):
- If you’re adding flaky sea salt, chopped peanuts, mini chocolate chips, or a peanut butter drizzle, do it now while the top chocolate layer is still wet so they adhere properly.
10. Chill to Set:
* Return the muffin tin to the refrigerator for at least 30-60 minutes, or to the freezer for 15-30 minutes, until the chocolate is completely firm and the cups are set.
11. Serve and Enjoy!
* Once set, gently remove the Chocolate Peanut Butter Banana Cups from the muffin liners. They are best enjoyed chilled.
Nutrition Facts
- Servings: This recipe makes approximately 12 cups.
- Calories per serving (1 cup): Approximately 250-300 calories.
Disclaimer: The nutritional information is an estimate and can vary significantly based on the specific brands of ingredients used (especially chocolate and peanut butter), the exact amount of sweetener added, and the precise size of the cups. For precise nutritional data, it’s recommended to calculate based on your specific ingredients using an online nutrition calculator.
These cups offer a good balance of fats (from peanut butter, chocolate, and coconut oil), carbohydrates (from banana and chocolate), and some protein (from peanut butter).
Preparation Time
- Active Preparation Time: 20-25 minutes (includes melting chocolate, slicing bananas, mixing peanut butter)
- Chilling Time (Total): Minimum 45 minutes to 1.5 hours (includes chilling the base and then the final cups)
- Total Time: Approximately 1 hour 5 minutes to 2 hours (depending on chilling method and speed)
This makes them a relatively quick treat to whip up, with most of the time being hands-off chilling.
How to Serve Your Chocolate Peanut Butter Banana Cups
These versatile treats can be enjoyed in a variety of ways. Here are some serving suggestions:
- Straight from the Fridge: This is the classic way. The cool temperature makes them incredibly refreshing, and the chocolate has a satisfying snap.
- Slightly Softened: Let them sit at room temperature for 5-10 minutes before serving. This softens the chocolate slightly and makes the peanut butter even creamier.
- As a Dessert Topping:
- Crumble a cup over a bowl of vanilla ice cream or dairy-free nice cream.
- Chop one up and sprinkle over Greek yogurt or a smoothie bowl for a decadent breakfast or snack.
- With a Hot Beverage: Pair a cup with a hot coffee, tea, or a glass of milk for an afternoon indulgence.
- Party Platter Star: Arrange them on a platter for parties, potlucks, or gatherings. They are always a crowd-pleaser and look elegant.
- After-Dinner Treat: Serve them as a light yet satisfying dessert after a meal.
- Packed Lunch Surprise: If using nut-free butter alternatives and school policies allow, they can be a fun addition to a lunchbox (ensure they’re kept cool).
- Gifting: Package them in a nice box or tin, and they make a wonderful homemade gift for friends, neighbors, or teachers.
No matter how you choose to serve them, they are guaranteed to be a hit!
Additional Tips for the Perfect Cups (5 Tips)
- Use Quality Ingredients: The flavor of these cups heavily relies on the quality of your chocolate, peanut butter, and bananas. Using high-quality dark chocolate (60-70% cacao) will provide a richer, more complex flavor. Fresh, ripe-but-firm bananas and good-tasting peanut butter are also key.
- Don’t Rush the Chilling: Patience is a virtue, especially when it comes to letting the chocolate layers set. Ensure each chocolate layer is completely firm before adding the next. This prevents the layers from mixing and ensures clean, distinct sections in your final cups. If you try to remove them too soon, they might fall apart.
- Master the Chocolate Melting: Avoid overheating your chocolate. Microwave in short bursts and stir frequently, or use a gentle double boiler. If chocolate gets too hot, it can seize (become thick and grainy) or burn. If it does seize, sometimes stirring in a tiny bit more coconut oil (about ½ teaspoon at a time) can help smooth it out, but prevention is best.
- Easy Removal with Liners: Silicone muffin liners are your best friend for this recipe as they peel away effortlessly. If using paper liners, you might find that some chocolate sticks. To minimize sticking with paper liners, ensure the cups are thoroughly chilled; sometimes a very light spray of non-stick cooking spray in the paper liner before adding chocolate can help, but it’s often not necessary.
- Adjust Banana Thickness: The thickness of your banana slices can impact the balance of flavors. Thicker slices will give a more prominent banana flavor and a softer bite, while thinner slices will let the chocolate and peanut butter shine more. Experiment to find your preferred thickness, generally around ¼ to ⅓ inch is ideal.
Frequently Asked Questions (FAQ)
Q1: Can I make these Chocolate Peanut Butter Banana Cups vegan?
A: Absolutely! This recipe is very easily made vegan. Simply ensure you use dairy-free dark chocolate chips (many good quality dark chocolates are naturally vegan – just check the ingredients for milk solids or milk fat). Also, if using honey as a sweetener for the peanut butter, swap it for maple syrup or agave nectar. Coconut oil and peanut butter are typically vegan.
Q2: Can I use a different nut butter or a seed butter?
A: Yes, you can! Almond butter, cashew butter, or even sunflower seed butter (for a nut-free option) would work beautifully in this recipe. Keep in mind that different nut/seed butters have varying consistencies and flavors, so you might need to adjust the optional sweetener. For example, tahini could also be used for a more unique, slightly bitter counterpoint to the sweet banana and chocolate.
Q3: How ripe should the bananas be?
A: You want bananas that are ripe for sweetness but still firm. Look for yellow bananas, perhaps with a few small brown spots. Avoid green, underripe bananas as they won’t be sweet enough and will have a starchy texture. Conversely, avoid overly ripe, mushy brown bananas, as they will be difficult to slice neatly and can make the cups watery or too soft.
Q4: How should I store these cups, and how long do they last?
A: These cups must be stored in the refrigerator in an airtight container. Because of the fresh banana, they are best enjoyed within 3-4 days. For longer storage, you can freeze them. Place them in a single layer in a freezer-safe airtight container or freezer bag. They will last for up to 1-2 months in the freezer. Thaw in the refrigerator for about 30 minutes to an hour before enjoying, or eat them straight from the freezer for a more ice-cream-like treat (they will be very firm).
Q5: My chocolate seized while melting. What did I do wrong, and can I fix it?
A: Chocolate typically seizes (becomes thick, clumpy, and unworkable) for two main reasons: overheating or contact with even a tiny amount of water.
* Overheating: Melt chocolate gently. If microwaving, use short intervals and stir frequently.
* Water: Ensure your bowl and utensils are perfectly dry. Even a drop of water can cause seizing.
If your chocolate has seized, you might be able to rescue it by vigorously stirring in a very small amount (½ teaspoon at a time) of fat, like more melted coconut oil or vegetable shortening, until it smooths out. However, this doesn’t always work, and the texture might be slightly different. Prevention is always the best approach.
These Chocolate Peanut Butter Banana Cups are more than just a recipe; they’re an experience. They’re the perfect blend of simplicity and indulgence, a testament to how a few basic ingredients can transform into something truly special. I encourage you to give them a try. Whip up a batch, share them with loved ones (or keep them all for yourself – no judgment here!), and watch as they quickly become a requested favorite. Enjoy every chocolatey, peanut buttery, banana-filled bite!
Print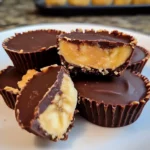
Chocolate Peanut Butter Banana Cups Recipe
Ingredients
- For the Chocolate Layers:
- 1 ½ cups (approx. 270g or 9.5 oz) good quality dark chocolate chips or chopped dark chocolate (at least 60-70% cacao recommended for best flavor and less sugar)
- 2 tablespoons coconut oil (unrefined for a slight coconutty hint, or refined for neutral flavor), divided
- For the Peanut Butter Layer:
- ¾ cup creamy peanut butter (natural, unsweetened is great, or your favorite brand)
- 1 tablespoon maple syrup or honey (optional, adjust to taste, especially if using unsweetened peanut butter)
- ½ teaspoon vanilla extract
- Pinch of sea salt (especially if your peanut butter is unsalted)
- For the Banana Layer:
- 2 medium ripe but firm bananas (not overly mushy)
- Optional for Topping:
- Flaky sea salt
- Chopped peanuts
- Mini chocolate chips
- A drizzle of extra melted peanut butter
Instructions
- For the Chocolate Layers:
- 1 ½ cups (approx. 270g or 9.5 oz) good quality dark chocolate chips or chopped dark chocolate (at least 60-70% cacao recommended for best flavor and less sugar)
- 2 tablespoons coconut oil (unrefined for a slight coconutty hint, or refined for neutral flavor), divided
- For the Peanut Butter Layer:
- ¾ cup creamy peanut butter (natural, unsweetened is great, or your favorite brand)
- 1 tablespoon maple syrup or honey (optional, adjust to taste, especially if using unsweetened peanut butter)
- ½ teaspoon vanilla extract
- Pinch of sea salt (especially if your peanut butter is unsalted)
- For the Banana Layer:
- 2 medium ripe but firm bananas (not overly mushy)
- Optional for Topping:
- Flaky sea salt
- Chopped peanuts
- Mini chocolate chips
- A drizzle of extra melted peanut butter
Nutrition
- Serving Size: One Normal Portion
- Calories: 250-300


