As a food blogger, I’ve made countless recipes, from the simplest weeknight dinners to elaborate weekend feasts. But there’s something truly special about Classic Chicken & Waffles. It’s a dish that perfectly marries savory and sweet, crispy and fluffy, and it’s become a beloved staple in our home. My family absolutely adores when Chicken & Waffles are on the menu. The kids get excited for the crispy chicken and the fluffy waffles, while my partner and I appreciate the satisfyingly balanced flavors and textures. It’s a meal that brings smiles to everyone’s faces, whether we’re enjoying it for a fun brunch, a comforting dinner, or even a “breakfast-for-dinner” treat. This isn’t just a recipe; it’s an experience – a delightful culinary adventure that’s surprisingly easy to recreate in your own kitchen. And let me tell you, the homemade version is miles ahead of anything you’ll find at a restaurant. Get ready to fall in love with this iconic comfort food!
Ingredients
To make truly exceptional Classic Chicken & Waffles, you need to start with quality ingredients. This recipe breaks down the ingredients needed for both the crispy fried chicken and the fluffy, golden waffles. We’ll delve into each component, explaining why certain ingredients are chosen and suggesting potential substitutions if needed.
For the Crispy Fried Chicken:
- 2 lbs Bone-in, Skin-on Chicken Pieces (Thighs, Drumsticks, and Breasts): Using a mix of bone-in, skin-on pieces ensures a variety of textures and flavors. Thighs and drumsticks are richer and juicier due to their higher fat content, while breasts offer a leaner, more substantial bite. The bone and skin contribute significantly to flavor and moisture retention during frying, resulting in incredibly tender and flavorful chicken. You can adjust the proportions based on your preference, but a mix is highly recommended for the best overall experience.
- 2 cups Buttermilk: Buttermilk is the secret ingredient to incredibly tender and juicy fried chicken. Its acidity tenderizes the chicken fibers, resulting in a melt-in-your-mouth texture. Additionally, buttermilk helps the breading adhere beautifully to the chicken, creating a crispy and flavorful crust. If you don’t have buttermilk, you can make a quick substitute by adding 2 tablespoons of lemon juice or white vinegar to 2 cups of milk. Let it sit for 5 minutes to curdle slightly.
- 1 cup All-Purpose Flour: All-purpose flour forms the base of our breading. It provides structure and crispness to the coating. For a slightly lighter and crispier texture, you can substitute a portion of the all-purpose flour with cake flour or even cornstarch.
- 1 cup Cornstarch: Cornstarch is crucial for achieving that extra crispy coating. It helps to absorb moisture and creates a delicate, almost shatteringly crisp texture. Using a combination of flour and cornstarch is a classic technique for perfectly crispy fried chicken.
- 2 tablespoons Paprika: Paprika not only adds a beautiful reddish-brown color to the chicken but also contributes a subtle smoky and slightly sweet flavor. You can use sweet paprika for a milder flavor or smoked paprika for a more pronounced smoky note.
- 2 tablespoons Garlic Powder: Garlic powder provides a savory depth of flavor that complements the chicken perfectly. It infuses the breading with a pleasant garlicky aroma and taste.
- 2 tablespoons Onion Powder: Similar to garlic powder, onion powder adds another layer of savory complexity to the seasoning blend. It enhances the overall flavor profile and balances the other spices.
- 1 tablespoon Dried Thyme: Dried thyme offers a subtle earthy and slightly minty flavor that works wonderfully with chicken. It adds a touch of herbaceousness that elevates the overall taste.
- 1 tablespoon Dried Oregano: Dried oregano brings a slightly pungent and peppery flavor that complements the other spices and herbs. It adds a Mediterranean touch to the seasoning blend.
- 1 tablespoon Salt: Salt is essential for seasoning both the chicken and the breading. It enhances the natural flavors of the chicken and balances the other spices. Use kosher salt or sea salt for the best flavor.
- 2 teaspoons Black Pepper: Black pepper adds a touch of spice and warmth to the breading. Freshly ground black pepper is always preferred for its more vibrant flavor.
- Vegetable Oil or Canola Oil, for frying: Choose a neutral-flavored oil with a high smoke point for frying, such as vegetable oil or canola oil. These oils can withstand high temperatures without breaking down or imparting unwanted flavors to the chicken. You’ll need enough oil to reach a depth of about 2-3 inches in your frying pan or pot.
For the Fluffy Waffles:
- 2 cups All-Purpose Flour: All-purpose flour is the foundation for our waffles, providing structure and a slightly chewy texture.
- 2 tablespoons Sugar: Sugar adds a touch of sweetness to the waffles, balancing the savory chicken and creating a delightful contrast. It also helps with browning and adds a slight crispness to the edges.
- 4 teaspoons Baking Powder: Baking powder is the leavening agent that makes waffles light and fluffy. It creates air bubbles in the batter, resulting in a tender and airy texture. Make sure your baking powder is fresh for optimal results.
- 1 teaspoon Salt: Salt enhances the flavors of the other ingredients and balances the sweetness.
- 2 Large Eggs: Eggs provide richness, structure, and moisture to the waffles. They bind the ingredients together and contribute to a tender crumb.
- 1 ¾ cups Milk: Milk adds moisture to the batter and helps to create a smooth and pourable consistency. You can use whole milk for richer waffles, or 2% milk for a slightly lighter version. Buttermilk can also be used for a tangier flavor and even more tender waffles.
- ½ cup Vegetable Oil or Melted Unsalted Butter: Vegetable oil or melted unsalted butter adds richness and moisture to the waffles. Butter will impart a richer flavor, while oil will result in slightly crispier waffles. You can use either or even a combination of both.
- 1 teaspoon Vanilla Extract (Optional): Vanilla extract adds a subtle hint of sweetness and aroma to the waffles, enhancing their overall flavor. While optional, it’s a lovely addition.
Instructions
Creating Classic Chicken & Waffles is a rewarding process that involves a few steps, but each step is crucial for achieving the perfect balance of crispy chicken and fluffy waffles. Follow these detailed instructions for a guaranteed success:
Part 1: Preparing the Crispy Fried Chicken
- Brine the Chicken (Optional but Recommended): For extra juicy and flavorful chicken, consider brining it. In a large bowl, dissolve ¼ cup of salt in 4 cups of cold water. Submerge the chicken pieces in the brine, ensuring they are fully covered. Refrigerate for at least 2 hours, or ideally, overnight. Brining helps the chicken retain moisture during frying, resulting in incredibly tender meat. If you brine, make sure to rinse the chicken thoroughly under cold water and pat it completely dry with paper towels before proceeding to the next steps. Skipping the brine is perfectly fine if you are short on time, but it does make a noticeable difference in the final result.
- Prepare the Buttermilk Marinade: In a large bowl, pour in the buttermilk. This is where the magic begins to happen! The buttermilk tenderizes the chicken and helps the breading adhere perfectly.
- Marinate the Chicken: Submerge the chicken pieces in the buttermilk, ensuring they are fully coated. Cover the bowl with plastic wrap or a lid and refrigerate for at least 2 hours, or preferably 4-8 hours. The longer the chicken marinates, the more tender and flavorful it will become. Overnight marination is ideal for maximum flavor and tenderness.
- Prepare the Breading Mixture: In a separate large, shallow dish (like a baking dish or pie plate), whisk together the all-purpose flour, cornstarch, paprika, garlic powder, onion powder, dried thyme, dried oregano, salt, and black pepper. Mix everything thoroughly to ensure the spices are evenly distributed throughout the flour mixture. This flavorful breading is what will give our chicken its signature crispy crust.
- Set up the Frying Station: Place the bowl of breading mixture next to the bowl of marinated chicken. Line a baking sheet with paper towels or a wire rack to drain the fried chicken. This setup will make the breading process efficient and organized.
- Bread the Chicken: Remove one piece of chicken from the buttermilk marinade at a time, letting any excess buttermilk drip back into the bowl. Dredge the chicken thoroughly in the breading mixture, pressing it gently to ensure the breading adheres well to all sides. Make sure every nook and cranny is coated for maximum crispiness. Place the breaded chicken pieces on a clean plate or baking sheet.
- Heat the Oil: In a large, heavy-bottomed pot or deep skillet, pour in enough vegetable oil or canola oil to reach a depth of about 2-3 inches. Heat the oil over medium-high heat until it reaches a temperature of 325-350°F (160-175°C). Use a deep-fry thermometer to monitor the oil temperature accurately. Maintaining the correct oil temperature is crucial for achieving crispy chicken that is cooked through without burning. If you don’t have a thermometer, you can test the oil by dropping a small pinch of breading into it; it should sizzle gently and turn golden brown in about 30-45 seconds.
- Fry the Chicken: Carefully place a few pieces of breaded chicken into the hot oil, being careful not to overcrowd the pot. Overcrowding will lower the oil temperature and result in soggy chicken. Fry the chicken in batches, maintaining the oil temperature between 325-350°F (160-175°C). Fry for about 6-8 minutes per side for smaller pieces like drumsticks and thighs, and 8-10 minutes per side for larger pieces like breasts, or until the chicken is golden brown, crispy, and cooked through. The internal temperature of the chicken should reach 165°F (74°C) when measured with a meat thermometer inserted into the thickest part, avoiding the bone.
- Drain the Chicken: Once the chicken is cooked through and golden brown, carefully remove it from the oil using tongs or a slotted spoon. Place the fried chicken pieces on the prepared baking sheet lined with paper towels or a wire rack to drain excess oil. This step is important to keep the chicken crispy and prevent it from becoming greasy.
- Keep Warm (Optional): If you are not serving the chicken immediately, you can keep it warm in a preheated oven at 200°F (93°C) while you prepare the waffles. Place the chicken on a wire rack set inside a baking sheet to allow air to circulate and keep it crispy.
Part 2: Making the Fluffy Waffles
- Preheat the Waffle Iron: Preheat your waffle iron according to the manufacturer’s instructions. Different waffle irons heat up differently, so it’s important to follow the specific guidelines for your appliance.
- Whisk Dry Ingredients: In a large bowl, whisk together the all-purpose flour, sugar, baking powder, and salt. Whisking ensures that the dry ingredients are evenly combined and that there are no lumps of baking powder.
- Whisk Wet Ingredients: In a separate bowl, whisk together the eggs, milk, and vegetable oil or melted butter (and vanilla extract, if using). Whisk until the wet ingredients are well combined and slightly frothy.
- Combine Wet and Dry Ingredients: Pour the wet ingredients into the bowl with the dry ingredients. Gently whisk until just combined. Be careful not to overmix the batter. Overmixing can develop the gluten in the flour, resulting in tough waffles. A few lumps in the batter are okay.
- Cook the Waffles: Lightly grease the preheated waffle iron with cooking spray or a little oil, if necessary (some non-stick waffle irons don’t require greasing). Pour the appropriate amount of batter onto the hot waffle iron according to your waffle iron’s instructions. Close the lid and cook until the waffles are golden brown and cooked through, usually about 3-5 minutes per batch, depending on your waffle iron. Follow your waffle iron’s indicator lights or timer if it has one.
- Keep Waffles Warm (Optional): As you cook the waffles, you can keep them warm in a preheated oven at 200°F (93°C). Place the cooked waffles on a wire rack in a single layer to prevent them from steaming and becoming soggy.
Part 3: Assemble and Serve
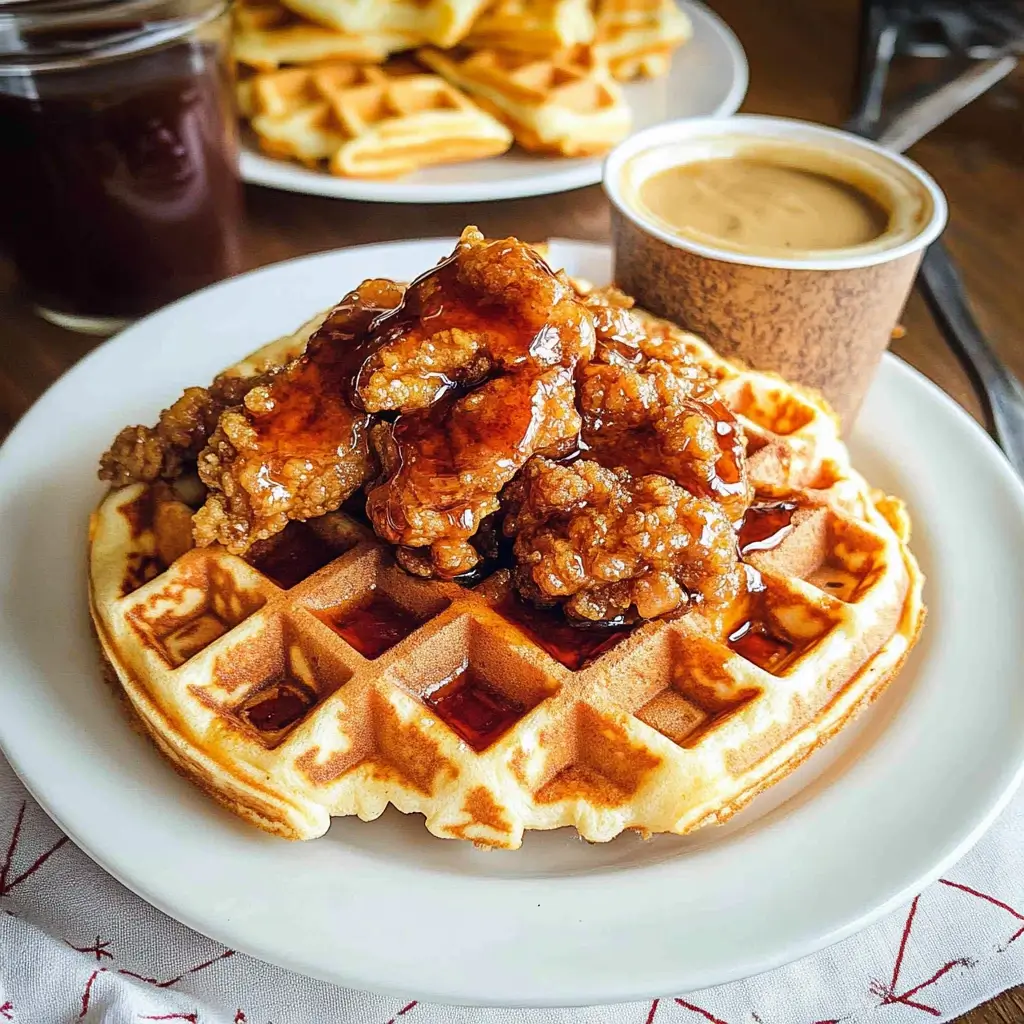
- Plate the Chicken & Waffles: Place a warm waffle on a plate. Top with a piece or two of crispy fried chicken.
- Add Toppings: Drizzle generously with maple syrup. Consider adding other toppings like hot sauce, honey, powdered sugar, fresh fruit (berries, peaches), or a pat of butter.
- Serve Immediately: Serve the Classic Chicken & Waffles immediately while the chicken is hot and crispy and the waffles are warm and fluffy. Enjoy the perfect combination of savory and sweet!
Nutrition Facts
(Note: Nutritional information is an estimate and can vary based on specific ingredients and portion sizes.)
- Servings: Approximately 6-8 servings
- Calories per Serving (Estimated): 600-800 calories (This can vary significantly based on portion size, chicken piece, and toppings. Fried chicken and waffles are calorie-dense.)
Approximate Breakdown per Serving (Estimated):
- Protein: 30-40g
- Fat: 30-45g
- Carbohydrates: 50-70g
Important Considerations:
- These are estimates and can vary greatly depending on the size of chicken pieces, waffle size, amount of oil absorbed during frying, and toppings used.
- Fried chicken and waffles are a high-calorie and high-fat dish. Enjoy in moderation as part of a balanced diet.
- To reduce calories, you can consider using skinless chicken, baking the chicken instead of frying (though it will change the texture), using whole wheat flour in the waffles, and limiting sugary toppings.
Preparation Time
- Prep Time: 45 minutes (includes marinating and breading time, waffle batter prep)
- Cook Time: 45 minutes (includes frying chicken and cooking waffles)
- Total Time: 1 hour 30 minutes (excluding optional overnight chicken brining)
Tips for Time Management:
- Marinate Chicken Ahead: Marinate the chicken overnight to save time on the day of cooking.
- Prepare Breading Mixture and Waffle Batter in Advance: You can whisk together the dry ingredients for both the chicken breading and waffle batter ahead of time and store them in airtight containers.
- Fry Chicken While Making Waffles: Start frying the chicken while you preheat the waffle iron and prepare the waffle batter. This will allow you to work efficiently and have both components ready around the same time.
- Keep Components Warm: Utilize your oven to keep the fried chicken and waffles warm while you finish cooking the remaining batches, ensuring everything is served hot and fresh.
How to Serve
Classic Chicken & Waffles is incredibly versatile when it comes to serving. While maple syrup is the traditional and quintessential topping, there are numerous ways to enhance and personalize this dish. Here are some serving suggestions to elevate your Chicken & Waffles experience:
- Classic Maple Syrup:
- The absolute must-have! Use pure maple syrup for the best flavor. Warm it slightly for an extra touch of indulgence.
- Consider different grades of maple syrup for varying flavor profiles (e.g., dark amber for a richer taste).
- Hot Sauce:
- A drizzle of your favorite hot sauce adds a delightful spicy kick that cuts through the richness of the chicken and waffles.
- Try different types of hot sauce, from mild to fiery, to find your perfect heat level.
- Honey:
- Honey offers a natural sweetness and floral notes that complement both the savory chicken and the waffles.
- Consider using infused honey for added flavor complexity (e.g., lavender honey, chili honey).
- Butter:
- A pat of unsalted butter melting over the warm waffles adds richness and enhances the buttery flavor.
- Compound butters (like cinnamon butter or herb butter) can add an extra layer of flavor.
- Powdered Sugar:
- A dusting of powdered sugar adds a touch of sweetness and elegance.
- It creates a beautiful visual contrast against the golden-brown chicken and waffles.
- Fresh Fruit:
- Berries (strawberries, blueberries, raspberries) add a burst of freshness and acidity that balances the richness of the dish.
- Sliced peaches, bananas, or grilled pineapple are also delicious fruit options.
- Savory Gravy:
- For a more savory twist, try serving chicken and waffles with a creamy gravy (chicken gravy, sausage gravy, or even a mushroom gravy).
- This transforms the dish into a more dinner-appropriate meal.
- Side Dishes:
- Coleslaw: A creamy or vinegar-based coleslaw provides a cool and crunchy contrast to the rich chicken and waffles.
- Mac and Cheese: A classic Southern side that pairs perfectly with fried chicken.
- Green Salad: A simple green salad with a light vinaigrette adds freshness and balance.
- Roasted Vegetables: Roasted vegetables like Brussels sprouts, asparagus, or sweet potatoes offer a healthy and flavorful side.
- Hash Browns or Grits: For a heartier meal, serve with hash browns or creamy grits.
- Drinks:
- Coffee: A classic pairing for brunch or breakfast-for-dinner.
- Orange Juice: Freshly squeezed orange juice is a refreshing accompaniment.
- Sweet Tea: A Southern staple that complements the flavors perfectly.
- Mimosas or Bellinis: For a celebratory brunch, serve with mimosas or bellinis.
- Craft Beer: A crisp IPA or a malty amber ale can pair surprisingly well with fried chicken and waffles.
Additional Tips for Perfect Chicken & Waffles
To ensure your Classic Chicken & Waffles are a resounding success every time, here are five essential tips to keep in mind:
- Maintain Oil Temperature: Consistent oil temperature is paramount for crispy, evenly cooked fried chicken. Use a deep-fry thermometer to monitor the oil temperature and adjust the heat as needed to keep it between 325-350°F (160-175°C). If the oil is too hot, the chicken will brown too quickly on the outside and be undercooked inside. If the oil is too cold, the chicken will absorb too much oil and become soggy. Fry in batches to avoid overcrowding the pot and lowering the oil temperature.
- Don’t Overmix Waffle Batter: Overmixing waffle batter develops the gluten in the flour, resulting in tough and dense waffles. Mix the wet and dry ingredients just until combined, leaving a few lumps in the batter. These lumps will disappear as the waffles cook. Gentle mixing is key to light and fluffy waffles.
- Pat Chicken Dry Before Breading: After marinating the chicken in buttermilk, pat it thoroughly dry with paper towels before dredging it in the breading mixture. Excess moisture will prevent the breading from adhering properly and can lead to soggy chicken. Dry chicken ensures a crispier crust.
- Season Generously: Don’t be shy with the seasonings! Season both the chicken marinade and the breading mixture generously with salt, pepper, and spices. Proper seasoning is crucial for flavorful chicken and waffles. Taste the breading mixture before you start breading the chicken and adjust seasonings as needed.
- Preheat Waffle Iron Properly: Ensure your waffle iron is fully preheated before adding the batter. A hot waffle iron is essential for achieving crispy and evenly cooked waffles. Follow the manufacturer’s instructions for preheating your specific waffle iron. Waiting for the waffle iron to reach the correct temperature will make a significant difference in the texture of your waffles.
FAQ – Frequently Asked Questions
Here are five frequently asked questions about making Classic Chicken & Waffles, along with helpful answers to guide you:
Q1: Can I make Chicken & Waffles ahead of time?
A: While Chicken & Waffles are best enjoyed fresh, you can prepare components in advance. You can marinate the chicken overnight and prepare the waffle batter a few hours ahead of time (store covered in the refrigerator). Fried chicken is best served immediately for maximum crispiness, but you can keep it warm in a low oven (200°F/93°C) for a short period. Waffles can also be kept warm in a low oven. However, reheating fried chicken and waffles will slightly compromise their texture. For best results, fry the chicken and cook the waffles closer to serving time.
Q2: Can I bake the chicken instead of frying it?
A: Yes, you can bake the chicken for a healthier option, but the texture will be different from traditional fried chicken. For baked chicken, preheat your oven to 400°F (200°C). Place breaded chicken pieces on a baking sheet lined with parchment paper and bake for 30-40 minutes, or until cooked through and golden brown, flipping halfway through. While baked chicken won’t be as crispy as fried chicken, it can still be a delicious and healthier alternative. You can also try air frying for a crispier result compared to oven baking.
Q3: What are some variations I can try with the waffle batter?
A: There are many delicious variations you can try with waffle batter! For savory waffles, add shredded cheese (cheddar, parmesan), herbs (chives, rosemary), or spices (cayenne pepper, garlic powder) to the batter. For sweeter waffles, try adding cinnamon, nutmeg, chocolate chips, or mashed banana. You can also experiment with different flours, such as whole wheat flour or buckwheat flour, for a different flavor and texture profile. Buttermilk waffles are another popular variation, adding a tangy flavor and extra tenderness.
Q4: Can I use frozen waffles instead of making them from scratch?
A: While homemade waffles are highly recommended for the best flavor and texture, you can use frozen waffles in a pinch. Choose high-quality frozen waffles and toast them according to package instructions until crispy and heated through. While they won’t have the same freshness and fluffiness as homemade waffles, they can be a convenient option when you’re short on time.
Q5: What’s the best way to store leftover Chicken & Waffles?
A: Leftover fried chicken is best stored in an airtight container in the refrigerator for up to 3-4 days. Leftover waffles can also be stored in an airtight container at room temperature for a day or two, or in the refrigerator for up to a week. To reheat fried chicken, bake it in a preheated oven at 350°F (175°C) until heated through and crispy, or use an air fryer for best results. Reheat waffles in a toaster, toaster oven, or waffle iron until warm and crisp. Microwaving is generally not recommended as it can make both chicken and waffles soggy.
This comprehensive guide to Classic Chicken & Waffles provides everything you need to create this iconic dish at home. From detailed ingredient explanations and step-by-step instructions to serving suggestions and helpful tips, you’re now equipped to impress your family and friends with perfectly crispy chicken and fluffy waffles. Enjoy!
Print
Classic Chicken & Waffles Recipe
Ingredients
For the Crispy Fried Chicken:
- 2 lbs Bone-in, Skin-on Chicken Pieces (Thighs, Drumsticks, and Breasts): Using a mix of bone-in, skin-on pieces ensures a variety of textures and flavors. Thighs and drumsticks are richer and juicier due to their higher fat content, while breasts offer a leaner, more substantial bite. The bone and skin contribute significantly to flavor and moisture retention during frying, resulting in incredibly tender and flavorful chicken. You can adjust the proportions based on your preference, but a mix is highly recommended for the best overall experience.
- 2 cups Buttermilk: Buttermilk is the secret ingredient to incredibly tender and juicy fried chicken. Its acidity tenderizes the chicken fibers, resulting in a melt-in-your-mouth texture. Additionally, buttermilk helps the breading adhere beautifully to the chicken, creating a crispy and flavorful crust. If you don’t have buttermilk, you can make a quick substitute by adding 2 tablespoons of lemon juice or white vinegar to 2 cups of milk. Let it sit for 5 minutes to curdle slightly.
- 1 cup All-Purpose Flour: All-purpose flour forms the base of our breading. It provides structure and crispness to the coating. For a slightly lighter and crispier texture, you can substitute a portion of the all-purpose flour with cake flour or even cornstarch.
- 1 cup Cornstarch: Cornstarch is crucial for achieving that extra crispy coating. It helps to absorb moisture and creates a delicate, almost shatteringly crisp texture. Using a combination of flour and cornstarch is a classic technique for perfectly crispy fried chicken.
- 2 tablespoons Paprika: Paprika not only adds a beautiful reddish-brown color to the chicken but also contributes a subtle smoky and slightly sweet flavor. You can use sweet paprika for a milder flavor or smoked paprika for a more pronounced smoky note.
- 2 tablespoons Garlic Powder: Garlic powder provides a savory depth of flavor that complements the chicken perfectly. It infuses the breading with a pleasant garlicky aroma and taste.
- 2 tablespoons Onion Powder: Similar to garlic powder, onion powder adds another layer of savory complexity to the seasoning blend. It enhances the overall flavor profile and balances the other spices.
- 1 tablespoon Dried Thyme: Dried thyme offers a subtle earthy and slightly minty flavor that works wonderfully with chicken. It adds a touch of herbaceousness that elevates the overall taste.
- 1 tablespoon Dried Oregano: Dried oregano brings a slightly pungent and peppery flavor that complements the other spices and herbs. It adds a Mediterranean touch to the seasoning blend.
- 1 tablespoon Salt: Salt is essential for seasoning both the chicken and the breading. It enhances the natural flavors of the chicken and balances the other spices. Use kosher salt or sea salt for the best flavor.
- 2 teaspoons Black Pepper: Black pepper adds a touch of spice and warmth to the breading. Freshly ground black pepper is always preferred for its more vibrant flavor.
- Vegetable Oil or Canola Oil, for frying: Choose a neutral-flavored oil with a high smoke point for frying, such as vegetable oil or canola oil. These oils can withstand high temperatures without breaking down or imparting unwanted flavors to the chicken. You’ll need enough oil to reach a depth of about 2-3 inches in your frying pan or pot.
For the Fluffy Waffles:
- 2 cups All-Purpose Flour: All-purpose flour is the foundation for our waffles, providing structure and a slightly chewy texture.
- 2 tablespoons Sugar: Sugar adds a touch of sweetness to the waffles, balancing the savory chicken and creating a delightful contrast. It also helps with browning and adds a slight crispness to the edges.
- 4 teaspoons Baking Powder: Baking powder is the leavening agent that makes waffles light and fluffy. It creates air bubbles in the batter, resulting in a tender and airy texture. Make sure your baking powder is fresh for optimal results.
- 1 teaspoon Salt: Salt enhances the flavors of the other ingredients and balances the sweetness.
- 2 Large Eggs: Eggs provide richness, structure, and moisture to the waffles. They bind the ingredients together and contribute to a tender crumb.
- 1 ¾ cups Milk: Milk adds moisture to the batter and helps to create a smooth and pourable consistency. You can use whole milk for richer waffles, or 2% milk for a slightly lighter version. Buttermilk can also be used for a tangier flavor and even more tender waffles.
- ½ cup Vegetable Oil or Melted Unsalted Butter: Vegetable oil or melted unsalted butter adds richness and moisture to the waffles. Butter will impart a richer flavor, while oil will result in slightly crispier waffles. You can use either or even a combination of both.
- 1 teaspoon Vanilla Extract (Optional): Vanilla extract adds a subtle hint of sweetness and aroma to the waffles, enhancing their overall flavor. While optional, it’s a lovely addition.
Instructions
Part 1: Preparing the Crispy Fried Chicken
- Brine the Chicken (Optional but Recommended): For extra juicy and flavorful chicken, consider brining it. In a large bowl, dissolve ¼ cup of salt in 4 cups of cold water. Submerge the chicken pieces in the brine, ensuring they are fully covered. Refrigerate for at least 2 hours, or ideally, overnight. Brining helps the chicken retain moisture during frying, resulting in incredibly tender meat. If you brine, make sure to rinse the chicken thoroughly under cold water and pat it completely dry with paper towels before proceeding to the next steps. Skipping the brine is perfectly fine if you are short on time, but it does make a noticeable difference in the final result.
- Prepare the Buttermilk Marinade: In a large bowl, pour in the buttermilk. This is where the magic begins to happen! The buttermilk tenderizes the chicken and helps the breading adhere perfectly.
- Marinate the Chicken: Submerge the chicken pieces in the buttermilk, ensuring they are fully coated. Cover the bowl with plastic wrap or a lid and refrigerate for at least 2 hours, or preferably 4-8 hours. The longer the chicken marinates, the more tender and flavorful it will become. Overnight marination is ideal for maximum flavor and tenderness.
- Prepare the Breading Mixture: In a separate large, shallow dish (like a baking dish or pie plate), whisk together the all-purpose flour, cornstarch, paprika, garlic powder, onion powder, dried thyme, dried oregano, salt, and black pepper. Mix everything thoroughly to ensure the spices are evenly distributed throughout the flour mixture. This flavorful breading is what will give our chicken its signature crispy crust.
- Set up the Frying Station: Place the bowl of breading mixture next to the bowl of marinated chicken. Line a baking sheet with paper towels or a wire rack to drain the fried chicken. This setup will make the breading process efficient and organized.
- Bread the Chicken: Remove one piece of chicken from the buttermilk marinade at a time, letting any excess buttermilk drip back into the bowl. Dredge the chicken thoroughly in the breading mixture, pressing it gently to ensure the breading adheres well to all sides. Make sure every nook and cranny is coated for maximum crispiness. Place the breaded chicken pieces on a clean plate or baking sheet.
- Heat the Oil: In a large, heavy-bottomed pot or deep skillet, pour in enough vegetable oil or canola oil to reach a depth of about 2-3 inches. Heat the oil over medium-high heat until it reaches a temperature of 325-350°F (160-175°C). Use a deep-fry thermometer to monitor the oil temperature accurately. Maintaining the correct oil temperature is crucial for achieving crispy chicken that is cooked through without burning. If you don’t have a thermometer, you can test the oil by dropping a small pinch of breading into it; it should sizzle gently and turn golden brown in about 30-45 seconds.
- Fry the Chicken: Carefully place a few pieces of breaded chicken into the hot oil, being careful not to overcrowd the pot. Overcrowding will lower the oil temperature and result in soggy chicken. Fry the chicken in batches, maintaining the oil temperature between 325-350°F (160-175°C). Fry for about 6-8 minutes per side for smaller pieces like drumsticks and thighs, and 8-10 minutes per side for larger pieces like breasts, or until the chicken is golden brown, crispy, and cooked through. The internal temperature of the chicken should reach 165°F (74°C) when measured with a meat thermometer inserted into the thickest part, avoiding the bone.
- Drain the Chicken: Once the chicken is cooked through and golden brown, carefully remove it from the oil using tongs or a slotted spoon. Place the fried chicken pieces on the prepared baking sheet lined with paper towels or a wire rack to drain excess oil. This step is important to keep the chicken crispy and prevent it from becoming greasy.
- Keep Warm (Optional): If you are not serving the chicken immediately, you can keep it warm in a preheated oven at 200°F (93°C) while you prepare the waffles. Place the chicken on a wire rack set inside a baking sheet to allow air to circulate and keep it crispy.
Part 2: Making the Fluffy Waffles
- Preheat the Waffle Iron: Preheat your waffle iron according to the manufacturer’s instructions. Different waffle irons heat up differently, so it’s important to follow the specific guidelines for your appliance.
- Whisk Dry Ingredients: In a large bowl, whisk together the all-purpose flour, sugar, baking powder, and salt. Whisking ensures that the dry ingredients are evenly combined and that there are no lumps of baking powder.
- Whisk Wet Ingredients: In a separate bowl, whisk together the eggs, milk, and vegetable oil or melted butter (and vanilla extract, if using). Whisk until the wet ingredients are well combined and slightly frothy.
- Combine Wet and Dry Ingredients: Pour the wet ingredients into the bowl with the dry ingredients. Gently whisk until just combined. Be careful not to overmix the batter. Overmixing can develop the gluten in the flour, resulting in tough waffles. A few lumps in the batter are okay.
- Cook the Waffles: Lightly grease the preheated waffle iron with cooking spray or a little oil, if necessary (some non-stick waffle irons don’t require greasing). Pour the appropriate amount of batter onto the hot waffle iron according to your waffle iron’s instructions. Close the lid and cook until the waffles are golden brown and cooked through, usually about 3-5 minutes per batch, depending on your waffle iron. Follow your waffle iron’s indicator lights or timer if it has one.
- Keep Waffles Warm (Optional): As you cook the waffles, you can keep them warm in a preheated oven at 200°F (93°C). Place the cooked waffles on a wire rack in a single layer to prevent them from steaming and becoming soggy.
Part 3: Assemble and Serve
- Plate the Chicken & Waffles: Place a warm waffle on a plate. Top with a piece or two of crispy fried chicken.
- Add Toppings: Drizzle generously with maple syrup. Consider adding other toppings like hot sauce, honey, powdered sugar, fresh fruit (berries, peaches), or a pat of butter.
- Serve Immediately: Serve the Classic Chicken & Waffles immediately while the chicken is hot and crispy and the waffles are warm and fluffy. Enjoy the perfect combination of savory and sweet!
Nutrition
- Serving Size: One Normal Portion
- Calories: 600-800
- Fat: 30-45g
- Carbohydrates: 50-70g
- Protein: 30-40g