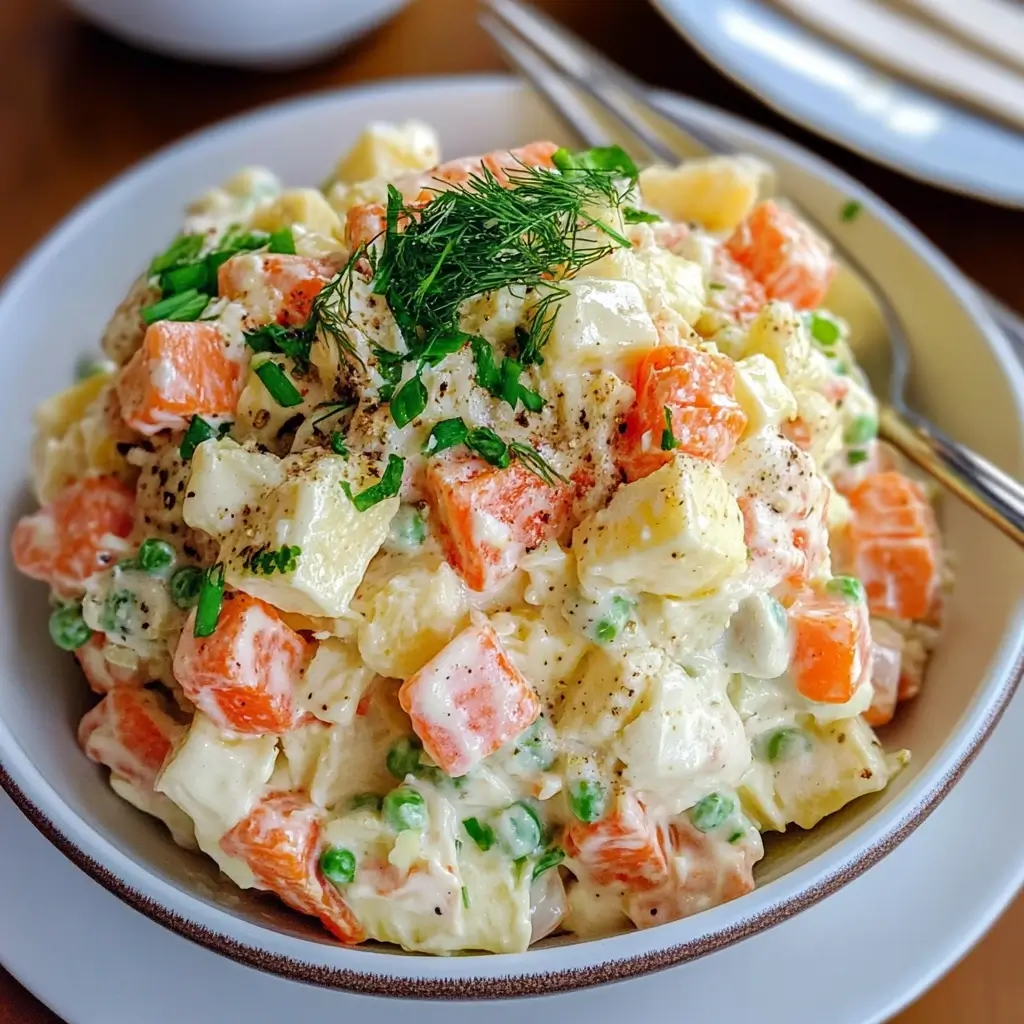

This Classic Russian Salad, often known in its homeland as “Salad Olivier” (Салат Оливье), is more than just a dish to me; it’s a cornerstone of celebrations, a taste of nostalgia, and a guaranteed crowd-pleaser. I remember my grandmother meticulously dicing each ingredient to a perfect, uniform size, the aroma of boiled potatoes and carrots mingling with the sharp scent of pickles. The first time I made it myself for a family gathering, the pressure was immense. Would it live up to those cherished memories? To my delight, and slight relief, it was a resounding success! My children, initially skeptical of the “old-fashioned” salad, now request it for birthdays and holidays. The creamy, savory, and slightly tangy symphony of flavors, combined with the delightful textural contrasts, makes it an enduring favorite. It’s a labor of love, yes, but every chop and every stir is worth it when you see the smiles around the table. This recipe is my homage to that tradition, perfected over years of making and sharing.
The Enduring Appeal of Classic Russian Salad (Olivier Salad)
The Classic Russian Salad, or Olivier Salad, holds a special place in culinary history, particularly across Russia and former Soviet republics. Its story begins in the 1860s with Lucien Olivier, a Belgian chef at the renowned Hermitage restaurant in Moscow. His original creation was a far more elaborate affair, featuring luxury ingredients like grouse, veal tongue, caviar, and a secret, complex dressing. Over time, as the recipe spread and ingredients became less accessible, it evolved into the beloved, more humble version we know today.
This transformation didn’t diminish its popularity; if anything, it democratized it. The modern Olivier Salad became a staple for New Year’s Eve (Novy God) celebrations and other festive occasions, a symbol of hospitality and shared joy. Its enduring appeal lies in its comforting familiarity, the harmonious blend of simple, hearty ingredients, and its versatility. Each family often has its own subtle variations, passed down through generations, making it a deeply personal and cherished dish. It’s a testament to how a recipe can adapt, thrive, and continue to bring people together, transcending borders and time.
Ingredients for Your Perfect Classic Russian Salad
Crafting the perfect Russian Salad is all about balancing flavors and textures. Here’s what you’ll need to create a generous batch, perfect for sharing:
- Potatoes: 4 medium (about 600g or 1.3 lbs) waxy potatoes (like Yukon Gold or red potatoes), peeled
- Carrots: 3 medium (about 300g or 0.66 lbs), peeled
- Eggs: 5 large, hard-boiled and cooled
- Dill Pickles: 4-5 medium (about 250g or 0.55 lbs), preferably barrel-fermented or good quality crunchy dill pickles
- Cooked Meat: 300g (about 0.66 lbs) of your choice. Options include:
- Boiled chicken breast or thigh meat, cooled and diced
- Good quality cooked ham, diced
- “Doktorskaya” or similar bologna-style sausage, diced (a very traditional choice)
- Green Peas: 1 cup (about 150g) frozen peas, thawed (or canned, drained and rinsed)
- Mayonnaise: 1 cup (about 240ml) good quality, full-fat mayonnaise (adjust to your preferred creaminess)
- Fresh Dill: 2-3 tablespoons, finely chopped (plus extra for garnish)
- Fresh Parsley: 1-2 tablespoons, finely chopped (optional, for added freshness)
- Salt: 1 teaspoon, or to taste
- Black Pepper: ½ teaspoon, freshly ground, or to taste
- Optional: 1 small yellow onion or 2-3 spring onions, very finely diced (if using yellow onion, you can rinse it under cold water after dicing to mellow its flavor)
A Note on Ingredients:
The quality of your ingredients significantly impacts the final taste.
- Potatoes: Waxy potatoes are crucial as they hold their shape when boiled and diced, unlike starchy potatoes (like Russets) which can become mushy.
- Pickles: The tang and crunch from pickles are essential. Avoid sweet pickles. Gherkins or cornichons can work, but traditional dill pickles are best.
- Mayonnaise: This is the binder and a key flavor component. Use a brand you enjoy. Homemade mayonnaise takes it to another level if you’re feeling ambitious.
Step-by-Step Instructions for Authentic Russian Salad
Follow these instructions carefully for a delicious and authentic Olivier Salad. The key is patience, especially in cooling the ingredients and dicing them uniformly.
- Cook the Root Vegetables:
- Place the peeled whole potatoes and whole carrots into a large pot. Cover them with cold water and add a pinch of salt.
- Bring to a boil, then reduce the heat to a simmer. Cook until tender when pierced with a fork. This typically takes 20-30 minutes for potatoes and 15-25 minutes for carrots, depending on their size. Try to cook them so they are tender but still firm enough to hold their shape when diced. Avoid overcooking.
- Once cooked, drain the vegetables immediately and let them cool completely. You can spread them on a baking sheet to speed up the cooling process. Chilling them in the refrigerator for at least an hour (or even overnight) makes dicing much easier and neater.
- Prepare the Eggs:
- While the vegetables are cooking, if you haven’t already, hard-boil the eggs. Place eggs in a saucepan, cover with cold water, bring to a boil, then cover, remove from heat, and let sit for 10-12 minutes.
- Transfer the eggs to an ice bath to stop the cooking process and make peeling easier.
- Once cooled, peel the eggs.
- Thaw the Peas:
- If using frozen peas, place them in a bowl and cover with hot water for a few minutes to thaw quickly. Drain them thoroughly. If using canned peas, simply drain and rinse.
- Dice the Ingredients:
- This is arguably the most crucial step for achieving the classic texture. Aim for uniform dice, about ¼ to ½ inch (0.5cm to 1cm) cubes, for all the main ingredients.
- Potatoes & Carrots: Once completely cool, dice the potatoes and carrots.
- Eggs: Dice the peeled hard-boiled eggs.
- Pickles: Dice the dill pickles. If they are very watery, you can gently pat them with a paper towel after dicing to remove excess moisture.
- Cooked Meat: Dice your chosen cooked meat (chicken, ham, or bologna) to the same size as the vegetables.
- Onion (if using): If you’re adding onion, dice it very finely. For a milder flavor, you can soak the diced yellow onion in cold water for 10 minutes, then drain thoroughly.
- Combine the Salad:
- In a very large mixing bowl, gently combine the diced potatoes, carrots, eggs, pickles, cooked meat, and thawed peas.
- Add the finely chopped fresh dill and parsley (if using).
- Dress the Salad:
- Add the mayonnaise to the bowl. Start with about ¾ of the recommended amount and add more if needed, until the salad reaches your desired creaminess.
- Season with salt and freshly ground black pepper. Remember that pickles and some cooked meats are already salty, so taste before adding too much salt initially.
- Gently fold all the ingredients together with a large spoon or spatula until everything is evenly coated with mayonnaise. Be careful not to mash the potatoes.
- Chill and Rest:
- Cover the bowl with plastic wrap or a lid and refrigerate for at least 2-3 hours, or preferably overnight. This chilling time is essential! It allows the flavors to meld together beautifully, making the salad taste significantly better.
- Taste and Adjust:
- Before serving, give the salad a final gentle stir. Taste it and adjust seasoning (salt, pepper, or even a touch more mayonnaise or pickle juice for tang) if necessary. The flavors can change slightly as it chills.
Nutrition Facts (Estimated)
- Servings: This recipe yields approximately 8-10 generous servings.
- Calories per serving (approximate): 350-450 calories.
Disclaimer: Nutritional information is an estimate and can vary significantly based on specific ingredient choices (especially the type of meat and mayonnaise used) and exact serving sizes.
The salad is a good source of protein from the eggs and meat, carbohydrates from the potatoes, and vitamins from the vegetables. However, due to the mayonnaise, it is also relatively high in fat and calories, so enjoy it as part of a balanced diet.
Preparation Time
Understanding the time commitment will help you plan accordingly:
- Active Preparation Time (Chopping, Mixing): 45-60 minutes (this heavily depends on your knife skills and how meticulously you dice).
- Cooking Time (Vegetables, Eggs): 25-35 minutes.
- Cooling and Chilling Time: Minimum 3 hours (vegetables and eggs need to cool completely before dicing, and the assembled salad needs to chill for flavors to meld). Ideally, chill overnight.
Total Time (including chilling): Approximately 4.5 hours minimum, but best when components are prepped and chilled over a longer period or the salad is made a day ahead.
How to Serve Your Classic Russian Salad
Russian Salad is versatile and can be presented in various ways, fitting both casual and more formal settings.
- Family Style:
- Serve directly from a large, attractive bowl, allowing everyone to help themselves. This is common for family gatherings and potlucks.
- Individual Portions:
- Use an ice cream scoop or a ring mold to create neat individual portions on small plates or lettuce cups. This offers a more elegant presentation for dinner parties.
- As a Side Dish:
- It’s an excellent accompaniment to grilled meats, roasted chicken, or fish.
- Often served as part of a “zakuski” spread (Russian appetizers).
- In Sandwiches or Wraps:
- Leftover salad can be used as a delicious and hearty filling for sandwiches or wraps.
- Garnishing is Key: A few simple garnishes can elevate the visual appeal:
- Fresh Herbs: Sprinkle generously with fresh chopped dill (most traditional), parsley, or chives just before serving.
- Egg Slices/Wedges: Arrange slices or wedges of hard-boiled egg on top.
- Pickle Fans: Create small fans from dill pickles.
- Vegetable Art: A small sprig of dill, a few strategically placed peas, or a thin carrot curl can add a pop of color.
- A light dusting of paprika can also add color and a hint of smoky flavor.
- Serving Temperature: Always serve Russian Salad chilled. It’s refreshing and the flavors are at their best when cold.
Additional Tips for the Ultimate Russian Salad
- Uniform Dicing is Non-Negotiable: This might seem tedious, but dicing all your cooked vegetables, meat, eggs, and pickles to a consistent small size (around ¼ to ½ inch) is paramount. It ensures that every spoonful offers a balanced mix of textures and flavors. It also contributes significantly to the traditional aesthetic of the salad.
- Cool Ingredients Thoroughly: Do not rush the cooling process for the potatoes, carrots, and eggs. Dicing warm ingredients can lead to a mushy texture, and adding warm components to mayonnaise can affect its consistency or even cause it to separate. Patience here pays off in the final product.
- Don’t Skimp on the Pickles (and consider their juice!): The pickles provide essential acidity and crunch that cuts through the richness of the mayonnaise and starchy vegetables. If your salad tastes a little flat, sometimes a tablespoon or two of pickle juice (from the pickle jar) mixed into the dressing can brighten it up wonderfully, instead of just adding more salt.
- The “Resting” Period is Crucial: As mentioned, allowing the salad to chill in the refrigerator for at least a few hours (preferably overnight) before serving is vital. This isn’t just about getting it cold; it’s about allowing the diverse flavors of the individual ingredients to meld and marry into that harmonious, signature Olivier taste.
- Taste and Adjust Seasoning Before Serving: After the chilling period, the flavors will have settled and might need a final tweak. Always taste your salad one last time before you present it. It might need a little more salt, a fresh grinding of black pepper, an extra dollop of mayonnaise for creaminess, or a squeeze of lemon juice/pickle juice for brightness.
FAQ: Your Russian Salad Questions Answered
Q1: Can I make Russian Salad ahead of time?
A1: Absolutely! In fact, it’s highly recommended. Russian Salad tastes best when made at least a few hours in advance, or even a day before serving. This allows the flavors to fully meld together. Store it covered in the refrigerator.
Q2: How long does Russian Salad last in the refrigerator?
A2: When stored properly in an airtight container in the refrigerator, Russian Salad can last for 3 to 4 days. However, its texture might change slightly over time as the ingredients absorb more moisture. Always use your best judgment regarding smell and appearance before consuming leftovers.
Q3: Can I use different vegetables or meat in Russian Salad?
A3: Yes, while the recipe provided is classic, variations are common. Some people add finely diced crisp apple for sweetness and crunch, or substitute some of the potatoes with cooked celery root. For meat, cooked turkey, beef tongue, or even smoked fish (like salmon, for a non-traditional twist) can be used. However, straying too far might result in a delicious salad, but perhaps not a “Classic Russian Salad.”
Q4: How can I make a vegetarian version of Russian Salad?
A4: It’s very easy to make a vegetarian version. Simply omit the cooked meat. The salad will still be delicious with the combination of potatoes, carrots, eggs, peas, and pickles. To make it vegan, you would also need to omit the eggs and use a good quality vegan mayonnaise. You could add smoked tofu or chickpeas for extra protein if desired.
Q5: My salad seems a bit dry or too thick. What can I do?
A5: If your salad seems too dry after chilling (as the potatoes can absorb some of the mayonnaise), simply stir in a little more mayonnaise until it reaches your desired consistency. If it’s too thick and you don’t want to add more mayo, a tablespoon of pickle juice or even a tiny bit of cold water or milk can help loosen it slightly. Always add liquids gradually and mix gently.

Classic Russian Salad Recipe
Ingredients
- Potatoes: 4 medium (about 600g or 1.3 lbs) waxy potatoes (like Yukon Gold or red potatoes), peeled
- Carrots: 3 medium (about 300g or 0.66 lbs), peeled
- Eggs: 5 large, hard-boiled and cooled
- Dill Pickles: 4-5 medium (about 250g or 0.55 lbs), preferably barrel-fermented or good quality crunchy dill pickles
- Cooked Meat: 300g (about 0.66 lbs) of your choice. Options include:
- Boiled chicken breast or thigh meat, cooled and diced
- Good quality cooked ham, diced
- “Doktorskaya” or similar bologna-style sausage, diced (a very traditional choice)
- Green Peas: 1 cup (about 150g) frozen peas, thawed (or canned, drained and rinsed)
- Mayonnaise: 1 cup (about 240ml) good quality, full-fat mayonnaise (adjust to your preferred creaminess)
- Fresh Dill: 2-3 tablespoons, finely chopped (plus extra for garnish)
- Fresh Parsley: 1-2 tablespoons, finely chopped (optional, for added freshness)
- Salt: 1 teaspoon, or to taste
- Black Pepper: ½ teaspoon, freshly ground, or to taste
- Optional: 1 small yellow onion or 2-3 spring onions, very finely diced (if using yellow onion, you can rinse it under cold water after dicing to mellow its flavor)
Instructions
- Cook the Root Vegetables:
- Place the peeled whole potatoes and whole carrots into a large pot. Cover them with cold water and add a pinch of salt.
- Bring to a boil, then reduce the heat to a simmer. Cook until tender when pierced with a fork. This typically takes 20-30 minutes for potatoes and 15-25 minutes for carrots, depending on their size. Try to cook them so they are tender but still firm enough to hold their shape when diced. Avoid overcooking.
- Once cooked, drain the vegetables immediately and let them cool completely. You can spread them on a baking sheet to speed up the cooling process. Chilling them in the refrigerator for at least an hour (or even overnight) makes dicing much easier and neater.
- Prepare the Eggs:
- While the vegetables are cooking, if you haven’t already, hard-boil the eggs. Place eggs in a saucepan, cover with cold water, bring to a boil, then cover, remove from heat, and let sit for 10-12 minutes.
- Transfer the eggs to an ice bath to stop the cooking process and make peeling easier.
- Once cooled, peel the eggs.
- Thaw the Peas:
- If using frozen peas, place them in a bowl and cover with hot water for a few minutes to thaw quickly. Drain them thoroughly. If using canned peas, simply drain and rinse.
- Dice the Ingredients:
- This is arguably the most crucial step for achieving the classic texture. Aim for uniform dice, about ¼ to ½ inch (0.5cm to 1cm) cubes, for all the main ingredients.
- Potatoes & Carrots: Once completely cool, dice the potatoes and carrots.
- Eggs: Dice the peeled hard-boiled eggs.
- Pickles: Dice the dill pickles. If they are very watery, you can gently pat them with a paper towel after dicing to remove excess moisture.
- Cooked Meat: Dice your chosen cooked meat (chicken, ham, or bologna) to the same size as the vegetables.
- Onion (if using): If you’re adding onion, dice it very finely. For a milder flavor, you can soak the diced yellow onion in cold water for 10 minutes, then drain thoroughly.
- Combine the Salad:
- In a very large mixing bowl, gently combine the diced potatoes, carrots, eggs, pickles, cooked meat, and thawed peas.
- Add the finely chopped fresh dill and parsley (if using).
- Dress the Salad:
- Add the mayonnaise to the bowl. Start with about ¾ of the recommended amount and add more if needed, until the salad reaches your desired creaminess.
- Season with salt and freshly ground black pepper. Remember that pickles and some cooked meats are already salty, so taste before adding too much salt initially.
- Gently fold all the ingredients together with a large spoon or spatula until everything is evenly coated with mayonnaise. Be careful not to mash the potatoes.
- Chill and Rest:
- Cover the bowl with plastic wrap or a lid and refrigerate for at least 2-3 hours, or preferably overnight. This chilling time is essential! It allows the flavors to meld together beautifully, making the salad taste significantly better.
- Taste and Adjust:
- Before serving, give the salad a final gentle stir. Taste it and adjust seasoning (salt, pepper, or even a touch more mayonnaise or pickle juice for tang) if necessary. The flavors can change slightly as it chills.
Nutrition
- Serving Size: One Normal Portion
- Calories: 350-450