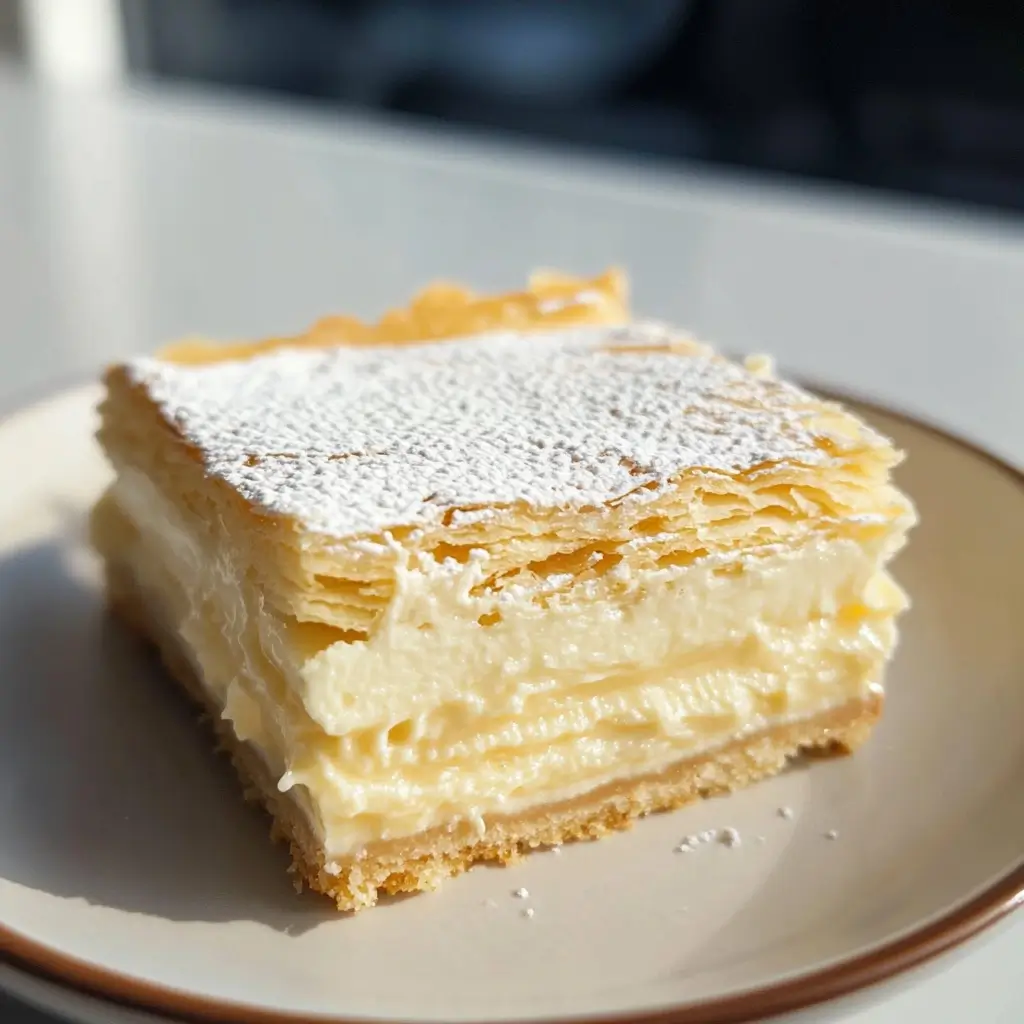
There are desserts that whisper promises of simple pleasures, and then there are desserts that shout pure, unadulterated joy. The Classic Vanilla Slice, also known as Mille-feuille or Custard Slice, falls firmly into the latter category. In my kitchen, this recipe has become a legend. The first time I made it, the silence that fell upon my family as they took their first bites was more eloquent than any praise. Eyes widened, smiles bloomed, and satisfied murmurs filled the air. It was a unanimous declaration: this was the vanilla slice, the kind you dream about, the one that sets the benchmark for all others.
What is it about this seemingly simple dessert that holds such captivating power? It’s the exquisite dance of textures and flavors. Imagine layers of shatteringly crisp, buttery pastry embracing a cloud of silken, intensely vanilla-flavored custard. The contrast is nothing short of magical. Each bite is a symphony of sensations – the initial crackle of the pastry, the smooth, cool embrace of the custard, and the lingering sweetness of vanilla. It’s a dessert that’s both comforting and elegant, familiar yet utterly irresistible.
This recipe, adapted from the masterful Nick Makrides, takes the classic vanilla slice to new heights. It’s not just about following instructions; it’s about understanding the nuances, the subtle techniques that elevate a good vanilla slice to an exceptional one. So, let’s embark on this culinary journey together, and unlock the secrets to creating a vanilla slice that will not only impress but truly delight.
Ingredients
The beauty of the classic vanilla slice lies in the quality of its components. While the ingredient list is relatively short, each element plays a crucial role in the final masterpiece. Let’s break down each ingredient and understand its contribution:
Pastry
- 2 sheets butter puff pastry, frozen (see notes): The foundation of our vanilla slice is undeniably the puff pastry. Butter puff pastry is non-negotiable here. Its high butter content is what creates those incredible layers of flaky, crispy goodness that are essential for the textural contrast. Frozen puff pastry, especially all-butter varieties, is readily available and a fantastic shortcut without compromising on quality. Note on Puff Pastry: Look for puff pastry sheets made with butter and not vegetable shortening or oil. All-butter puff pastry will provide a superior flavor and flakier texture. Brands like Dufour or Pepperidge Farm (look for the “Puff Pastry Sheets” specifically) are excellent choices if you are looking for readily available options.
Vanilla Custard
- 110 g caster sugar: Caster sugar, also known as superfine sugar, is essential for the custard. Its finer granules dissolve more easily into the custard base, ensuring a smooth and silky texture. If you only have granulated sugar, you can pulse it in a food processor for a few seconds to achieve a finer consistency.
- 50 g corn starch, corn flour: Corn starch, or corn flour as it’s known in some regions, is the thickening agent in our custard. It provides a stable and smooth thickening without the grainy texture that can sometimes occur with flour. Ensure your corn starch is fresh for optimal thickening power.
- 8 egg yolks, room temperature: Egg yolks are the heart and soul of a rich and decadent custard. They contribute to the creamy texture, the vibrant yellow color, and a subtle richness that is simply irreplaceable. Using room temperature egg yolks is crucial as they emulsify more readily and incorporate smoothly into the hot milk, reducing the risk of curdling.
- 750 g whole milk, warmed: Whole milk is preferred for its higher fat content, which contributes to a richer and more luxurious custard. Warming the milk before adding it to the egg mixture is a critical step. It helps to temper the eggs gently, preventing them from scrambling when they come into contact with the hot liquid. Warmed milk also helps the custard thicken faster and more evenly.
- 14 g vanilla bean paste: Vanilla is the star flavor of this dessert, and vanilla bean paste delivers an intense and authentic vanilla experience. It contains both vanilla extract and vanilla bean seeds, providing both flavor depth and those beautiful flecks of vanilla that are visually appealing. If you don’t have vanilla bean paste, you can substitute with vanilla extract, but for the best flavor, consider using a vanilla bean. Alternative with Vanilla Bean: If using a vanilla bean, split it lengthwise and scrape out the seeds. Add both the seeds and the bean pod to the milk while warming. Remove the pod before adding the milk to the egg mixture.
- 125 g unsalted butter, chilled and cubed: Butter is added at the end of the custard-making process to enrich the flavor, add a glossy sheen, and contribute to a smoother, more melt-in-your-mouth texture. Using chilled, cubed butter is important. Cold butter melts slower, allowing it to emulsify properly into the hot custard without causing it to split or become greasy.
- 50 g powdered sugar to dust: A generous dusting of powdered sugar, also known as icing sugar, is the perfect finishing touch. It adds a delicate sweetness, a beautiful snowy white contrast to the golden pastry, and a slight textural element. Dusting just before serving prevents the powdered sugar from dissolving into the custard.
Instructions
Creating a truly exceptional vanilla slice is a process that involves both precision and care. Let’s break down each step, ensuring you understand the “why” behind each action to achieve perfect results.
Pastry Preparation
- Preheat the Oven and Prepare Baking Trays: Begin by preheating your oven to 180°C / 355°F if using a fan-forced oven, or 200°C / 390°F for a conventional oven. Oven temperature is crucial for achieving perfectly puffed and crispy pastry. Line two flat baking trays with baking paper. This prevents sticking and makes it easier to remove the baked pastry.
- Prepare the Puff Pastry: Lay the frozen butter puff pastry sheets onto the prepared baking trays. Allow them to thaw slightly. You don’t want them to be completely thawed and floppy, but just softened enough to handle without cracking. Prick holes all over both sheets of pastry using a fork. This is a vital step to prevent the pastry from puffing up too much unevenly during baking. Pricking allows steam to escape, resulting in flatter, more uniform pastry sheets that are ideal for layering in a vanilla slice.
- Weight Down the Pastry for Even Baking: Cover each pastry sheet with another sheet of baking paper. Then, place another flat baking tray on top of each. This “weighting down” technique is key to achieving flat, even pastry sheets. The weight prevents excessive puffing and ensures the pastry bakes uniformly, creating the perfect crisp layers.
- Bake the Pastry to Golden Perfection: Place the baking trays with the weighted pastry into the preheated oven. If using a fan-forced oven, bake for 40 minutes. If using a conventional oven, bake for 50 minutes. However, it’s crucial to check for doneness starting at the 30-minute mark, as oven temperatures can vary. The pastry is perfectly baked when it is a deep golden brown color and feels crispy to the touch. Don’t be afraid to bake it until it’s deeply golden; this ensures maximum crispness and flavor.
- Cool the Pastry Completely: Once baked, remove the trays from the oven and allow the pastry to cool completely at room temperature on the baking trays. Do not attempt to move or cut the pastry while it is still warm, as it is very delicate and prone to breaking. Cooling allows the pastry to firm up and become easier to handle.
- Cut the Pastry to Size: Once the pastry is completely cool, it’s time to trim it to fit your baking tin. Gently place an 8-inch square baking tin (or similar size) on top of one of the baked pastry sheets. Using a serrated knife (a bread knife works well), gently score around the edge of the baking tin, pressing lightly. Then, carefully cut along the scored lines to trim the pastry to the exact size of the tin’s base. Repeat this process with the second pastry sheet, using the top of the baking tin as a guide. Baking tins can sometimes be slightly different sizes at the top and bottom, so using the base and top respectively ensures a perfect fit for both pastry layers. For extra precision, you can use a ruler to measure and cut 8-inch squares if desired. Handle the baked pastry with care as it is delicate and can easily break.
Vanilla Custard Creation
- Combine Dry Ingredients: In a large, heatproof bowl, whisk together the caster sugar and corn starch until thoroughly combined. Whisking ensures there are no lumps of corn starch, which could lead to a lumpy custard.
- Incorporate Egg Yolks: Add the room temperature egg yolks to the sugar and corn starch mixture. Whisk continuously until the mixture is smooth, pale yellow, and slightly thickened. This step combines the dry and wet ingredients and prepares the egg yolks to be tempered with the hot milk.
- Warm the Milk: Pour the whole milk into a large, non-stick saucepan. Using a non-stick saucepan minimizes the risk of the milk scorching. Heat the milk over low heat, stirring occasionally to prevent sticking. Heat the milk until you see small bubbles forming around the edges of the pan. Do not let the milk boil. Heating the milk to just below boiling point is crucial for tempering the eggs effectively.
- Temper the Egg Mixture: Tempering the eggs is the key to preventing them from scrambling when they come into contact with the hot milk. Take the saucepan of hot milk off the heat. Ladle about ¼ cup of the hot milk into the egg yolk mixture, whisking constantly and vigorously as you pour. This slowly raises the temperature of the egg yolks without cooking them too quickly. Add another ¼ cup of hot milk, whisking continuously. Continue adding the hot milk in small increments, whisking constantly, until about half of the milk has been incorporated into the egg yolk mixture. Once the egg mixture is warmed through, you can pour the egg mixture into the saucepan with the remaining hot milk.
- Cook the Custard to Thick Perfection: Return the saucepan to medium heat. Continue to stir the custard constantly with a whisk or a heatproof spatula. Stirring prevents the custard from sticking to the bottom of the pan and ensures even cooking. The custard will begin to thicken noticeably after about 3-4 minutes. As it thickens, it will become smooth and glossy. Continue stirring until the custard is very thick and begins to bubble and steam. Once it bubbles, continue cooking and stirring for exactly 3 minutes. This ensures the corn starch is fully cooked and the custard is stable.
- Infuse with Vanilla: Remove the saucepan from the heat immediately after the 3 minutes of bubbling. Add the vanilla bean paste (or vanilla extract if using). Stir vigorously until the vanilla bean paste is fully incorporated and evenly distributed throughout the custard.
- Enrich with Butter: While the custard is still hot, add the cold, cubed butter in four separate batches. Add the first batch of butter and stir continuously until it is completely melted and incorporated into the custard. Then, add the second batch and repeat, and so on, until all the butter is added and the custard is smooth, glossy, and emulsified. Adding the cold butter in batches and stirring continuously ensures it melts slowly and emulsifies properly into the hot custard, creating a rich and velvety texture.
- Strain for Ultimate Smoothness (Optional but Recommended): For an exceptionally smooth custard, pour the hot custard through a fine-mesh sieve into a clean bowl. Press the custard through the sieve using a spatula to remove any lumps or cooked egg particles. This step is optional but highly recommended for achieving a truly refined and professional-quality vanilla slice.
Assembly and Chilling
- Prepare the Baking Tin: Line the 8-inch square baking tin (the same one you used to cut the pastry) with baking paper or double layers of plastic wrap. Ensure the paper or wrap overhangs the sides of the tin; this will make it easy to lift the vanilla slice out later.
- Layer the First Pastry Sheet: Place one of the trimmed pastry sheets into the lined baking tin, ensuring it fits snugly at the bottom.
- Pour and Smooth the Custard: Pour the warm custard directly over the pastry base in the baking tin. Use a spatula to spread the custard evenly and smooth the surface.
- Top with Second Pastry Sheet: Gently place the second trimmed pastry sheet on top of the custard layer, aligning it carefully.
- Chill Thoroughly: Cover the baking tin with the overhanging baking paper or plastic wrap. Place the vanilla slice in the refrigerator to chill for a minimum of 5 hours, or preferably overnight. Chilling is absolutely crucial for the vanilla slice to set properly and for the flavors to meld together. The custard needs time to firm up completely, and the pastry will soften slightly from the moisture of the custard, creating the perfect texture when served.
- Dust and Serve: Just before serving, remove the vanilla slice from the refrigerator and carefully lift it out of the baking tin using the overhanging baking paper or plastic wrap. Place it on a cutting board. Generously dust the top of the vanilla slice with powdered sugar. Using a sharp, serrated knife, carefully cut the vanilla slice into 9 even squares. Serve chilled and enjoy the symphony of textures and flavors!
Nutrition Facts
(Per Serving, Serves 9)
- Calories: 581kcal
Please note: Nutritional information is an estimate and can vary based on specific ingredients and brands used.
Preparation Time
- Prep Time: 20 minutes
- Cook Time: 40 minutes
- Chill Time: 5 hours (minimum)
- Total Time: 6 hours (minimum)
How to Serve
The classic vanilla slice is a dessert that can be enjoyed in its pure, unadulterated form, or elevated with simple accompaniments. Here are some delightful ways to serve your homemade masterpiece:
- Classic Dusting: The most traditional and elegant way to serve vanilla slice is simply dusted generously with powdered sugar just before serving. The snowy white dusting provides a beautiful contrast and a touch of sweetness.
- Fresh Berries: A scattering of fresh berries like raspberries, strawberries, or blueberries adds a burst of freshness and a vibrant pop of color. The tartness of the berries complements the richness of the custard beautifully.
- Whipped Cream: A dollop of lightly sweetened whipped cream alongside a vanilla slice is a classic pairing. The airy creaminess enhances the overall dessert experience.
- Chocolate Shavings: For a touch of indulgence, sprinkle some dark or milk chocolate shavings over the powdered sugar dusting. The slightly bitter chocolate provides a lovely counterpoint to the sweetness of the vanilla slice.
- Fruit Coulis: A delicate fruit coulis, such as raspberry or passion fruit, drizzled around the vanilla slice adds a sophisticated touch and a layer of fruity flavor.
- Coffee or Tea: Vanilla slice is the perfect accompaniment to a cup of freshly brewed coffee or a pot of fragrant tea. The dessert’s richness pairs wonderfully with the warmth and slight bitterness of these beverages.
- Dessert Platter: Incorporate vanilla slice into a dessert platter alongside other sweet treats like macarons, cookies, and fresh fruit for a stunning and varied dessert offering.
Additional Tips for Vanilla Slice Perfection
- Use High-Quality Butter Puff Pastry: The quality of your puff pastry directly impacts the final result. Opt for all-butter puff pastry for the best flavor and flakiness. Avoid puff pastry made with vegetable shortening or oil, as it will lack the rich buttery flavor and crispness that are essential for a classic vanilla slice.
- Don’t Overcook the Custard: Overcooked custard can become grainy or curdled. Cook the custard over medium heat, stirring constantly, until it thickens and just begins to bubble. Once it bubbles, cook for the specified 3 minutes and remove from the heat immediately. Look for a smooth, glossy, and thick consistency.
- Chill Thoroughly and Patiently: Resist the temptation to rush the chilling process. Allow the vanilla slice to chill in the refrigerator for at least 5 hours, or ideally overnight. This chilling time is crucial for the custard to set firmly and for the flavors to fully develop and meld together.
- Use a Serrated Knife for Clean Cuts: A sharp, serrated knife, like a bread knife, is your best friend when cutting vanilla slice. Use a gentle sawing motion to cut through the layers cleanly without crushing the delicate pastry or squishing out the custard. Wipe the knife clean between cuts for the neatest squares.
- Dust with Powdered Sugar Just Before Serving: Powdered sugar tends to absorb moisture over time. For the most visually appealing and fresh-tasting vanilla slice, dust generously with powdered sugar right before you are ready to serve it. This ensures a pristine white dusting that hasn’t become damp or dissolved.
FAQ – Frequently Asked Questions about Vanilla Slice
Q1: Can I use regular milk instead of whole milk?
A: While whole milk is recommended for its higher fat content, which results in a richer and creamier custard, you can use lower-fat milk if you prefer. However, the custard may be slightly less rich and have a slightly less luxurious texture. For the best classic vanilla slice experience, whole milk is highly recommended.
Q2: Can I make vanilla slice ahead of time?
A: Yes, vanilla slice is actually an excellent make-ahead dessert! In fact, chilling it overnight is beneficial for both texture and flavor development. You can assemble the entire vanilla slice and store it in the refrigerator for up to 2 days. Dust with powdered sugar just before serving.
Q3: Can I freeze vanilla slice?
A: Freezing vanilla slice is not recommended. The custard’s texture can become grainy and unpleasant upon thawing. However, you can freeze baked puff pastry sheets separately. Bake the pastry sheets as instructed, let them cool completely, and then freeze them in an airtight container. Thaw them completely before assembling the vanilla slice with freshly made custard.
Q4: My custard is lumpy, what did I do wrong?
A: Lumpy custard is usually caused by either the egg yolks curdling or the corn starch not being properly mixed. To prevent curdling, temper the egg yolks gently by gradually adding the hot milk in small increments, whisking constantly. Ensure the corn starch is thoroughly whisked with the sugar before adding the egg yolks to eliminate lumps from the start. If your custard does become slightly lumpy, straining it through a fine-mesh sieve after cooking can help smooth it out.
Q5: My pastry is not crispy, what went wrong?
A: Several factors can contribute to pastry that isn’t crispy. Ensure your oven is preheated to the correct temperature and that you are baking for the recommended time. Weighing down the pastry during baking is crucial for preventing excessive puffing and ensuring crispness. Also, avoid over-handling the pastry dough and make sure it is properly thawed but still cold when you put it in the oven. Finally, ensure the baked pastry is cooled completely at room temperature before assembling the vanilla slice, as warmth can make it soften.
By following this detailed recipe and embracing these tips, you’ll be well on your way to creating a truly magnificent Classic Vanilla Slice. Prepare to be amazed by the symphony of textures and flavors, and to witness the sheer delight on the faces of everyone who savors a bite of this timeless dessert. Happy baking!
Print
Classic Vanilla Slice Recipe
Ingredients
Pastry
- 2 sheets butter puff pastry, frozen (see notes): The foundation of our vanilla slice is undeniably the puff pastry. Butter puff pastry is non-negotiable here. Its high butter content is what creates those incredible layers of flaky, crispy goodness that are essential for the textural contrast. Frozen puff pastry, especially all-butter varieties, is readily available and a fantastic shortcut without compromising on quality. Note on Puff Pastry: Look for puff pastry sheets made with butter and not vegetable shortening or oil. All-butter puff pastry will provide a superior flavor and flakier texture. Brands like Dufour or Pepperidge Farm (look for the “Puff Pastry Sheets” specifically) are excellent choices if you are looking for readily available options.
Vanilla Custard
- 110 g caster sugar: Caster sugar, also known as superfine sugar, is essential for the custard. Its finer granules dissolve more easily into the custard base, ensuring a smooth and silky texture. If you only have granulated sugar, you can pulse it in a food processor for a few seconds to achieve a finer consistency.
- 50 g corn starch, corn flour: Corn starch, or corn flour as it’s known in some regions, is the thickening agent in our custard. It provides a stable and smooth thickening without the grainy texture that can sometimes occur with flour. Ensure your corn starch is fresh for optimal thickening power.
- 8 egg yolks, room temperature: Egg yolks are the heart and soul of a rich and decadent custard. They contribute to the creamy texture, the vibrant yellow color, and a subtle richness that is simply irreplaceable. Using room temperature egg yolks is crucial as they emulsify more readily and incorporate smoothly into the hot milk, reducing the risk of curdling.
- 750 g whole milk, warmed: Whole milk is preferred for its higher fat content, which contributes to a richer and more luxurious custard. Warming the milk before adding it to the egg mixture is a critical step. It helps to temper the eggs gently, preventing them from scrambling when they come into contact with the hot liquid. Warmed milk also helps the custard thicken faster and more evenly.
- 14 g vanilla bean paste: Vanilla is the star flavor of this dessert, and vanilla bean paste delivers an intense and authentic vanilla experience. It contains both vanilla extract and vanilla bean seeds, providing both flavor depth and those beautiful flecks of vanilla that are visually appealing. If you don’t have vanilla bean paste, you can substitute with vanilla extract, but for the best flavor, consider using a vanilla bean. Alternative with Vanilla Bean: If using a vanilla bean, split it lengthwise and scrape out the seeds. Add both the seeds and the bean pod to the milk while warming. Remove the pod before adding the milk to the egg mixture.
- 125 g unsalted butter, chilled and cubed: Butter is added at the end of the custard-making process to enrich the flavor, add a glossy sheen, and contribute to a smoother, more melt-in-your-mouth texture. Using chilled, cubed butter is important. Cold butter melts slower, allowing it to emulsify properly into the hot custard without causing it to split or become greasy.
- 50 g powdered sugar to dust: A generous dusting of powdered sugar, also known as icing sugar, is the perfect finishing touch. It adds a delicate sweetness, a beautiful snowy white contrast to the golden pastry, and a slight textural element. Dusting just before serving prevents the powdered sugar from dissolving into the custard.
Instructions
Pastry Preparation
- Preheat the Oven and Prepare Baking Trays: Begin by preheating your oven to 180°C / 355°F if using a fan-forced oven, or 200°C / 390°F for a conventional oven. Oven temperature is crucial for achieving perfectly puffed and crispy pastry. Line two flat baking trays with baking paper. This prevents sticking and makes it easier to remove the baked pastry.
- Prepare the Puff Pastry: Lay the frozen butter puff pastry sheets onto the prepared baking trays. Allow them to thaw slightly. You don’t want them to be completely thawed and floppy, but just softened enough to handle without cracking. Prick holes all over both sheets of pastry using a fork. This is a vital step to prevent the pastry from puffing up too much unevenly during baking. Pricking allows steam to escape, resulting in flatter, more uniform pastry sheets that are ideal for layering in a vanilla slice.
- Weight Down the Pastry for Even Baking: Cover each pastry sheet with another sheet of baking paper. Then, place another flat baking tray on top of each. This “weighting down” technique is key to achieving flat, even pastry sheets. The weight prevents excessive puffing and ensures the pastry bakes uniformly, creating the perfect crisp layers.
- Bake the Pastry to Golden Perfection: Place the baking trays with the weighted pastry into the preheated oven. If using a fan-forced oven, bake for 40 minutes. If using a conventional oven, bake for 50 minutes. However, it’s crucial to check for doneness starting at the 30-minute mark, as oven temperatures can vary. The pastry is perfectly baked when it is a deep golden brown color and feels crispy to the touch. Don’t be afraid to bake it until it’s deeply golden; this ensures maximum crispness and flavor.
- Cool the Pastry Completely: Once baked, remove the trays from the oven and allow the pastry to cool completely at room temperature on the baking trays. Do not attempt to move or cut the pastry while it is still warm, as it is very delicate and prone to breaking. Cooling allows the pastry to firm up and become easier to handle.
- Cut the Pastry to Size: Once the pastry is completely cool, it’s time to trim it to fit your baking tin. Gently place an 8-inch square baking tin (or similar size) on top of one of the baked pastry sheets. Using a serrated knife (a bread knife works well), gently score around the edge of the baking tin, pressing lightly. Then, carefully cut along the scored lines to trim the pastry to the exact size of the tin’s base. Repeat this process with the second pastry sheet, using the top of the baking tin as a guide. Baking tins can sometimes be slightly different sizes at the top and bottom, so using the base and top respectively ensures a perfect fit for both pastry layers. For extra precision, you can use a ruler to measure and cut 8-inch squares if desired. Handle the baked pastry with care as it is delicate and can easily break.
Vanilla Custard Creation
- Combine Dry Ingredients: In a large, heatproof bowl, whisk together the caster sugar and corn starch until thoroughly combined. Whisking ensures there are no lumps of corn starch, which could lead to a lumpy custard.
- Incorporate Egg Yolks: Add the room temperature egg yolks to the sugar and corn starch mixture. Whisk continuously until the mixture is smooth, pale yellow, and slightly thickened. This step combines the dry and wet ingredients and prepares the egg yolks to be tempered with the hot milk.
- Warm the Milk: Pour the whole milk into a large, non-stick saucepan. Using a non-stick saucepan minimizes the risk of the milk scorching. Heat the milk over low heat, stirring occasionally to prevent sticking. Heat the milk until you see small bubbles forming around the edges of the pan. Do not let the milk boil. Heating the milk to just below boiling point is crucial for tempering the eggs effectively.
- Temper the Egg Mixture: Tempering the eggs is the key to preventing them from scrambling when they come into contact with the hot milk. Take the saucepan of hot milk off the heat. Ladle about ¼ cup of the hot milk into the egg yolk mixture, whisking constantly and vigorously as you pour. This slowly raises the temperature of the egg yolks without cooking them too quickly. Add another ¼ cup of hot milk, whisking continuously. Continue adding the hot milk in small increments, whisking constantly, until about half of the milk has been incorporated into the egg yolk mixture. Once the egg mixture is warmed through, you can pour the egg mixture into the saucepan with the remaining hot milk.
- Cook the Custard to Thick Perfection: Return the saucepan to medium heat. Continue to stir the custard constantly with a whisk or a heatproof spatula. Stirring prevents the custard from sticking to the bottom of the pan and ensures even cooking. The custard will begin to thicken noticeably after about 3-4 minutes. As it thickens, it will become smooth and glossy. Continue stirring until the custard is very thick and begins to bubble and steam. Once it bubbles, continue cooking and stirring for exactly 3 minutes. This ensures the corn starch is fully cooked and the custard is stable.
- Infuse with Vanilla: Remove the saucepan from the heat immediately after the 3 minutes of bubbling. Add the vanilla bean paste (or vanilla extract if using). Stir vigorously until the vanilla bean paste is fully incorporated and evenly distributed throughout the custard.
- Enrich with Butter: While the custard is still hot, add the cold, cubed butter in four separate batches. Add the first batch of butter and stir continuously until it is completely melted and incorporated into the custard. Then, add the second batch and repeat, and so on, until all the butter is added and the custard is smooth, glossy, and emulsified. Adding the cold butter in batches and stirring continuously ensures it melts slowly and emulsifies properly into the hot custard, creating a rich and velvety texture.
- Strain for Ultimate Smoothness (Optional but Recommended): For an exceptionally smooth custard, pour the hot custard through a fine-mesh sieve into a clean bowl. Press the custard through the sieve using a spatula to remove any lumps or cooked egg particles. This step is optional but highly recommended for achieving a truly refined and professional-quality vanilla slice.
Nutrition
- Serving Size: One Normal Portion
- Calories: 581kcal