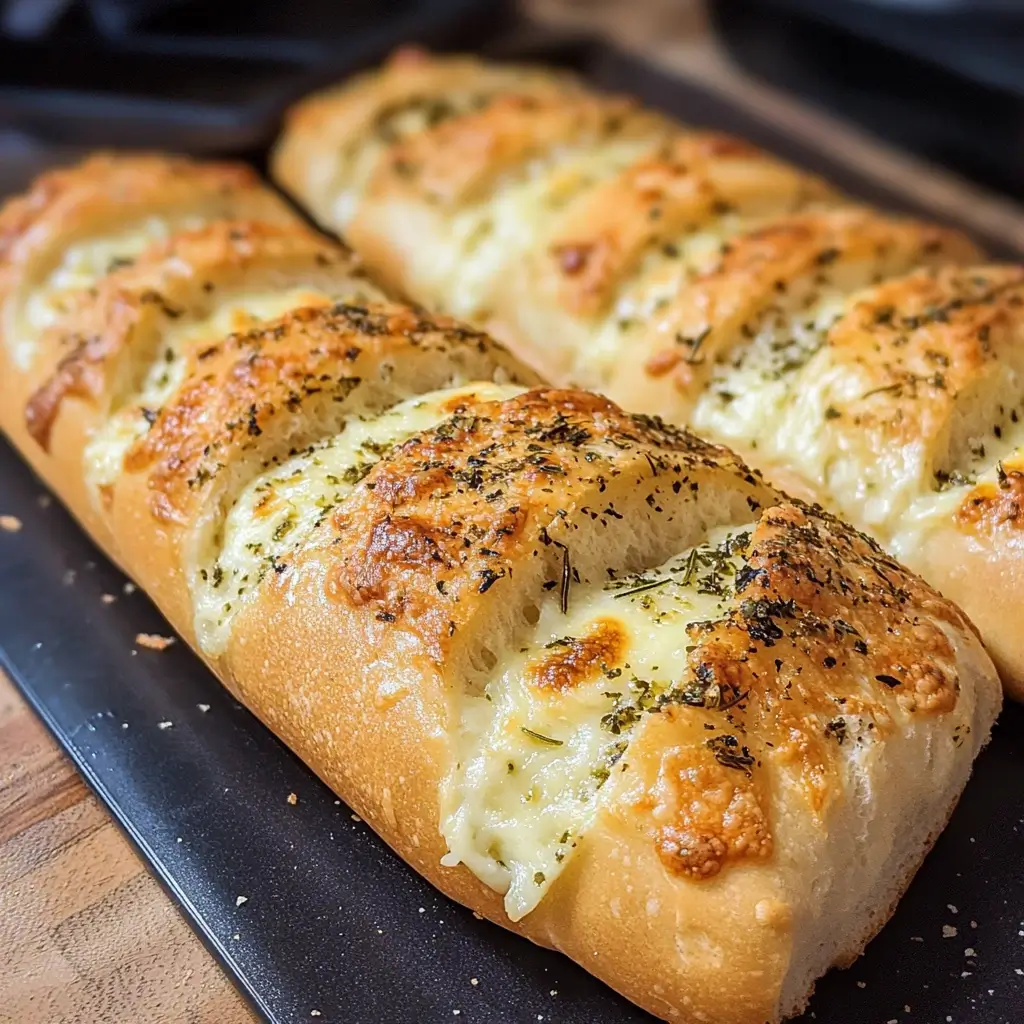
Okay, let’s bake some magic! Few things in my kitchen get the whole family as excited as the smell of freshly baked bread, and when that bread is a dead ringer for Subway’s iconic Italian Herb & Cheese, well, let’s just say anticipation reaches fever pitch! The first time I pulled these golden, herb-flecked, cheese-crusted loaves from my oven, the aroma alone transported us. My kids, usually picky eaters, devoured their sandwiches made on this bread, declaring it “even better than the real thing!” My partner, a true bread aficionado, was equally impressed by the soft, chewy interior and the perfectly savory, cheesy crust. It’s become a weekend staple, perfect for crafting epic sandwiches, serving alongside a hearty soup, or simply enjoying warm with a pat of butter. The satisfaction of recreating this beloved classic at home, with wholesome ingredients and a little bit of love, is truly unparalleled. Get ready to fill your home with the most irresistible aroma and impress everyone with your baking prowess!
Ingredients for Your Homemade Italian Herb & Cheese Masterpiece
This recipe yields two generous Subway-style loaves, perfect for a family or for stocking up your freezer. We’re aiming for that authentic flavor and texture, so quality ingredients are key!
For the Dough:
- Warm Water: 1 ½ cups (105-115°F or 40-46°C) – Crucial for activating the yeast.
- Granulated Sugar: 2 tablespoons – Feeds the yeast and adds a subtle sweetness.
- Instant Yeast (or Active Dry Yeast): 1 packet (2 ¼ teaspoons or 7g) – If using active dry, you’ll need to bloom it first (see instructions).
- Bread Flour: 4 to 4 ½ cups, plus more for dusting – Bread flour has higher protein content, giving the bread its characteristic chewiness. All-purpose can be used in a pinch, but the texture will be slightly different.
- Salt: 1 ½ teaspoons – Enhances flavor and controls yeast activity.
- Olive Oil: 3 tablespoons, plus more for greasing the bowl – Adds flavor and softness to the crumb.
For the Herb & Cheese Topping:
- Dried Italian Herb Blend: 2 tablespoons – Or a mix of dried oregano, basil, parsley, marjoram, and a pinch of thyme.
- Grated Parmesan Cheese: ½ cup, freshly grated if possible – For that sharp, nutty, savory crust.
- Shredded Monterey Jack or Mild Cheddar Cheese: 1 cup – For a beautiful melt and cheesy pull. You can also use a blend.
- Optional for extra flavor inside: ½ cup of shredded cheese mixed into the dough during the last stages of kneading.
Equipment You’ll Need:
- Large mixing bowl
- Stand mixer with dough hook (optional, can be kneaded by hand)
- Measuring cups and spoons
- Baking sheet
- Parchment paper
- Plastic wrap
- Sharp knife or lame for scoring
Step-by-Step Instructions to Subway-Style Perfection
Follow these instructions carefully, and you’ll be rewarded with bread that rivals your favorite sandwich shop.
1. Activate the Yeast (Bloom if using Active Dry):
- In a large mixing bowl (or the bowl of your stand mixer), combine the warm water and granulated sugar. Stir gently to dissolve the sugar.
- If using Instant Yeast, you can add it directly with the flour in the next step.
- If using Active Dry Yeast, sprinkle it over the warm sugar water. Let it sit for 5-10 minutes until it becomes foamy and bubbly. This indicates the yeast is alive and active. If it doesn’t foam, your yeast may be old, or the water might have been too hot or too cold – you’ll need to start over with fresh yeast.
2. Mix the Dough:
- To the bowl with the yeast mixture (or just water/sugar if using instant yeast), add the olive oil.
- In a separate bowl, whisk together 4 cups of bread flour and the salt. If using instant yeast, whisk it in with the flour and salt now.
- Gradually add the flour mixture to the wet ingredients, mixing on low speed with the dough hook attachment if using a stand mixer, or with a wooden spoon if mixing by hand.
- Continue to mix until a shaggy dough forms. If the dough seems too sticky, add the remaining ½ cup of flour, a little at a time, until the dough starts to pull away from the sides of the bowl. The dough should be soft and slightly tacky, but not overly sticky.
3. Knead the Dough:
- Stand Mixer Method: Knead on medium-low speed for 7-10 minutes. The dough should become smooth, elastic, and pass the “windowpane test” (a small piece can be stretched thin enough to see light through it without tearing).
- Hand Kneading Method: Turn the dough out onto a lightly floured surface. Knead for 10-15 minutes. To knead, fold the dough over itself, then push it away from you with the heel of your hand. Rotate the dough a quarter turn and repeat. Continue this process until the dough is smooth, elastic, and springs back when gently poked.
- Optional Cheese Addition: If you want cheese swirled into the bread, flatten the dough slightly towards the end of kneading, sprinkle over ½ cup of your chosen shredded cheese, and knead for another minute or two until just incorporated.
4. First Rise (Bulk Fermentation):
- Lightly grease a large, clean bowl with olive oil.
- Form the kneaded dough into a ball and place it in the greased bowl, turning it once to coat the entire surface with oil. This prevents a dry crust from forming.
- Cover the bowl tightly with plastic wrap or a damp kitchen towel.
- Place the bowl in a warm, draft-free place to rise for 1 to 1.5 hours, or until the dough has doubled in size. The ideal temperature is around 75-80°F (24-27°C). If your kitchen is cool, you can place it in an oven with just the light on, or near a warm appliance.
5. Shape the Loaves:
- Once doubled, gently punch down the dough to release the air.
- Turn the dough out onto a lightly floured surface.
- Divide the dough into two equal pieces. A kitchen scale is helpful for accuracy.
- Working with one piece at a time, gently pat or roll it into a rectangle, approximately 8×12 inches. Don’t press out all the air.
- Tightly roll the rectangle lengthwise, like a jelly roll, to form a log. Pinch the seam firmly to seal, and tuck in the ends slightly.
- Repeat with the second piece of dough.
- You should now have two loaves, roughly 10-12 inches long, resembling Subway’s footlong shape.
6. Second Rise (Proofing):
- Line a large baking sheet with parchment paper.
- Carefully place the shaped loaves onto the prepared baking sheet, leaving at least 3-4 inches between them to allow for expansion.
- Loosely cover the loaves with plastic wrap (lightly greased if it might touch the dough) or a damp kitchen towel.
- Let the loaves rise in a warm, draft-free place for another 45-60 minutes, or until they have increased in size by about 50-75% and look puffy. When gently poked, the indentation should spring back slowly.
7. Prepare the Topping and Preheat Oven:
- About 20 minutes before the second rise is complete, preheat your oven to 375°F (190°C). Position an oven rack in the center.
- In a small bowl, combine the dried Italian herbs, grated Parmesan cheese, and shredded Monterey Jack/Cheddar cheese. Mix well.
8. Score and Top the Loaves:
- Once the loaves have finished their second rise and the oven is preheated, they are ready for their topping.
- If desired, lightly brush the tops of the loaves with a little water or an egg wash (1 egg beaten with 1 tablespoon of water) – this helps the topping stick and promotes browning.
- Using a very sharp knife, a lame, or even a clean razor blade, make 3-4 shallow diagonal slashes across the top of each loaf, about ¼ inch deep. This allows steam to escape and gives the bread a professional look.
- Generously and evenly sprinkle the herb and cheese mixture over the top of each loaf, pressing it gently so it adheres. Some will fall onto the parchment paper, which is fine – those bits get deliciously crispy!
9. Bake to Golden Perfection:
- Carefully place the baking sheet into the preheated oven.
- Bake for 20-25 minutes, or until the loaves are golden brown on top and sound hollow when tapped on the bottom. The internal temperature should reach 190-200°F (88-93°C) when checked with an instant-read thermometer.
- If the cheese topping starts to brown too quickly before the bread is fully cooked, you can loosely tent the loaves with aluminum foil.
10. Cool and Enjoy:
* Once baked, carefully remove the loaves from the oven and transfer them to a wire cooling rack.
* It’s tempting to slice in immediately, but allow the bread to cool for at least 20-30 minutes before slicing. This allows the crumb structure to set and makes for easier slicing. Slicing hot bread can result in a gummy texture.
* Once cooled, slice with a serrated bread knife and prepare for sandwich nirvana!
Nutritional Insights: What’s in a Slice?
- Servings: This recipe makes 2 large loaves. Each loaf can be sliced into approximately 8-10 substantial sandwich slices, yielding a total of 16-20 servings.
- Calories per serving (approximate): Based on 1/10th of a loaf (one generous slice), each serving contains approximately 180-220 calories.
Please Note: This is an estimation. The exact nutritional values can vary based on the specific brands of ingredients used, the precise amount of flour absorbed, and the thickness of your slices. Homemade bread generally offers the benefit of controlling ingredients like sodium and avoiding preservatives often found in commercially produced bread. The primary source of calories comes from carbohydrates (flour), with contributions from fats (olive oil, cheese) and protein (flour, cheese, yeast). This bread also provides some dietary fiber.
Time Commitment: From Pantry to Perfection
Making yeast bread is a labor of love, but much of the time is hands-off rising time. Here’s a breakdown:
- Yeast Blooming (if using Active Dry): 5-10 minutes
- Mixing the Dough: 10-15 minutes (by hand or stand mixer)
- Kneading the Dough: 7-15 minutes (depending on method)
- First Rise (Bulk Fermentation): 60-90 minutes
- Shaping the Loaves: 10-15 minutes
- Second Rise (Proofing): 45-60 minutes
- Oven Preheat Time: ~20 minutes (can overlap with second rise)
- Baking Time: 20-25 minutes
- Cooling Time: At least 30 minutes (essential!)
Total Active Time (Hands-On): Approximately 45-60 minutes
Total Inactive Time (Rising, Baking, Cooling): Approximately 3 to 4 hours
While it seems like a long process, the active work is quite manageable. Plan your baking day accordingly, and enjoy the therapeutic process of bread-making!
Serving Suggestions: Beyond the Sandwich
While this Italian Herb & Cheese bread is the undisputed champion for recreating your favorite Subway sandwiches at home, its versatility extends far beyond that. Here are some delicious ways to enjoy your homemade loaves:
- The Ultimate Sandwich Base:
- Classic Subway Style: Load it up with your favorite deli meats (turkey, ham, salami, roast beef), cheeses (provolone, Swiss, cheddar), fresh veggies (lettuce, tomatoes, onions, pickles, peppers), and a drizzle of your preferred sauce.
- Gourmet Grilled Cheese: The herb and cheese crust takes grilled cheese to a whole new level. Try it with a blend of Gruyère and sharp cheddar.
- Paninis: Press it with fillings like mozzarella, pesto, and roasted red peppers for a warm, melty delight.
- Meatball Sub: The sturdy yet soft crumb is perfect for holding saucy meatballs.
- Accompaniment to Meals:
- Soup Dipper: Perfect for soaking up hearty tomato soup, minestrone, or a creamy chowder. The herby notes complement these beautifully.
- Pasta Sidekick: Serve alongside lasagna, spaghetti Bolognese, or fettuccine Alfredo to mop up every last bit of delicious sauce.
- Salad Companion: A slice of this bread turns a simple salad into a more satisfying meal.
- Charcuterie Boards: Slice thinly and toast lightly to serve with cheeses, cured meats, olives, and dips.
- Transformed into Other Delights:
- Garlic Bread: Slice the loaf, spread with garlic butter, and broil until golden and bubbly. The existing herbs and cheese add an extra layer of flavor.
- Croutons: Cube leftover bread, toss with olive oil and more herbs if desired, and bake until crispy for amazing homemade croutons for salads and soups.
- Bread Pudding (Savory): For a unique twist, use this bread in a savory bread pudding with cheese, herbs, and perhaps some cooked sausage or bacon.
- Breakfast Toast: Toasted and slathered with butter, or topped with a fried egg, it makes for a flavorful start to the day.
Pro Tips for a Flawless Bake Every Time
Elevate your bread-making game with these five essential tips for achieving bakery-quality Italian Herb & Cheese bread:
- Measure Flour Correctly – The Spoon & Level Method: How you measure flour significantly impacts your dough. Don’t scoop flour directly from the bag with your measuring cup, as this compacts it, leading to too much flour and dry bread. Instead, fluff the flour in its container with a spoon, then lightly spoon it into your measuring cup until it’s overflowing. Finally, level off the excess with the back of a knife. This ensures a more accurate measurement and a softer crumb.
- Yeast is King – Ensure its Vitality: Yeast is a living organism. For it to work its magic, it needs the right conditions.
- Water Temperature: Use a thermometer to ensure your water is between 105-115°F (40-46°C). Too cold, and the yeast won’t activate properly; too hot, and you’ll kill it.
- Freshness: Check the expiration date on your yeast packet. If using active dry yeast, the blooming step is a crucial test – if it doesn’t get foamy, discard it and start with fresh yeast.
- Create a “Proofing Paradise” for Rising: Yeast thrives in a warm, humid, draft-free environment.
- Oven Method: Turn your oven light on (the heat from the bulb is often enough) or briefly preheat your oven to its lowest setting, then turn it OFF before placing the dough inside.
- Microwave Method: Boil a cup of water in the microwave to create steam, then remove the water and place your covered dough bowl inside (with the microwave off).
- Avoid Cold Spots: Keep the dough away from open windows or air conditioning vents. Consistent warmth leads to a consistent, airy rise.
- Strategic Cheese Application for Maximum Flavor and Melt: Don’t add all the topping cheese at the very beginning of the bake, especially if your oven runs hot.
- Mid-Bake Addition: Consider adding the shredded cheese topping about halfway through the baking time. This prevents it from burning or becoming overly browned before the bread is fully cooked. The Parmesan and herbs can go on from the start as they are more resilient.
- Gentle Press: When you do add the cheese, press it gently into the dough so it adheres well and doesn’t just slide off after baking.
- Achieve that Irresistible Golden-Brown Crust:
- Steam Power: For a crisper crust, create steam in your oven during the first few minutes of baking. Place a shallow metal pan (not glass, it can shatter) on the bottom rack while preheating. Just before putting the bread in, carefully pour a cup of hot water into the hot pan. Be cautious of the steam. Bake as directed. (Remove the steam pan after 10-15 minutes).
- Egg Wash (Optional): For a shinier, deeper golden crust, brush the loaves with an egg wash (one egg beaten with one tablespoon of water or milk) just before scoring and adding the toppings. This also helps the toppings stick.
Frequently Asked Questions (FAQ): Your Bread-Making Queries Answered
Here are answers to some common questions you might have as you embark on your copycat Subway bread adventure:
Q1: Can I use all-purpose flour instead of bread flour?
- A: Yes, you can use all-purpose flour if bread flour isn’t available. However, bread flour has a higher protein content (typically 12-14%) compared to all-purpose flour (10-12%). This higher protein content contributes to stronger gluten development, resulting in a chewier crumb and better structure, which is characteristic of Subway-style bread. If using all-purpose flour, your bread might be slightly softer and less chewy, but it will still be delicious. You might also need slightly less all-purpose flour, so start with the lower end of the recommended amount and add more only if the dough is too sticky.
Q2: My dough isn’t rising. What did I do wrong?
- A: Several factors can cause dough not to rise:
- Expired or Dead Yeast: Yeast is a living organism and can lose its potency over time or if stored improperly. Always check the expiration date. If using active dry yeast, ensure it foamed during the blooming step.
- Water Temperature: Water that is too hot (above 120°F/49°C) can kill the yeast, while water that is too cold won’t activate it sufficiently. Aim for 105-115°F (40-46°C).
- Too Much Salt or Sugar: While necessary, excessive amounts of salt or sugar can inhibit or kill yeast. Ensure you’re measuring accurately.
- Cold Environment: Yeast activity slows down significantly in cold temperatures. Make sure your dough is rising in a warm, draft-free spot (around 75-80°F or 24-27°C).
- Not Enough Kneading: Proper kneading develops the gluten structure that traps the gases produced by the yeast, allowing the dough to rise.
Q3: Can I make this dough ahead of time?
- A: Absolutely! There are a couple of ways:
- Refrigerator Rise (Cold Fermentation): After the first knead, place the dough in a greased, covered bowl and refrigerate for up to 24 hours (or even 48 for more developed flavor). This slow, cold fermentation can enhance the bread’s flavor. When ready to bake, remove the dough from the fridge, let it sit at room temperature for about 30-60 minutes to warm up slightly, then shape, let it do its second rise (this may take longer than usual as the dough is cold), and bake as directed.
- Freeze After Shaping: You can shape the loaves, wrap them tightly in plastic wrap and then foil, and freeze them for up to 1-2 months. When ready to bake, thaw them overnight in the refrigerator, then let them come to room temperature and complete their second rise on the baking sheet before topping and baking.
Q4: Can I use different herbs or cheeses for the topping?
- A: Definitely! This recipe is a fantastic base for customization.
- Herbs: Feel free to adjust the Italian herb blend to your liking. You could add a pinch of red pepper flakes for a little heat, some garlic powder, or onion powder. Fresh herbs can also be used, but you’ll need about three times the amount of dried herbs, and they are best added finely chopped.
- Cheeses: While Parmesan and Monterey Jack/Cheddar are classic, experiment with other cheeses. Asiago, Romano, or Pecorino Romano can offer a sharper flavor than Parmesan. For the melting cheese, Provolone, a low-moisture Mozzarella, or even a Colby Jack blend would work beautifully. Consider what flavors you enjoy most!
Q5: How should I store leftover Italian Herb & Cheese Bread?
- A: To keep your homemade bread fresh for as long as possible:
- Room Temperature: Once completely cooled, store the bread in an airtight container, a bread box, or a plastic bag at room temperature for up to 2-3 days. Slicing only as needed can also help retain moisture.
- Freezing: For longer storage, this bread freezes exceptionally well. Once completely cool, slice the loaf (or leave it whole) and wrap it tightly in plastic wrap, followed by a layer of aluminum foil or a freezer-safe bag. It can be frozen for up to 2-3 months. To serve, thaw at room temperature or gently reheat slices in a toaster or oven. Reheating can help revive the crust’s crispness. Avoid refrigerating bread, as it tends to make it go stale faster.
Copycat Subway Italian Herb & Cheese Bread Recipe
Ingredients
For the Dough:
- Warm Water: 1 ½ cups (105-115°F or 40-46°C) – Crucial for activating the yeast.
- Granulated Sugar: 2 tablespoons – Feeds the yeast and adds a subtle sweetness.
- Instant Yeast (or Active Dry Yeast): 1 packet (2 ¼ teaspoons or 7g) – If using active dry, you’ll need to bloom it first (see instructions).
- Bread Flour: 4 to 4 ½ cups, plus more for dusting – Bread flour has higher protein content, giving the bread its characteristic chewiness. All-purpose can be used in a pinch, but the texture will be slightly different.
- Salt: 1 ½ teaspoons – Enhances flavor and controls yeast activity.
- Olive Oil: 3 tablespoons, plus more for greasing the bowl – Adds flavor and softness to the crumb.
For the Herb & Cheese Topping:
- Dried Italian Herb Blend: 2 tablespoons – Or a mix of dried oregano, basil, parsley, marjoram, and a pinch of thyme.
- Grated Parmesan Cheese: ½ cup, freshly grated if possible – For that sharp, nutty, savory crust.
- Shredded Monterey Jack or Mild Cheddar Cheese: 1 cup – For a beautiful melt and cheesy pull. You can also use a blend.
- Optional for extra flavor inside: ½ cup of shredded cheese mixed into the dough during the last stages of kneading.
Instructions
For the Dough:
- Warm Water: 1 ½ cups (105-115°F or 40-46°C) – Crucial for activating the yeast.
- Granulated Sugar: 2 tablespoons – Feeds the yeast and adds a subtle sweetness.
- Instant Yeast (or Active Dry Yeast): 1 packet (2 ¼ teaspoons or 7g) – If using active dry, you’ll need to bloom it first (see instructions).
- Bread Flour: 4 to 4 ½ cups, plus more for dusting – Bread flour has higher protein content, giving the bread its characteristic chewiness. All-purpose can be used in a pinch, but the texture will be slightly different.
- Salt: 1 ½ teaspoons – Enhances flavor and controls yeast activity.
- Olive Oil: 3 tablespoons, plus more for greasing the bowl – Adds flavor and softness to the crumb.
For the Herb & Cheese Topping:
- Dried Italian Herb Blend: 2 tablespoons – Or a mix of dried oregano, basil, parsley, marjoram, and a pinch of thyme.
- Grated Parmesan Cheese: ½ cup, freshly grated if possible – For that sharp, nutty, savory crust.
- Shredded Monterey Jack or Mild Cheddar Cheese: 1 cup – For a beautiful melt and cheesy pull. You can also use a blend.
- Optional for extra flavor inside: ½ cup of shredded cheese mixed into the dough during the last stages of kneading.
Nutrition
- Serving Size: One Normal Portion
- Calories: 180-220