

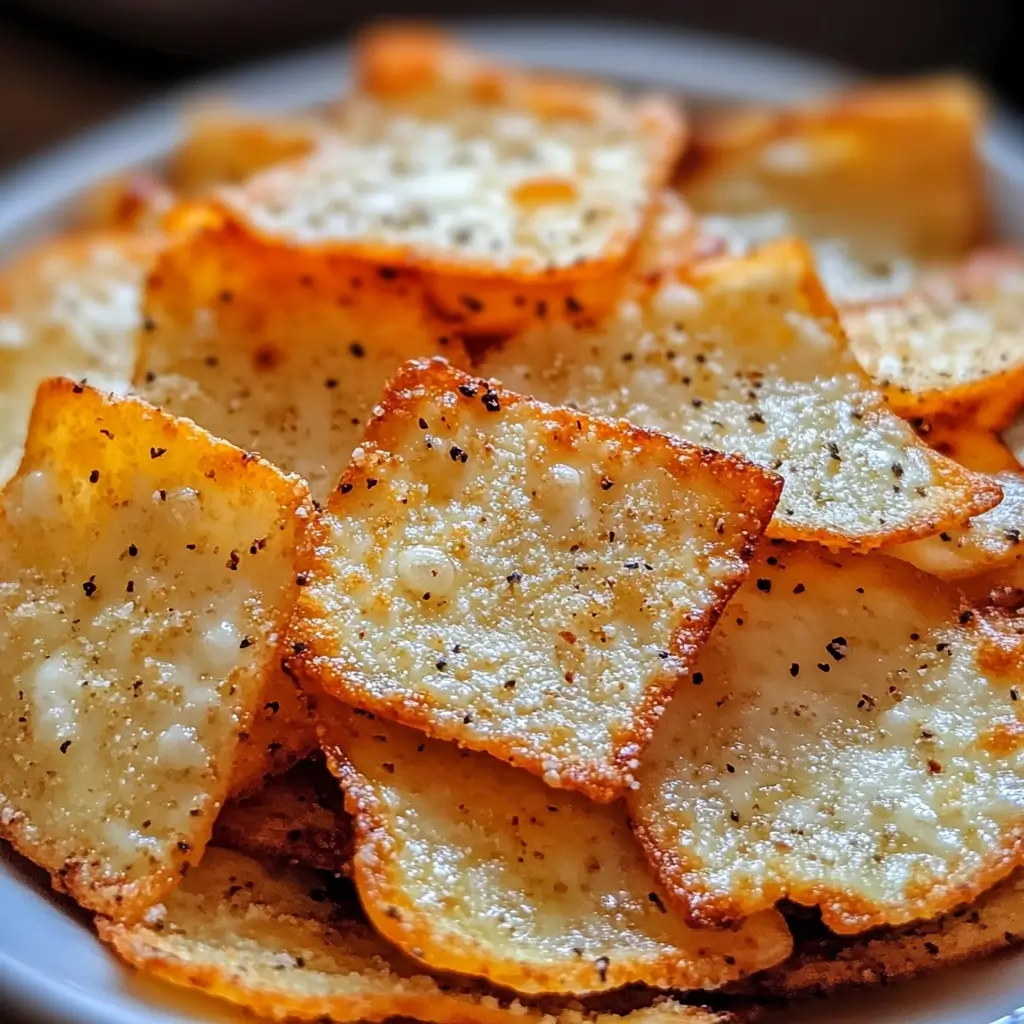

It’s always a win in our house when snack time rolls around and I can offer something that’s not only delicious but also secretly good for you. These Cottage Cheese Chips have become an absolute game-changer! Initially, I was skeptical – cottage cheese, chips? But after the first batch emerged from the oven, golden and crispy, any doubts vanished. My kids, who are usually chip connoisseurs (of the less healthy variety!), devoured them. Even my husband, a self-proclaimed snack critic, was impressed. What I love most is that they are incredibly versatile. Perfect for dipping, topping, or just munching straight up, these chips have become a regular part of our snack rotation. If you’re looking for a healthy, high-protein, low-carb snack that actually tastes amazing, you absolutely have to try these Cottage Cheese Chips. Trust me, you won’t be disappointed!
Ingredients for Crispy Cottage Cheese Chips
Creating these incredibly satisfying Cottage Cheese Chips requires just a handful of simple ingredients, most of which you likely already have in your kitchen. The beauty of this recipe lies in its simplicity and the transformation of humble cottage cheese into a crunchy, flavorful snack. Let’s delve into each ingredient and explore why they are essential for achieving chip perfection.
- 1 cup Full-Fat Cottage Cheese: The star of the show! Full-fat cottage cheese is crucial for achieving the best texture and flavor. The fat content contributes to the crispiness and browning of the chips, and it also provides a richer, more satisfying taste. While you can technically use low-fat or non-fat cottage cheese, the results will be significantly different. They may become drier, less crispy, and prone to sticking. For optimal results, opt for full-fat. When selecting your cottage cheese, look for a brand that you enjoy the taste of, as this will directly impact the final flavor of your chips. You can use large curd or small curd cottage cheese; the choice is primarily based on personal preference, as both work equally well in this recipe. Consider the moisture content too – some brands are wetter than others. If your cottage cheese seems particularly watery, you might want to drain it slightly using a cheesecloth or fine-mesh sieve for about 15-20 minutes before proceeding with the recipe. This extra step can help ensure crispier chips.
- 1 Large Egg: The egg acts as a binder in this recipe, helping to hold the cottage cheese together and create a cohesive batter that can be spread thinly and baked into chips. The protein in the egg also contributes to the structure and crispiness of the chips. Make sure your egg is fresh for the best results. While you could potentially try using egg substitutes like flax eggs or chia eggs, the texture and binding properties might be slightly different, and the crispiness may be affected. For the most reliable outcome, a standard large chicken egg is recommended. Ensure you whisk the egg thoroughly before incorporating it into the cottage cheese mixture to ensure even distribution and binding.
- 1/4 cup Nutritional Yeast (Optional, but highly recommended): Nutritional yeast is a magical ingredient that adds a cheesy, savory, and slightly nutty flavor to these chips, enhancing their overall taste profile and making them even more addictive. It’s also a fantastic source of B vitamins and protein, adding a nutritional boost. If you’re aiming for a cheesy flavor without adding actual cheese, nutritional yeast is your secret weapon. Don’t be tempted to skip it, especially if you want that classic chip-like savory taste. Different brands of nutritional yeast can vary slightly in flavor intensity, so start with the recommended amount and adjust to taste in future batches. For a more intense cheesy flavor, you could even increase the amount slightly, but be mindful that too much might overpower the other flavors.
- 1 teaspoon Garlic Powder: Garlic powder adds a wonderful savory depth to the chips and complements the cheesy notes from the nutritional yeast. It provides a subtle but essential flavor base that elevates the overall taste. Use good quality garlic powder for the best flavor. Fresh garlic is not recommended in this recipe as it contains too much moisture and might not distribute evenly in the batter. If you are particularly fond of garlic, you can experiment with increasing the amount slightly to your preference. For a different flavor profile, you could also try using roasted garlic powder.
- 1/2 teaspoon Onion Powder: Similar to garlic powder, onion powder contributes to the savory complexity of the chips, adding another layer of flavor that enhances their overall appeal. It works synergistically with the garlic powder and nutritional yeast to create a well-rounded and delicious taste. Again, use good quality onion powder for the best results. Fresh onion is not suitable for this recipe due to its moisture content and texture. You can adjust the amount of onion powder to your liking, but the recommended amount provides a balanced flavor.
- 1/2 teaspoon Paprika (Smoked Paprika recommended for extra flavor): Paprika, especially smoked paprika, adds a touch of warmth, subtle smokiness, and beautiful color to the chips. Smoked paprika, in particular, enhances the savory and slightly umami flavors of the chips, making them even more irresistible. Regular paprika will also work, but smoked paprika is highly recommended for its superior flavor contribution. For those who enjoy a bit of heat, you could experiment with using a pinch of chili powder or cayenne pepper in addition to, or instead of, paprika.
- Salt and Black Pepper to taste: Seasoning is crucial for bringing out the flavors of all the ingredients and ensuring that the chips are not bland. Salt enhances the savory notes, while black pepper adds a touch of spice and complexity. Use sea salt or kosher salt for the best flavor. Freshly ground black pepper is always preferable for its superior aroma and taste compared to pre-ground pepper. Season generously to taste, keeping in mind that the flavors will mellow slightly during baking. It’s always better to season gradually and taste as you go, rather than adding too much salt at once.
- Optional additions for flavor variations: This recipe is a fantastic base that you can customize with various flavor additions to suit your preferences. Consider adding a pinch of dried herbs like oregano, thyme, or rosemary for an Italian-inspired flavor. For a spicier kick, add a dash of cayenne pepper or red pepper flakes. For a herby and fresh flavor, you can incorporate finely chopped fresh chives or parsley into the mixture. Experiment with different spice blends like taco seasoning, everything bagel seasoning, or ranch seasoning to create unique and exciting flavor variations. The possibilities are endless!
Step-by-Step Instructions for Making Perfect Cottage Cheese Chips
Creating these delicious and healthy Cottage Cheese Chips is surprisingly simple and straightforward. Follow these detailed step-by-step instructions to ensure chip perfection every time, whether you’re using an oven or an air fryer. We will cover both methods to provide you with options based on your kitchen appliances and preferences.
Oven Method:
- Preheat Your Oven and Prepare Baking Sheet: Begin by preheating your oven to 350°F (175°C). This temperature is ideal for baking the chips to a crispy golden brown without burning them. While the oven is preheating, line a large baking sheet with parchment paper or a silicone baking mat. Parchment paper is recommended as it prevents sticking and makes cleanup a breeze. A silicone baking mat also works well and is reusable. Ensure the baking sheet is large enough to spread the cottage cheese mixture thinly in a single layer. If you are making a larger batch, you may need to use two baking sheets or bake in batches.
- Combine Ingredients in a Bowl: In a medium-sized mixing bowl, combine the 1 cup of full-fat cottage cheese, 1 large egg, 1/4 cup of nutritional yeast (if using), 1 teaspoon of garlic powder, 1/2 teaspoon of onion powder, 1/2 teaspoon of paprika (smoked paprika recommended), salt, and black pepper to taste. Use a whisk or a fork to thoroughly mix all the ingredients together until they are well combined and form a smooth, slightly thick batter. Ensure there are no large clumps of cottage cheese remaining and that the spices are evenly distributed throughout the mixture. Taste the mixture at this stage and adjust the seasoning if needed. Remember that the flavors will mellow slightly during baking.
- Spread the Cottage Cheese Mixture Thinly: This is arguably the most crucial step for achieving crispy chips. Take spoonfuls of the cottage cheese mixture and place them onto the prepared baking sheet. Using the back of a spoon or a small offset spatula, spread each spoonful into a very thin, even circle. Aim for circles that are about 2-3 inches in diameter and as thin as possible without tearing. The thinner you spread the mixture, the crispier your chips will be. Leave a small amount of space between each chip to allow for even baking and air circulation. Don’t worry if the edges are not perfectly round; slightly irregular shapes are perfectly fine and will add to the rustic charm of your homemade chips. Take your time with this step and ensure each chip is spread thinly and evenly for optimal crispiness.
- Bake in the Preheated Oven: Place the baking sheet in the preheated oven and bake for 25-35 minutes, or until the chips are golden brown and crispy around the edges. The baking time may vary slightly depending on your oven and how thinly you spread the chips. Keep a close eye on them towards the end of the baking time to prevent burning. The chips should become firm and easily lift off the parchment paper when they are done. If the chips are still soft in the center after 30 minutes, you can bake them for a few more minutes, checking frequently for doneness. For extra crispiness, you can broil them for the last 1-2 minutes, watching very carefully to prevent burning.
- Cool Completely on Baking Sheet: Once the chips are baked to golden perfection, remove the baking sheet from the oven and let the chips cool completely on the baking sheet. This is another crucial step for achieving maximum crispiness. As the chips cool, they will continue to crisp up and harden. Resist the temptation to move them while they are still warm, as they are more fragile at this stage and may break. Allowing them to cool completely on the baking sheet ensures they become perfectly crispy and easy to handle. Once completely cool, gently peel the chips off the parchment paper or silicone mat.
Air Fryer Method:
- Preheat Your Air Fryer (if necessary): Some air fryers require preheating, while others do not. If your air fryer requires preheating, preheat it to 350°F (175°C). Consult your air fryer’s instruction manual for specific preheating guidelines.
- Combine Ingredients (Same as Oven Method): Follow step 2 from the oven method: In a medium-sized mixing bowl, combine the 1 cup of full-fat cottage cheese, 1 large egg, 1/4 cup of nutritional yeast (if using), 1 teaspoon of garlic powder, 1/2 teaspoon of onion powder, 1/2 teaspoon of paprika (smoked paprika recommended), salt, and black pepper to taste. Mix thoroughly.
- Spread the Cottage Cheese Mixture Thinly (Same as Oven Method): Follow step 3 from the oven method: Take spoonfuls of the cottage cheese mixture and spread them thinly into circles on parchment paper. However, instead of spreading directly on the air fryer basket, it’s often easier to spread them on parchment paper first and then carefully transfer the parchment with the chips to the air fryer basket. This makes handling them easier and prevents them from sticking to the air fryer basket. You may need to cut the parchment paper to fit your air fryer basket and ensure it doesn’t block air circulation too much.
- Air Fry to Crispy Perfection: Carefully place the parchment paper with the thinly spread cottage cheese chips into the air fryer basket. Air fry at 350°F (175°C) for 10-15 minutes, or until the chips are golden brown and crispy. Air fryers cook much faster than ovens, so check the chips frequently after 10 minutes to prevent burning. The exact cooking time will depend on your air fryer model and how thinly you spread the chips. Shake the air fryer basket halfway through the cooking time to ensure even browning. The chips are done when they are golden brown, crispy, and easily lift off the parchment paper.
- Cool Completely (Same as Oven Method): Follow step 5 from the oven method: Once air-fried, remove the chips and let them cool completely on a wire rack or plate. Cooling is essential for crispiness. They will continue to crisp up as they cool.
Tips for Extra Crispiness (Both Methods):
- Spread Thinly: Emphasizing this again – the thinner the chips, the crispier they will be.
- Don’t Overcrowd: Whether in the oven or air fryer, avoid overcrowding the baking sheet or air fryer basket. Cook in batches if necessary to ensure even baking and crispiness.
- Cool Completely: Patience is key! Allow the chips to cool completely before serving for maximum crispiness.
Nutrition Facts for Cottage Cheese Chips
These Cottage Cheese Chips are not only delicious but also a surprisingly healthy snack option compared to traditional potato chips or processed snacks. They are packed with protein, low in carbohydrates, and can be a great addition to a balanced diet. Let’s break down the estimated nutritional information per serving.
Serving Size: Approximately 5-7 chips (depending on size)
Servings per recipe: This recipe makes approximately 20-25 chips, so roughly 4-5 servings.
(Note: Nutritional information is an estimate and can vary based on specific ingredients and serving sizes. The following values are approximate per serving of 5-7 chips):
- Calories: Approximately 80-100 calories
- Protein: 10-12 grams
- Fat: 4-6 grams (primarily from full-fat cottage cheese and egg)
- Saturated Fat: 2-3 grams (from full-fat cottage cheese)
- Carbohydrates: 2-3 grams
- Fiber: Less than 1 gram
- Sugar: 1-2 grams (naturally occurring in cottage cheese)
- Sodium: Varies depending on salt added and cottage cheese brand, approximately 100-200mg
- Cholesterol: Approximately 50-60mg
- Vitamins and Minerals: Good source of Vitamin B12 (from cottage cheese and nutritional yeast), Riboflavin (B2), Vitamin D (from egg), Calcium (from cottage cheese), and Phosphorus. Nutritional yeast also provides B vitamins and trace minerals.
Health Benefits:
- High in Protein: Cottage cheese is an excellent source of protein, which is essential for muscle building, satiety, and overall health. These chips provide a significant protein boost compared to traditional carb-heavy snacks.
- Low in Carbohydrates: With only 2-3 grams of carbohydrates per serving, these chips are a fantastic low-carb snack option, suitable for those following ketogenic, low-carb, or diabetic-friendly diets.
- Lower in Calories than Traditional Chips: Compared to regular potato chips, which are often high in calories and unhealthy fats, these cottage cheese chips are a lighter and healthier alternative.
- Good Source of Nutrients: They provide essential nutrients like protein, vitamins, and minerals, contributing to a more nutritious snack choice.
- May Aid in Weight Management: The high protein and low carbohydrate content can help promote satiety and reduce overall calorie intake, potentially aiding in weight management.
Comparison to Traditional Potato Chips (per similar serving size):
- Calories: Potato chips: 150-200 calories (significantly higher) vs. Cottage Cheese Chips: 80-100 calories
- Protein: Potato chips: 1-2 grams (very low) vs. Cottage Cheese Chips: 10-12 grams (significantly higher)
- Fat: Potato chips: 10-15 grams (higher and often unhealthy fats) vs. Cottage Cheese Chips: 4-6 grams (healthier fats)
- Carbohydrates: Potato chips: 15-20 grams (much higher) vs. Cottage Cheese Chips: 2-3 grams (very low)
Disclaimer: This nutritional information is an estimate. For precise values, use a nutrition calculator with the specific brands and quantities of ingredients you use. Consult with a healthcare professional or registered dietitian for personalized dietary advice.
Preparation Time for Cottage Cheese Chips
The beauty of these Cottage Cheese Chips is not only their deliciousness and health benefits but also their quick and easy preparation. Here’s a breakdown of the time involved in making this fantastic snack:
- Prep Time: 10-15 minutes
- This includes gathering ingredients, mixing them together in a bowl, and preparing your baking sheet or air fryer setup. The mixing process is very quick and straightforward. Spreading the mixture thinly onto the baking sheet takes a little bit of time and attention, but even this step is relatively fast once you get the hang of it.
- Cook Time (Oven): 25-35 minutes
- Baking in the oven takes a bit longer, but it’s mostly hands-off time. You can relax or do other kitchen tasks while the chips are baking. The baking time can vary slightly depending on your oven and how thinly you spread the chips.
- Cook Time (Air Fryer): 10-15 minutes
- Using an air fryer significantly reduces the cooking time, making these chips a super-fast snack option. Air frying is a great choice when you are short on time but still want a crispy and healthy snack.
- Cooling Time: 15-20 minutes (essential for crispiness)
- While not active preparation time, allowing the chips to cool completely is crucial for achieving the desired crispy texture. This is passive time where you simply let the chips sit and cool on the baking sheet or wire rack.
- Total Time (Oven Method): Approximately 50-70 minutes (including cooling)
- Total Time (Air Fryer Method): Approximately 35-50 minutes (including cooling)
Time-Saving Tips:
- Pre-measure Spices: To speed up the prep time, pre-measure your spices and have them ready to add to the cottage cheese mixture.
- Use Parchment Paper: Lining your baking sheet or air fryer basket with parchment paper not only prevents sticking but also makes cleanup much faster.
- Air Fryer for Speed: If you are short on time, the air fryer method is significantly faster than oven baking.
- Make a Larger Batch: While the initial prep might take slightly longer for a larger batch, you’ll have more chips ready to go for snacking throughout the week, saving you time in the long run. These chips store well in an airtight container at room temperature for a few days.
Overall, these Cottage Cheese Chips are remarkably quick to prepare, especially when using an air fryer. Even with the oven method and cooling time included, they are still a relatively fast and easy snack to make, perfect for satisfying cravings without spending hours in the kitchen.
How to Serve Cottage Cheese Chips
The versatility of Cottage Cheese Chips is one of their greatest strengths! They are not just a snack; they can be incorporated into various meals and enjoyed in numerous ways. Here are some delicious and creative serving suggestions to elevate your Cottage Cheese Chip experience:
- Dipping Delights:
- Classic Dips: Serve with classic dips like guacamole, salsa, hummus, French onion dip, or spinach artichoke dip. The sturdy texture of the chips holds up well to thick dips.
- Greek Yogurt Dips: Create healthier dips using Greek yogurt as a base. Mix Greek yogurt with herbs, spices, garlic, or lemon juice for refreshing and protein-packed dips. Tzatziki, dill dip, or a spicy feta dip are excellent choices.
- Cheese Dips: Pair with warm cheese dips like queso, cheddar cheese dip, or a creamy brie dip for a decadent treat.
- Bean Dips: Black bean dip, white bean dip, or refried bean dip are delicious and fiber-rich options that complement the savory flavor of the chips.
- Sweet Dips (for a surprising twist): Surprisingly, these savory chips can also be paired with sweet dips like fruit salsa, yogurt with honey and cinnamon, or even a light chocolate hummus for a unique snack experience.
- Toppings Galore:
- Nachos Style: Create healthy “nachos” by topping the chips with shredded cheese (cheddar, Monterey Jack, pepper jack), salsa, guacamole, sour cream or Greek yogurt, black beans, corn, jalapenos, and your favorite nacho toppings. Bake briefly in the oven or air fryer until the cheese is melted and bubbly.
- Pizza Chips: Spread a thin layer of tomato sauce or pesto on the chips, top with mozzarella cheese, pepperoni, olives, mushrooms, or other pizza toppings, and bake or air fry until the cheese is melted and gooey.
- Bruschetta Bites: Top the chips with diced tomatoes, basil, garlic, balsamic glaze, and a drizzle of olive oil for a healthy and flavorful bruschetta-inspired snack.
- Mediterranean Medley: Top with hummus, crumbled feta cheese, olives, cucumber, sun-dried tomatoes, and a sprinkle of oregano for a Mediterranean-inspired appetizer.
- Avocado Toast Chips: Mash avocado with lime juice, salt, and pepper, and spread it on the chips for a quick and healthy avocado toast alternative.
- Meal Accompaniments:
- Soup and Salad Side: Serve Cottage Cheese Chips as a crunchy side with soups or salads instead of bread or croutons. They add a satisfying crunch and protein boost to lighter meals.
- Taco “Shells”: Use larger, flatter chips as a low-carb alternative to taco shells. Fill them with taco meat, shredded lettuce, cheese, salsa, and sour cream for mini taco bites.
- Charcuterie Board Addition: Add Cottage Cheese Chips to your charcuterie or cheese board for a healthy and unique crunchy element alongside cheeses, meats, olives, and fruits.
- Crumbled Topping: Crumble the chips and use them as a crispy topping for casseroles, salads, or grain bowls for added texture and flavor.
- Simple Snacking:
- Enjoy them plain: Sometimes, the best way to enjoy these chips is simply on their own! Their savory flavor and satisfying crunch make them a perfect standalone snack.
- Lightly Seasoned: Sprinkle with extra sea salt, black pepper, or your favorite spice blend right after baking for an extra flavor boost.
No matter how you choose to serve them, Cottage Cheese Chips are sure to be a hit. Experiment with different dips, toppings, and serving styles to find your favorite ways to enjoy this healthy and delicious snack!
Additional Tips for Perfect Cottage Cheese Chips
To ensure your Cottage Cheese Chips turn out perfectly crispy and delicious every time, here are five essential additional tips to keep in mind:
- Moisture Control is Key: Cottage cheese naturally contains moisture, and excess moisture is the enemy of crispiness. While full-fat cottage cheese is recommended for flavor and texture, some brands may be wetter than others. If your cottage cheese appears particularly watery, consider draining it slightly before mixing the ingredients. Place the cottage cheese in a cheesecloth-lined sieve or fine-mesh strainer and let it drain for about 15-20 minutes. This will remove excess liquid and help ensure crispier chips. Don’t over-drain it, however, as you still need some moisture to bind the mixture.
- Spread Thinly and Evenly: This tip cannot be overstated! The thickness of your cottage cheese chips directly impacts their crispiness. The thinner you spread the mixture, the crispier they will become. Take your time and use the back of a spoon or a small offset spatula to spread each chip into a very thin, even circle. Aim for almost paper-thin if possible, especially towards the edges. Uneven thickness can result in some parts of the chip being crispy while others remain soft. Practice makes perfect, and with a little patience, you’ll master the art of thin spreading.
- Don’t Overcrowd the Baking Sheet or Air Fryer: Whether you are baking in the oven or using an air fryer, avoid overcrowding the baking sheet or air fryer basket. Overcrowding prevents proper air circulation, which is essential for even baking and crisping. If you are making a larger batch, bake or air fry in batches, ensuring that the chips are spread in a single layer with some space between each one. This allows hot air to circulate around each chip, promoting even browning and maximum crispiness.
- Cool Completely for Maximum Crispness: Patience is rewarded when it comes to cooling Cottage Cheese Chips. Resist the temptation to eat them while they are still warm, even if they look tempting! As the chips cool, they will continue to crisp up and harden. Allow them to cool completely on the baking sheet or wire rack before handling or serving. This cooling process is crucial for achieving that satisfying crispy crunch. If you try to move or eat them while warm, they may be softer and more prone to breaking.
- Experiment with Flavors and Seasonings: While the basic recipe is delicious, don’t be afraid to experiment with different flavors and seasonings to customize your Cottage Cheese Chips to your liking. As mentioned in the ingredients section, you can add various spices, herbs, and seasonings to create different flavor profiles. Try adding Italian herbs like oregano and basil for an Italian twist, chili powder and cumin for a Tex-Mex flavor, everything bagel seasoning for a savory everything bagel taste, or even a touch of cinnamon and sweetener for a sweet and savory chip. Get creative and find your favorite flavor combinations!
By following these additional tips, you’ll be well on your way to consistently making perfectly crispy and delicious Cottage Cheese Chips that will satisfy your snack cravings in a healthy and satisfying way.
Frequently Asked Questions (FAQ) about Cottage Cheese Chips
Here are five frequently asked questions about Cottage Cheese Chips to help you understand the recipe better and troubleshoot any potential issues:
Q1: Can I use low-fat or non-fat cottage cheese?
A: While technically you can use low-fat or non-fat cottage cheese, it is highly recommended to use full-fat cottage cheese for the best results. Full-fat cottage cheese provides the necessary fat content for browning and crisping, resulting in a more flavorful and satisfying chip. Low-fat or non-fat versions tend to be drier and may not crisp up as well, potentially becoming tough or sticking to the baking surface. If you do use low-fat or non-fat cottage cheese, you may need to adjust the baking time slightly and be extra careful to spread the mixture very thinly. The taste and texture will be noticeably different from chips made with full-fat cottage cheese.
Q2: My Cottage Cheese Chips are not crispy. What did I do wrong?
A: There are several reasons why your Cottage Cheese Chips might not be crispy. The most common culprits are:
* Spreading the mixture too thickly: Ensure you spread the cottage cheese mixture as thinly as possible. Thick chips will not crisp up properly in the center.
* Not baking for long enough: Baking time can vary depending on your oven or air fryer and the thickness of the chips. Make sure to bake them until they are golden brown and crispy around the edges. They should feel firm and easily lift off the parchment paper when done.
* Not cooling completely: Cooling is crucial for crispiness. Allow the chips to cool completely on the baking sheet or wire rack. They will continue to crisp up as they cool.
* Excess moisture in cottage cheese: If your cottage cheese was very watery, it might have contributed to less crispy chips. Consider draining excess moisture next time.
* Oven temperature too low: Ensure your oven or air fryer is at the correct temperature (350°F/175°C). Lower temperatures might lead to softer chips.
Q3: How should I store leftover Cottage Cheese Chips?
A: Leftover Cottage Cheese Chips are best stored in an airtight container at room temperature. They will typically stay crispy for 2-3 days if stored properly. Avoid storing them in the refrigerator, as the moisture in the fridge can make them lose their crispness and become soggy. If they do lose some crispness after storage, you can try to re-crisp them briefly in a preheated oven or air fryer at a low temperature (around 250°F/120°C) for a few minutes, watching carefully to prevent burning.
Q4: Can I make Cottage Cheese Chips ahead of time?
A: Yes, you can make Cottage Cheese Chips ahead of time. They are a great snack to prepare in advance for parties, gatherings, or meal prepping. Bake them according to the recipe instructions and allow them to cool completely. Then, store them in an airtight container at room temperature as described in the previous question. They are best enjoyed within a few days of making them for optimal crispiness and flavor.
Q5: Can I add other ingredients to the Cottage Cheese Chip mixture?
A: Absolutely! Cottage Cheese Chips are very versatile and can be customized with various additions. You can add different spices, herbs, seasonings, and even finely chopped vegetables or cheeses to the mixture. Some popular additions include:
* Spices: Chili powder, cayenne pepper, cumin, smoked paprika, Italian seasoning, ranch seasoning, everything bagel seasoning.
* Herbs: Dried oregano, thyme, rosemary, basil, or finely chopped fresh chives, parsley, cilantro.
* Cheeses: A small amount of shredded parmesan cheese or cheddar cheese can be added for extra cheesy flavor.
* Vegetables: Finely minced spinach, bell peppers, or onions (ensure vegetables are finely chopped and not too watery to avoid affecting crispiness).
* Seeds: Sesame seeds, poppy seeds, or flax seeds can be sprinkled on top before baking for added texture and nutrition.
When adding extra ingredients, be mindful not to add too much moisture, as this can affect the crispiness of the chips. Experiment with small amounts of additions to find your favorite flavor combinations!
Print
Cottage Cheese Chips Recipe
Ingredients
- 1 cup Full-Fat Cottage Cheese: The star of the show! Full-fat cottage cheese is crucial for achieving the best texture and flavor. The fat content contributes to the crispiness and browning of the chips, and it also provides a richer, more satisfying taste. While you can technically use low-fat or non-fat cottage cheese, the results will be significantly different. They may become drier, less crispy, and prone to sticking. For optimal results, opt for full-fat. When selecting your cottage cheese, look for a brand that you enjoy the taste of, as this will directly impact the final flavor of your chips. You can use large curd or small curd cottage cheese; the choice is primarily based on personal preference, as both work equally well in this recipe. Consider the moisture content too – some brands are wetter than others. If your cottage cheese seems particularly watery, you might want to drain it slightly using a cheesecloth or fine-mesh sieve for about 15–20 minutes before proceeding with the recipe. This extra step can help ensure crispier chips.
- 1 Large Egg: The egg acts as a binder in this recipe, helping to hold the cottage cheese together and create a cohesive batter that can be spread thinly and baked into chips. The protein in the egg also contributes to the structure and crispiness of the chips. Make sure your egg is fresh for the best results. While you could potentially try using egg substitutes like flax eggs or chia eggs, the texture and binding properties might be slightly different, and the crispiness may be affected. For the most reliable outcome, a standard large chicken egg is recommended. Ensure you whisk the egg thoroughly before incorporating it into the cottage cheese mixture to ensure even distribution and binding.
- 1/4 cup Nutritional Yeast (Optional, but highly recommended): Nutritional yeast is a magical ingredient that adds a cheesy, savory, and slightly nutty flavor to these chips, enhancing their overall taste profile and making them even more addictive. It’s also a fantastic source of B vitamins and protein, adding a nutritional boost. If you’re aiming for a cheesy flavor without adding actual cheese, nutritional yeast is your secret weapon. Don’t be tempted to skip it, especially if you want that classic chip-like savory taste. Different brands of nutritional yeast can vary slightly in flavor intensity, so start with the recommended amount and adjust to taste in future batches. For a more intense cheesy flavor, you could even increase the amount slightly, but be mindful that too much might overpower the other flavors.
- 1 teaspoon Garlic Powder: Garlic powder adds a wonderful savory depth to the chips and complements the cheesy notes from the nutritional yeast. It provides a subtle but essential flavor base that elevates the overall taste. Use good quality garlic powder for the best flavor. Fresh garlic is not recommended in this recipe as it contains too much moisture and might not distribute evenly in the batter. If you are particularly fond of garlic, you can experiment with increasing the amount slightly to your preference. For a different flavor profile, you could also try using roasted garlic powder.
- 1/2 teaspoon Onion Powder: Similar to garlic powder, onion powder contributes to the savory complexity of the chips, adding another layer of flavor that enhances their overall appeal. It works synergistically with the garlic powder and nutritional yeast to create a well-rounded and delicious taste. Again, use good quality onion powder for the best results. Fresh onion is not suitable for this recipe due to its moisture content and texture. You can adjust the amount of onion powder to your liking, but the recommended amount provides a balanced flavor.
- 1/2 teaspoon Paprika (Smoked Paprika recommended for extra flavor): Paprika, especially smoked paprika, adds a touch of warmth, subtle smokiness, and beautiful color to the chips. Smoked paprika, in particular, enhances the savory and slightly umami flavors of the chips, making them even more irresistible. Regular paprika will also work, but smoked paprika is highly recommended for its superior flavor contribution. For those who enjoy a bit of heat, you could experiment with using a pinch of chili powder or cayenne pepper in addition to, or instead of, paprika.
- Salt and Black Pepper to taste: Seasoning is crucial for bringing out the flavors of all the ingredients and ensuring that the chips are not bland. Salt enhances the savory notes, while black pepper adds a touch of spice and complexity. Use sea salt or kosher salt for the best flavor. Freshly ground black pepper is always preferable for its superior aroma and taste compared to pre-ground pepper. Season generously to taste, keeping in mind that the flavors will mellow slightly during baking. It’s always better to season gradually and taste as you go, rather than adding too much salt at once.
- Optional additions for flavor variations: This recipe is a fantastic base that you can customize with various flavor additions to suit your preferences. Consider adding a pinch of dried herbs like oregano, thyme, or rosemary for an Italian-inspired flavor. For a spicier kick, add a dash of cayenne pepper or red pepper flakes. For a herby and fresh flavor, you can incorporate finely chopped fresh chives or parsley into the mixture. Experiment with different spice blends like taco seasoning, everything bagel seasoning, or ranch seasoning to create unique and exciting flavor variations. The possibilities are endless!
Instructions
- Preheat Your Oven and Prepare Baking Sheet: Begin by preheating your oven to 350°F (175°C). This temperature is ideal for baking the chips to a crispy golden brown without burning them. While the oven is preheating, line a large baking sheet with parchment paper or a silicone baking mat. Parchment paper is recommended as it prevents sticking and makes cleanup a breeze. A silicone baking mat also works well and is reusable. Ensure the baking sheet is large enough to spread the cottage cheese mixture thinly in a single layer. If you are making a larger batch, you may need to use two baking sheets or bake in batches.
- Combine Ingredients in a Bowl: In a medium-sized mixing bowl, combine the 1 cup of full-fat cottage cheese, 1 large egg, 1/4 cup of nutritional yeast (if using), 1 teaspoon of garlic powder, 1/2 teaspoon of onion powder, 1/2 teaspoon of paprika (smoked paprika recommended), salt, and black pepper to taste. Use a whisk or a fork to thoroughly mix all the ingredients together until they are well combined and form a smooth, slightly thick batter. Ensure there are no large clumps of cottage cheese remaining and that the spices are evenly distributed throughout the mixture. Taste the mixture at this stage and adjust the seasoning if needed. Remember that the flavors will mellow slightly during baking.
- Spread the Cottage Cheese Mixture Thinly: This is arguably the most crucial step for achieving crispy chips. Take spoonfuls of the cottage cheese mixture and place them onto the prepared baking sheet. Using the back of a spoon or a small offset spatula, spread each spoonful into a very thin, even circle. Aim for circles that are about 2-3 inches in diameter and as thin as possible without tearing. The thinner you spread the mixture, the crispier your chips will be. Leave a small amount of space between each chip to allow for even baking and air circulation. Don’t worry if the edges are not perfectly round; slightly irregular shapes are perfectly fine and will add to the rustic charm of your homemade chips. Take your time with this step and ensure each chip is spread thinly and evenly for optimal crispiness.
- Bake in the Preheated Oven: Place the baking sheet in the preheated oven and bake for 25-35 minutes, or until the chips are golden brown and crispy around the edges. The baking time may vary slightly depending on your oven and how thinly you spread the chips. Keep a close eye on them towards the end of the baking time to prevent burning. The chips should become firm and easily lift off the parchment paper when they are done. If the chips are still soft in the center after 30 minutes, you can bake them for a few more minutes, checking frequently for doneness. For extra crispiness, you can broil them for the last 1-2 minutes, watching very carefully to prevent burning.
- Cool Completely on Baking Sheet: Once the chips are baked to golden perfection, remove the baking sheet from the oven and let the chips cool completely on the baking sheet. This is another crucial step for achieving maximum crispiness. As the chips cool, they will continue to crisp up and harden. Resist the temptation to move them while they are still warm, as they are more fragile at this stage and may break. Allowing them to cool completely on the baking sheet ensures they become perfectly crispy and easy to handle. Once completely cool, gently peel the chips off the parchment paper or silicone mat.
Nutrition
- Serving Size: One Normal Portion
- Calories: 80-100
- Sugar: 1-2 grams
- Sodium: 100-200mg
- Fat: 4-6 grams
- Saturated Fat: 2-3 grams
- Carbohydrates: 2-3 grams
- Fiber: Less than 1 gram
- Protein: 10-12 grams
- Cholesterol: 50-60mg


