The crisp autumn air has a certain magic to it, a prelude to the delightful chaos of Halloween. In our house, the lead-up to the big night is a whirlwind of costume planning, decoration hanging, and a constant, low-level hum of excitement from the kids. For years, I struggled to find the perfect Halloween dinner – something festive and fun, but not loaded with sugar before a night of trick-or-treating. I needed a meal that was easy to make amidst the pre-parade frenzy, yet special enough to feel like a tradition. That’s when the Creepy Quesadillas were born. The first time I carved a spooky jack-o’-lantern face into a tortilla and revealed the golden, cheesy grin to my kids, their eyes went wide with a mixture of awe and glee. It wasn’t just a quesadilla anymore; it was a character in our Halloween story. They devoured them, dipping the “monster faces” into a “blood bath” of salsa and a “ghostly goo” of sour cream. Now, it’s our non-negotiable Halloween tradition. It’s the savory, satisfying fuel we all need before we venture out into the twilight, and it’s a recipe that brings as many smiles as the candy haul itself. It’s incredibly simple, wonderfully versatile, and guarantees you’ll be the hero of Halloween night.
Unveiling the Spooktacular Secret: Your Creepy Quesadilla Recipe
This recipe is designed for maximum fun and flavor with minimal stress. It transforms a humble quesadilla into a ghoulishly good centerpiece for your Halloween festivities. The beauty lies in its simplicity, allowing even the littlest monsters in your kitchen to help out. We’ll be creating classic jack-o’-lantern faces, but feel free to let your imagination run wild with ghosts, bats, or any spooky creature you can dream up.
A Ghoulish Gathering of Ingredients
Before we begin our culinary witchcraft, we must gather our potent components. Each ingredient is chosen not just for taste, but for its role in creating the perfect spooky aesthetic and satisfying texture.
- Large Flour Tortillas (Burrito Size): 8 tortillas. Flour tortillas are the ideal canvas for our creepy creations. They are soft and pliable, making them easy to carve without tearing. Their pale color also allows the jack-o’-lantern’s toasty features to stand out beautifully.
- Shredded Cooked Chicken: 2 cups. Using pre-cooked chicken (a rotisserie chicken is a fantastic time-saver) makes this recipe incredibly fast. The chicken provides a hearty, protein-packed base that makes these quesadillas a truly satisfying meal.
- Shredded Mexican Cheese Blend: 3 cups. A blend of Monterey Jack, Cheddar, Asadero, and Queso Quesadilla cheeses provides the perfect meltability and flavor profile. The orange hue of the cheddar is essential for that classic, glowing jack-o’-lantern look peeking through the carved face.
- Black Beans: 1 can (15 ounces), rinsed and drained. The black beans add a wonderful, creamy texture and a boost of fiber. Visually, they create dark, mysterious shadows within the quesadilla, enhancing the spooky effect.
- Mild Taco Seasoning: 1 tablespoon. This is our magic dust. It infuses the filling with a savory, slightly smoky flavor that complements the cheese and chicken perfectly without being too spicy for younger palates.
- Unsalted Butter: 4 tablespoons, melted. Brushing the outside of the quesadillas with butter is the secret to achieving that perfectly golden, irresistibly crispy exterior. It ensures an even browning and adds a rich, decadent flavor.
The Witch’s Brew: Step-by-Step Instructions
Follow these steps carefully to conjure your perfect batch of Creepy Quesadillas. The process is broken down into four key stages: carving your faces, mixing the filling, assembling the ghouls, and cooking them to crispy perfection.
Step 1: Carving Your Canvas (The Tortillas)
This is the most creative part of the process! Take your time and have fun with it.
- Prepare Your Workspace: Lay four of the eight tortillas on a clean, flat surface like a large cutting board. These will be the top layers with the carved faces. The other four will be the solid bottom layers.
- Select Your Tool: A small, sharp paring knife is the best tool for this job. Its pointed tip allows for precise cuts and easy maneuvering around curves. For intricate designs, a clean craft knife (used only for food) can also work, but this should be handled strictly by adults.
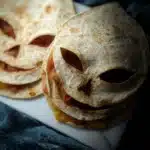
- Carve the Faces: Carefully use the tip of your knife to cut out jack-o’-lantern faces from the four tortillas. Classic triangles for eyes and a nose, and a jagged, smiling mouth work great. Don’t worry about perfection; slightly lopsided or quirky faces add to the charm.
- Pro-Tip: To make triangles, simply press the tip of the knife in and make three small, connected cuts. For the mouth, it’s easiest to cut a series of connected “V” shapes to create a jagged look. Gently push the cutout pieces out from the back.
Step 2: Conjuring the Filling
Now we mix the delicious potion that will bring our quesadillas to life.
- Combine Ingredients: In a medium-sized mixing bowl, combine the 2 cups of shredded cooked chicken, 3 cups of shredded Mexican cheese, the entire can of rinsed and drained black beans, and the 1 tablespoon of taco seasoning.
- Mix Thoroughly: Use a spoon or your hands to gently toss the ingredients together until everything is evenly distributed. You want to ensure every bite has a perfect mix of cheese, chicken, and beans. The cheese will act as the “glue” that holds the filling together once it melts.
Step 3: Assembling Your Ghouls
With our faces carved and our filling mixed, it’s time to build our quesadillas.
- Lay the Foundation: Place the four un-carved tortillas on your workspace. These are the bottom layers.
- Spread the Filling: Divide the chicken and cheese mixture evenly among the four bottom tortillas. Spread the filling in a flat, even layer, leaving about a half-inch border around the edge. This prevents the filling from oozing out during cooking.
- Top it Off: Carefully place one of the carved tortillas on top of each filled tortilla. Gently press down to seal the edges and compact the filling slightly. You should now have four fully assembled, un-cooked quesadillas.
Step 4: The Fiery Finish (Cooking)
This final step brings the heat, melting the cheese and crisping the tortilla to golden perfection.
- Heat the Pan: Place a large non-stick skillet or a cast-iron griddle over medium heat. Allowing the pan to preheat is crucial for getting a good sear.
- Butter the Beast: Using a pastry brush, lightly brush the top (the carved side) of one quesadilla with melted butter.
- Cook Side One: Carefully place the quesadilla, butter-side down, into the hot skillet. As it cooks, brush the new top side (the un-carved bottom) with more melted butter.
- Flip and Finish: Cook for 3-4 minutes, or until the bottom is golden brown and crispy and the cheese has begun to melt. Use a large spatula to carefully flip the quesadilla. Cook for another 3-4 minutes on the second side, until it’s equally golden and the cheese is completely melted and gooey.
- Repeat: Remove the finished quesadilla from the pan and place it on a cutting board. Repeat the process with the remaining three quesadillas.
- Serve Immediately: Cut the quesadillas into wedges and serve hot while the cheese is still perfectly stringy.
Nutrition Facts
- Servings: 4 large quesadillas (can be cut into 8-16 wedges)
- Calories per serving (1 full quesadilla): Approximately 650-750 kcal
Disclaimer: The nutritional information is an estimate and can vary based on the specific brands of ingredients used, such as the type of cheese and tortillas.
Preparation Time
Breaking down the timing can help you plan your Halloween evening schedule perfectly.
- Active Prep Time (Mixing Filling): 5 minutes
- Creative Carving Time: 10-15 minutes
- Cooking Time (per quesadilla): 6-8 minutes
- Total Time: Approximately 30-40 minutes
This quick turnaround makes it an ideal meal for a busy night when you want to get out the door for trick-or-treating without spending hours in the kitchen.
How to Serve Your Creepy Quesadillas for Maximum Frightful Fun
Presentation is everything when it comes to a festive meal. Elevate your Creepy Quesadillas from a simple dinner to a memorable Halloween experience with these serving suggestions.
The Perfect Dipping Potions
A quesadilla is only as good as its dip! Serve a trio of colorful and spookily-named dips to delight your guests.
- Guacamole “Swamp Slime”: A vibrant green guacamole is the perfect “slime.” Its creamy texture and fresh flavor provide a cool contrast to the warm, cheesy quesadilla.
- Salsa “Blood Bath”: A classic red salsa is a must. Its chunky texture and tangy flavor cut through the richness of the cheese. Choose a mild version for kids or a spicy one for the adults.
- Sour Cream “Ghost Garnish”: A dollop of pure white sour cream or plain Greek yogurt looks wonderfully ghostly. You can even pipe it into a swirl shape and use two tiny olive pieces for eyes to create a mini ghost on the plate.
- Queso “Molten Lava”: For an extra-decadent option, a warm, orange queso dip is a guaranteed crowd-pleaser and fits the Halloween color scheme perfectly.
Building a Haunted Buffet
If you’re hosting a party, these quesadillas can be the star of a savory Halloween buffet.
- Platter Presentation: Arrange the quesadilla wedges on a large, dark-colored platter (black or deep orange works best). Scatter a few clean, plastic spiders around the platter for a creepy-crawly effect.
- Garnish with Herbs: Sprinkle fresh cilantro over the platter to add a pop of color and freshness that contrasts nicely with the orange and black tones.
- Pair with Other Spooky Snacks: Complement the quesadillas with other themed foods like:
- Mummy Dogs: Hot dogs wrapped in strips of crescent roll dough.
- Witch Finger Pretzels: Pretzel rods dipped in green candy melts with a sliced almond for a fingernail.
- Graveyard Taco Dip: A layered dip in a clear dish, topped with “dirt” (crumbled black olives) and “tombstones” (tortilla chips standing upright).
Ghoulishly Good: Additional Tips for Perfect Creepy Quesadillas
These five tips will help you troubleshoot common issues and ensure your quesadillas are frighteningly flawless every time.
- The Tortilla Trick for Tear-Free Carving: Flour tortillas are your best friend here, as corn tortillas are too brittle and will crack. If your flour tortillas feel a bit stiff, you can warm them ever so slightly to make them more pliable. Stack them and microwave for 15-20 seconds. This small step makes the carving process much smoother and prevents frustrating tears.
- Cheese is a Crucial Component: While pre-shredded cheese is convenient, it’s often coated in starches like potato starch or cellulose to prevent clumping. This coating can inhibit melting, resulting in a less gooey texture. For the absolute best, melt-in-your-mouth cheese pull, buy a block of cheddar or Monterey Jack and shred it yourself. The difference is noticeable!
- Mastering the Art of the Carve: Don’t feel limited to a paring knife. For those who are detail-oriented, a clean X-Acto knife (adults only!) can create incredibly intricate designs. Alternatively, for a super kid-friendly approach, use small, Halloween-themed cookie cutters (like bats, ghosts, or pumpkins). Simply press the cookie cutter firmly into the center of the tortilla to create a perfect shape every time.
- The Golden Rule: Don’t Overstuff!: It’s tempting to load your quesadilla with as much filling as possible, but this is a common pitfall. An overstuffed quesadilla will lead to a “blowout,” where the filling oozes out the sides, burns in the pan, and makes a huge mess. A thin, even layer is all you need. A good rule of thumb is about ¾ to 1 cup of filling per large quesadilla.
- Batch Cooking for a Hungry Horde: Making these one by one can be slow if you’re feeding a crowd. To streamline the process, turn to your oven! Assemble all the quesadillas on two large baking sheets. Brush the tops with melted butter. Bake in a preheated 425°F (220°C) oven for 10-12 minutes, flipping them halfway through, until they are golden and crispy. This method ensures everyone gets to eat a hot quesadilla at the same time.
Frequently Asked Haunts: Your Creepy Quesadilla Questions Answered
Here are answers to some of the most common questions about making this festive Halloween treat.
1. Can I make Creepy Quesadillas ahead of time?
Yes, you can do most of the prep in advance to save time on Halloween! You can mix the filling and store it in an airtight container in the refrigerator for up to two days. You can also carve the tortilla faces, stack them with parchment paper in between each layer to prevent sticking, and store them in a zip-top bag. When you’re ready to eat, simply assemble and cook. To reheat leftover cooked quesadillas, the best methods are in a dry skillet over medium heat, in an air fryer for a few minutes, or in the oven to re-crisp the tortilla. Avoid the microwave, as it will make them soft and soggy.
2. What are some other spooky filling ideas?
The possibilities are endless! This recipe is a fantastic base for customization. Try these variations:
- Vegetarian Monster Mash: Swap the chicken for a can of refried beans mixed with a cup of corn and sautéed bell peppers.
- Spicy Demon: For the adults, add finely diced jalapeños, a pinch of cayenne pepper, and use a spicy Pepper Jack cheese.
- Pizza Ghouls: Fill with mozzarella cheese, mini pepperoni, and a thin layer of pizza sauce.
- Sweet Pumpkin Guts: For a dessert version, fill with a mixture of cream cheese, pumpkin puree, and a sprinkle of cinnamon sugar. Brush the outside with butter and sprinkle with more cinnamon sugar before cooking.
3. How can I make these quesadillas gluten-free?
To make a gluten-free version, you’ll need to use certified gluten-free corn tortillas. However, corn tortillas are more fragile than flour and are very difficult to carve without breaking. The best approach is to skip the intricate carving. Instead, use small, sharp cookie cutters to punch a shape out of the top tortilla. Alternatively, you can cook the quesadilla whole and then use a dark-colored food-safe marker to draw a spooky face on the cooked surface. Always check that all your other ingredients, like the taco seasoning, are certified gluten-free.
4. My kids are picky eaters. Any tips to make them more appealing?
This recipe is already very kid-friendly, but for extra-picky eaters, involvement is key. Let them help mix the filling or choose the shapes for the faces. You can also simplify the filling to be just cheese (“Plain Ghost” quesadillas) or just chicken and cheese. Cutting them into fun shapes with a large cookie cutter after they are cooked can also add to the appeal. Serving them with a familiar and beloved dip, like ranch dressing, can also encourage them to try it.
5. How do I get my quesadillas extra crispy?
The secret to an ultra-crispy tortilla lies in three things: fat, heat, and pressure. First, be generous but even with the butter or oil on the outside. Second, ensure your pan is preheated to medium heat—not too high, or the tortilla will burn before the cheese melts, and not too low, or it will become soft. Finally, while it’s cooking, use a spatula to gently press down on the quesadilla. This ensures the entire surface makes contact with the hot pan, creating a uniformly golden and crispy crust. A cast-iron skillet is fantastic for this as it retains and distributes heat exceptionally well.
Creepy Quesadilla Recipe
Ingredients
- Large Flour Tortillas (Burrito Size): 8 tortillas. Flour tortillas are the ideal canvas for our creepy creations. They are soft and pliable, making them easy to carve without tearing. Their pale color also allows the jack-o’-lantern’s toasty features to stand out beautifully.
- Shredded Cooked Chicken: 2 cups. Using pre-cooked chicken (a rotisserie chicken is a fantastic time-saver) makes this recipe incredibly fast. The chicken provides a hearty, protein-packed base that makes these quesadillas a truly satisfying meal.
- Shredded Mexican Cheese Blend: 3 cups. A blend of Monterey Jack, Cheddar, Asadero, and Queso Quesadilla cheeses provides the perfect meltability and flavor profile. The orange hue of the cheddar is essential for that classic, glowing jack-o’-lantern look peeking through the carved face.
- Black Beans: 1 can (15 ounces), rinsed and drained. The black beans add a wonderful, creamy texture and a boost of fiber. Visually, they create dark, mysterious shadows within the quesadilla, enhancing the spooky effect.
- Mild Taco Seasoning: 1 tablespoon. This is our magic dust. It infuses the filling with a savory, slightly smoky flavor that complements the cheese and chicken perfectly without being too spicy for younger palates.
- Unsalted Butter: 4 tablespoons, melted. Brushing the outside of the quesadillas with butter is the secret to achieving that perfectly golden, irresistibly crispy exterior. It ensures an even browning and adds a rich, decadent flavor.
Instructions
Step 1: Carving Your Canvas (The Tortillas)
This is the most creative part of the process! Take your time and have fun with it.
- Prepare Your Workspace: Lay four of the eight tortillas on a clean, flat surface like a large cutting board. These will be the top layers with the carved faces. The other four will be the solid bottom layers.
- Select Your Tool: A small, sharp paring knife is the best tool for this job. Its pointed tip allows for precise cuts and easy maneuvering around curves. For intricate designs, a clean craft knife (used only for food) can also work, but this should be handled strictly by adults.
- Carve the Faces: Carefully use the tip of your knife to cut out jack-o’-lantern faces from the four tortillas. Classic triangles for eyes and a nose, and a jagged, smiling mouth work great. Don’t worry about perfection; slightly lopsided or quirky faces add to the charm.
- Pro-Tip: To make triangles, simply press the tip of the knife in and make three small, connected cuts. For the mouth, it’s easiest to cut a series of connected “V” shapes to create a jagged look. Gently push the cutout pieces out from the back.
Step 2: Conjuring the Filling
Now we mix the delicious potion that will bring our quesadillas to life.
- Combine Ingredients: In a medium-sized mixing bowl, combine the 2 cups of shredded cooked chicken, 3 cups of shredded Mexican cheese, the entire can of rinsed and drained black beans, and the 1 tablespoon of taco seasoning.
- Mix Thoroughly: Use a spoon or your hands to gently toss the ingredients together until everything is evenly distributed. You want to ensure every bite has a perfect mix of cheese, chicken, and beans. The cheese will act as the “glue” that holds the filling together once it melts.
Step 3: Assembling Your Ghouls
With our faces carved and our filling mixed, it’s time to build our quesadillas.
- Lay the Foundation: Place the four un-carved tortillas on your workspace. These are the bottom layers.
- Spread the Filling: Divide the chicken and cheese mixture evenly among the four bottom tortillas. Spread the filling in a flat, even layer, leaving about a half-inch border around the edge. This prevents the filling from oozing out during cooking.
- Top it Off: Carefully place one of the carved tortillas on top of each filled tortilla. Gently press down to seal the edges and compact the filling slightly. You should now have four fully assembled, un-cooked quesadillas.
Step 4: The Fiery Finish (Cooking)
This final step brings the heat, melting the cheese and crisping the tortilla to golden perfection.
- Heat the Pan: Place a large non-stick skillet or a cast-iron griddle over medium heat. Allowing the pan to preheat is crucial for getting a good sear.
- Butter the Beast: Using a pastry brush, lightly brush the top (the carved side) of one quesadilla with melted butter.
- Cook Side One: Carefully place the quesadilla, butter-side down, into the hot skillet. As it cooks, brush the new top side (the un-carved bottom) with more melted butter.
- Flip and Finish: Cook for 3-4 minutes, or until the bottom is golden brown and crispy and the cheese has begun to melt. Use a large spatula to carefully flip the quesadilla. Cook for another 3-4 minutes on the second side, until it’s equally golden and the cheese is completely melted and gooey.
- Repeat: Remove the finished quesadilla from the pan and place it on a cutting board. Repeat the process with the remaining three quesadillas.
- Serve Immediately: Cut the quesadillas into wedges and serve hot while the cheese is still perfectly stringy.
Nutrition
- Serving Size: One Normal Portion
- Calories: 650-750 kcal