

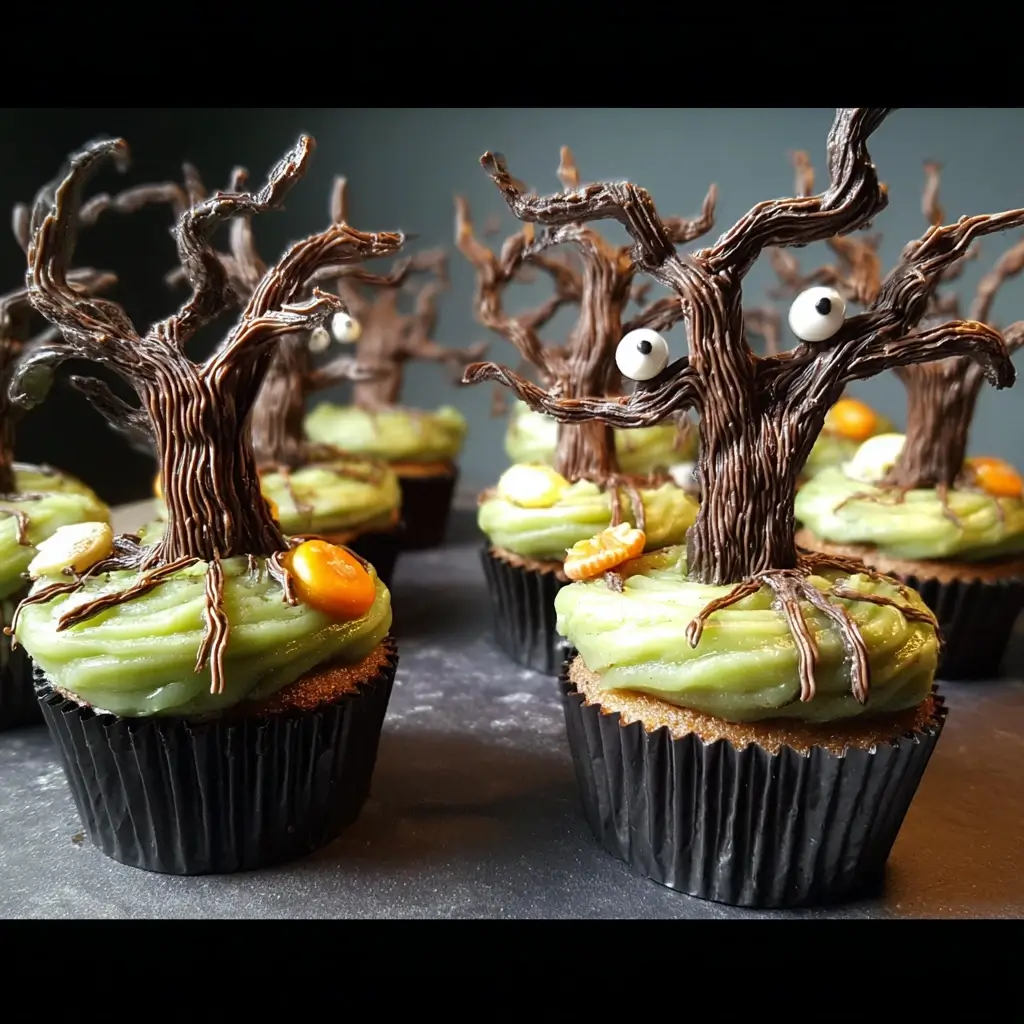

The air on Halloween night has a unique magic, a crisp chill that carries the scent of fallen leaves and the excited whispers of children. In our house, that magic isn’t just outside; it’s baked right into the heart of our kitchen. I remember the first time I decided to move beyond simple ghost-shaped cookies and attempt something truly spectacular for our annual family Halloween party. I wanted a centerpiece, a treat that would make everyone gasp and then immediately ask for a second one. That’s how these Creepy Tree Cupcakes were born. The first time I presented them, arranged on a platter like a miniature haunted forest, the room fell silent for a moment. My youngest, wide-eyed, pointed and whispered, “They’re watching us!” He was right. The gnarled, twisted chocolate branches seemed to reach out, casting long shadows under the dim party lights. But the moment of spooky reverence was quickly broken by the first brave bite. The silence was replaced by murmurs of “Oh, this is the best chocolate cupcake ever!” and “How did you make these trees?” They were a smash hit. The deep, dark, moist chocolate cake, crowned with a silky, rich chocolate buttercream “dirt,” was the perfect foundation for the star of the show: the delicate, crunchy, and intensely chocolatey creepy trees. They became more than just a dessert; they became a tradition, a story we retell every year, and the most requested Halloween treat in our family’s history. This recipe is the culmination of that tradition, perfected over years to be not just visually stunning, but utterly, wickedly delicious.
Creepy Tree Cupcakes: The Ultimate Spooky Treat
This recipe will guide you through creating a dozen of the most enchanting and delicious Halloween cupcakes you’ve ever made. We break it down into three core components: the impossibly moist dark chocolate cupcakes, the rich and decadent chocolate buttercream “dirt,” and the show-stopping creepy chocolate trees. Don’t be intimidated by the decorative element; it’s a fun, creative process that yields spectacular results.
Complete Ingredients List
Gathering your ingredients, or your “potion components,” is the first step to baking magic. For the best results, ensure your dairy and eggs are at room temperature. This helps them incorporate smoothly into the batter, creating a finer, more tender crumb.
For the Deep Dark Chocolate Cupcakes (Yields 12-14 Cupcakes):
- All-Purpose Flour: 1 ½ cups (180g) – The structural backbone of our cupcakes.
- Granulated Sugar: 1 cup (200g) – Provides sweetness and helps create a tender texture.
- Unsweetened Dutch-Processed Cocoa Powder: ¾ cup (75g) – This is key for a deep, dark color and a rich, smooth, non-bitter chocolate flavor.
- Baking Soda: 1 ½ teaspoons – The primary leavening agent, reacting with the acid in the buttermilk and coffee.
- Baking Powder: ¾ teaspoon – Provides an extra lift, ensuring a light and fluffy cupcake.
- Salt: ¾ teaspoon – Balances the sweetness and enhances the chocolate flavor.
- Large Egg: 1, at room temperature – Binds the ingredients together.
- Buttermilk: ¾ cup (180ml), at room temperature – The acid in buttermilk tenderizes the gluten, resulting in a supremely moist cupcake.
- Vegetable Oil: ½ cup (120ml) – Guarantees a moist crumb that stays fresh for days.
- Vanilla Extract: 2 teaspoons – Adds a layer of aromatic depth to the chocolate.
- Hot Brewed Coffee or Hot Water: ¾ cup (180ml) – The secret weapon! Hot liquid “blooms” the cocoa powder, unlocking its deepest flavor potential and adding moisture. Coffee intensifies the chocolate flavor without making it taste like coffee.
For the Silky Chocolate Buttercream “Dirt”:
- Unsalted Butter: 1 cup (226g), softened to room temperature – The base of our frosting. It must be soft, but not melting.
- Powdered Sugar: 3 cups (360g), sifted – Provides sweetness and structure. Sifting prevents lumps.
- Unsweetened Dutch-Processed Cocoa Powder: ⅔ cup (66g), sifted – For that rich, dark chocolate flavor and “dirt” color.
- Heavy Cream or Whole Milk: 3-4 tablespoons, at room temperature – To achieve the perfect smooth and pipeable consistency.
- Vanilla Extract: 1 teaspoon – Enhances the overall flavor.
- Pinch of Salt: Just a small pinch to cut through the sweetness.
For the Creepy Chocolate Trees & Assembly:
- Semi-Sweet or Dark Chocolate Chips/Wafers: 1 cup (170g) – Use good quality chocolate for the best flavor and melting experience. Wafers (callets) are designed for melting and are a great choice.
- Optional Topping: ¼ cup crushed chocolate sandwich cookies (like Oreos) – For extra “dirt” texture on top of the frosting.
Step-by-Step Instructions
Follow these instructions carefully, and you’ll be rewarded with perfect cupcakes. The process is divided into making the cupcakes, preparing the trees and frosting, and the final assembly.
Part 1: Baking the Deep Dark Chocolate Cupcakes
- Preheat and Prep: Preheat your oven to 350°F (175°C). Line a standard 12-cup muffin tin with paper liners. This recipe might yield an extra cupcake or two, so have a couple of extra liners ready.
- Combine Dry Ingredients: In a large mixing bowl, whisk together the all-purpose flour, granulated sugar, Dutch-processed cocoa powder, baking soda, baking powder, and salt. Whisking for a full 30 seconds helps aerate the mixture and ensures the leavening agents are evenly distributed, which is crucial for a uniform rise.
- Combine Wet Ingredients: In a separate medium-sized bowl, whisk together the room temperature egg, buttermilk, vegetable oil, and vanilla extract until fully combined and smooth.
- Marry the Wet and Dry: Pour the wet ingredients into the large bowl with the dry ingredients. Using a whisk or a rubber spatula, mix until just combined. Be careful not to overmix at this stage; a few small lumps are perfectly fine. Overmixing develops gluten, which can lead to tough, rubbery cupcakes.
- The Secret Step – Bloom the Cocoa: Carefully pour the hot coffee (or hot water) into the batter. The batter will be very thin and liquidy at this point—this is completely normal! This is the key to an ultra-moist cupcake. Gently whisk until the batter is smooth and uniform.
- Fill and Bake: Using a measuring cup or an ice cream scoop for even distribution, fill each cupcake liner about two-thirds full. This leaves enough room for the cupcakes to rise without spilling over.
- Baking Time: Bake for 18-22 minutes. The cupcakes are done when a wooden skewer or toothpick inserted into the center comes out clean or with a few moist crumbs attached (but no wet batter).
- Cool Down: Let the cupcakes cool in the muffin tin for about 5-10 minutes before transferring them to a wire rack. It is essential to let them cool completely before frosting. Frosting a warm cupcake will result in a melted, soupy mess. This can take at least an hour.
Part 2: Crafting the Creepy Chocolate Trees
This is the most creative part! Do this while your cupcakes are cooling.
- Prepare Your Workspace: Lay a large sheet of parchment paper on a flat baking sheet that will fit in your freezer or refrigerator.
- Melt the Chocolate: Place your semi-sweet or dark chocolate chips in a microwave-safe bowl. Microwave in 20-30 second intervals, stirring well between each interval, until the chocolate is almost completely melted. Then, just stir until the residual heat melts the remaining pieces. This tempering method prevents the chocolate from overheating and becoming grainy. Alternatively, you can use a double boiler.
- Prepare for Piping: Let the melted chocolate cool for a few minutes so it’s not piping hot, but still fluid. Transfer the melted chocolate into a piping bag fitted with a small round tip (like a Wilton #2 or #3), or into a sturdy zip-top bag. If using a zip-top bag, snip a tiny corner off.
- Pipe the Trees: On the parchment paper, begin piping your trees. Start by piping a trunk, making it thicker at the base. Then, from the trunk, pipe out gnarled, twisted branches. Make some branches thin and spindly, others thicker. Let them cross over each other. The goal is to make them look spooky and organic, so imperfection is key! Create at least 12 distinct trees, plus a few extras in case of breakage.
- Chill to Set: Place the entire baking sheet with the piped trees into the refrigerator or freezer for about 10-15 minutes, or until the chocolate is completely firm and solid. They will be delicate, so handle them with care.
Part 3: Whipping the Chocolate Buttercream & Final Assembly
- Beat the Butter: In a large bowl using a stand mixer with a paddle attachment or a hand mixer, beat the softened butter on medium-high speed for 2-3 minutes until it’s light, pale, and creamy. This incorporates air and is the foundation of a fluffy frosting.
- Incorporate Sugar and Cocoa: With the mixer on low speed, gradually add the sifted powdered sugar and sifted cocoa powder. Mix until just combined. The mixture will be thick and crumbly.
- Add Liquid and Vanilla: Add the vanilla extract and 3 tablespoons of heavy cream. Increase the mixer speed to medium-high and beat for another 3-4 minutes until the frosting is incredibly smooth, light, and airy. If it’s too thick, add the remaining tablespoon of cream. If it’s too thin, add a little more powdered sugar.
- Frost the Cupcakes: Once the cupcakes are completely cool, frost them with the chocolate buttercream. You can use an offset spatula to create a flat, “dirt” like surface. You don’t need to be neat; a slightly messy look adds to the rustic, graveyard effect.
- Add the “Dirt”: If using, sprinkle the crushed chocolate sandwich cookies over the frosting to create an extra layer of texture that looks just like freshly turned soil.
- Plant the Trees: Very carefully peel your hardened chocolate trees from the parchment paper. Gently press the base of one tree into the center of each frosted cupcake. The frosting will hold it securely in place. Voilà! Your creepy forest is complete.
Nutrition Facts
- Servings: 12 cupcakes
- Calories per serving (1 cupcake): Approximately 480 kcal
Disclaimer: The nutritional information provided is an estimate and can vary based on the specific ingredients and brands used.
Preparation Time
- Active Time: 45 minutes (Mixing batter, making frosting, piping trees)
- Baking Time: 20 minutes
- Cooling & Chilling Time: 1 hour 15 minutes
- Total Time: Approximately 2 hours 20 minutes
How to Serve and Present Your Creepy Tree Cupcakes
Presentation is everything when it comes to a themed treat. Here are some ideas to make your cupcakes the star of the Halloween spread:
- Create a Haunted Forest Diorama:
- Arrange the cupcakes on a large, dark platter or a wooden board.
- Scatter extra crushed chocolate cookies around the base of the cupcakes to create a continuous “forest floor.”
- Place a few gummy worms peeking out from the “dirt.”
- Use dry ice in a container placed safely behind the platter to create a low-lying, spooky fog that rolls through your edible forest. (Always handle dry ice with gloves and ensure proper ventilation).
- Individual Graveyard Plots:
- Serve each cupcake on its own small, dark plate.
- Use a food-safe marker to write “RIP” on a small, rectangular cookie (like a shortbread) and stick it into the frosting in front of the tree to resemble a tombstone.
- Themed Party Pairings:
- Serve alongside a “Witches’ Brew” punch (a green or purple sparkling beverage).
- Pair them with other spooky finger foods like “Witch Finger” pretzels or “Mummy” hot dogs.
- Lighting is Key:
- Serve them in a dimly lit area.
- Use battery-operated candles or fairy lights woven around the platter to cast long, eerie shadows from the chocolate trees, enhancing the “creepy” effect.
Additional Tips for Success
- Don’t Overmix the Batter: This is the golden rule of cake and cupcake baking. Mix the wet and dry ingredients only until they are just combined. Overmixing develops the gluten in the flour, which will result in dense, tough, and chewy cupcakes instead of light and tender ones. The thin, liquidy nature of this batter helps prevent over-development, but it’s still a crucial point to remember.
- Room Temperature is Not a Suggestion: For the cake batter and the buttercream, using room temperature ingredients (eggs, buttermilk, butter) is non-negotiable for the best texture. Cold ingredients don’t emulsify properly. The butter won’t cream to its full, airy potential, and the batter can curdle or separate, leading to a coarse crumb. Take your ingredients out of the fridge at least 30-60 minutes before you begin.
- Make-Ahead Strategy: Halloween can be a busy day. You can easily break this recipe up to save time.
- Cupcakes: Can be baked up to 2 days in advance. Store them in an airtight container at room temperature once fully cooled.
- Buttercream: Can be made up to 3 days in advance and stored in an airtight container in the refrigerator. Let it come to room temperature and re-whip it with your mixer for a few minutes to restore its smooth, fluffy texture before using.
- Chocolate Trees: Can be made a week in advance! Store them flat in an airtight container in the refrigerator.
- The Perfect Chocolate Tree Technique: If you’re nervous about piping, practice on the parchment paper first. You can scoop the chocolate back up and re-melt it if needed. For a stronger tree, make the trunk and the base of the main branches a little thicker. This provides more stability when you press it into the cupcake. And remember to make extras—they are delicate and a few might break, so having backups is a lifesaver.
- Filling Surprise: For an extra decadent and spooky touch, you can add a filling to the cupcakes. After the cupcakes have cooled, use an apple corer or a small knife to remove a small core from the center of each one. Fill the cavity with raspberry jam (for a “bleeding” effect), salted caramel, or even a dollop of green-tinted vanilla pudding before frosting.
Frequently Asked Questions (FAQ)
Q1: Can I use a different type of cocoa powder?
A: You can, but it will change the final product. This recipe is optimized for Dutch-processed cocoa powder, which is less acidic and has a darker color and smoother flavor. If you only have natural unsweetened cocoa powder, the cupcakes will have a slightly lighter, reddish hue and a more traditional, tangier chocolate flavor. The texture may also be slightly different, as the Dutch-processed cocoa reacts specifically with the baking powder, while natural cocoa reacts with the baking soda.
Q2: My chocolate trees keep breaking! What am I doing wrong?
A: This is a common issue with such delicate work! There are a few likely culprits. First, your piped branches might be too thin and spindly. Try making the main trunk and the base of the branches a bit thicker for support. Second, ensure the chocolate is fully hardened in the fridge or freezer before you even attempt to peel them off the parchment. Be patient! Finally, peel the parchment paper away from the chocolate, rather than trying to lift the chocolate off the paper. This puts less stress on the delicate structure. And always, always make extras!
Q3: Can I make these cupcakes gluten-free?
A: Yes, you can adapt this recipe to be gluten-free. Substitute the all-purpose flour with a high-quality, 1-to-1 gluten-free baking flour blend that contains xanthan gum. Brands like Bob’s Red Mill 1-to-1 or King Arthur Flour Measure for Measure work well. The rest of the recipe can remain the same. The texture may be slightly different from the original, but they will still be deliciously moist and chocolatey.
Q4: I don’t have a piping bag for the trees. Is there another way?
A: Absolutely! The easiest alternative is a heavy-duty plastic freezer bag (a zip-top bag). Fill the bag with the melted chocolate, push it down to one corner, and snip a very tiny piece off the corner. This creates a makeshift piping bag that works perfectly for this task. You could also try drizzling the chocolate from a spoon to create more abstract, spooky “twig” shapes, though you’ll have less control over the final design.
Q5: How should I store the finished Creepy Tree Cupcakes?
A: Once assembled, these cupcakes are best enjoyed within 2 days. Because of the buttercream, they should be stored in an airtight container. You can store them at a cool room temperature for up to 24 hours. For longer storage, it’s best to place the container in the refrigerator for up to 3-4 days. The cupcakes are best served at room temperature, so remove them from the fridge about 30 minutes before serving to allow the buttercream and cake to soften up. The chocolate trees may “sweat” a little in the fridge but will still look fantastic.
Creepy Tree Cupcakes Recipe
Ingredients
For the Deep Dark Chocolate Cupcakes (Yields 12-14 Cupcakes):
- All-Purpose Flour: 1 ½ cups (180g) – The structural backbone of our cupcakes.
- Granulated Sugar: 1 cup (200g) – Provides sweetness and helps create a tender texture.
- Unsweetened Dutch-Processed Cocoa Powder: ¾ cup (75g) – This is key for a deep, dark color and a rich, smooth, non-bitter chocolate flavor.
- Baking Soda: 1 ½ teaspoons – The primary leavening agent, reacting with the acid in the buttermilk and coffee.
- Baking Powder: ¾ teaspoon – Provides an extra lift, ensuring a light and fluffy cupcake.
- Salt: ¾ teaspoon – Balances the sweetness and enhances the chocolate flavor.
- Large Egg: 1, at room temperature – Binds the ingredients together.
- Buttermilk: ¾ cup (180ml), at room temperature – The acid in buttermilk tenderizes the gluten, resulting in a supremely moist cupcake.
- Vegetable Oil: ½ cup (120ml) – Guarantees a moist crumb that stays fresh for days.
- Vanilla Extract: 2 teaspoons – Adds a layer of aromatic depth to the chocolate.
- Hot Brewed Coffee or Hot Water: ¾ cup (180ml) – The secret weapon! Hot liquid “blooms” the cocoa powder, unlocking its deepest flavor potential and adding moisture. Coffee intensifies the chocolate flavor without making it taste like coffee.
For the Silky Chocolate Buttercream “Dirt”:
- Unsalted Butter: 1 cup (226g), softened to room temperature – The base of our frosting. It must be soft, but not melting.
- Powdered Sugar: 3 cups (360g), sifted – Provides sweetness and structure. Sifting prevents lumps.
- Unsweetened Dutch-Processed Cocoa Powder: ⅔ cup (66g), sifted – For that rich, dark chocolate flavor and “dirt” color.
- Heavy Cream or Whole Milk: 3-4 tablespoons, at room temperature – To achieve the perfect smooth and pipeable consistency.
- Vanilla Extract: 1 teaspoon – Enhances the overall flavor.
- Pinch of Salt: Just a small pinch to cut through the sweetness.
For the Creepy Chocolate Trees & Assembly:
- Semi-Sweet or Dark Chocolate Chips/Wafers: 1 cup (170g) – Use good quality chocolate for the best flavor and melting experience. Wafers (callets) are designed for melting and are a great choice.
- Optional Topping: ¼ cup crushed chocolate sandwich cookies (like Oreos) – For extra “dirt” texture on top of the frosting.
Instructions
Part 1: Baking the Deep Dark Chocolate Cupcakes
- Preheat and Prep: Preheat your oven to 350°F (175°C). Line a standard 12-cup muffin tin with paper liners. This recipe might yield an extra cupcake or two, so have a couple of extra liners ready.
- Combine Dry Ingredients: In a large mixing bowl, whisk together the all-purpose flour, granulated sugar, Dutch-processed cocoa powder, baking soda, baking powder, and salt. Whisking for a full 30 seconds helps aerate the mixture and ensures the leavening agents are evenly distributed, which is crucial for a uniform rise.
- Combine Wet Ingredients: In a separate medium-sized bowl, whisk together the room temperature egg, buttermilk, vegetable oil, and vanilla extract until fully combined and smooth.
- Marry the Wet and Dry: Pour the wet ingredients into the large bowl with the dry ingredients. Using a whisk or a rubber spatula, mix until just combined. Be careful not to overmix at this stage; a few small lumps are perfectly fine. Overmixing develops gluten, which can lead to tough, rubbery cupcakes.
- The Secret Step – Bloom the Cocoa: Carefully pour the hot coffee (or hot water) into the batter. The batter will be very thin and liquidy at this point—this is completely normal! This is the key to an ultra-moist cupcake. Gently whisk until the batter is smooth and uniform.
- Fill and Bake: Using a measuring cup or an ice cream scoop for even distribution, fill each cupcake liner about two-thirds full. This leaves enough room for the cupcakes to rise without spilling over.
- Baking Time: Bake for 18-22 minutes. The cupcakes are done when a wooden skewer or toothpick inserted into the center comes out clean or with a few moist crumbs attached (but no wet batter).
- Cool Down: Let the cupcakes cool in the muffin tin for about 5-10 minutes before transferring them to a wire rack. It is essential to let them cool completely before frosting. Frosting a warm cupcake will result in a melted, soupy mess. This can take at least an hour.
Part 2: Crafting the Creepy Chocolate Trees
This is the most creative part! Do this while your cupcakes are cooling.
- Prepare Your Workspace: Lay a large sheet of parchment paper on a flat baking sheet that will fit in your freezer or refrigerator.
- Melt the Chocolate: Place your semi-sweet or dark chocolate chips in a microwave-safe bowl. Microwave in 20-30 second intervals, stirring well between each interval, until the chocolate is almost completely melted. Then, just stir until the residual heat melts the remaining pieces. This tempering method prevents the chocolate from overheating and becoming grainy. Alternatively, you can use a double boiler.
- Prepare for Piping: Let the melted chocolate cool for a few minutes so it’s not piping hot, but still fluid. Transfer the melted chocolate into a piping bag fitted with a small round tip (like a Wilton #2 or #3), or into a sturdy zip-top bag. If using a zip-top bag, snip a tiny corner off.
- Pipe the Trees: On the parchment paper, begin piping your trees. Start by piping a trunk, making it thicker at the base. Then, from the trunk, pipe out gnarled, twisted branches. Make some branches thin and spindly, others thicker. Let them cross over each other. The goal is to make them look spooky and organic, so imperfection is key! Create at least 12 distinct trees, plus a few extras in case of breakage.
- Chill to Set: Place the entire baking sheet with the piped trees into the refrigerator or freezer for about 10-15 minutes, or until the chocolate is completely firm and solid. They will be delicate, so handle them with care.
Part 3: Whipping the Chocolate Buttercream & Final Assembly
- Beat the Butter: In a large bowl using a stand mixer with a paddle attachment or a hand mixer, beat the softened butter on medium-high speed for 2-3 minutes until it’s light, pale, and creamy. This incorporates air and is the foundation of a fluffy frosting.
- Incorporate Sugar and Cocoa: With the mixer on low speed, gradually add the sifted powdered sugar and sifted cocoa powder. Mix until just combined. The mixture will be thick and crumbly.
- Add Liquid and Vanilla: Add the vanilla extract and 3 tablespoons of heavy cream. Increase the mixer speed to medium-high and beat for another 3-4 minutes until the frosting is incredibly smooth, light, and airy. If it’s too thick, add the remaining tablespoon of cream. If it’s too thin, add a little more powdered sugar.
- Frost the Cupcakes: Once the cupcakes are completely cool, frost them with the chocolate buttercream. You can use an offset spatula to create a flat, “dirt” like surface. You don’t need to be neat; a slightly messy look adds to the rustic, graveyard effect.
- Add the “Dirt”: If using, sprinkle the crushed chocolate sandwich cookies over the frosting to create an extra layer of texture that looks just like freshly turned soil.
- Plant the Trees: Very carefully peel your hardened chocolate trees from the parchment paper. Gently press the base of one tree into the center of each frosted cupcake. The frosting will hold it securely in place. Voilà! Your creepy forest is complete.
Nutrition
- Serving Size: One Normal Portion
- Calories: 480


