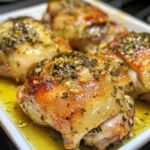
Of all the weeknight dinner dilemmas, finding a recipe that satisfies everyone—from the pickiest little eater to the most discerning adult palate—is the ultimate challenge. For years, I was on a quest for the perfect baked chicken: something with the satisfying crunch of fried chicken but without the mess and added fat. I tried countless methods, from cornflake crusts to complicated brines, but nothing quite hit the mark. That is, until I perfected this recipe for Seasoned Panko Crusted Baked Chicken Drumsticks. The first time I pulled these out of the oven, glistening and golden-brown, my family fell silent. The only sound was the incredible, audible crunch with every bite, followed by murmurs of “Wow, this is the best chicken ever.” The panko crust is unbelievably crispy, the seasoning blend is savory with a hint of smokiness, and the meat inside remains incredibly juicy and tender. It has become our go-to “special” weeknight meal, our requested dish for family gatherings, and the one recipe I share with anyone who says they can’t make baked chicken that’s truly crispy. It’s simple, reliable, and tastes like a decadent treat, but it’s secretly easy and so much healthier than its deep-fried cousin. This isn’t just a recipe; it’s the solution to your chicken dinner dreams.
The Ultimate Crispy Baked Chicken Drumsticks
This recipe is designed to be straightforward while delivering maximum flavor and texture. The key is in the details: the three-step breading process, the specific seasoning blend, and the baking technique that ensures a perfectly crisp, golden crust all the way around.
Why This Recipe is a Keeper
Before we dive in, let’s talk about why this specific method works so well and will become a staple in your kitchen:
- Unbeatable Crunch: We’re using Japanese-style Panko breadcrumbs, which are coarser and flakier than traditional breadcrumbs. They absorb less oil and bake up into an incredibly light, airy, and super-crispy coating.
- Healthier Than Fried: By baking instead of deep-frying, we significantly reduce the amount of oil and fat, making this a guilt-free way to enjoy “fried” chicken.
- Juiciness Guaranteed: The panko crust creates a protective barrier, sealing in the chicken’s natural juices as it bakes. This prevents the drumsticks from drying out, ensuring every bite is moist and flavorful.
- Perfectly Seasoned: The seasoning isn’t just in the crust; it’s in the initial flour dredge, too. This layering technique ensures the chicken meat itself is savory, not just the coating on the outside.
- Family & Budget-Friendly: Chicken drumsticks are one of the most affordable cuts of meat. This recipe transforms them into a meal that feels special enough for Sunday dinner but is easy and inexpensive enough for any Tuesday night.
Ingredients You’ll Need
Gather these simple pantry staples to create your masterpiece. The quality of your ingredients, especially the spices, will make a noticeable difference.
- Chicken: 8 medium-sized chicken drumsticks (about 2.5 – 3 lbs / 1.2 – 1.4 kg), skin on
- For the Dredging Station:
- Flour Mixture:
- 1 cup all-purpose flour
- 1 teaspoon salt
- 1/2 teaspoon black pepper
- Egg Wash:
- 2 large eggs
- 1 tablespoon water or milk
- Panko Coating:
- 2 cups Panko breadcrumbs
- 1/3 cup grated Parmesan cheese (the kind in the shaker works great for this)
- 2 teaspoons smoked paprika (this adds amazing color and a subtle smoky flavor)
- 1 teaspoon garlic powder
- 1 teaspoon onion powder
- 1/2 teaspoon dried oregano or Italian seasoning
- 1/2 teaspoon salt
- 1/4 teaspoon black pepper
- Flour Mixture:
- For Finishing:
- 1/4 cup olive oil or melted butter (or use a cooking oil spray)
Step-by-Step Instructions for Perfect Panko Chicken
Follow these steps carefully for foolproof results. The secret to success lies in the preparation and the setup of your breading station.
Step 1: Prepare Your Oven and Baking Sheet
Preheat your oven to 400°F (200°C). Proper temperature is crucial for a crispy crust. Place a wire cooling rack inside a large, rimmed baking sheet. This is a non-negotiable step! Elevating the chicken on a rack allows hot air to circulate all around the drumsticks, crisping up the bottom and preventing it from becoming soggy. If you don’t have a rack, the bottom will steam in the chicken’s own juices.
Step 2: Pat the Chicken Dry
Using paper towels, thoroughly pat each chicken drumstick completely dry. Moisture is the enemy of a crispy crust. A dry surface helps the flour, and subsequently the entire coating, adhere properly to the skin.
Step 3: Set Up Your Breading Station
This organized setup makes the process smooth and less messy. You’ll need three shallow dishes or pie plates.
- Dish 1 (Flour): In the first dish, whisk together the 1 cup of all-purpose flour, 1 teaspoon of salt, and 1/2 teaspoon of black pepper.
- Dish 2 (Egg): In the second dish, whisk the 2 eggs with 1 tablespoon of water or milk until smooth and uniform.
- Dish 3 (Panko): In the third dish, combine the 2 cups of Panko breadcrumbs, 1/3 cup of grated Parmesan cheese, 2 teaspoons of smoked paprika, 1 teaspoon of garlic powder, 1 teaspoon of onion powder, 1/2 teaspoon of dried oregano, 1/2 teaspoon of salt, and 1/4 teaspoon of black pepper. Mix thoroughly with a fork to ensure the seasonings and cheese are evenly distributed throughout the breadcrumbs.
Step 4: The Breading Process (Dredge, Dip, Coat)
Work with one drumstick at a time. A great tip to keep your hands clean is to use one hand for the dry ingredients (flour, panko) and the other hand for the wet ingredient (egg).
- Dredge in Flour: Take a dry drumstick and dredge it in the flour mixture, shaking off any excess. The goal is a very thin, even coating that will help the egg wash stick.
- Dip in Egg: Transfer the floured drumstick to the egg wash. Turn it to coat completely, letting any excess egg drip back into the dish.
- Coat in Panko: Immediately place the egg-coated drumstick into the panko mixture. Press the panko firmly onto the chicken on all sides to ensure a thick, even crust. Don’t be shy here; you want that coating to be robust.
Step 5: Arrange and Bake
Place the fully coated drumstick on the prepared wire rack on your baking sheet. Repeat the breading process for the remaining drumsticks, making sure to leave a little space between each one on the rack. Crowding the pan will cause the chicken to steam instead of bake, resulting in a less crispy finish.
Drizzle the 1/4 cup of olive oil or melted butter evenly over the tops of the drumsticks. Alternatively, give them a generous coating with cooking oil spray. This fat is essential for helping the panko “fry” in the oven, turning it golden-brown and delicious.
Bake in the preheated 400°F (200°C) oven for 40-50 minutes. You can flip the drumsticks halfway through if you wish, but if you’re using a wire rack, it’s often not necessary. The chicken is done when the crust is a deep golden brown and an instant-read meat thermometer inserted into the thickest part of the drumstick (without touching the bone) registers 165°F (74°C).
Step 6: Rest and Serve
Remove the baking sheet from the oven and let the chicken rest on the wire rack for 5-10 minutes before serving. This allows the juices to redistribute throughout the meat, ensuring a tender, juicy bite.
Nutrition Facts
- Servings: 4 (2 drumsticks per serving)
- Calories per serving: Approximately 460 kcal
Disclaimer: The nutritional information provided is an estimate and can vary based on the specific ingredients used, the size of the chicken drumsticks, and the amount of oil absorbed during baking.
Preparation & Cook Time
- Prep time: 20 minutes
- Cook time: 40-50 minutes
- Total time: 60-70 minutes
How to Serve Your Crispy Baked Chicken Drumsticks
These versatile drumsticks pair beautifully with a wide variety of sides. Here are some ideas to build a complete and satisfying meal, ranging from classic comfort food to healthy and fresh options.
- Classic Comfort Pairings:
- Creamy Mashed Potatoes: The ultimate comfort food to soak up any chicken juices.
- Homestyle Mac and Cheese: A rich, cheesy side that complements the savory chicken perfectly.
- Simple Chicken Gravy: For dipping and drizzling over everything.
- Fluffy Buttermilk Biscuits: Ideal for a Southern-style feast.
- Healthy & Vegetable-Forward Sides:
- Roasted Broccoli or Asparagus: Toss them with olive oil, salt, and pepper and roast them alongside the chicken for the last 20 minutes of cooking.
- A Crisp Garden Salad: A simple salad with a lemon vinaigrette provides a fresh, acidic contrast to the rich chicken.
- Steamed Green Beans: Topped with a little butter and toasted almonds for extra crunch.
- Corn on the Cob: A sweet and juicy classic.
- Essential Dipping Sauces:
- Honey Mustard: The perfect blend of sweet and tangy.
- Classic BBQ Sauce: For a smoky, sweet flavor boost.
- Creamy Ranch Dressing: A cool and herby dip that kids and adults love.
- Spicy Aioli: Mix mayonnaise with a little sriracha, garlic, and a squeeze of lime juice for a zesty kick.
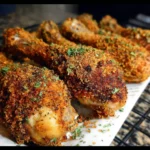
The Science of the Perfect Crunch: Panko vs. Regular Breadcrumbs
Have you ever wondered why Panko is so magical? Understanding the difference between Panko and standard breadcrumbs reveals why it’s the superior choice for creating a truly crispy coating.
Regular breadcrumbs are typically made from loaves of bread that have their crusts removed. The bread is then processed into fine, dense crumbs. When used as a coating, these crumbs absorb a significant amount of moisture and oil, which can lead to a heavier, greasier, and sometimes soggier result.
Panko, on the other hand, is Japanese-style breadcrumb made from a special kind of crustless white bread. The bread is baked using an electrical current, which yields a loaf with no crust. It’s then shredded into large, airy flakes and dried.
- Texture: The flaky, shard-like shape of Panko provides more surface area, resulting in a lighter, airier texture.
- Absorption: Panko absorbs less oil than regular breadcrumbs. This means that instead of becoming saturated and heavy, it fries up to be incredibly crisp and stays that way for longer.
When you bake these chicken drumsticks, the fat (olive oil or butter) you drizzle on top essentially “fries” the Panko flakes in the dry heat of the oven. This process, combined with the lower absorption rate of the Panko, is the secret behind that shatteringly crisp crust that rivals any deep-fried chicken.
Mastering the Crunch: 5 Essential Tips for Perfect Panko Chicken
To elevate your chicken from good to absolutely unforgettable, pay attention to these five critical tips. They address the most common pitfalls and ensure success every time.
1. The Dryness Doctrine: Pat It Dry, Then Dry It Again
This is the single most important step for crust adhesion. If the chicken skin is wet, the flour will turn into a gummy paste instead of a dry primer. This weak foundation will cause the entire crust to slide off during or after baking. Use several paper towels and be thorough. For ultimate results, you can even let the patted-dry chicken sit uncovered on a rack in the refrigerator for 30 minutes to an hour to allow the surface to air-dry even further.
2. The Unbreakable Bond: The Three-Step Breading Station
Don’t skip any part of the flour-egg-panko process. Each step serves a vital purpose. The seasoned flour acts as a primer, giving the egg something to cling to. The egg wash is the glue that binds the panko to the chicken. Finally, the panko provides the crunch. When you press the panko firmly onto the egg-coated chicken, you are creating a mechanical bond that will hold strong in the oven’s heat.
3. Elevate for 360° Crispiness: The Wire Rack Is Your Best Friend
Baking chicken directly on a baking sheet is a recipe for a soggy bottom. As the chicken cooks, it releases juices. If it’s sitting flat, the bottom of the drumstick will steam in this liquid, while the top gets crispy. The wire rack elevates the chicken, allowing hot air to circulate freely around the entire piece. This ensures even cooking and a uniformly crisp crust from top to bottom. It is the key to mimicking the all-over crunch of a deep fryer.
4. Give Them Space: Don’t Crowd the Pan
When food is packed too tightly onto a baking sheet, it traps steam. This lowers the effective temperature around the food and changes the cooking method from dry-heat baking/roasting to steaming. To get that golden, crispy crust, the chicken needs space. Ensure there’s at least an inch of room around each drumstick. If your baking sheet isn’t large enough, it’s far better to use two separate sheets than to crowd one.
5. The Pro Move: Toast Your Panko First
For a guaranteed, beautifully even, deep golden-brown crust, try this professional trick. Before you mix it with the seasonings, spread the plain Panko in a dry skillet over medium heat. Toast it, stirring constantly, for 3-5 minutes until it becomes fragrant and lightly golden. Then, let it cool completely before mixing in the cheese and spices and proceeding with the breading. This pre-toasting gives you a head start on browning, ensuring your crust is perfectly colored by the time the chicken is cooked through, with no pale spots.
Customizing Your Seasoning Blend
While the provided seasoning blend is a perfectly balanced, crowd-pleasing classic, don’t be afraid to experiment! The Panko crust is a fantastic canvas for a variety of flavor profiles. Simply swap the spices in the Panko mixture (Dish 3) to create a new experience.
- Spicy Kick: Replace the oregano with 1 teaspoon of chili powder and add 1/2 teaspoon of cayenne pepper.
- Italian Herb: Increase the dried oregano to 1 teaspoon and add 1/2 teaspoon each of dried basil and dried thyme. Add a pinch of red pepper flakes for warmth.
- Lemony Herb: Add the zest of one lemon to the Panko mixture along with 1 teaspoon of dried thyme. The bright citrus notes are incredible with chicken.
- Smoky BBQ: Add 1 tablespoon of brown sugar and 1 teaspoon of chili powder to the Panko mixture, and increase the smoked paprika to 1 tablespoon.
Frequently Asked Questions (FAQ)
1. How do I know for sure when the chicken is fully cooked?
The most reliable way to ensure chicken is safely cooked is by using an instant-read meat thermometer. The internal temperature of the thickest part of the drumstick should be at least 165°F (74°C). If you don’t have a thermometer, you can pierce the thickest part of the meat with a knife. The juices should run clear, not pink. However, a thermometer is the only way to be 100% certain of both safety and preventing overcooking.
2. Can I make these in an air fryer?
Absolutely! This recipe adapts wonderfully to the air fryer and gets even crispier. Prepare the chicken exactly as described through the breading process. Preheat your air fryer to 380°F (190°C). Place the drumsticks in the air fryer basket in a single layer (do not overcrowd; cook in batches if necessary). Spray the tops generously with cooking oil spray. Air fry for 20-25 minutes, flipping halfway through, until the crust is golden and the internal temperature reaches 165°F (74°C).
3. My panko coating fell off during baking! What did I do wrong?
This is a common issue that usually comes down to one of three things. First, the chicken was likely not patted dry enough, creating a weak foundation. Second, you may have skipped the flour dredge, so the egg had nothing to adhere to. Third, you may not have pressed the Panko coating firmly enough onto the chicken. Be sure to follow the three-step breading process precisely and really press that final coating on to create a solid crust.
4. How do I store and reheat leftovers for the best results?
Store leftover chicken in an airtight container in the refrigerator for up to 3-4 days. The key to reheating is to restore the crispiness. The microwave will make the crust soggy, so it’s best to avoid it. The best methods are:
- Oven/Toaster Oven: Place the drumsticks on a wire rack and heat in a 375°F (190°C) oven for 10-15 minutes, or until warmed through.
- Air Fryer: Reheat at 375°F (190°C) for 4-6 minutes. This is the fastest way to get them tasting almost as crispy as when they were fresh.
5. Can I use this recipe with other cuts of chicken, like breasts or thighs?
Yes, this panko crust is delicious on any cut of chicken. You will just need to adjust the baking time.
- Boneless, Skinless Chicken Breasts (pounded to even thickness): Bake at 400°F (200°C) for 20-25 minutes.
- Boneless, Skinless Chicken Thighs: Bake at 400°F (200°C) for 25-30 minutes.
- Bone-in, Skin-on Chicken Thighs: Bake at 400°F (200°C) for 35-45 minutes.
Regardless of the cut, always cook to an internal temperature of 165°F (74°C).
Crispy Baked Chicken Drumsticks Recipe
Ingredients
- Chicken: 8 medium-sized chicken drumsticks (about 2.5 – 3 lbs / 1.2 – 1.4 kg), skin on
- For the Dredging Station:
- Flour Mixture:
- 1 cup all-purpose flour
- 1 teaspoon salt
- 1/2 teaspoon black pepper
- Egg Wash:
- 2 large eggs
- 1 tablespoon water or milk
- Panko Coating:
- 2 cups Panko breadcrumbs
- 1/3 cup grated Parmesan cheese (the kind in the shaker works great for this)
- 2 teaspoons smoked paprika (this adds amazing color and a subtle smoky flavor)
- 1 teaspoon garlic powder
- 1 teaspoon onion powder
- 1/2 teaspoon dried oregano or Italian seasoning
- 1/2 teaspoon salt
- 1/4 teaspoon black pepper
- Flour Mixture:
- For Finishing:
- 1/4 cup olive oil or melted butter (or use a cooking oil spray)
Instructions
Step 1: Prepare Your Oven and Baking Sheet
Preheat your oven to 400°F (200°C). Proper temperature is crucial for a crispy crust. Place a wire cooling rack inside a large, rimmed baking sheet. This is a non-negotiable step! Elevating the chicken on a rack allows hot air to circulate all around the drumsticks, crisping up the bottom and preventing it from becoming soggy. If you don’t have a rack, the bottom will steam in the chicken’s own juices.
Step 2: Pat the Chicken Dry
Using paper towels, thoroughly pat each chicken drumstick completely dry. Moisture is the enemy of a crispy crust. A dry surface helps the flour, and subsequently the entire coating, adhere properly to the skin.
Step 3: Set Up Your Breading Station
This organized setup makes the process smooth and less messy. You’ll need three shallow dishes or pie plates.
- Dish 1 (Flour): In the first dish, whisk together the 1 cup of all-purpose flour, 1 teaspoon of salt, and 1/2 teaspoon of black pepper.
- Dish 2 (Egg): In the second dish, whisk the 2 eggs with 1 tablespoon of water or milk until smooth and uniform.
- Dish 3 (Panko): In the third dish, combine the 2 cups of Panko breadcrumbs, 1/3 cup of grated Parmesan cheese, 2 teaspoons of smoked paprika, 1 teaspoon of garlic powder, 1 teaspoon of onion powder, 1/2 teaspoon of dried oregano, 1/2 teaspoon of salt, and 1/4 teaspoon of black pepper. Mix thoroughly with a fork to ensure the seasonings and cheese are evenly distributed throughout the breadcrumbs.
Step 4: The Breading Process (Dredge, Dip, Coat)
Work with one drumstick at a time. A great tip to keep your hands clean is to use one hand for the dry ingredients (flour, panko) and the other hand for the wet ingredient (egg).
- Dredge in Flour: Take a dry drumstick and dredge it in the flour mixture, shaking off any excess. The goal is a very thin, even coating that will help the egg wash stick.
- Dip in Egg: Transfer the floured drumstick to the egg wash. Turn it to coat completely, letting any excess egg drip back into the dish.
- Coat in Panko: Immediately place the egg-coated drumstick into the panko mixture. Press the panko firmly onto the chicken on all sides to ensure a thick, even crust. Don’t be shy here; you want that coating to be robust.
Step 5: Arrange and Bake
Place the fully coated drumstick on the prepared wire rack on your baking sheet. Repeat the breading process for the remaining drumsticks, making sure to leave a little space between each one on the rack. Crowding the pan will cause the chicken to steam instead of bake, resulting in a less crispy finish.
Drizzle the 1/4 cup of olive oil or melted butter evenly over the tops of the drumsticks. Alternatively, give them a generous coating with cooking oil spray. This fat is essential for helping the panko “fry” in the oven, turning it golden-brown and delicious.
Bake in the preheated 400°F (200°C) oven for 40-50 minutes. You can flip the drumsticks halfway through if you wish, but if you’re using a wire rack, it’s often not necessary. The chicken is done when the crust is a deep golden brown and an instant-read meat thermometer inserted into the thickest part of the drumstick (without touching the bone) registers 165°F (74°C).
Step 6: Rest and Serve
Remove the baking sheet from the oven and let the chicken rest on the wire rack for 5-10 minutes before serving. This allows the juices to redistribute throughout the meat, ensuring a tender, juicy bite.
Nutrition
- Serving Size: One Normal Portion
- Calories: 460 kcal