

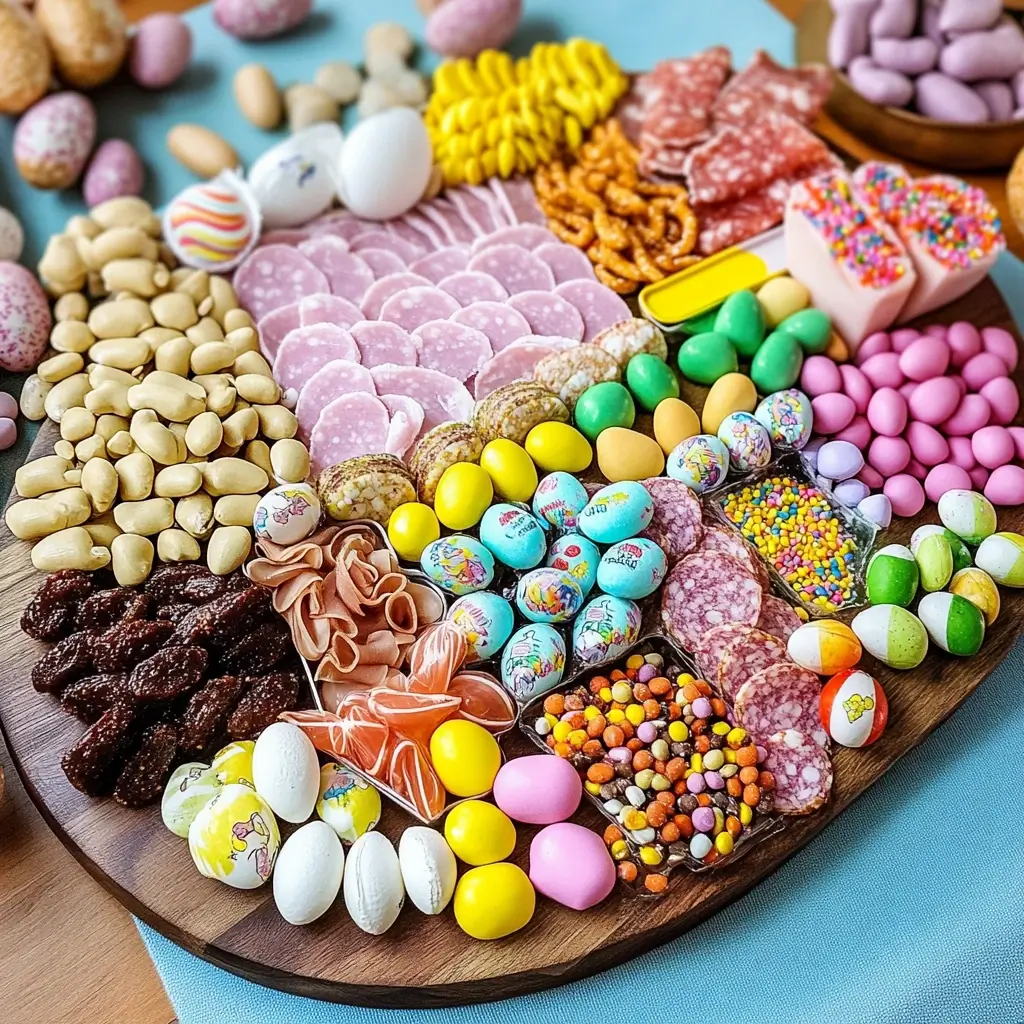

It’s become a tradition in our household – Easter Sunday isn’t truly Easter without the grand unveiling of the Easter Candy Charcuterie Board. Forget the formal cheese and crackers, this is a vibrant, sugar-fueled explosion of springtime joy that captivates kids and adults alike. The squeals of delight as the little ones spot their favorite treats amongst the rainbow of candies are priceless. Even the grown-ups, initially skeptical, find themselves drawn to the playful arrangement, sneaking a Peep here, a chocolate egg there. It’s not just a dessert; it’s an experience, a centerpiece that sparks conversation and creates lasting Easter memories. This year, the board was bigger and better than ever, a testament to the endless possibilities and pure fun of crafting your own candy masterpiece. If you’re looking for a way to elevate your Easter celebration and bring a burst of color and sweetness to your table, look no further. This Easter Candy Charcuterie Board is guaranteed to be the highlight of your holiday feast.
Ingredients
Creating an Easter Candy Charcuterie Board is wonderfully flexible – the beauty lies in the variety and visual appeal. Feel free to adapt this list to your family’s favorites and what you find readily available in stores. Think textures, colors, and shapes to make your board truly captivating!
Chocolate Delights:
- Chocolate Easter Bunnies (Various Sizes): From large centerpiece bunnies to miniature ones scattered throughout, these are iconic Easter figures and provide a solid chocolate anchor. Consider milk chocolate, dark chocolate, and white chocolate varieties for visual and flavor diversity.
- Chocolate Easter Eggs (Solid & Filled): A must-have! Include a mix of solid chocolate eggs, cream-filled eggs, caramel-filled eggs, and even mini chocolate eggs like Cadbury Mini Eggs. The different fillings add surprise and texture.
- Chocolate Covered Pretzels (Easter Themed): These offer a delightful salty-sweet contrast and can be found in festive pastel coatings or drizzled with chocolate and sprinkles.
- Chocolate Truffles (Easter Colors or Flavors): Consider pastel-colored truffles or those with Easter flavors like carrot cake or coconut. These add a touch of elegance and richness.
- Chocolate Bark (Easter Sprinkled): Homemade or store-bought chocolate bark, especially dark chocolate bark sprinkled with pastel candies or Easter-themed sprinkles, provides a satisfying crunch and visual appeal.
- Chocolate Dipped Strawberries (Optional): For a slightly healthier and more sophisticated touch, chocolate-dipped strawberries with pastel drizzles or sprinkles can be a beautiful addition.
Marshmallow Magic:
- Peeps Marshmallow Chicks & Bunnies (Various Colors): The quintessential Easter marshmallow treat! Choose a rainbow of colors and even different flavors like cotton candy or fruit punch for extra fun.
- Marshmallow Eggs (Plain & Flavored): Large marshmallow eggs or mini marshmallow eggs offer a different texture than Peeps and can be found in vanilla, strawberry, and other flavors.
- Marshmallow Twists or Ropes (Pastel Colors): These add height and a playful, whimsical element to the board. Look for pastel pink, blue, yellow, and green twists.
- Mini Marshmallows (White & Colored): Use these to fill small gaps or add a soft, fluffy texture to bowls and containers on the board.
Jelly Bean Jamboree:
- Jelly Beans (Classic & Gourmet): A vibrant mix of colors and flavors is key! Include classic jelly beans, gourmet jelly beans with more sophisticated flavors, and even sour jelly beans for those who prefer a tangy touch.
- Starburst Jelly Beans (Fruity Flavors): These are a popular choice for their intense fruit flavors and softer texture compared to traditional jelly beans.
- Jelly Bean Eggs (Egg-Shaped Jelly Beans): These add an extra Easter touch and can be found in various flavors and colors.
Gummy Goodness:
- Gummy Bunnies & Chicks (Easter Shapes): Look for gummy candies shaped like bunnies, chicks, and other Easter symbols in a variety of fruity flavors and vibrant colors.
- Gummy Eggs (Egg-Shaped Gummies): Similar to jelly bean eggs, gummy eggs offer a different texture and chewiness and come in various fruit flavors.
- Gummy Worms (Pastel Colors): Pastel gummy worms add a playful, wiggly element and a chewy texture. Consider pink, blue, green, and yellow worms.
- Gummy Bears (Fruit Flavored & Easter Colors): Classic gummy bears are always a hit, and you can find Easter-themed colors or fruit flavors that complement the board.
Chewy & Crunchy Candies:
- Cadbury Mini Eggs (Chocolate with Candy Shell): These are a quintessential Easter treat with their crunchy candy shell and creamy chocolate center.
- Whoppers Robin Eggs (Malted Milk Balls with Candy Shell): Similar to Cadbury Mini Eggs but with a malted milk ball center, these add another textural dimension.
- M&M’s (Easter Colors or Pastel Mix): Use Easter-themed M&M’s in pastel colors or a mix of pastel shades for a vibrant pop of color.
- Skittles (Original & Sour): Skittles offer a chewy texture and a burst of fruity flavors. Include both original and sour Skittles for variety.
- Licorice (Pastel Colors or Easter Shapes): Pastel-colored licorice twists or licorice shaped like bunnies or eggs can add a unique flavor and texture.
Lollipops & Hard Candies:
- Easter Themed Lollipops (Bunny, Chick, Egg Shapes): These add height and visual interest, especially when placed in vases or small containers on the board.
- Hard Candy Eggs or Chicks: Small hard candies shaped like eggs or chicks in pastel colors can be used as fillers or accents on the board.
- Rock Candy Sticks (Pastel Colors): Rock candy sticks in pastel colors add a sugary crunch and a touch of elegance.
Optional Additions & Garnishes:
- Sprinkles (Easter Themed & Pastel Colors): Use sprinkles to decorate chocolate-covered pretzels, strawberries, or even sprinkle directly onto the board for extra sparkle.
- Edible Easter Grass (Green or Pastel Colors): Use edible Easter grass as a base layer or to fill in gaps and add a festive touch.
- Candy Melts (Pastel Colors): Melted candy melts can be used to drizzle over pretzels, cookies, or fruit for added decoration and sweetness.
- Pretzel Rods (Chocolate Dipped & Sprinkled): Long pretzel rods dipped in chocolate and decorated with Easter sprinkles add height and a salty-sweet element.
- Cookies (Easter Shaped Sugar Cookies or Shortbread): Include Easter-shaped sugar cookies or shortbread cookies for a more substantial treat and to break up the pure candy.
Containers & Board:
- Large Charcuterie Board or Platter: Choose a board that is large enough to accommodate all your candies. Wooden boards, marble platters, or even large serving trays work well.
- Small Bowls, Ramekins, or Egg Cups: These are essential for containing smaller candies like jelly beans, M&M’s, and mini marshmallows and adding visual levels to the board.
- Small Vases or Jars (Optional): Use these to display lollipops or pretzel rods upright and add height to the board.
- Serving Spoons or Tongs: Provide serving spoons or tongs for easy and hygienic candy selection.
Instructions
Assembling an Easter Candy Charcuterie Board is more about artistic arrangement than complex cooking. Think of it as creating a candy landscape, focusing on visual appeal, variety, and easy access to all the delicious treats.
Step 1: Gather Your Supplies & Prep Your Space
- Clear a large workspace: You’ll need ample room to lay out all your candies and arrange your board.
- Wash and dry your charcuterie board and containers: Ensure everything is clean and ready for your sweet creations.
- Unwrap candies (if necessary): While some candies look great in their wrappers, consider unwrapping some to showcase their colors and textures better. This is especially helpful for individually wrapped chocolates.
Step 2: Plan Your Layout (Optional but Recommended)
- Visualize your board: Before placing any candies, take a moment to envision how you want your board to look. Consider the color balance, shapes, and textures.
- Strategic Placement: Think about placing larger items first, like chocolate bunnies and larger containers of candies, as anchors. Then, fill in with smaller items.
- Color Grouping (or Mixing): Decide if you want to group candies by color for a rainbow effect or mix colors for a more playful, eclectic look. Both can be visually stunning!
- Consider Height and Dimension: Use bowls, ramekins, and small vases to create different heights and levels on your board. This adds visual interest and makes it easier to see all the candies.
Step 3: Place Larger Anchor Items
- Centerpiece Candy: If using a large chocolate bunny or a focal point candy, place it slightly off-center to create visual interest.
- Bowls and Containers First: Arrange your bowls, ramekins, and any larger containers on the board. Distribute them somewhat evenly, leaving space between them for direct candy placement.
Step 4: Fill Bowls and Containers
- Categorize Candies: Fill your bowls and containers with different types of candies. Consider placing similar candies together in bowls (e.g., jelly beans in one bowl, M&M’s in another).
- Color Coordination: Use bowls to create color blocks or contrasting color combinations to enhance the visual appeal.
- Vary Textures: Mix different textures in bowls. For example, combine smooth jelly beans with crunchy Cadbury Mini Eggs in separate containers.
Step 5: Arrange Candies Directly on the Board
- Fill in the Gaps: Start filling in the spaces between bowls and containers directly on the board.
- Layer Candies: Layer different types of candies to create depth and visual interest. For example, place a layer of chocolate eggs and then top with Peeps.
- Create Flow and Movement: Arrange candies in curves, lines, or radiating patterns to guide the eye across the board.
- Use Different Shapes and Sizes: Mix large and small candies, round and elongated candies to create visual variety and texture.
- Consider Color Balance: Distribute colors evenly across the board to create a balanced and harmonious look. Avoid clumping too many of the same color together.
Step 6: Add Finishing Touches and Garnishes
- Sprinkles and Edible Grass: Sprinkle edible Easter grass around the board to fill in any remaining gaps and add a festive touch. Lightly sprinkle Easter-themed sprinkles over certain areas for extra sparkle.
- Lollipops and Pretzel Rods: If using lollipops or pretzel rods, place them in small vases or jars strategically around the board to add height and vertical elements.
- Final Adjustments: Step back and look at your board from different angles. Make any final adjustments to ensure it looks balanced, visually appealing, and inviting.
Step 7: Serve and Enjoy!
- Place Serving Utensils: Add serving spoons or tongs near the board for easy and hygienic candy selection.
- Present Your Masterpiece: Place your Easter Candy Charcuterie Board as a centerpiece on your Easter table or dessert buffet and watch the delighted reactions!
Nutrition Facts
Please note: Nutritional information for a candy charcuterie board is highly variable depending on the specific candies chosen. This is an approximate estimate and should be considered a general guideline only. Candy is generally high in sugar and calories and should be enjoyed in moderation.
Servings: Approximately 12-15 servings (depending on portion sizes and board size).
Calories Per Serving (Estimated): 400-600 calories per serving (This is a broad range. A smaller serving with primarily jelly beans and marshmallows will be lower in calories than a serving heavy on chocolate and filled candies).
Approximate Nutritional Breakdown (Per Serving – Estimated):
- Calories: 400-600 kcal
- Total Fat: 15-30g (depending on chocolate content)
- Saturated Fat: 10-20g (depending on chocolate content)
- Cholesterol: 10-30mg (trace amounts)
- Sodium: 50-150mg (depending on pretzels and some candies)
- Total Carbohydrate: 60-90g
- Dietary Fiber: 1-3g (minimal)
- Sugars: 50-80g (primarily from added sugars)
- Protein: 2-5g (minimal)
Important Considerations:
- Sugar Content: Candy is primarily sugar. This board is intended as an occasional treat and should be consumed in moderation as part of a balanced diet.
- Portion Control: Encourage smaller portion sizes to manage sugar and calorie intake.
- Variety: While candy is the focus, including a few healthier elements like chocolate-dipped strawberries or fruit skewers (not listed in the core recipe but could be added) can slightly balance the nutritional profile.
- Dietary Restrictions: Be mindful of any dietary restrictions or allergies among your guests. Offer sugar-free, gluten-free, or nut-free candy options if needed and label them clearly.
Preparation Time
Total Time: Approximately 30-45 minutes
- Shopping for Ingredients: 15-20 minutes (depending on your local store and candy availability. Ordering online can save time but requires advance planning).
- Unwrapping Candies and Prep: 10-15 minutes (Unwrapping individually wrapped candies, gathering containers, and prepping your workspace).
- Assembling the Board: 15-20 minutes (Arranging candies on the board, creating the visual layout).
Make-Ahead Tips:
- Candy Shopping: Purchase your candies 1-2 days in advance to avoid last-minute rushes.
- Unwrapping: Unwrap individually wrapped candies the day before and store them in airtight containers.
- Containers: Prepare your bowls and containers the day before so they are ready to use.
- Board Assembly: Assemble the board a few hours before serving. Keep it in a cool, dry place away from direct sunlight or heat to prevent chocolate from melting. If storing for longer than a couple of hours, consider covering loosely with plastic wrap.
How to Serve
The Easter Candy Charcuterie Board is designed to be a visually stunning and interactive centerpiece. Here are some serving suggestions to maximize its impact and enjoyment:
- As a Dessert Centerpiece:
- Place the board prominently on your dessert table or Easter buffet.
- Make it the focal point of your Easter celebration’s sweet treats.
- Surround it with complementary desserts like Easter cupcakes, cookies, or a carrot cake for a truly decadent spread.
- During Easter Brunch or Dinner:
- Serve it after your main Easter meal as a delightful and playful dessert option.
- It’s a great way to transition from a savory meal to a sweet and festive conclusion.
- The visual appeal and variety will keep guests entertained and satisfied after the main course.
- As a Fun Activity for Kids (and Adults!):
- Make assembling the board a family activity! Let kids help choose candies and arrange them (with adult supervision, of course).
- It’s a creative and engaging activity that builds anticipation for enjoying the sweet treats.
- Turn it into a “candy art” project – let everyone contribute to the design.
- For Easter Parties and Gatherings:
- It’s the perfect shareable dessert for Easter parties, egg hunts, or family gatherings.
- It caters to a wide range of tastes and preferences, ensuring there’s something for everyone.
- It’s a conversation starter and a visually impressive element for any festive occasion.
- As a Gift or Hostess Present:
- Create a smaller, more curated candy board as a unique and thoughtful Easter gift for friends, family, or your Easter brunch host.
- Arrange candies on a smaller platter or even in a decorative Easter basket.
- Wrap it attractively with cellophane and a ribbon for a charming and delicious present.
Serving Utensils & Presentation:
- Serving Spoons and Tongs: Provide small serving spoons, tongs, or even candy scoops to make it easy and hygienic for guests to select their treats.
- Small Plates or Napkins: Have small dessert plates or festive Easter-themed napkins readily available for guests to enjoy their candy selections.
- Drink Pairings (Optional):
- Milk: Classic and kid-friendly pairing.
- Sparkling Cider or Juice: Adds a touch of festivity.
- Coffee or Tea: For adults who prefer a less sugary beverage.
- Prosecco or Sparkling Wine (Adults): For a more celebratory and sophisticated pairing (consider drier sparkling wines to balance the sweetness).
Additional Tips for Easter Candy Charcuterie Board Success
- Variety is Key: Don’t be afraid to mix and match different types of candies – chocolates, marshmallows, gummies, jellies, hard candies, chewy candies, crunchy candies. Variety in texture, flavor, and color is what makes the board exciting and appealing. Aim for a rainbow of colors and a range of shapes and sizes.
- Consider Dietary Needs: Be mindful of any dietary restrictions or allergies among your guests. Offer a few options that cater to different needs. For example:
- Sugar-Free Candies: Include a small selection of sugar-free candies for those watching their sugar intake.
- Gluten-Free Candies: Many candies are naturally gluten-free, but always double-check labels. Clearly label gluten-free options if you include them.
- Nut-Free Candies: Be cautious about nut allergies. Choose candies that are labeled as nut-free and avoid candies that may have been processed in facilities that also handle nuts if serving to someone with a severe allergy.
- Don’t Overcrowd the Board (Initially): Start with a slightly less crowded board and have extra candies on hand to refill as needed. This prevents it from looking overwhelming initially and allows you to replenish specific favorites as they disappear. It also makes it easier to manage the candies and keep the board looking neat throughout your event.
- Think About Height and Dimension: Use bowls, ramekins, small vases, or even tiered serving stands to create different levels and visual interest. Elevating some candies makes the board more dynamic and ensures that all the treats are visible and accessible. Place taller items towards the back or center to create a backdrop for the lower-profile candies.
- Store Properly (If Making Ahead): If you need to assemble the board in advance, store it properly to maintain freshness and prevent melting, especially for chocolate candies:
- Cool, Dry Place: Store the board in a cool, dry place away from direct sunlight and heat.
- Avoid Refrigeration (Generally): Refrigeration can sometimes cause chocolate to bloom (develop a white coating) and can make some candies sticky. Unless your room is excessively warm, avoid refrigerating.
- Loose Covering: If you need to cover the board, use plastic wrap loosely, avoiding direct contact with the candies to prevent sticking or condensation. Ideally, store it uncovered in a cool room until serving time.
FAQ – Frequently Asked Questions About Easter Candy Charcuterie Boards
Q1: Can I make this Easter Candy Charcuterie Board ahead of time?
A: Yes, you can prepare parts of it ahead of time. You can purchase and unwrap candies 1-2 days in advance. Assembling the board itself is best done a few hours before serving to maintain freshness, especially for chocolate. If assembling ahead, store it in a cool, dry place away from direct sunlight. Avoid refrigeration unless absolutely necessary due to heat, and if so, cover loosely with plastic wrap.
Q2: What kind of board should I use for my candy charcuterie?
A: You can use a variety of boards! Large wooden charcuterie boards, marble platters, large serving trays (round, rectangular, or even oval), or even tiered serving stands all work well. Choose a size that suits the amount of candy you want to display and the number of guests you are serving. Consider the aesthetic you want to achieve – wood offers a rustic look, while marble is more elegant.
Q3: Can I customize the candy selection based on my family’s preferences?
A: Absolutely! Customization is the beauty of a candy charcuterie board. Tailor the candy selection to your family’s favorite treats. If you know they love gummy candies, include more gummy varieties. If they are chocolate fanatics, focus on different types of chocolate candies. You can also incorporate specific Easter-themed candies that are family favorites or try new and exciting Easter treats each year.
Q4: How do I prevent the candies from getting mixed together on the board?
A: Using small bowls, ramekins, and containers is key to keeping candies organized and separated. Place smaller candies like jelly beans and M&M’s in bowls. Arrange larger candies directly on the board around the bowls. Encourage guests to use serving spoons or tongs to select candies, which helps minimize mixing. While some mixing is inevitable as people enjoy the board, the initial arrangement will be maintained for a good portion of your event.
Q5: What’s the best way to store leftover candy from the charcuterie board?
A: Store leftover candies in airtight containers or resealable bags at room temperature. Separate different types of candy if possible (chocolate from gummies, for example) to maintain their individual textures and flavors. Most candies will last for several weeks or even months if stored properly. Hard candies and chocolates generally keep well, while softer candies like marshmallows and gummies may become slightly chewier over time but are still safe to eat. Avoid storing in humid environments, as moisture can affect the texture and quality of the candies.
Print
Easter Candy Charcuterie Board Recipe
Ingredients
Chocolate Delights:
- Chocolate Easter Bunnies (Various Sizes): From large centerpiece bunnies to miniature ones scattered throughout, these are iconic Easter figures and provide a solid chocolate anchor. Consider milk chocolate, dark chocolate, and white chocolate varieties for visual and flavor diversity.
- Chocolate Easter Eggs (Solid & Filled): A must-have! Include a mix of solid chocolate eggs, cream-filled eggs, caramel-filled eggs, and even mini chocolate eggs like Cadbury Mini Eggs. The different fillings add surprise and texture.
- Chocolate Covered Pretzels (Easter Themed): These offer a delightful salty-sweet contrast and can be found in festive pastel coatings or drizzled with chocolate and sprinkles.
- Chocolate Truffles (Easter Colors or Flavors): Consider pastel-colored truffles or those with Easter flavors like carrot cake or coconut. These add a touch of elegance and richness.
- Chocolate Bark (Easter Sprinkled): Homemade or store-bought chocolate bark, especially dark chocolate bark sprinkled with pastel candies or Easter-themed sprinkles, provides a satisfying crunch and visual appeal.
- Chocolate Dipped Strawberries (Optional): For a slightly healthier and more sophisticated touch, chocolate-dipped strawberries with pastel drizzles or sprinkles can be a beautiful addition.
Marshmallow Magic:
- Peeps Marshmallow Chicks & Bunnies (Various Colors): The quintessential Easter marshmallow treat! Choose a rainbow of colors and even different flavors like cotton candy or fruit punch for extra fun.
- Marshmallow Eggs (Plain & Flavored): Large marshmallow eggs or mini marshmallow eggs offer a different texture than Peeps and can be found in vanilla, strawberry, and other flavors.
- Marshmallow Twists or Ropes (Pastel Colors): These add height and a playful, whimsical element to the board. Look for pastel pink, blue, yellow, and green twists.
- Mini Marshmallows (White & Colored): Use these to fill small gaps or add a soft, fluffy texture to bowls and containers on the board.
Jelly Bean Jamboree:
- Jelly Beans (Classic & Gourmet): A vibrant mix of colors and flavors is key! Include classic jelly beans, gourmet jelly beans with more sophisticated flavors, and even sour jelly beans for those who prefer a tangy touch.
- Starburst Jelly Beans (Fruity Flavors): These are a popular choice for their intense fruit flavors and softer texture compared to traditional jelly beans.
- Jelly Bean Eggs (Egg-Shaped Jelly Beans): These add an extra Easter touch and can be found in various flavors and colors.
Gummy Goodness:
- Gummy Bunnies & Chicks (Easter Shapes): Look for gummy candies shaped like bunnies, chicks, and other Easter symbols in a variety of fruity flavors and vibrant colors.
- Gummy Eggs (Egg-Shaped Gummies): Similar to jelly bean eggs, gummy eggs offer a different texture and chewiness and come in various fruit flavors.
- Gummy Worms (Pastel Colors): Pastel gummy worms add a playful, wiggly element and a chewy texture. Consider pink, blue, green, and yellow worms.
- Gummy Bears (Fruit Flavored & Easter Colors): Classic gummy bears are always a hit, and you can find Easter-themed colors or fruit flavors that complement the board.
Chewy & Crunchy Candies:
- Cadbury Mini Eggs (Chocolate with Candy Shell): These are a quintessential Easter treat with their crunchy candy shell and creamy chocolate center.
- Whoppers Robin Eggs (Malted Milk Balls with Candy Shell): Similar to Cadbury Mini Eggs but with a malted milk ball center, these add another textural dimension.
- M&M’s (Easter Colors or Pastel Mix): Use Easter-themed M&M’s in pastel colors or a mix of pastel shades for a vibrant pop of color.
- Skittles (Original & Sour): Skittles offer a chewy texture and a burst of fruity flavors. Include both original and sour Skittles for variety.
- Licorice (Pastel Colors or Easter Shapes): Pastel-colored licorice twists or licorice shaped like bunnies or eggs can add a unique flavor and texture.
Lollipops & Hard Candies:
- Easter Themed Lollipops (Bunny, Chick, Egg Shapes): These add height and visual interest, especially when placed in vases or small containers on the board.
- Hard Candy Eggs or Chicks: Small hard candies shaped like eggs or chicks in pastel colors can be used as fillers or accents on the board.
- Rock Candy Sticks (Pastel Colors): Rock candy sticks in pastel colors add a sugary crunch and a touch of elegance.
Instructions
Step 1: Gather Your Supplies & Prep Your Space
- Clear a large workspace: You’ll need ample room to lay out all your candies and arrange your board.
- Wash and dry your charcuterie board and containers: Ensure everything is clean and ready for your sweet creations.
- Unwrap candies (if necessary): While some candies look great in their wrappers, consider unwrapping some to showcase their colors and textures better. This is especially helpful for individually wrapped chocolates.
Step 2: Plan Your Layout (Optional but Recommended)
- Visualize your board: Before placing any candies, take a moment to envision how you want your board to look. Consider the color balance, shapes, and textures.
- Strategic Placement: Think about placing larger items first, like chocolate bunnies and larger containers of candies, as anchors. Then, fill in with smaller items.
- Color Grouping (or Mixing): Decide if you want to group candies by color for a rainbow effect or mix colors for a more playful, eclectic look. Both can be visually stunning!
- Consider Height and Dimension: Use bowls, ramekins, and small vases to create different heights and levels on your board. This adds visual interest and makes it easier to see all the candies.
Step 3: Place Larger Anchor Items
- Centerpiece Candy: If using a large chocolate bunny or a focal point candy, place it slightly off-center to create visual interest.
- Bowls and Containers First: Arrange your bowls, ramekins, and any larger containers on the board. Distribute them somewhat evenly, leaving space between them for direct candy placement.
Step 4: Fill Bowls and Containers
- Categorize Candies: Fill your bowls and containers with different types of candies. Consider placing similar candies together in bowls (e.g., jelly beans in one bowl, M&M’s in another).
- Color Coordination: Use bowls to create color blocks or contrasting color combinations to enhance the visual appeal.
- Vary Textures: Mix different textures in bowls. For example, combine smooth jelly beans with crunchy Cadbury Mini Eggs in separate containers.
Step 5: Arrange Candies Directly on the Board
- Fill in the Gaps: Start filling in the spaces between bowls and containers directly on the board.
- Layer Candies: Layer different types of candies to create depth and visual interest. For example, place a layer of chocolate eggs and then top with Peeps.
- Create Flow and Movement: Arrange candies in curves, lines, or radiating patterns to guide the eye across the board.
- Use Different Shapes and Sizes: Mix large and small candies, round and elongated candies to create visual variety and texture.
- Consider Color Balance: Distribute colors evenly across the board to create a balanced and harmonious look. Avoid clumping too many of the same color together.
Step 6: Add Finishing Touches and Garnishes
- Sprinkles and Edible Grass: Sprinkle edible Easter grass around the board to fill in any remaining gaps and add a festive touch. Lightly sprinkle Easter-themed sprinkles over certain areas for extra sparkle.
- Lollipops and Pretzel Rods: If using lollipops or pretzel rods, place them in small vases or jars strategically around the board to add height and vertical elements.
- Final Adjustments: Step back and look at your board from different angles. Make any final adjustments to ensure it looks balanced, visually appealing, and inviting.
Step 7: Serve and Enjoy!
- Place Serving Utensils: Add serving spoons or tongs near the board for easy and hygienic candy selection.
- Present Your Masterpiece: Place your Easter Candy Charcuterie Board as a centerpiece on your Easter table or dessert buffet and watch the delighted reactions!
Nutrition
- Serving Size: one normal portion
- Calories: 400-600
- Sugar: 50-80g
- Sodium: 50-150mg
- Fat: 15-30g
- Saturated Fat: 10-20g
- Carbohydrates: 60-90g
- Fiber: 1-3g
- Protein: 2-5g
- Cholesterol: 10-30mg


