


It’s become a tradition in our family now – Easter Sunday just isn’t Easter Sunday without the Easter Egg Cheese Ball making its grand appearance on the appetizer table. The first time I made it, I was looking for something festive and easy to bring to our family gathering. Honestly, I wasn’t expecting it to be this popular. From the moment I unveiled it, shaped like a giant, beautifully decorated Easter egg, it was a hit. Kids were fascinated, adults were intrigued, and everyone was reaching for crackers to scoop up a taste. The creamy, savory cheese mixture, studded with colorful bits and coated in crunchy nuts, was an absolute delight. It vanished in record time, with everyone asking for the recipe. Since then, it’s become a staple, and I’ve tweaked it over the years to perfection. It’s not just delicious; it’s a centerpiece that sparks conversation and brings a touch of whimsy to our Easter celebrations. If you’re looking for a show-stopping appetizer that’s surprisingly simple to make and guaranteed to impress, look no further than this Easter Egg Cheese Ball. Trust me, it’ll become a beloved tradition for your family too.
Ingredients for the Perfect Easter Egg Cheese Ball
Creating the perfect Easter Egg Cheese Ball starts with selecting high-quality ingredients. Each component plays a crucial role in the flavor, texture, and overall appeal of this festive appetizer. Let’s delve into each ingredient and understand why it’s essential for a truly exceptional cheese ball.
Cream Cheese: The Foundation of Creaminess
- Quantity: 2 (8-ounce) packages, full-fat cream cheese
- Importance: Cream cheese is the very base of our cheese ball, providing that signature creamy and tangy foundation. Opting for full-fat cream cheese is crucial for achieving the best texture and richest flavor. Reduced-fat versions can be used, but they might result in a slightly less creamy and potentially drier cheese ball.
- Preparation: It’s absolutely vital that your cream cheese is softened to room temperature before you begin. This is non-negotiable for a smooth, lump-free cheese ball. If the cream cheese is cold, it will be difficult to blend with the other ingredients, leading to clumps and an uneven texture. Take the cream cheese out of the refrigerator at least an hour before you plan to start making the cheese ball, or even a couple of hours in warmer environments. You can gently speed up the process by cutting the cream cheese into smaller cubes, but natural softening is always best.
Shredded Cheese: Adding Depth and Flavor
- Quantity: 2 cups, shredded cheddar cheese (sharp or medium)
- Importance: Cheddar cheese brings a savory depth and sharpness that perfectly complements the cream cheese’s tanginess. You have flexibility here – sharp cheddar will provide a more pronounced cheesy bite, while medium cheddar offers a milder, more balanced flavor. Consider your preference and the overall flavor profile you want to achieve.
- Variety: While cheddar is classic, you can experiment with other cheeses to customize your cheese ball. Monterey Jack adds a creamy, mild flavor and melts beautifully if you were to slightly warm the cheese ball (though not recommended for this recipe). Pepper Jack can introduce a subtle spicy kick. For a richer, nuttier flavor, consider Gruyere or even a smoked Gouda. Mixing different types of shredded cheese can create a more complex and interesting flavor profile. However, for a classic Easter Egg Cheese Ball, cheddar is a reliable and delicious choice.
- Freshly Shredded vs. Pre-Shredded: Freshly shredded cheese is always recommended for its superior flavor and melting quality (though melting isn’t a factor in this recipe, the flavor is). Pre-shredded cheese often contains cellulose to prevent clumping, which can sometimes affect the texture and flavor. If you have the time, shredding your own cheese will elevate the overall quality of your cheese ball.
Chopped Ham or Cooked Bacon: Savory Umami
- Quantity: 1 cup, finely diced cooked ham or crispy cooked bacon
- Importance: This ingredient injects a savory, umami-rich element into the cheese ball. Ham provides a slightly salty and meaty flavor, while bacon adds a smoky, crispy dimension. Both options are fantastic and cater to different taste preferences.
- Preparation: If using ham, choose a good quality cooked ham and dice it finely. For bacon, cook it until crispy, drain off the excess grease, and then crumble or finely chop it. Ensure both are cooled completely before adding them to the cheese mixture, as warm ingredients can soften the cream cheese and affect the cheese ball’s consistency.
- Vegetarian Alternatives: For a vegetarian version, consider using finely chopped sun-dried tomatoes, roasted red peppers, or even sautéed mushrooms to provide that savory depth. Finely diced black olives or artichoke hearts can also add interesting flavor and texture.
Green Onions: Freshness and Zesty Bite
- Quantity: ½ cup, finely chopped green onions (scallions)
- Importance: Green onions bring a fresh, mild oniony flavor and a vibrant green color that adds visual appeal and a zesty bite to the cheese ball. They cut through the richness of the cheese and ham/bacon, providing a welcome contrast.
- Preparation: Use both the white and green parts of the green onions for a fuller flavor. Wash them thoroughly and chop them finely. If you prefer a milder onion flavor, you can soak the chopped green onions in cold water for a few minutes, then drain and pat them dry before adding them to the cheese mixture.
- Substitutions: If you don’t have green onions, you can substitute with finely minced chives or a very small amount of finely minced red onion (red onion will have a stronger flavor, so use sparingly). Fresh parsley or cilantro can also add a touch of freshness, but they won’t provide the same oniony bite.
Worcestershire Sauce: Umami Booster
- Quantity: 1 tablespoon, Worcestershire sauce
- Importance: Worcestershire sauce is a secret ingredient that adds a complex umami flavor to the cheese ball without being overpowering. It enhances the savory notes of the cheese and ham/bacon, creating a more well-rounded and flavorful appetizer.
- Flavor Profile: Worcestershire sauce is a fermented condiment with a tangy, savory, and slightly sweet flavor profile. It’s made with a blend of vinegar, molasses, tamarind, anchovies, and other seasonings. Even if you don’t typically use Worcestershire sauce, don’t skip it in this recipe – it makes a noticeable difference.
- Alternatives: If you don’t have Worcestershire sauce, a very small dash of soy sauce or tamari can provide a similar umami boost, but use it sparingly as it’s saltier. A tiny drop of fish sauce (if you’re not vegetarian) can also work, but again, use with caution due to its strong flavor.
Garlic Powder: Aromatic Depth
- Quantity: 1 teaspoon, garlic powder
- Importance: Garlic powder adds a subtle but essential aromatic depth to the cheese ball. It enhances the savory flavors and complements the other ingredients beautifully. Garlic powder is preferred over fresh garlic in this recipe because it disperses evenly throughout the cheese mixture and avoids any harsh garlic flavor.
- Fresh Garlic vs. Garlic Powder: While fresh garlic can be tempting, it can be overpowering in a cheese ball and its raw flavor might not be as pleasant. Garlic powder provides a more mellow and consistent garlic flavor that blends seamlessly into the mixture.
- Variations: For a slightly different flavor profile, you can experiment with roasted garlic powder or smoked garlic powder. A pinch of onion powder can also be added to complement the garlic.
Optional Ingredients for the Coating (Enhancing Texture and Visual Appeal)
- Finely Chopped Nuts: (Pecans, almonds, walnuts, pistachios) – for crunch and nutty flavor. Pecans and almonds are classic choices. Pistachios add a beautiful green color.
- Chopped Fresh Herbs: (Parsley, dill, chives) – for freshness and vibrant green color. Finely chopped parsley is a versatile and visually appealing option. Dill adds a fresh, slightly tangy flavor. Chives provide a mild oniony flavor and delicate green color.
- Finely Grated Carrots: (For color and subtle sweetness) – Adds a bright orange color and a hint of sweetness that can complement the savory flavors.
- Finely Chopped Red Bell Pepper: (For color and mild sweetness) – Adds a vibrant red color and a mild, slightly sweet flavor.
- Everything Bagel Seasoning: (For savory, crunchy, and flavorful coating) – Adds a complex savory flavor and satisfying crunch.
- Paprika: (Smoked or sweet, for color and subtle smoky or sweet notes) – Adds a beautiful reddish-orange color and a subtle smoky or sweet flavor depending on the type of paprika used.
- Colorful Sprinkles: (For a whimsical, Easter-themed decoration) – Adds a fun, festive, and colorful touch, especially appealing to children. Use sparingly and consider coordinating colors with your Easter theme.
Choosing your coating is a chance to get creative and tailor the cheese ball to your preferences and the overall Easter theme. A combination of textures and colors is often most appealing.
Step-by-Step Instructions for Making Your Easter Egg Cheese Ball
Now that we have our high-quality ingredients prepared, let’s move on to the step-by-step instructions for creating this delicious and festive Easter Egg Cheese Ball. Follow these instructions carefully for a foolproof recipe.
Step 1: Combine the Base Ingredients
- In a large mixing bowl, add the softened cream cheese, shredded cheddar cheese, diced ham or bacon, chopped green onions, Worcestershire sauce, and garlic powder.
- Using an electric mixer (hand mixer or stand mixer) or a sturdy spoon, beat all the ingredients together until they are thoroughly combined and smooth. If using a hand mixer, start on low speed to prevent ingredients from splattering and gradually increase to medium speed. If mixing by hand, ensure you work the mixture until it is completely smooth and there are no lumps of cream cheese remaining. This step is crucial for achieving the desired creamy texture.
- Taste and Adjust Seasoning: At this stage, taste the cheese mixture. You can adjust the seasoning to your preference. If you want a saltier cheese ball, add a pinch of salt (taste carefully as ham/bacon and cheddar cheese are already salty). If you prefer more garlic flavor, add a little more garlic powder. You can also add a pinch of black pepper if desired.
Step 2: Shape the Cheese Ball into an Egg
- Gather the Cheese Mixture: Once the cheese mixture is well combined and seasoned to your liking, gather it into a ball in the center of the mixing bowl.
- Prepare Plastic Wrap: Lay out a large sheet of plastic wrap on a clean surface. Make sure it’s large enough to completely encase the cheese ball.
- Shape into an Egg: Transfer the cheese mixture onto the plastic wrap. Using your hands (you can lightly dampen your hands with water to prevent sticking), gently shape the cheese ball into an egg shape. Imagine you are sculpting clay – start with a ball and then gently elongate one end to create the egg shape. Don’t worry about perfection at this stage; you can refine the shape further once it’s chilled.
- Wrap Tightly: Wrap the plastic wrap tightly around the egg-shaped cheese ball, ensuring there are no air pockets. Twist the ends of the plastic wrap to secure the shape. This tight wrapping is important for maintaining the egg shape during chilling.
Step 3: Chill the Cheese Ball
- Refrigerate: Place the wrapped cheese ball in the refrigerator.
- Chill Time: Chill for at least 2-3 hours, or preferably overnight. Chilling is essential for firming up the cheese ball, making it easier to handle and slice. The longer it chills, the firmer it will become. Overnight chilling is ideal as it allows the flavors to meld together beautifully.
Step 4: Prepare the Coating
- Choose Your Coating(s): While the cheese ball is chilling, prepare your chosen coating ingredients. If using nuts, chop them finely. If using fresh herbs, chop them finely. If using grated carrots or bell peppers, ensure they are finely grated or diced. If using multiple coatings, prepare each one separately in shallow bowls or plates.
- Set Up Coating Station: Once the cheese ball is chilled and firm, you’ll set up your coating station. Have your chosen coatings ready in shallow dishes. You’ll also need a clean plate or serving platter to place the finished cheese ball on.
Step 5: Coat and Decorate the Cheese Ball
- Unwrap the Cheese Ball: Carefully remove the chilled cheese ball from the plastic wrap.
- Refine Shape (Optional): At this stage, if you want to refine the egg shape further, you can gently reshape it with your hands. The chilled cheese ball will be firm and easy to work with.
- Apply Coating: Gently roll the cheese ball in your chosen coating(s). Press the coating ingredients lightly into the cheese ball to ensure they adhere well. You can coat the entire cheese ball in one coating, or you can create sections with different coatings for a more decorative effect.
- Decorate (Optional): This is where you can get creative and decorate your Easter Egg Cheese Ball to truly resemble an Easter egg.
- “Stripes” or “Patterns”: Use different coatings to create stripes, swirls, or other patterns on the cheese ball. For example, you could create stripes using chopped nuts and chopped herbs.
- “Sprinkles”: Use colorful sprinkles to add a whimsical and festive touch.
- “Vegetable Decorations”: Use thinly sliced vegetables like bell peppers, carrots, or cucumber to create floral or geometric designs.
- “Herb Accents”: Arrange small sprigs of fresh herbs like dill or parsley to resemble leaves or flowers.
- Chill Again (Briefly): After coating and decorating, you can chill the cheese ball for another 15-20 minutes to help the coating set and keep it firm before serving. This is optional but recommended, especially if you are preparing it in advance.
Step 6: Serve and Enjoy!
- Transfer to Serving Platter: Carefully transfer the decorated Easter Egg Cheese Ball to your serving platter.
- Arrange Accompaniments: Arrange crackers, vegetables, breadsticks, or other serving accompaniments around the cheese ball on the platter.
- Serve Chilled: Serve the Easter Egg Cheese Ball chilled. It’s best enjoyed within a few hours of being coated for optimal freshness and texture.
Nutrition Facts (Estimated)
(Please note: Nutritional information is an estimate and can vary based on specific ingredients and brands used.)
- Servings: Approximately 16-20 servings
- Serving Size: Approximately 2 tablespoons
Estimated Calories per Serving:
- Calories: 180-220 calories
- Fat: 15-20 grams
- Saturated Fat: 9-12 grams
- Cholesterol: 50-60 mg
- Sodium: 200-300 mg
- Carbohydrates: 3-5 grams
- Protein: 5-7 grams
These values are estimates and will depend on the specific ingredients used, particularly the type of cheese, ham/bacon, and coating. For more precise nutritional information, use a nutrition calculator with the specific brands and quantities of ingredients you use.
Preparation Time
- Prep Time: 30-40 minutes (includes softening cream cheese, chopping ingredients, mixing, and shaping)
- Chill Time: Minimum 2-3 hours (ideally overnight)
- Coating and Decorating Time: 15-20 minutes
- Total Time: Minimum 2 hours 45 minutes – Overnight (mostly inactive chilling time)
This recipe is fantastic for making ahead of time. You can prepare the cheese ball up to 2-3 days in advance and keep it tightly wrapped in the refrigerator. Coat and decorate it just before serving for the best texture and appearance.
How to Serve Your Easter Egg Cheese Ball
The Easter Egg Cheese Ball is incredibly versatile and pairs well with a variety of accompaniments. Here are some serving suggestions to create a beautiful and delicious appetizer platter:
- Crackers:
- Assorted Crackers: Offer a variety of crackers – water crackers, wheat crackers, rye crackers, multi-grain crackers, and flavored crackers.
- Buttery Crackers: Buttery crackers like Ritz or club crackers provide a rich and classic pairing.
- Crispy Crackers: Thin and crispy crackers are ideal for scooping up the cheese ball without breaking.
- Vegetables:
- Crudités Platter: Create a colorful crudités platter with fresh, crisp vegetables.
- Carrot Sticks: Adds sweetness and crunch.
- Celery Sticks: Provides a refreshing and crisp contrast.
- Cucumber Slices: Mild and hydrating.
- Bell Pepper Strips: Adds sweetness and color (red, yellow, orange).
- Broccoli Florets: Lightly steamed or raw, for a slightly bitter and healthy option.
- Cherry Tomatoes: Sweet and juicy burst of flavor.
- Snap Peas: Sweet and crunchy.
- Radishes: Peppery and crisp.
- Bread and Breadsticks:
- Baguette Slices: Toasted or fresh baguette slices offer a sturdy and flavorful base.
- Breadsticks: Crispy breadsticks provide a different texture and are easy to grab.
- Pita Bread Wedges: Toasted pita wedges are sturdy and flavorful.
- Pretzels: Salty pretzels offer a contrasting flavor and crunch.
- Fruits (for a sweet and savory combination):
- Apple Slices: Crisp apple slices (Granny Smith, Honeycrisp) provide a refreshing and slightly tart contrast.
- Pear Slices: Ripe pear slices offer a delicate sweetness and smooth texture.
- Grapes: Red and green grapes add sweetness and visual appeal.
- Dried Apricots or Figs: Chewy dried fruit provides a sweet and savory pairing.
- Serving Utensils:
- Cheese Spreaders: Provide small cheese spreaders or knives for guests to easily serve themselves.
- Small Spoons: Small spoons can also be used for scooping the cheese ball onto crackers or vegetables.
Presentation Tips:
- Festive Platter: Use a festive platter or serving board that complements your Easter theme.
- Garnish: Garnish the platter with fresh herbs like parsley sprigs or dill sprigs for added visual appeal.
- Height: Add height to your platter by placing the cheese ball on a small stand or riser.
- Color Coordination: Coordinate the colors of your crackers, vegetables, and fruits with your Easter theme for a cohesive and visually appealing presentation.
Additional Tips for Cheese Ball Success
Here are five additional tips to ensure your Easter Egg Cheese Ball is a resounding success:
- Don’t Rush the Softening of Cream Cheese: This is the most crucial step for a smooth cheese ball. Ensure your cream cheese is truly softened to room temperature before mixing. If it’s still cold, you’ll end up with lumps and an uneven texture. Plan ahead and take it out of the refrigerator well in advance.
- Make it Ahead and Save Time: The Easter Egg Cheese Ball is an excellent make-ahead appetizer. Prepare the cheese ball mixture and shape it up to 2-3 days in advance. Keep it tightly wrapped in plastic wrap in the refrigerator. Coat and decorate it just before serving for the freshest flavor and texture. This is a lifesaver for busy holiday preparations.
- Get Creative with Coatings: Don’t be afraid to experiment with different coatings to create unique flavors and visual appeal. Consider toasting your nuts for extra flavor and crunch. Use a combination of textures and colors for a more interesting cheese ball. Think beyond just nuts – seeds, dried cranberries, everything bagel seasoning, or even crushed potato chips can add exciting dimensions.
- Customize the Flavor Profile: Adjust the ingredients to suit your taste preferences. Want a spicier cheese ball? Add a pinch of red pepper flakes or a dash of hot sauce to the cheese mixture. Prefer a milder flavor? Use mild cheddar cheese and omit the Worcestershire sauce or reduce the garlic powder. You can also experiment with different herbs and spices to create your signature cheese ball flavor.
- Proper Storage is Key: Store leftover cheese ball tightly wrapped in plastic wrap in the refrigerator. It will last for 3-4 days. While you can freeze cheese balls, the texture may change slightly upon thawing, becoming a bit more crumbly. If you do freeze it, wrap it very tightly and thaw it slowly in the refrigerator overnight before serving. However, fresh is always best for optimal texture and flavor.
Frequently Asked Questions (FAQ) about Easter Egg Cheese Balls
Here are five frequently asked questions about making Easter Egg Cheese Balls:
Q1: Can I make the Easter Egg Cheese Ball vegetarian?
A: Absolutely! To make this cheese ball vegetarian, simply omit the ham or bacon. To replace the savory flavor, you can add 1 cup of finely chopped sun-dried tomatoes (oil-packed, drained), roasted red peppers, sautéed mushrooms, or a combination of these. You can also add a sprinkle of smoked paprika to enhance the smoky flavor that bacon would have provided.
Q2: How far in advance can I make the cheese ball?
A: You can prepare the cheese ball mixture and shape it up to 2-3 days in advance. Keep it tightly wrapped in plastic wrap in the refrigerator. It’s best to coat and decorate the cheese ball just before serving (within a few hours) for the best texture and appearance of the coating.
Q3: Can I freeze the Easter Egg Cheese Ball?
A: While you can technically freeze a cheese ball, it’s not highly recommended as the texture may change slightly upon thawing. The cream cheese can become a bit more crumbly. If you do need to freeze it, wrap it very tightly in plastic wrap, then in a freezer bag, and freeze for up to 1 month. Thaw it slowly in the refrigerator overnight before unwrapping and coating/decorating.
Q4: What if I don’t have Worcestershire sauce? Can I substitute it?
A: Worcestershire sauce adds a unique umami flavor, but if you don’t have it, you can substitute with a very small dash of soy sauce or tamari. Use it sparingly as soy sauce is saltier. Another alternative, if you have it, is a tiny drop of fish sauce (if not vegetarian), but again, use it cautiously due to its strong flavor. If you don’t have any of these, you can simply omit it – the cheese ball will still be delicious, just slightly less complex in flavor.
Q5: My cheese ball is too soft and not holding its shape. What did I do wrong?
A: The most common reason for a soft cheese ball is not chilling it long enough, or not using softened cream cheese properly. Ensure your cream cheese is fully softened to room temperature before mixing. After mixing and shaping, make sure to chill the cheese ball for at least 2-3 hours, or preferably overnight. This chilling time is crucial for the cheese ball to firm up and hold its shape. If it’s still too soft after chilling, it might be due to using reduced-fat cream cheese, which has a higher water content. Full-fat cream cheese is recommended for the best texture.
Print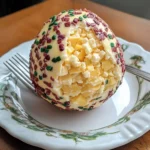
Easter Egg Cheese Ball Recipe
Ingredients
Cream Cheese: The Foundation of Creaminess
- Quantity: 2 (8-ounce) packages, full-fat cream cheese
- Importance: Cream cheese is the very base of our cheese ball, providing that signature creamy and tangy foundation. Opting for full-fat cream cheese is crucial for achieving the best texture and richest flavor. Reduced-fat versions can be used, but they might result in a slightly less creamy and potentially drier cheese ball.
- Preparation: It’s absolutely vital that your cream cheese is softened to room temperature before you begin. This is non-negotiable for a smooth, lump-free cheese ball. If the cream cheese is cold, it will be difficult to blend with the other ingredients, leading to clumps and an uneven texture. Take the cream cheese out of the refrigerator at least an hour before you plan to start making the cheese ball, or even a couple of hours in warmer environments. You can gently speed up the process by cutting the cream cheese into smaller cubes, but natural softening is always best.
Shredded Cheese: Adding Depth and Flavor
- Quantity: 2 cups, shredded cheddar cheese (sharp or medium)
- Importance: Cheddar cheese brings a savory depth and sharpness that perfectly complements the cream cheese’s tanginess. You have flexibility here – sharp cheddar will provide a more pronounced cheesy bite, while medium cheddar offers a milder, more balanced flavor. Consider your preference and the overall flavor profile you want to achieve.
- Variety: While cheddar is classic, you can experiment with other cheeses to customize your cheese ball. Monterey Jack adds a creamy, mild flavor and melts beautifully if you were to slightly warm the cheese ball (though not recommended for this recipe). Pepper Jack can introduce a subtle spicy kick. For a richer, nuttier flavor, consider Gruyere or even a smoked Gouda. Mixing different types of shredded cheese can create a more complex and interesting flavor profile. However, for a classic Easter Egg Cheese Ball, cheddar is a reliable and delicious choice.
- Freshly Shredded vs. Pre-Shredded: Freshly shredded cheese is always recommended for its superior flavor and melting quality (though melting isn’t a factor in this recipe, the flavor is). Pre-shredded cheese often contains cellulose to prevent clumping, which can sometimes affect the texture and flavor. If you have the time, shredding your own cheese will elevate the overall quality of your cheese ball.
Chopped Ham or Cooked Bacon: Savory Umami
- Quantity: 1 cup, finely diced cooked ham or crispy cooked bacon
- Importance: This ingredient injects a savory, umami-rich element into the cheese ball. Ham provides a slightly salty and meaty flavor, while bacon adds a smoky, crispy dimension. Both options are fantastic and cater to different taste preferences.
- Preparation: If using ham, choose a good quality cooked ham and dice it finely. For bacon, cook it until crispy, drain off the excess grease, and then crumble or finely chop it. Ensure both are cooled completely before adding them to the cheese mixture, as warm ingredients can soften the cream cheese and affect the cheese ball’s consistency.
- Vegetarian Alternatives: For a vegetarian version, consider using finely chopped sun-dried tomatoes, roasted red peppers, or even sautéed mushrooms to provide that savory depth. Finely diced black olives or artichoke hearts can also add interesting flavor and texture.
Green Onions: Freshness and Zesty Bite
- Quantity: ½ cup, finely chopped green onions (scallions)
- Importance: Green onions bring a fresh, mild oniony flavor and a vibrant green color that adds visual appeal and a zesty bite to the cheese ball. They cut through the richness of the cheese and ham/bacon, providing a welcome contrast.
- Preparation: Use both the white and green parts of the green onions for a fuller flavor. Wash them thoroughly and chop them finely. If you prefer a milder onion flavor, you can soak the chopped green onions in cold water for a few minutes, then drain and pat them dry before adding them to the cheese mixture.
- Substitutions: If you don’t have green onions, you can substitute with finely minced chives or a very small amount of finely minced red onion (red onion will have a stronger flavor, so use sparingly). Fresh parsley or cilantro can also add a touch of freshness, but they won’t provide the same oniony bite.
Worcestershire Sauce: Umami Booster
- Quantity: 1 tablespoon, Worcestershire sauce
- Importance: Worcestershire sauce is a secret ingredient that adds a complex umami flavor to the cheese ball without being overpowering. It enhances the savory notes of the cheese and ham/bacon, creating a more well-rounded and flavorful appetizer.
- Flavor Profile: Worcestershire sauce is a fermented condiment with a tangy, savory, and slightly sweet flavor profile. It’s made with a blend of vinegar, molasses, tamarind, anchovies, and other seasonings. Even if you don’t typically use Worcestershire sauce, don’t skip it in this recipe – it makes a noticeable difference.
- Alternatives: If you don’t have Worcestershire sauce, a very small dash of soy sauce or tamari can provide a similar umami boost, but use it sparingly as it’s saltier. A tiny drop of fish sauce (if you’re not vegetarian) can also work, but again, use with caution due to its strong flavor.
Garlic Powder: Aromatic Depth
- Quantity: 1 teaspoon, garlic powder
- Importance: Garlic powder adds a subtle but essential aromatic depth to the cheese ball. It enhances the savory flavors and complements the other ingredients beautifully. Garlic powder is preferred over fresh garlic in this recipe because it disperses evenly throughout the cheese mixture and avoids any harsh garlic flavor.
- Fresh Garlic vs. Garlic Powder: While fresh garlic can be tempting, it can be overpowering in a cheese ball and its raw flavor might not be as pleasant. Garlic powder provides a more mellow and consistent garlic flavor that blends seamlessly into the mixture.
- Variations: For a slightly different flavor profile, you can experiment with roasted garlic powder or smoked garlic powder. A pinch of onion powder can also be added to complement the garlic.
Instructions
Step 1: Combine the Base Ingredients
- In a large mixing bowl, add the softened cream cheese, shredded cheddar cheese, diced ham or bacon, chopped green onions, Worcestershire sauce, and garlic powder.
- Using an electric mixer (hand mixer or stand mixer) or a sturdy spoon, beat all the ingredients together until they are thoroughly combined and smooth. If using a hand mixer, start on low speed to prevent ingredients from splattering and gradually increase to medium speed. If mixing by hand, ensure you work the mixture until it is completely smooth and there are no lumps of cream cheese remaining. This step is crucial for achieving the desired creamy texture.
- Taste and Adjust Seasoning: At this stage, taste the cheese mixture. You can adjust the seasoning to your preference. If you want a saltier cheese ball, add a pinch of salt (taste carefully as ham/bacon and cheddar cheese are already salty). If you prefer more garlic flavor, add a little more garlic powder. You can also add a pinch of black pepper if desired.
Step 2: Shape the Cheese Ball into an Egg
- Gather the Cheese Mixture: Once the cheese mixture is well combined and seasoned to your liking, gather it into a ball in the center of the mixing bowl.
- Prepare Plastic Wrap: Lay out a large sheet of plastic wrap on a clean surface. Make sure it’s large enough to completely encase the cheese ball.
- Shape into an Egg: Transfer the cheese mixture onto the plastic wrap. Using your hands (you can lightly dampen your hands with water to prevent sticking), gently shape the cheese ball into an egg shape. Imagine you are sculpting clay – start with a ball and then gently elongate one end to create the egg shape. Don’t worry about perfection at this stage; you can refine the shape further once it’s chilled.
- Wrap Tightly: Wrap the plastic wrap tightly around the egg-shaped cheese ball, ensuring there are no air pockets. Twist the ends of the plastic wrap to secure the shape. This tight wrapping is important for maintaining the egg shape during chilling.
Step 3: Chill the Cheese Ball
- Refrigerate: Place the wrapped cheese ball in the refrigerator.
- Chill Time: Chill for at least 2-3 hours, or preferably overnight. Chilling is essential for firming up the cheese ball, making it easier to handle and slice. The longer it chills, the firmer it will become. Overnight chilling is ideal as it allows the flavors to meld together beautifully.
Step 4: Prepare the Coating
- Choose Your Coating(s): While the cheese ball is chilling, prepare your chosen coating ingredients. If using nuts, chop them finely. If using fresh herbs, chop them finely. If using grated carrots or bell peppers, ensure they are finely grated or diced. If using multiple coatings, prepare each one separately in shallow bowls or plates.
- Set Up Coating Station: Once the cheese ball is chilled and firm, you’ll set up your coating station. Have your chosen coatings ready in shallow dishes. You’ll also need a clean plate or serving platter to place the finished cheese ball on.
Step 5: Coat and Decorate the Cheese Ball
- Unwrap the Cheese Ball: Carefully remove the chilled cheese ball from the plastic wrap.
- Refine Shape (Optional): At this stage, if you want to refine the egg shape further, you can gently reshape it with your hands. The chilled cheese ball will be firm and easy to work with.
- Apply Coating: Gently roll the cheese ball in your chosen coating(s). Press the coating ingredients lightly into the cheese ball to ensure they adhere well. You can coat the entire cheese ball in one coating, or you can create sections with different coatings for a more decorative effect.
- Decorate (Optional): This is where you can get creative and decorate your Easter Egg Cheese Ball to truly resemble an Easter egg.
- “Stripes” or “Patterns”: Use different coatings to create stripes, swirls, or other patterns on the cheese ball. For example, you could create stripes using chopped nuts and chopped herbs.
- “Sprinkles”: Use colorful sprinkles to add a whimsical and festive touch.
- “Vegetable Decorations”: Use thinly sliced vegetables like bell peppers, carrots, or cucumber to create floral or geometric designs.
- “Herb Accents”: Arrange small sprigs of fresh herbs like dill or parsley to resemble leaves or flowers.
- Chill Again (Briefly): After coating and decorating, you can chill the cheese ball for another 15-20 minutes to help the coating set and keep it firm before serving. This is optional but recommended, especially if you are preparing it in advance.
Step 6: Serve and Enjoy!
- Transfer to Serving Platter: Carefully transfer the decorated Easter Egg Cheese Ball to your serving platter.
- Arrange Accompaniments: Arrange crackers, vegetables, breadsticks, or other serving accompaniments around the cheese ball on the platter.
- Serve Chilled: Serve the Easter Egg Cheese Ball chilled. It’s best enjoyed within a few hours of being coated for optimal freshness and texture.
Nutrition
- Serving Size: one normal portion
- Calories: 180-220
- Sodium: 200-300mg
- Fat: 15-20 grams
- Saturated Fat: 9-12 grams
- Carbohydrates: 3-5 grams
- Protein: 5-7 grams
- Cholesterol: 50-60 mg


