


Of all the recipes that have graced my family’s dinner table, few have received the universal, resounding cheer that greets these Easy Cheesy Chicken Crescent Rolls. In the chaotic symphony of weeknight dinners, this recipe is my calm, reliable conductor. I still remember the first time I made them. It was one of those evenings where the clock seemed to be sprinting, the kids were a whirlwind of energy, and my dinner plans had completely evaporated. Scavenging through the fridge, I found a tube of crescent rolls, a block of cream cheese, some leftover rotisserie chicken, and a bag of shredded cheddar. It felt like a culinary Hail Mary. Twenty-five minutes later, I pulled a tray of glistening, golden-brown parcels from the oven, the scent of baked dough, savory chicken, and melted cheese filling the entire house. The kids, who usually approach new foods with the caution of bomb disposal experts, devoured them without a second thought. My husband, a man of few words, simply said, “You can make these again. Anytime.” And so, they became a legend in our home.
This isn’t just a recipe; it’s a solution. It’s the answer to “What’s for dinner?” on a Tuesday night. It’s the perfect, crowd-pleasing appetizer for a last-minute get-together. It’s the ultimate comfort food that feels like a warm hug in edible form. The beauty lies in its simplicity. The flaky, buttery layers of the crescent roll give way to a ridiculously creamy, cheesy, and savory chicken filling that is both rich and comforting. It’s a recipe that’s practically begging for you to make it your own, to experiment with different cheeses, herbs, and add-ins. This guide is more than just a list of ingredients and steps; it’s your comprehensive roadmap to mastering what will surely become your new go-to meal. We’ll cover everything from the basic assembly to pro tips for preventing soggy bottoms, creative serving ideas, and answers to every question you might have. Get ready to fall in love with the simple, undeniable magic of Cheesy Chicken Crescent Rolls.
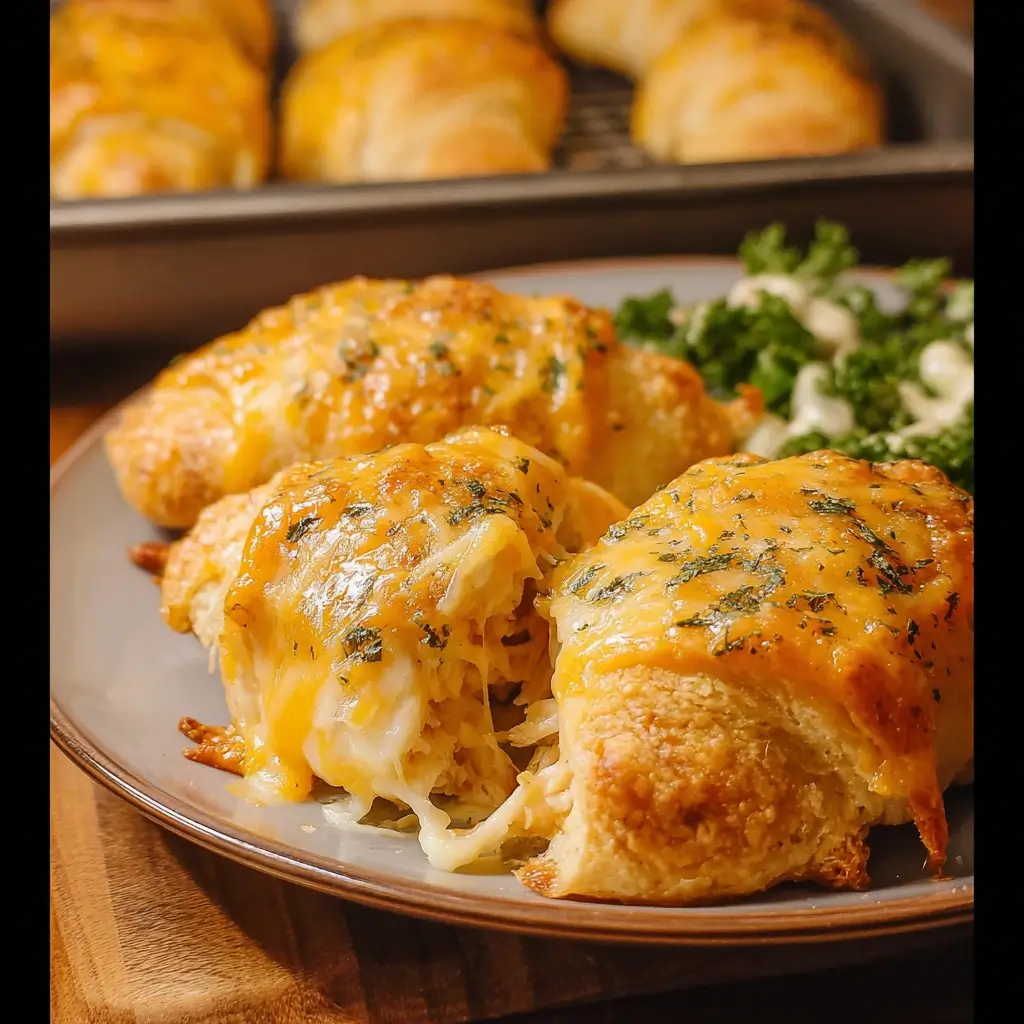
The Ultimate Easy Cheesy Chicken Crescent Rolls Recipe
This recipe is designed for maximum flavor with minimal effort. The quantities are a perfect starting point, but feel free to adjust to your personal taste. More cheese? Go for it. A little spicier? Add a dash of cayenne. This is your canvas.
Ingredients You’ll Need
- 2 cups cooked, shredded chicken: A store-bought rotisserie chicken is the ultimate time-saver here. You can also use leftover grilled or baked chicken, or simply boil two chicken breasts until cooked through and shred them with two forks.
- 8 ounces cream cheese, softened to room temperature: This is crucial! Softened cream cheese is the key to a smooth, lump-free filling. Set it on the counter for about 30-45 minutes before you start.
- 1 cup shredded cheddar cheese: A medium or sharp cheddar provides a great tangy flavor that cuts through the richness of the cream cheese. You can also use a Colby Jack, Monterey Jack, or a Mexican blend.
- 1/4 cup finely chopped green onions (scallions): This adds a mild, fresh onion flavor and a pop of color.
- 1 teaspoon garlic powder: Provides a savory, aromatic base note.
- 1/2 teaspoon onion powder: Complements the garlic powder and deepens the savory flavor profile.
- 1/2 teaspoon dried parsley: For a touch of color and herby freshness.
- 1/4 teaspoon black pepper: Freshly ground is always best for a more potent flavor.
- Salt to taste: The amount you need will depend on how salty your chicken and cheese are. Start with 1/4 teaspoon and adjust from there.
- 2 (8-ounce) cans of refrigerated crescent roll dough: This will give you 16 crescent rolls in total. The classic Pillsbury brand works perfectly.
- 2 tablespoons unsalted butter, melted: This is for brushing on top to get that beautiful golden-brown, bakery-quality finish.
- Optional Topping: A sprinkle of additional dried parsley, garlic powder, or sesame seeds for the top.
Step-by-Step Instructions for Perfect Crescent Rolls
Follow these detailed instructions for a foolproof result every time. We’ve broken it down into three simple phases: preparing the filling, assembling the rolls, and baking to perfection.
Phase 1: Preparing the Creamy Chicken Filling
- Preheat and Prepare: First things first, preheat your oven to 375°F (190°C). This ensures the oven is at the perfect temperature to cook the crescent rolls evenly and quickly. Line a large baking sheet with parchment paper. This is a non-negotiable tip for easy cleanup and to help prevent the bottoms from sticking or getting too dark.
- Combine the Filling Ingredients: In a medium-sized mixing bowl, combine the softened cream cheese, shredded cheddar cheese, shredded chicken, chopped green onions, garlic powder, onion powder, dried parsley, and black pepper.
- Mix Thoroughly: Using a sturdy spatula or a wooden spoon, mix all the ingredients together until they are thoroughly combined. You want to ensure there are no large pockets of plain cream cheese left. The mixture should be thick, creamy, and uniform. Give it a small taste and add salt as needed. Remember that the crescent dough is also slightly salty, so don’t go overboard.
Phase 2: Assembling the Cheesy Chicken Crescent Rolls
- Unroll the Dough: Open one of the cans of crescent roll dough. Carefully unroll the dough onto a clean, flat surface or directly onto your parchment-lined baking sheet. The dough will be perforated into 8 triangles. Gently separate the triangles along the perforations.
- Portion the Filling: Spoon a generous tablespoon of the chicken mixture onto the wide end of each crescent dough triangle. A cookie scoop is an excellent tool for this, as it helps ensure each roll has a consistent amount of filling. Don’t overfill the rolls, as the filling can ooze out during baking. You should use about half of your filling mixture for the first can of dough.
- Roll Them Up: Starting from the wide end where you placed the filling, roll each triangle up towards the pointed tip. Try to roll them snugly, but not so tightly that you stretch the dough too much.
- Seal and Shape: As you roll, gently press the seams to seal them. Curve the ends inward slightly to create that classic crescent shape. Place the rolled crescent on your prepared baking sheet with the pointed tip tucked underneath. This helps prevent it from unrolling while it bakes.
- Repeat: Continue this process with the remaining triangles from the first can, and then repeat the entire assembly process with the second can of crescent dough and the rest of your filling. Arrange the rolls on the baking sheet, leaving about 1-2 inches of space between them to allow for expansion.
Phase 3: Baking to Golden Perfection
- The Finishing Touch: In a small bowl, melt the 2 tablespoons of butter in the microwave. Using a pastry brush, gently brush the melted butter over the tops of each crescent roll. This is the secret to achieving that irresistible, shiny, golden-brown crust.
- Add Optional Toppings: If desired, now is the time to sprinkle a little extra something on top. A pinch more dried parsley, a dusting of garlic powder, or even some sesame seeds or poppy seeds can add extra flavor and visual appeal.
- Bake: Place the baking sheet in the preheated oven. Bake for 12-15 minutes, or until the tops are a deep golden brown and the filling is hot and bubbly. Keep a close eye on them during the last few minutes, as they can go from perfectly golden to overly brown very quickly.
- Cool and Serve: Remove the baking sheet from the oven and let the crescent rolls cool on the pan for 5-10 minutes. This is an important step! It allows the filling to set up slightly, making them less likely to fall apart when you pick them up. Serve them warm and enjoy the cheesy goodness.
Nutrition Facts
- Servings: 16 crescent rolls
- Serving Size: 1 crescent roll
- Calories Per Serving: Approximately 195 kcal
Disclaimer: The nutritional information provided is an estimate and will vary depending on the specific brands of ingredients used, such as the type of crescent roll dough (e.g., reduced-fat), the fat content of the cheeses and cream cheese, and the leanness of the chicken.
Preparation Time
This recipe is a true weeknight warrior, coming together in well under an hour.
- Prep Time: 15 minutes
- Cook Time: 15 minutes
- Total Time: 30 minutes
How to Serve Your Cheesy Chicken Crescent Rolls
These versatile parcels of joy can be served in a multitude of ways, fitting in as a main course, an appetizer, or a party snack. Here are some of our favorite ways to serve them:
As a Satisfying Main Course
Transform these rolls into a complete, balanced meal with the right accompaniments.
- With a Fresh Salad: Pair them with a simple green salad tossed in a light vinaigrette. The acidity of the dressing cuts through the richness of the rolls beautifully.
- With Roasted Vegetables: Serve alongside a tray of roasted broccoli, asparagus, or a colorful bell pepper and onion mix.
- With a Warm Soup: For the ultimate comfort meal, serve with a bowl of creamy tomato soup or a simple vegetable soup for dipping.
- With Steamed Greens: A side of steamed green beans or sautéed spinach with garlic adds a healthy, simple touch.
As a Crowd-Pleasing Appetizer or Snack
Perfect for game day, movie night, or when you have guests over.
- With Dipping Sauces: Set out a variety of dips for an interactive experience. Great options include:
- Ranch dressing
- Marinara sauce
- Honey mustard
- Buffalo sauce (for a spicy kick!)
- Queso dip
- On a Platter: Arrange them on a large platter, perhaps garnished with fresh parsley or green onions, for an impressive-looking appetizer that took you no time at all.
For a Party or Potluck
These are one of the best dishes to bring to a gathering because they travel well and can be enjoyed warm or at room temperature.
- Make a Double Batch: This recipe is easily doubled or tripled for a large crowd.
- Label Them: If you’re at a potluck, a small sign that says “Cheesy Chicken Crescent Rolls” will ensure they disappear quickly!
5 Additional Tips for Flawless Results
Take your crescent roll game to the next level with these expert tips and tricks.
- The Secret to Preventing a Soggy Bottom: This is the most common issue with filled pastries. The best defense is a double-pronged attack. First, always use parchment paper. It creates a barrier between the metal pan and the dough. Second, ensure your filling is not overly wet. If you’re using freshly boiled chicken, make sure it’s well-drained and patted dry before shredding. The cream cheese and shredded cheese filling is naturally low in moisture, which helps tremendously.
- Master the Art of Making Ahead: You can absolutely prep this recipe in advance to make your life even easier.
- Prep the Filling: The chicken filling can be made up to 2 days in advance. Store it in an airtight container in the refrigerator. When you’re ready to bake, just give it a quick stir and proceed with the assembly.
- Assemble Ahead: You can assemble the rolls, place them on the baking sheet, cover them tightly with plastic wrap, and refrigerate for up to 4 hours before baking. You may need to add 1-2 minutes to the baking time since they’ll be starting from cold.
- Endless Ingredient Variations and Customizations: Don’t be afraid to get creative! This recipe is a fantastic base for experimentation.
- Add Veggies: Finely chop and sauté some spinach, mushrooms, or bell peppers and mix them into the filling. Make sure to squeeze out any excess moisture from the vegetables.
- Spice It Up: Add a finely diced jalapeño, a dash of cayenne pepper, or a swirl of buffalo hot sauce to the filling for a spicy kick.
- Change the Cheese: Swap the cheddar for smoked Gouda, pepper jack, or a rich Gruyère for a different flavor profile.
- Add Some Bacon: Mix in some crumbled, cooked bacon for an extra layer of salty, smoky flavor.
- Freezing for a Future Meal: These freeze exceptionally well, making them a perfect freezer-stash meal for busy days.
- To Freeze Unbaked: Assemble the rolls but do not brush with butter. Place them on a baking sheet and “flash freeze” for 1 hour, or until solid. Transfer the frozen rolls to a freezer-safe zip-top bag. They can be frozen for up to 2 months. To bake, place them frozen on a parchment-lined sheet, brush with melted butter, and bake at 375°F (190°C), adding about 5-10 minutes to the original baking time.
- To Freeze Baked: Let the baked rolls cool completely. Wrap them individually in plastic wrap and then place them in a freezer-safe bag. To reheat, unwrap and bake at 350°F (175°C) for 10-12 minutes, or until warmed through.
- Achieve the Perfect Golden-Brown Top Every Time: The melted butter brush is key, but you can enhance it. For an even deeper brown color and a slightly crispier shell, try an egg wash. Whisk one large egg with a tablespoon of water and brush this mixture over the rolls before baking instead of the butter. The proteins in the egg will brown beautifully in the oven, giving you a professional, shiny finish.
Frequently Asked Questions (FAQ)
Here are answers to some of the most common questions about making Easy Cheesy Chicken Crescent Rolls.
1. Can I use canned chicken for this recipe?
Absolutely! Canned chicken is a fantastic shortcut that makes this recipe even faster. Be sure to buy chicken packed in water, not oil. The most important step is to drain it very well. After draining, I recommend placing the chicken on a plate lined with paper towels and pressing down with another paper towel to absorb as much excess moisture as possible. This will prevent the filling from becoming watery. You’ll need about two (5-ounce) cans to get the 2 cups of chicken required for the recipe.
2. My filling leaked out while baking. What did I do wrong?
This is a common issue that usually comes down to one of two things: overfilling or improper sealing. First, make sure you’re only using about a tablespoon of filling per roll. It might not seem like a lot, but it expands as the cheese melts. Second, when you roll the crescent, pay special attention to the seams. Gently pinch the edges of the dough together to create a good seal. Finally, placing the pointed tip of the dough triangle on the bottom when you place it on the baking sheet acts as a final lock to keep everything tucked in.
3. How do I store and reheat leftovers?
Leftover Cheesy Chicken Crescent Rolls can be stored in an airtight container in the refrigerator for up to 3 days. While you can reheat them in the microwave, they will lose their crispiness and become soft. For the best results, reheat them in an oven or toaster oven at 350°F (175°C) for 5-8 minutes, or until they are warmed through and the dough has crisped up again. An air fryer also works wonderfully for reheating; set it to 350°F and heat for 3-4 minutes.
4. Can I make these in an air fryer?
Yes, you can! The air fryer is perfect for making these rolls extra crispy. To do so, preheat your air fryer to 330°F (165°C). Place the assembled rolls in a single layer in the air fryer basket, making sure not to overcrowd it (you will likely need to cook them in batches). Air fry for 6-9 minutes, or until the crescent dough is golden brown and cooked through. The exact time will depend on your specific air fryer model, so check on them halfway through.
5. What other seasonings can I add to the filling for more flavor?
The sky’s the limit! The current seasoning blend is a classic savory profile, but you can easily customize it. For a Tex-Mex flair, try adding a teaspoon of taco seasoning or a mix of cumin and chili powder. For a smoky flavor, a pinch of smoked paprika is delicious. If you like Italian flavors, try a blend of dried oregano and basil. You could also add a dash of Worcestershire sauce for a deeper, umami-rich flavor. Experimenting with seasonings is a great way to make this recipe uniquely yours.
Print
Easy Cheesy Chicken Crescent Rolls Recipe
Ingredients
- 2 cups cooked, shredded chicken: A store-bought rotisserie chicken is the ultimate time-saver here. You can also use leftover grilled or baked chicken, or simply boil two chicken breasts until cooked through and shred them with two forks.
- 8 ounces cream cheese, softened to room temperature: This is crucial! Softened cream cheese is the key to a smooth, lump-free filling. Set it on the counter for about 30–45 minutes before you start.
- 1 cup shredded cheddar cheese: A medium or sharp cheddar provides a great tangy flavor that cuts through the richness of the cream cheese. You can also use a Colby Jack, Monterey Jack, or a Mexican blend.
- 1/4 cup finely chopped green onions (scallions): This adds a mild, fresh onion flavor and a pop of color.
- 1 teaspoon garlic powder: Provides a savory, aromatic base note.
- 1/2 teaspoon onion powder: Complements the garlic powder and deepens the savory flavor profile.
- 1/2 teaspoon dried parsley: For a touch of color and herby freshness.
- 1/4 teaspoon black pepper: Freshly ground is always best for a more potent flavor.
- Salt to taste: The amount you need will depend on how salty your chicken and cheese are. Start with 1/4 teaspoon and adjust from there.
- 2 (8-ounce) cans of refrigerated crescent roll dough: This will give you 16 crescent rolls in total. The classic Pillsbury brand works perfectly.
- 2 tablespoons unsalted butter, melted: This is for brushing on top to get that beautiful golden-brown, bakery-quality finish.
- Optional Topping: A sprinkle of additional dried parsley, garlic powder, or sesame seeds for the top.
Instructions
Phase 1: Preparing the Creamy Chicken Filling
- Preheat and Prepare: First things first, preheat your oven to 375°F (190°C). This ensures the oven is at the perfect temperature to cook the crescent rolls evenly and quickly. Line a large baking sheet with parchment paper. This is a non-negotiable tip for easy cleanup and to help prevent the bottoms from sticking or getting too dark.
- Combine the Filling Ingredients: In a medium-sized mixing bowl, combine the softened cream cheese, shredded cheddar cheese, shredded chicken, chopped green onions, garlic powder, onion powder, dried parsley, and black pepper.
- Mix Thoroughly: Using a sturdy spatula or a wooden spoon, mix all the ingredients together until they are thoroughly combined. You want to ensure there are no large pockets of plain cream cheese left. The mixture should be thick, creamy, and uniform. Give it a small taste and add salt as needed. Remember that the crescent dough is also slightly salty, so don’t go overboard.
Phase 2: Assembling the Cheesy Chicken Crescent Rolls
- Unroll the Dough: Open one of the cans of crescent roll dough. Carefully unroll the dough onto a clean, flat surface or directly onto your parchment-lined baking sheet. The dough will be perforated into 8 triangles. Gently separate the triangles along the perforations.
- Portion the Filling: Spoon a generous tablespoon of the chicken mixture onto the wide end of each crescent dough triangle. A cookie scoop is an excellent tool for this, as it helps ensure each roll has a consistent amount of filling. Don’t overfill the rolls, as the filling can ooze out during baking. You should use about half of your filling mixture for the first can of dough.
- Roll Them Up: Starting from the wide end where you placed the filling, roll each triangle up towards the pointed tip. Try to roll them snugly, but not so tightly that you stretch the dough too much.
- Seal and Shape: As you roll, gently press the seams to seal them. Curve the ends inward slightly to create that classic crescent shape. Place the rolled crescent on your prepared baking sheet with the pointed tip tucked underneath. This helps prevent it from unrolling while it bakes.
- Repeat: Continue this process with the remaining triangles from the first can, and then repeat the entire assembly process with the second can of crescent dough and the rest of your filling. Arrange the rolls on the baking sheet, leaving about 1-2 inches of space between them to allow for expansion.
Phase 3: Baking to Golden Perfection
- The Finishing Touch: In a small bowl, melt the 2 tablespoons of butter in the microwave. Using a pastry brush, gently brush the melted butter over the tops of each crescent roll. This is the secret to achieving that irresistible, shiny, golden-brown crust.
- Add Optional Toppings: If desired, now is the time to sprinkle a little extra something on top. A pinch more dried parsley, a dusting of garlic powder, or even some sesame seeds or poppy seeds can add extra flavor and visual appeal.
- Bake: Place the baking sheet in the preheated oven. Bake for 12-15 minutes, or until the tops are a deep golden brown and the filling is hot and bubbly. Keep a close eye on them during the last few minutes, as they can go from perfectly golden to overly brown very quickly.
- Cool and Serve: Remove the baking sheet from the oven and let the crescent rolls cool on the pan for 5-10 minutes. This is an important step! It allows the filling to set up slightly, making them less likely to fall apart when you pick them up. Serve them warm and enjoy the cheesy goodness.
Nutrition
- Serving Size: One Normal Portion
- Calories: 195


