


There’s something undeniably magical about the aroma of freshly baked bread wafting through your home. It’s a scent that instantly conjures feelings of warmth, comfort, and togetherness. For me, that aroma has become synonymous with Sunday afternoons, casual gatherings with friends, and even just a simple weeknight dinner elevated to something special. And the bread responsible for this delightful transformation? Easy focaccia. Honestly, before discovering this recipe, I considered focaccia to be a bakery treat, something best left to the professionals. The idea of making it at home seemed… complicated. But then, curiosity got the better of me, and I stumbled upon this incredibly straightforward recipe. Let me tell you, it was a revelation. The first time I pulled a golden, olive oil-drizzled focaccia from my oven, studded with fragrant rosemary and glistening with sea salt, I was hooked. And so was my family. My kids, usually picky eaters, devoured slice after slice, their faces smeared with olive oil and pure joy. My husband, a self-proclaimed bread connoisseur, declared it the best focaccia he’d ever tasted – high praise indeed! Since then, this easy focaccia recipe has become a staple in our kitchen. It’s unbelievably simple to make, requiring minimal effort and readily available ingredients. The result is a bread that’s simultaneously crusty and chewy, deeply flavorful thanks to the generous use of olive oil, and incredibly versatile. Whether you’re a seasoned baker or a complete novice, I promise you, this recipe is foolproof. Get ready to experience the pure joy of effortless baking and the delight of sharing homemade focaccia with those you love.
Ingredients: The Simple Symphony of Focaccia
The beauty of focaccia lies in its simplicity. It’s not about complex techniques or a laundry list of exotic ingredients. Instead, it’s about using a few high-quality staples and letting them shine. Here’s what you’ll need to create your own masterpiece of easy focaccia bread:
- All-Purpose Flour (500g, approximately 4 cups): The foundation of our focaccia. All-purpose flour provides the structure and chewiness we’re looking for. While you can experiment with bread flour for a slightly chewier texture, all-purpose is perfectly suitable and readily available, making this recipe truly accessible. For best results, use a good quality, unbleached all-purpose flour. The protein content in the flour is crucial for gluten development, which is essential for the bread’s texture.
- Active Dry Yeast (7g or 1 packet): The magic ingredient that brings our dough to life! Active dry yeast is responsible for fermentation, the process that creates air bubbles within the dough, resulting in a light and airy focaccia. It’s important to use fresh yeast for optimal results. Check the expiration date on your yeast packet to ensure it’s still active. If you’re using instant yeast, you can skip the initial proofing step and add it directly to the dry ingredients.
- Warm Water (350ml, approximately 1 ½ cups, lukewarm – around 105-115°F or 40-46°C): Warm water is essential for activating the active dry yeast. The temperature is crucial – too cold and the yeast won’t activate properly; too hot and it will kill the yeast. Lukewarm water, feeling comfortably warm to the touch but not hot, is ideal. Using filtered water is recommended for the best flavor, as tap water can sometimes contain chlorine or other impurities that can affect the yeast and the final taste of the bread.
- Extra Virgin Olive Oil (100ml, approximately ½ cup + extra for drizzling and greasing): Olive oil is the heart and soul of focaccia. It not only adds incredible flavor but also contributes to the bread’s characteristic texture – that wonderful balance of crispness and chewiness. Extra virgin olive oil is non-negotiable here. Its rich, fruity flavor is what sets focaccia apart. Don’t skimp on the quality; a good quality olive oil will truly elevate your focaccia. We’ll use it in the dough, for greasing the pan, and generously drizzled on top before and after baking.
- Salt (10g, approximately 2 teaspoons): Salt is not just about flavor; it plays a vital role in gluten development and controlling yeast activity. It enhances the flavor of all the other ingredients and balances the richness of the olive oil. Use fine sea salt or kosher salt. If using table salt, reduce the amount slightly as it’s more concentrated.
- Optional Toppings (to taste): This is where you can get creative and personalize your focaccia! The beauty of focaccia is its versatility – it’s a blank canvas for your culinary imagination. Some popular and delicious topping ideas include:
- Fresh Rosemary: The classic focaccia herb. Its piney aroma and flavor pair perfectly with olive oil and salt.
- Coarse Sea Salt Flakes: Adds a delightful crunch and bursts of salty flavor. Maldon sea salt flakes are particularly prized for their delicate texture and clean taste.
- Cherry Tomatoes (halved): Provide a juicy sweetness and vibrant color.
- Kalamata Olives (pitted and halved): Add a briny, Mediterranean flavor.
- Red Onion (thinly sliced): Offers a slightly pungent and sweet note.
- Garlic (thinly sliced or roasted cloves): Infuses the focaccia with a savory, aromatic depth.
- Parmesan Cheese (grated): Adds a salty, umami richness.
- Other Herbs: Thyme, oregano, sage, or basil can also be used individually or in combination.
- Peppers (roasted or fresh bell peppers, chili flakes): For a touch of sweetness or spice.
Remember, the quality of your ingredients directly impacts the final result. Using good quality flour, fresh yeast, and especially excellent extra virgin olive oil will make a world of difference in your homemade focaccia.
Instructions: The Simple Steps to Focaccia Perfection
Making focaccia is surprisingly straightforward. This recipe is designed to be easy and accessible for bakers of all skill levels. Follow these simple steps, and you’ll be rewarded with a beautiful, flavorful focaccia in no time.
Step 1: Activate the Yeast (Proofing)
- In a large mixing bowl, or the bowl of your stand mixer, combine the warm water and active dry yeast.
- Gently stir with a spoon or whisk to ensure the yeast is dissolved in the water.
- Let the mixture stand for 5-10 minutes, or until you see a frothy or foamy layer forming on the surface. This is called “proofing” the yeast and confirms that it’s active and ready to work its magic in the dough. If the yeast doesn’t foam, it might be expired or the water might have been too hot or cold, and you may need to start again with fresh yeast.
Step 2: Combine Dry Ingredients and Olive Oil
- In the same bowl (or a separate large bowl if you prefer), add the all-purpose flour and salt.
- Whisk the dry ingredients together to ensure the salt is evenly distributed throughout the flour. This is important for consistent gluten development and flavor.
- Pour in ½ cup (100ml) of extra virgin olive oil into the bowl with the dry ingredients.
Step 3: Combine Wet and Dry Ingredients and Knead
- Pour the proofed yeast mixture into the bowl with the flour and olive oil.
- Using a wooden spoon, spatula, or the dough hook attachment of your stand mixer, begin to mix the ingredients together.
- Mix until a shaggy dough forms. At first, it will look quite dry and crumbly, but as you continue to mix, it will come together.
- If using a stand mixer with a dough hook, knead on low speed for 8-10 minutes.
- If kneading by hand, turn the dough out onto a lightly floured surface. Knead for 10-12 minutes.
- Kneading is crucial for developing the gluten in the flour, which gives focaccia its characteristic chewy texture. The dough should become smooth, elastic, and slightly tacky, but not sticky. It should pull away from the sides of the bowl and bounce back slightly when poked.
Step 4: First Rise (Bulk Fermentation)
- Lightly grease a large bowl with olive oil.
- Form the kneaded dough into a ball and place it in the greased bowl.
- Turn the dough to coat it lightly with olive oil. This prevents the dough from drying out during the rise.
- Cover the bowl tightly with plastic wrap or a clean kitchen towel.
- Let the dough rise in a warm place for 1-1.5 hours, or until it has doubled in size. The ideal temperature for rising is around 75-80°F (24-27°C). A warm spot in your kitchen, like near a slightly warm oven or in a sunny area, will work well. The rising time may vary depending on the temperature of your kitchen; in a cooler environment, it may take longer.
Step 5: Prepare the Baking Pan and Second Rise
- Generously grease a 9×13 inch baking pan (or a similar sized sheet pan) with olive oil. Don’t be shy with the olive oil – it prevents sticking and contributes to the crispy bottom crust.
- Once the dough has doubled, gently punch it down to release the air.
- Transfer the dough to the prepared baking pan.
- Using your fingers, gently stretch and press the dough to fill the pan. It’s okay if it doesn’t reach all the corners initially; it will spread further during the second rise.
- Cover the pan loosely with plastic wrap or a clean kitchen towel.
- Let the dough rise again for 30-45 minutes. This second rise allows the dough to relax and become even lighter and airier.
Step 6: Dimpling and Topping
- Preheat your oven to 425°F (220°C).
- Uncover the dough.
- Generously drizzle the top of the dough with more extra virgin olive oil. This is another opportunity to enhance the flavor and create those characteristic crispy, oily dimples.
- Using your fingertips, firmly but gently press dimples all over the surface of the dough. These dimples are crucial for the focaccia texture – they create pockets for the olive oil to pool and crisp up during baking. Press deep enough to almost reach the bottom of the pan.
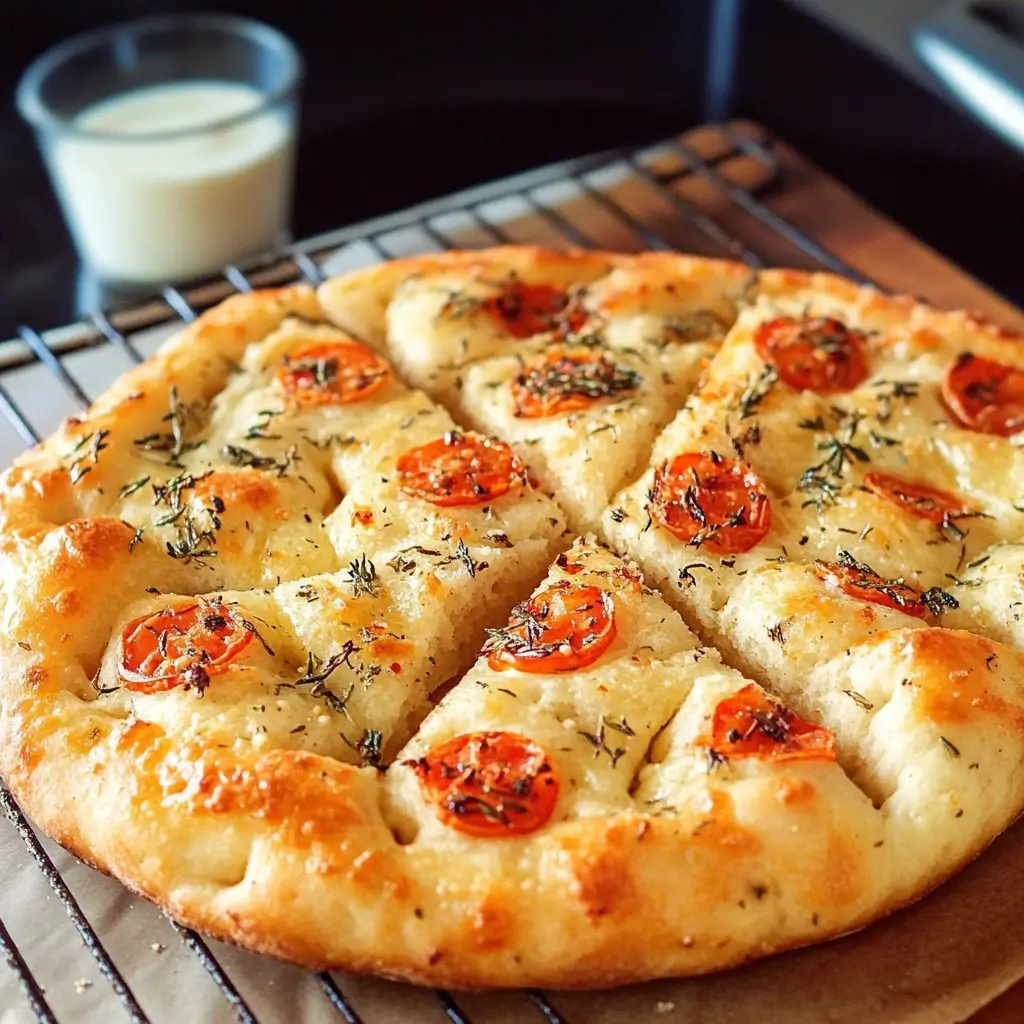
- Now is the time to add your desired toppings. If using rosemary, gently press sprigs of fresh rosemary into the dimples. Sprinkle generously with coarse sea salt flakes. If using other toppings like cherry tomatoes, olives, or onions, arrange them evenly over the surface of the dough, pressing them lightly into the dimples.
Step 7: Bake to Golden Perfection
- Bake in the preheated oven for 20-25 minutes, or until the focaccia is golden brown and cooked through. The baking time may vary slightly depending on your oven. The bottom should be nicely browned and crispy, and the top should be golden and slightly crisp.
- To check for doneness, gently tap the bottom of the focaccia – it should sound hollow. You can also insert a toothpick into the center; it should come out clean.
Step 8: Cool and Enjoy
- Once baked, remove the focaccia from the oven and let it cool in the pan for a few minutes before slicing and serving.
- For an extra touch of flavor and moisture, drizzle with a bit more extra virgin olive oil just before serving.
- Enjoy warm or at room temperature. Focaccia is best enjoyed fresh on the day it’s baked, but it can be stored in an airtight container at room temperature for a day or two and reheated gently in the oven or toaster oven to refresh its texture.
Congratulations! You’ve just baked your own delicious, easy focaccia bread. Prepare to be amazed by the incredible flavor and texture you’ve created with such simple steps.
Nutrition Facts: A Delectable Treat to Enjoy in Moderation
Focaccia, while incredibly delicious and made with wholesome ingredients, is still a bread and should be enjoyed as part of a balanced diet. Here’s a general overview of the nutritional information for this easy focaccia recipe. Please note that these are estimates and can vary based on ingredient variations, serving sizes, and specific toppings used.
Servings: This recipe typically yields approximately 12 servings, depending on how you slice it.
Estimated Nutrition Facts per Serving (plain focaccia, without toppings):
- Calories: Approximately 250-300 calories
- Total Fat: 12-15g
- Saturated Fat: 2-3g
- Monounsaturated Fat: 8-10g (primarily from olive oil, considered healthy fats)
- Polyunsaturated Fat: 1-2g
- Cholesterol: 0mg
- Sodium: 250-350mg (can vary based on salt added and toppings)
- Total Carbohydrates: 35-40g
- Dietary Fiber: 1-2g
- Sugars: 1-2g (naturally occurring in flour and yeast)
- Protein: 5-7g
Important Considerations:
- Olive Oil: The primary source of fat in focaccia is extra virgin olive oil, which is rich in monounsaturated fatty acids, antioxidants, and beneficial compounds. While healthy, olive oil is still calorie-dense, so portion control is important.
- Carbohydrates: Focaccia is primarily a carbohydrate-rich food due to the flour content. If you are watching your carbohydrate intake, be mindful of serving sizes.
- Sodium: The salt content contributes to the sodium level. You can adjust the salt slightly to your preference, but salt is essential for flavor and gluten development in bread.
- Toppings: The nutritional content will change significantly depending on the toppings you choose. Adding cheese, meats, or olives will increase the fat, sodium, and calorie content, while vegetables will add fiber and vitamins.
- Serving Size: These nutrition facts are based on an estimated serving size. Cutting the focaccia into smaller or larger pieces will affect the calorie and nutrient content per serving.
Enjoy in Moderation:
Focaccia is a wonderful treat to enjoy occasionally. Like any delicious bread, it’s best enjoyed as part of a balanced meal with plenty of vegetables, lean protein, and other nutrient-rich foods. Being mindful of portion sizes will allow you to savor the flavor and texture of focaccia without overindulging. You can also make healthier choices by loading up on vegetable toppings and using whole wheat flour for a portion of the all-purpose flour for increased fiber content (though this will slightly alter the texture).
Preparation Time: From Pantry to Plate
While the process of making focaccia involves some rising time, the active preparation time is surprisingly minimal. Here’s a breakdown of the estimated time involved:
- Active Preparation Time: Approximately 20-25 minutes
- Yeast Proofing: 5-10 minutes (mostly passive, but needs monitoring)
- Mixing Dough: 5-7 minutes
- Kneading Dough: 8-10 minutes (by hand or stand mixer)
- Preparing Pan and Toppings: 2-3 minutes
- Inactive Time (Rising Time): Approximately 2-2.5 hours
- First Rise (Bulk Fermentation): 1-1.5 hours
- Second Rise (Proofing in Pan): 30-45 minutes
- Baking Time: 20-25 minutes
- Cooling Time: 5-10 minutes (before slicing and serving)
Total Time (from start to finish): Approximately 2 hours 45 minutes to 3 hours.
Breakdown of Time Stages:
- Yeast Activation (5-10 minutes): This is the very first step and requires minimal active time – simply combining warm water and yeast and letting it sit.
- Dough Preparation (15-20 minutes active): This involves combining the wet and dry ingredients, adding olive oil, and kneading the dough. Kneading is the most active part of this stage, but even kneading by hand is manageable within 10-12 minutes.
- First Rise (1-1.5 hours passive): This is mostly hands-off time. The dough is simply left to rise in a warm place. You can use this time to prepare other parts of your meal, relax, or do other tasks.
- Second Rise (30-45 minutes passive): Similar to the first rise, this is also passive time while the dough rises in the baking pan.
- Dimpling and Topping (5 minutes active): This is a quick and fun step where you create the characteristic dimples and add your desired toppings.
- Baking (20-25 minutes passive): The oven does the work during this stage. You can monitor the focaccia through the oven door as it bakes and fills your kitchen with its wonderful aroma.
- Cooling (5-10 minutes passive): Letting the focaccia cool slightly before slicing helps it set and makes it easier to handle.
Tips for Time Management:
- Plan Ahead: While the active time is short, the rising times are significant. Plan accordingly if you want to serve focaccia at a specific time. You can start the dough preparation a few hours in advance.
- Warm Environment: Ensuring a warm environment for rising dough is crucial for reducing rising times. A slightly warmed oven (turned off), a sunny spot, or a proofing box can help.
- Stand Mixer: Using a stand mixer with a dough hook can reduce the kneading time and effort.
- Multitasking: Utilize the passive rising times to prepare other dishes or complete other tasks.
Despite the total time being around 3 hours, the actual hands-on time is less than 30 minutes. This makes easy focaccia bread a relatively quick and rewarding baking project, perfect for both weeknights and weekends.
How to Serve: Versatile Ways to Enjoy Your Focaccia
Focaccia is incredibly versatile and can be enjoyed in countless ways. Its delightful flavor and texture make it a perfect accompaniment to a variety of meals and occasions. Here are some delicious ways to serve your homemade easy focaccia:
- As an Appetizer:
- Olive Oil and Balsamic Dip: Simply drizzle slices of warm focaccia with extra virgin olive oil and serve alongside a small bowl of balsamic vinegar for dipping. The combination of the rich olive oil, tangy balsamic, and flavorful bread is irresistible.
- Antipasto Platter Companion: Include slices of focaccia on an antipasto platter with cured meats, cheeses, olives, roasted vegetables, and marinated artichokes. The focaccia provides a perfect base for enjoying the various flavors and textures of the platter.
- Bruschetta Style: Top toasted or grilled focaccia slices with fresh tomatoes, basil, garlic, and a drizzle of olive oil for a simple and flavorful bruschetta.
- As a Side Dish:
- With Soups and Stews: Serve warm focaccia alongside hearty soups, stews, and chili. It’s perfect for soaking up flavorful broths and adding a satisfying carb element to the meal.
- Alongside Salads: Focaccia complements salads beautifully. Serve it with a fresh garden salad, a Caprese salad, or a Caesar salad for a more substantial and satisfying meal.
- With Pasta Dishes: Instead of garlic bread, offer focaccia with pasta dishes, especially those with rich tomato-based sauces or creamy sauces.
- As a Sandwich Bread:
- Panini or Grilled Sandwiches: Slice focaccia horizontally and use it to make delicious panini or grilled sandwiches. Its sturdy texture holds up well to fillings and grilling.
- Open-Faced Sandwiches: Create open-faced sandwiches by topping focaccia slices with various ingredients like roasted vegetables, cheeses, smoked salmon, or avocado.
- As Part of a Bread Basket:
- Mixed Bread Basket: Include focaccia in a bread basket with other types of bread like sourdough, baguettes, or rolls for a variety of textures and flavors. Perfect for dinner parties or special occasions.
- For Breakfast or Brunch:
- Toasted with Avocado and Eggs: Toast focaccia slices and top with mashed avocado, a fried or poached egg, and a sprinkle of red pepper flakes for a savory and satisfying breakfast or brunch.
- French Toast Focaccia: Believe it or not, focaccia can be used to make delicious French toast! Its slightly dense texture soaks up the custard beautifully.
- Simply Enjoyed on its Own:
- Freshly Baked and Warm: Sometimes, the best way to enjoy focaccia is simply warm, fresh from the oven, with just a drizzle of extra virgin olive oil and a sprinkle of sea salt. Its inherent flavor is so delicious that it needs very little embellishment.
No matter how you choose to serve it, homemade focaccia is sure to be a crowd-pleaser. Its versatility and deliciousness make it a welcome addition to any meal or gathering. Experiment with different toppings and serving suggestions to discover your favorite ways to enjoy this easy and delightful bread.
Additional Tips for Focaccia Success: Baking Wisdom
While this focaccia recipe is designed to be easy, these additional tips will help you achieve focaccia perfection every time and troubleshoot any potential issues along the way.
- 1. The Warm Water Sweet Spot: Water temperature is crucial for yeast activation. Aim for lukewarm water, around 105-115°F (40-46°C). Too cold, and the yeast won’t activate; too hot, and it will kill the yeast. Use a kitchen thermometer if you’re unsure, or simply test it by feeling – it should feel comfortably warm to the touch, like bathwater.
- 2. Don’t Skimp on the Olive Oil: Olive oil is not just an ingredient in focaccia; it’s a key flavor component and textural element. Use good quality extra virgin olive oil, and don’t be afraid to be generous with it – in the dough, for greasing the pan, and especially for drizzling on top. The olive oil is what gives focaccia its signature flavor and crispy, yet tender, crumb.
- 3. The Importance of Dimpling: Those dimples are not just for aesthetics! They serve a functional purpose. Dimpling the dough creates pockets for the olive oil to pool and collect during baking, resulting in a beautifully crispy and flavorful crust. Dimple deeply, almost to the bottom of the pan, to ensure those wonderful crispy edges.
- 4. Gentle Handling After the First Rise: After the first rise, when you punch down the dough, be gentle. You want to release the air, but avoid deflating it completely. Gently transfer it to the prepared pan and stretch it carefully. Over-handling can toughen the dough and result in a less tender focaccia.
- 5. Customize Your Toppings (But Don’t Overload): Focaccia is a fantastic canvas for toppings, but resist the urge to overload it. Too many toppings can weigh down the dough and prevent it from baking properly. Choose a few complementary toppings and distribute them evenly. For juicy toppings like tomatoes, consider roasting them slightly beforehand to reduce excess moisture, which can make the focaccia soggy.
These tips, combined with following the recipe instructions carefully, will set you up for focaccia success. Baking bread is a rewarding process, and even small adjustments can make a big difference in the final outcome. Enjoy the process of creating your own delicious homemade focaccia!
FAQ Section: Your Focaccia Questions Answered
Got questions about making easy focaccia bread? You’re not alone! Here are answers to some frequently asked questions to help you bake with confidence and troubleshoot any challenges you might encounter.
Q1: My focaccia is dense and not as airy as I expected. What went wrong?
A: Several factors can contribute to dense focaccia. Firstly, ensure your yeast is fresh and active. Proofing the yeast (Step 1) is crucial to confirm its activity. Secondly, proper kneading is essential for gluten development, which creates the airy texture. Knead for the recommended time (8-10 minutes in a stand mixer, 10-12 minutes by hand). Thirdly, sufficient rising time is key. Make sure the dough doubles in size during the first rise and rises noticeably during the second rise. Finally, avoid over-handling the dough, especially after the first rise. Gentle handling helps maintain airiness. If your kitchen is cold, rising times may be longer; find a warmer spot for your dough to rise.
Q2: Can I use instant yeast instead of active dry yeast?
A: Yes, you can substitute instant yeast for active dry yeast. Use the same amount (7g or 1 packet). The main difference is that instant yeast doesn’t require proofing in water first. You can add it directly to the dry ingredients along with the flour and salt. Then, add the warm water and olive oil and proceed with the recipe as instructed from Step 3 (combining wet and dry ingredients and kneading).
Q3: Can I make focaccia ahead of time?
A: Focaccia is best enjoyed fresh on the day it’s baked for optimal texture and flavor. However, you can prepare the dough ahead of time. After the first rise (Step 4), you can punch down the dough, wrap it tightly in plastic wrap, and refrigerate it for up to 24 hours. When ready to bake, remove the dough from the refrigerator and let it come to room temperature for about 30-60 minutes before proceeding with Step 5 (preparing the baking pan and second rise). Alternatively, you can bake the focaccia ahead of time and reheat it gently in a warm oven or toaster oven to refresh its texture before serving.
Q4: My focaccia is browning too quickly on top, but the bottom is still pale. How can I fix this?
A: Oven temperatures can vary. If your focaccia is browning too quickly on top, you can loosely tent it with aluminum foil to prevent further browning while allowing the bottom to continue baking. You can also lower the oven temperature by 25°F (15°C) for the remaining baking time. To ensure the bottom browns nicely, make sure your baking pan is placed in the lower third of your oven. If your oven has hot spots, rotating the pan halfway through baking can also help ensure even browning.
Q5: Can I add other types of flour to make it healthier or change the flavor?
A: Yes, you can experiment with adding other types of flour. For a slightly healthier option, you can substitute up to 25% of the all-purpose flour with whole wheat flour. This will add fiber and a nuttier flavor, but it will also slightly alter the texture, making it a bit denser. You can also experiment with other flours like semolina flour for a slightly coarser texture and nutty flavor, or rye flour for a more robust and earthy taste. When substituting flours, start with smaller amounts and gradually increase to find the balance you prefer, as different flours absorb liquid differently and affect gluten development. Remember that significant flour substitutions may require adjustments to the liquid content and kneading time to maintain the desired focaccia texture.
Print
Easy Focaccia Bread Recipe
Ingredients
- All-Purpose Flour (500g, approximately 4 cups): The foundation of our focaccia. All-purpose flour provides the structure and chewiness we’re looking for. While you can experiment with bread flour for a slightly chewier texture, all-purpose is perfectly suitable and readily available, making this recipe truly accessible. For best results, use a good quality, unbleached all-purpose flour. The protein content in the flour is crucial for gluten development, which is essential for the bread’s texture.
- Active Dry Yeast (7g or 1 packet): The magic ingredient that brings our dough to life! Active dry yeast is responsible for fermentation, the process that creates air bubbles within the dough, resulting in a light and airy focaccia. It’s important to use fresh yeast for optimal results. Check the expiration date on your yeast packet to ensure it’s still active. If you’re using instant yeast, you can skip the initial proofing step and add it directly to the dry ingredients.
- Warm Water (350ml, approximately 1 ½ cups, lukewarm – around 105-115°F or 40-46°C): Warm water is essential for activating the active dry yeast. The temperature is crucial – too cold and the yeast won’t activate properly; too hot and it will kill the yeast. Lukewarm water, feeling comfortably warm to the touch but not hot, is ideal. Using filtered water is recommended for the best flavor, as tap water can sometimes contain chlorine or other impurities that can affect the yeast and the final taste of the bread.
- Extra Virgin Olive Oil (100ml, approximately ½ cup + extra for drizzling and greasing): Olive oil is the heart and soul of focaccia. It not only adds incredible flavor but also contributes to the bread’s characteristic texture – that wonderful balance of crispness and chewiness. Extra virgin olive oil is non-negotiable here. Its rich, fruity flavor is what sets focaccia apart. Don’t skimp on the quality; a good quality olive oil will truly elevate your focaccia. We’ll use it in the dough, for greasing the pan, and generously drizzled on top before and after baking.
- Salt (10g, approximately 2 teaspoons): Salt is not just about flavor; it plays a vital role in gluten development and controlling yeast activity. It enhances the flavor of all the other ingredients and balances the richness of the olive oil. Use fine sea salt or kosher salt. If using table salt, reduce the amount slightly as it’s more concentrated.
- Optional Toppings (to taste): This is where you can get creative and personalize your focaccia! The beauty of focaccia is its versatility – it’s a blank canvas for your culinary imagination. Some popular and delicious topping ideas include:
- Fresh Rosemary: The classic focaccia herb. Its piney aroma and flavor pair perfectly with olive oil and salt.
- Coarse Sea Salt Flakes: Adds a delightful crunch and bursts of salty flavor. Maldon sea salt flakes are particularly prized for their delicate texture and clean taste.
- Cherry Tomatoes (halved): Provide a juicy sweetness and vibrant color.
- Kalamata Olives (pitted and halved): Add a briny, Mediterranean flavor.
- Red Onion (thinly sliced): Offers a slightly pungent and sweet note.
- Garlic (thinly sliced or roasted cloves): Infuses the focaccia with a savory, aromatic depth.
- Parmesan Cheese (grated): Adds a salty, umami richness.
- Other Herbs: Thyme, oregano, sage, or basil can also be used individually or in combination.
- Peppers (roasted or fresh bell peppers, chili flakes): For a touch of sweetness or spice.
Instructions
Step 1: Activate the Yeast (Proofing)
- In a large mixing bowl, or the bowl of your stand mixer, combine the warm water and active dry yeast.
- Gently stir with a spoon or whisk to ensure the yeast is dissolved in the water.
- Let the mixture stand for 5-10 minutes, or until you see a frothy or foamy layer forming on the surface. This is called “proofing” the yeast and confirms that it’s active and ready to work its magic in the dough. If the yeast doesn’t foam, it might be expired or the water might have been too hot or cold, and you may need to start again with fresh yeast.
Step 2: Combine Dry Ingredients and Olive Oil
- In the same bowl (or a separate large bowl if you prefer), add the all-purpose flour and salt.
- Whisk the dry ingredients together to ensure the salt is evenly distributed throughout the flour. This is important for consistent gluten development and flavor.
- Pour in ½ cup (100ml) of extra virgin olive oil into the bowl with the dry ingredients.
Step 3: Combine Wet and Dry Ingredients and Knead
- Pour the proofed yeast mixture into the bowl with the flour and olive oil.
- Using a wooden spoon, spatula, or the dough hook attachment of your stand mixer, begin to mix the ingredients together.
- Mix until a shaggy dough forms. At first, it will look quite dry and crumbly, but as you continue to mix, it will come together.
- If using a stand mixer with a dough hook, knead on low speed for 8-10 minutes.
- If kneading by hand, turn the dough out onto a lightly floured surface. Knead for 10-12 minutes.
- Kneading is crucial for developing the gluten in the flour, which gives focaccia its characteristic chewy texture. The dough should become smooth, elastic, and slightly tacky, but not sticky. It should pull away from the sides of the bowl and bounce back slightly when poked.
Step 4: First Rise (Bulk Fermentation)
- Lightly grease a large bowl with olive oil.
- Form the kneaded dough into a ball and place it in the greased bowl.
- Turn the dough to coat it lightly with olive oil. This prevents the dough from drying out during the rise.
- Cover the bowl tightly with plastic wrap or a clean kitchen towel.
- Let the dough rise in a warm place for 1-1.5 hours, or until it has doubled in size. The ideal temperature for rising is around 75-80°F (24-27°C). A warm spot in your kitchen, like near a slightly warm oven or in a sunny area, will work well. The rising time may vary depending on the temperature of your kitchen; in a cooler environment, it may take longer.
Step 5: Prepare the Baking Pan and Second Rise
- Generously grease a 9×13 inch baking pan (or a similar sized sheet pan) with olive oil. Don’t be shy with the olive oil – it prevents sticking and contributes to the crispy bottom crust.
- Once the dough has doubled, gently punch it down to release the air.
- Transfer the dough to the prepared baking pan.
- Using your fingers, gently stretch and press the dough to fill the pan. It’s okay if it doesn’t reach all the corners initially; it will spread further during the second rise.
- Cover the pan loosely with plastic wrap or a clean kitchen towel.
- Let the dough rise again for 30-45 minutes. This second rise allows the dough to relax and become even lighter and airier.
Step 6: Dimpling and Topping
- Preheat your oven to 425°F (220°C).
- Uncover the dough.
- Generously drizzle the top of the dough with more extra virgin olive oil. This is another opportunity to enhance the flavor and create those characteristic crispy, oily dimples.
- Using your fingertips, firmly but gently press dimples all over the surface of the dough. These dimples are crucial for the focaccia texture – they create pockets for the olive oil to pool and crisp up during baking. Press deep enough to almost reach the bottom of the pan.
- Now is the time to add your desired toppings. If using rosemary, gently press sprigs of fresh rosemary into the dimples. Sprinkle generously with coarse sea salt flakes. If using other toppings like cherry tomatoes, olives, or onions, arrange them evenly over the surface of the dough, pressing them lightly into the dimples.
Step 7: Bake to Golden Perfection
- Bake in the preheated oven for 20-25 minutes, or until the focaccia is golden brown and cooked through. The baking time may vary slightly depending on your oven. The bottom should be nicely browned and crispy, and the top should be golden and slightly crisp.
- To check for doneness, gently tap the bottom of the focaccia – it should sound hollow. You can also insert a toothpick into the center; it should come out clean.
Step 8: Cool and Enjoy
- Once baked, remove the focaccia from the oven and let it cool in the pan for a few minutes before slicing and serving.
- For an extra touch of flavor and moisture, drizzle with a bit more extra virgin olive oil just before serving.
- Enjoy warm or at room temperature. Focaccia is best enjoyed fresh on the day it’s baked, but it can be stored in an airtight container at room temperature for a day or two and reheated gently in the oven or toaster oven to refresh its texture.
Nutrition
- Serving Size: one normal portion
- Calories: 250-300
- Sugar: 1-2g
- Sodium: 250-350mg
- Fat: 12-15g
- Saturated Fat: 2-3g
- Carbohydrates: 35-40g
- Fiber: 1-2g
- Protein: 5-7g
- Cholesterol: 0mg


