It was one of those gloriously sunny spring afternoons, the kind that just screams for something bright, zesty, and utterly refreshing. My family, a mix of dedicated vegans and curious omnivores, had been subtly (and not-so-subtly) hinting at a desire for a new dessert. I’d been tinkering with veganizing classic treats, and lemon squares were high on my “to-conquer” list. The challenge, as always, lay in replicating that perfect balance of tangy lemon curd and buttery shortbread crust without any dairy or eggs. After a few near-misses (one batch too runny, another with a slightly off-texture), I landed on this recipe. The moment of truth came when I presented a tray of these golden beauties. My eldest, usually my harshest critic when it comes to vegan baking, took a bite, his eyes widened, and then he simply reached for another. My partner, who adores anything lemon, declared them “sunshine in a square.” Even my traditionally-minded mother-in-law asked for the recipe! These Easy Vegan Lemon Squares have since become a staple for potlucks, family gatherings, or just a Tuesday afternoon pick-me-up. They are delightfully simple to make, yet taste incredibly decadent, proving that vegan baking can be both accessible and absolutely delicious.
The Quest for the Perfect Zesty Treat: Why These Vegan Lemon Squares Reign Supreme
Lemon squares. Just the name evokes images of sunny picnics, cheerful bake sales, and that irresistible combination of sweet and tart. For those embracing a plant-based lifestyle, the thought of achieving that classic, wobbly, custard-like lemon filling and a perfectly crumbly, buttery shortbread base without eggs or dairy might seem daunting. But fear not, because this recipe for Easy Vegan Lemon Squares is here to shatter those doubts and deliver a dessert that will have everyone, vegan or not, reaching for seconds (and thirds!).
The magic of these squares lies in their simplicity and their uncanny ability to replicate the beloved textures and flavors of traditional lemon bars. We’re talking about a rich, vibrant lemon curd that sets up beautifully, boasting an intense citrus punch, all nestled atop a tender, melt-in-your-mouth shortbread crust. This isn’t just a “good for vegan” dessert; it’s a “standout, amazing, can-I-have-the-recipe?” dessert, period.
We’ll guide you through every step, demystifying the process and ensuring your baking adventure is as joyful as the first bite of these lemony delights. Get ready to fill your kitchen with the aroma of freshly baked goodness and prepare to impress yourself and your loved ones with these incredibly Easy Vegan Lemon Squares.
Ingredients for Irresistible Easy Vegan Lemon Squares
Gathering your ingredients is the first step to citrus perfection. The beauty of this recipe lies in its use of readily available pantry staples. Here’s what you’ll need:
For the Buttery Vegan Shortbread Crust:
- All-Purpose Flour: 1 ½ cups (180g) – The structural backbone of our crust.
- Granulated Sugar: ½ cup (100g) – For sweetness and a tender crumb.
- Vegan Block Butter (Cold and Cubed): ¾ cup (170g) – Ensure it’s a good quality block butter (not margarine from a tub) for the best shortbread texture. Keep it cold!
- Cornstarch (Cornflour): 2 tablespoons – Helps create a more tender, melt-in-your-mouth texture.
- Salt: ¼ teaspoon – Balances the sweetness and enhances flavor.
- Optional: Lemon Zest: 1 teaspoon – For an extra hint of lemon in the crust.
For the Luscious Vegan Lemon Filling:
- Granulated Sugar: 1 ¼ cups (250g) – The primary sweetener for the tangy filling.
- Full-Fat Coconut Milk (from a can, well-shaken): 1 can (13.5 oz / 400ml) – Provides richness and creaminess, replacing traditional eggs and dairy. Use the thick, creamy part and the watery liquid.
- Fresh Lemon Juice: ¾ cup (180ml) – This is key! Freshly squeezed juice offers unparalleled brightness. You’ll likely need 3-4 large lemons.
- Lemon Zest: 2 tablespoons (from about 2-3 lemons) – Packs a powerful lemon aroma and flavor.
- Cornstarch (Cornflour): ½ cup (60g) – The magic ingredient that thickens the filling to a perfect custard-like consistency without eggs.
- All-Purpose Flour: 2 tablespoons – Works in tandem with cornstarch for structure.
- Turmeric Powder: ¼ teaspoon (or less) – Purely for a lovely sunny yellow color. It’s optional, and a tiny bit goes a long way – too much can impart flavor.
- Salt: ¼ teaspoon – Enhances all the other flavors.
Equipment Needed:
- 8×8 inch (20×20 cm) square baking pan
- Parchment paper
- Mixing bowls
- Whisk
- Spatula
- Zester or fine grater
- Measuring cups and spoons
Step-by-Step Instructions: Crafting Your Sunshine Squares
Follow these detailed steps, and you’ll be well on your way to enjoying the most delicious vegan lemon squares. Patience during chilling is key for perfect results!
Phase 1: Preparing the Perfect Vegan Shortbread Crust
- Preheat and Prep: Preheat your oven to 350°F (175°C). Line an 8×8 inch (20×20 cm) square baking pan with parchment paper, leaving an overhang on two opposite sides. This “sling” will make it easy to lift the squares out later. Lightly grease the pan before adding the parchment if you want extra non-stick security.
- Combine Dry Ingredients: In a medium-sized mixing bowl, whisk together the 1 ½ cups of all-purpose flour, ½ cup of granulated sugar, 2 tablespoons of cornstarch, and ¼ teaspoon of salt. If using, add the 1 teaspoon of lemon zest and whisk again to distribute.
- Cut in the Butter: Add the ¾ cup of cold, cubed vegan block butter to the dry ingredients. Using a pastry blender, your fingertips, or a food processor (pulse carefully), cut the butter into the flour mixture until it resembles coarse crumbs or wet sand. Don’t overmix; some small pea-sized butter pieces are fine.
- Press into Pan: Transfer the crumbly mixture to your prepared baking pan. Press it down firmly and evenly across the bottom of the pan using your fingers or the flat bottom of a glass. Aim for a compact, level base.
- Pre-Bake the Crust: Bake the crust in the preheated oven for 15-18 minutes, or until it’s lightly golden around the edges and set. Pre-baking ensures a crisp crust that won’t get soggy under the lemon filling.
- Cool Slightly: Once baked, remove the crust from the oven and set it aside to cool slightly while you prepare the lemon filling. Keep the oven on.
Phase 2: Whisking Up the Vibrant Vegan Lemon Filling
- Combine Dry Filling Ingredients: In a large mixing bowl, whisk together the 1 ¼ cups of granulated sugar, ½ cup of cornstarch, 2 tablespoons of all-purpose flour, ¼ teaspoon of turmeric powder (if using for color), and ¼ teaspoon of salt. Whisking these dry ingredients thoroughly helps prevent lumps when the wet ingredients are added.
- Add Wet Ingredients: Pour in the 1 can (400ml) of well-shaken full-fat coconut milk, ¾ cup of fresh lemon juice, and the 2 tablespoons of lemon zest.
- Whisk Until Smooth: Whisk everything together vigorously until the mixture is completely smooth and no lumps of cornstarch or flour remain. This might take a minute or two. Ensure you scrape the bottom and sides of the bowl to incorporate everything. The mixture will be quite liquid at this stage.
Phase 3: Assembling, Baking, and Chilling to Perfection
- Pour Filling Over Crust: Gently pour the prepared lemon filling mixture over the slightly cooled, pre-baked shortbread crust in the baking pan.
- Bake the Squares: Carefully transfer the pan back into the 350°F (175°C) oven. Bake for 25-30 minutes. The filling should look set around the edges and still have a slight wobble in the very center (like a cheesecake). The surface might have a few tiny bubbles. Be careful not to overbake, as this can make the filling rubbery.
- Cool Completely at Room Temperature: Once baked, remove the pan from the oven and place it on a wire rack. Let the lemon squares cool completely at room temperature. This can take 1-2 hours. Do not attempt to cut them or chill them while hot, as the filling needs to continue setting.
- Chill Thoroughly: Once cooled to room temperature, cover the pan loosely with plastic wrap (try not to let it touch the surface of the filling) and transfer it to the refrigerator. Chill for at least 4 hours, but preferably overnight. This chilling process is crucial for the filling to firm up properly, allowing for clean, neat slices.
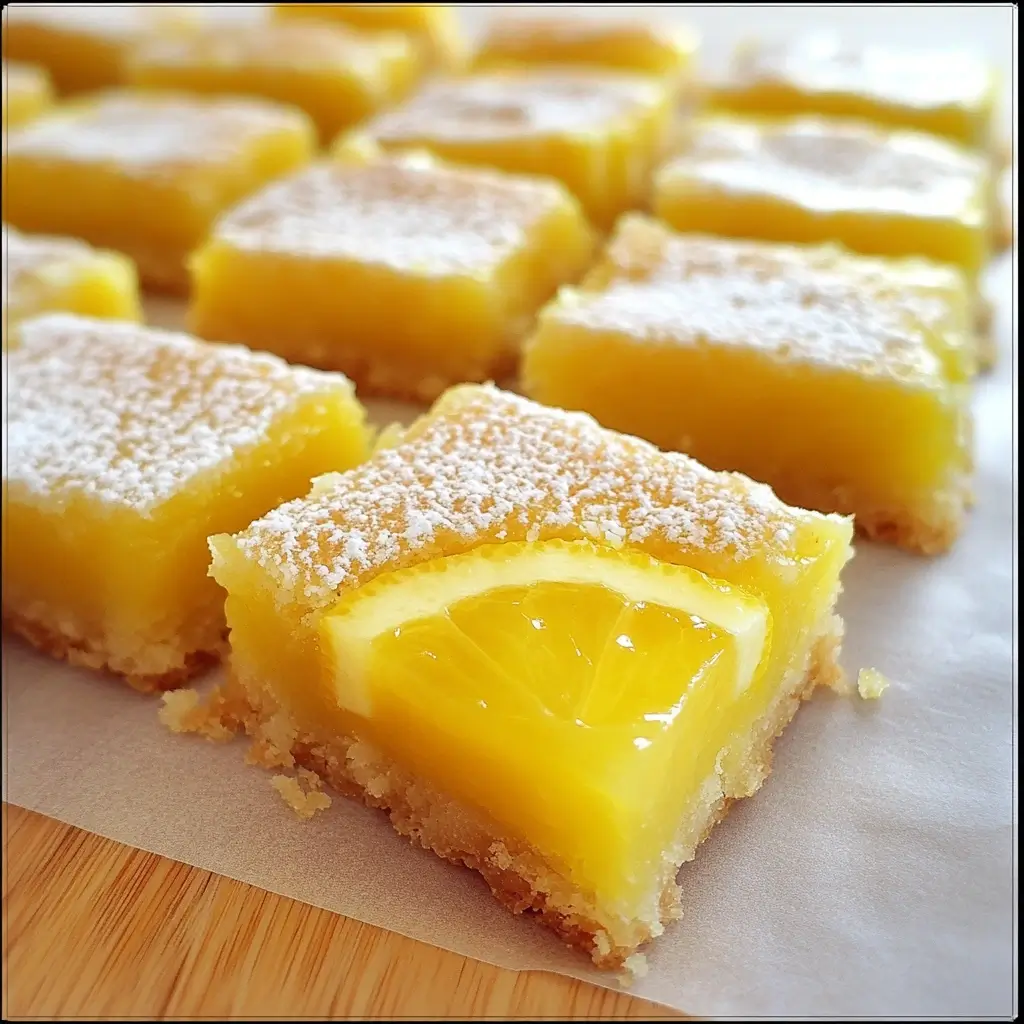
- Slice and Serve: Once thoroughly chilled, use the parchment paper overhangs to carefully lift the entire slab of lemon squares out of the pan and onto a cutting board. Using a large, sharp knife, cut into squares. For the cleanest cuts, wipe the knife clean with a damp cloth between each slice. A classic dusting of powdered sugar before serving is highly recommended!
Nutritional Snapshot: What’s in a Square?
While these are a treat, it’s always good to have an idea of the nutritional content. Please note that these values are approximate and can vary based on the specific brands of ingredients used and the final serving size.
- Servings: This recipe typically yields 12-16 squares, depending on how large you cut them.
- For 12 squares (larger): Approximately 2.6 x 2 inches each
- For 16 squares (smaller): Approximately 2 x 2 inches each
- Approximate Calories per Serving (if cut into 16 squares): Around 220-260 calories.
This calculation considers the vegan butter, sugar, flour, and coconut milk as primary calorie contributors. The fresh lemon juice adds negligible calories but immense flavor and Vitamin C!
Time Commitment: From Prep to Perfection
Understanding the time involved helps plan your baking adventure:
- Preparation Time (Active):
- Crust: 10-15 minutes
- Filling: 5-10 minutes
- Total Active Prep Time: Approximately 15-25 minutes
- Baking Time:
- Crust Pre-bake: 15-18 minutes
- Squares Bake: 25-30 minutes
- Total Baking Time: Approximately 40-48 minutes
- Cooling & Chilling Time (Passive but Essential):
- Room Temperature Cooling: 1-2 hours
- Refrigerator Chilling: Minimum 4 hours, preferably overnight (6-8 hours)
- Total Cooling/Chilling Time: Approximately 5-10 hours
- Overall Total Time: Roughly 6 to 11 hours (mostly passive chilling time). This makes them a great make-ahead dessert!
Serving Suggestions: Elevating Your Lemon Experience
These Easy Vegan Lemon Squares are delightful on their own, but here are a few ways to elevate their presentation and enjoyment:
- Classic Dusting:
- A generous dusting of powdered/confectioners’ sugar right before serving is a must for that iconic lemon square look and an extra touch of sweetness. Use a fine-mesh sieve for an even coat.
- Berry Bliss:
- Serve alongside a small handful of fresh berries like raspberries, blueberries, or sliced strawberries. The tartness and color of the berries beautifully complement the lemon.
- A simple berry coulis drizzled over or next to the square also adds elegance.
- Creamy Accompaniments:
- A dollop of vegan whipped cream (coconut-based or other plant-based varieties) provides a lovely creamy contrast.
- A scoop of vegan vanilla ice cream turns this into an even more decadent dessert.
- Herbal Elegance:
- Garnish with a tiny sprig of fresh mint for a pop of color and a subtle fresh aroma.
- Edible flowers like violas or pansies can make for a stunning presentation for special occasions.
- Beverage Pairings:
- Perfect with a cup of hot black tea (Earl Grey is particularly nice).
- An iced tea or freshly squeezed lemonade in warmer months.
- A light, crisp white wine like a Sauvignon Blanc can also pair nicely for an adult treat.
- On a Dessert Platter:
- Cut them into smaller, bite-sized pieces to include on a larger dessert platter with other vegan goodies like cookies or brownies.
Pro Tips for Flawless Vegan Lemon Squares Every Time
Unlock the secrets to consistently perfect vegan lemon squares with these expert tips:
- Fresh Lemon Juice is Non-Negotiable: This is the most crucial tip for vibrant flavor. Bottled lemon juice often has a dull or slightly metallic taste. The effort of squeezing fresh lemons (you’ll need about 3-4 large ones) is rewarded tenfold in the final taste. Don’t forget the zest – it contains essential oils that pack a huge lemon punch!
- Master the Zest: When zesting lemons, use a microplane or the finest side of a box grater. Only remove the yellow outer layer of the peel. The white pith underneath is bitter and can impart an unpleasant taste to your squares.
- Chilling is Your Best Friend (Seriously!): We cannot emphasize this enough. The filling needs ample time to set completely. Rushing the chilling process will result in a runny filling and messy cuts. Chilling overnight is ideal. This also allows the flavors to meld and intensify.
- Parchment Paper Power: Using a parchment paper sling is a game-changer. It not only prevents sticking but allows you to lift the entire slab of lemon squares out of the pan easily, making cutting neat, uniform squares much simpler and preventing damage to your pan.
- Don’t Overbake the Filling: Overbaking is a common culprit for a rubbery or overly firm lemon filling. Bake just until the edges are set and the center has a slight jiggle (like set Jell-O or a baked cheesecake). It will continue to firm up as it cools and chills. If you see significant browning or cracking, it’s likely been in too long.
Frequently Asked Questions (FAQ) About Easy Vegan Lemon Squares
Here are answers to some common questions you might have about making these delightful vegan treats:
- Q: Can I make these lemon squares gluten-free?
- A: Yes, you likely can! For the crust, substitute the all-purpose flour with a good quality gluten-free all-purpose baking blend that contains xanthan gum. The amount should be a 1:1 replacement. For the small amount of flour in the filling, you can also use your gluten-free blend or substitute it with an additional 2 tablespoons of cornstarch. Baking times might vary slightly, so keep an eye on them.
- Q: How should I store leftover vegan lemon squares?
- A: Store any leftover lemon squares in an airtight container in the refrigerator. They will keep well for up to 4-5 days. The crust may soften slightly over time, but they will still be delicious.
- Q: Can I freeze these vegan lemon squares?
- A: Yes, these freeze surprisingly well! Once they are completely chilled and cut, you can freeze them. For best results, place the cut squares on a baking sheet in a single layer and freeze until solid. Then, transfer them to a freezer-safe airtight container or bag, placing parchment paper between layers if stacking. They can be frozen for up to 2-3 months. Thaw them in the refrigerator overnight before serving.
- Q: Why is turmeric used in the filling? Will it make my lemon squares taste like turmeric?
- A: Turmeric is used in a very small quantity purely for its natural yellow color, helping to mimic the golden hue that egg yolks typically provide in traditional lemon bars. When used sparingly (¼ teaspoon or less), its flavor is undetectable and will not overpower the bright lemon taste. If you’re concerned or don’t have it, you can omit it; your squares will just be a paler yellow.
- Q: I don’t have full-fat coconut milk. Can I use another plant-based milk?
- A: Full-fat coconut milk is highly recommended for its richness and fat content, which contributes significantly to the creamy, custard-like texture of the filling. If you use a lower-fat plant milk (like almond, soy, or oat milk), the filling might not be as rich or set as firmly. You might need to increase the cornstarch slightly (perhaps by an extra tablespoon) if using a thinner milk, but the texture will likely be different. Soaked and blended raw cashews (cashew cream) could be a richer alternative if you cannot use coconut milk.
Enjoy baking and devouring these incredibly Easy Vegan Lemon Squares! They are a testament to the fact that plant-based desserts can be just as satisfying, flavorful, and crowd-pleasing as their traditional counterparts. Happy baking!
Print
Easy Vegan Lemon Squares Recipe
Ingredients
For the Buttery Vegan Shortbread Crust:
- All-Purpose Flour: 1 ½ cups (180g) – The structural backbone of our crust.
- Granulated Sugar: ½ cup (100g) – For sweetness and a tender crumb.
- Vegan Block Butter (Cold and Cubed): ¾ cup (170g) – Ensure it’s a good quality block butter (not margarine from a tub) for the best shortbread texture. Keep it cold!
- Cornstarch (Cornflour): 2 tablespoons – Helps create a more tender, melt-in-your-mouth texture.
- Salt: ¼ teaspoon – Balances the sweetness and enhances flavor.
- Optional: Lemon Zest: 1 teaspoon – For an extra hint of lemon in the crust.
For the Luscious Vegan Lemon Filling:
- Granulated Sugar: 1 ¼ cups (250g) – The primary sweetener for the tangy filling.
- Full-Fat Coconut Milk (from a can, well-shaken): 1 can (13.5 oz / 400ml) – Provides richness and creaminess, replacing traditional eggs and dairy. Use the thick, creamy part and the watery liquid.
- Fresh Lemon Juice: ¾ cup (180ml) – This is key! Freshly squeezed juice offers unparalleled brightness. You’ll likely need 3-4 large lemons.
- Lemon Zest: 2 tablespoons (from about 2-3 lemons) – Packs a powerful lemon aroma and flavor.
- Cornstarch (Cornflour): ½ cup (60g) – The magic ingredient that thickens the filling to a perfect custard-like consistency without eggs.
- All-Purpose Flour: 2 tablespoons – Works in tandem with cornstarch for structure.
- Turmeric Powder: ¼ teaspoon (or less) – Purely for a lovely sunny yellow color. It’s optional, and a tiny bit goes a long way – too much can impart flavor.
- Salt: ¼ teaspoon – Enhances all the other flavors.
Instructions
Phase 1: Preparing the Perfect Vegan Shortbread Crust
- Preheat and Prep: Preheat your oven to 350°F (175°C). Line an 8×8 inch (20×20 cm) square baking pan with parchment paper, leaving an overhang on two opposite sides. This “sling” will make it easy to lift the squares out later. Lightly grease the pan before adding the parchment if you want extra non-stick security.
- Combine Dry Ingredients: In a medium-sized mixing bowl, whisk together the 1 ½ cups of all-purpose flour, ½ cup of granulated sugar, 2 tablespoons of cornstarch, and ¼ teaspoon of salt. If using, add the 1 teaspoon of lemon zest and whisk again to distribute.
- Cut in the Butter: Add the ¾ cup of cold, cubed vegan block butter to the dry ingredients. Using a pastry blender, your fingertips, or a food processor (pulse carefully), cut the butter into the flour mixture until it resembles coarse crumbs or wet sand. Don’t overmix; some small pea-sized butter pieces are fine.
- Press into Pan: Transfer the crumbly mixture to your prepared baking pan. Press it down firmly and evenly across the bottom of the pan using your fingers or the flat bottom of a glass. Aim for a compact, level base.
- Pre-Bake the Crust: Bake the crust in the preheated oven for 15-18 minutes, or until it’s lightly golden around the edges and set. Pre-baking ensures a crisp crust that won’t get soggy under the lemon filling.
- Cool Slightly: Once baked, remove the crust from the oven and set it aside to cool slightly while you prepare the lemon filling. Keep the oven on.
Phase 2: Whisking Up the Vibrant Vegan Lemon Filling
- Combine Dry Filling Ingredients: In a large mixing bowl, whisk together the 1 ¼ cups of granulated sugar, ½ cup of cornstarch, 2 tablespoons of all-purpose flour, ¼ teaspoon of turmeric powder (if using for color), and ¼ teaspoon of salt. Whisking these dry ingredients thoroughly helps prevent lumps when the wet ingredients are added.
- Add Wet Ingredients: Pour in the 1 can (400ml) of well-shaken full-fat coconut milk, ¾ cup of fresh lemon juice, and the 2 tablespoons of lemon zest.
- Whisk Until Smooth: Whisk everything together vigorously until the mixture is completely smooth and no lumps of cornstarch or flour remain. This might take a minute or two. Ensure you scrape the bottom and sides of the bowl to incorporate everything. The mixture will be quite liquid at this stage.
Phase 3: Assembling, Baking, and Chilling to Perfection
- Pour Filling Over Crust: Gently pour the prepared lemon filling mixture over the slightly cooled, pre-baked shortbread crust in the baking pan.
- Bake the Squares: Carefully transfer the pan back into the 350°F (175°C) oven. Bake for 25-30 minutes. The filling should look set around the edges and still have a slight wobble in the very center (like a cheesecake). The surface might have a few tiny bubbles. Be careful not to overbake, as this can make the filling rubbery.
- Cool Completely at Room Temperature: Once baked, remove the pan from the oven and place it on a wire rack. Let the lemon squares cool completely at room temperature. This can take 1-2 hours. Do not attempt to cut them or chill them while hot, as the filling needs to continue setting.
- Chill Thoroughly: Once cooled to room temperature, cover the pan loosely with plastic wrap (try not to let it touch the surface of the filling) and transfer it to the refrigerator. Chill for at least 4 hours, but preferably overnight. This chilling process is crucial for the filling to firm up properly, allowing for clean, neat slices.
- Slice and Serve: Once thoroughly chilled, use the parchment paper overhangs to carefully lift the entire slab of lemon squares out of the pan and onto a cutting board. Using a large, sharp knife, cut into squares. For the cleanest cuts, wipe the knife clean with a damp cloth between each slice. A classic dusting of powdered sugar before serving is highly recommended!
Nutrition
- Serving Size: One Normal Portion
- Calories: 220-260