


I still remember the first time I stumbled upon the idea of yogurt bark. It was a sweltering summer afternoon, the kids were clamoring for ice cream, and I was desperately seeking a healthier, yet equally satisfying, alternative. Skeptical but hopeful, I whipped up a batch with some Greek yogurt, a handful of berries, and a drizzle of honey. The result? An absolute revelation! It was cool, creamy, crunchy, and disappeared from the freezer in record time. My family was instantly hooked, and “that yummy frozen yogurt stuff” became a household staple. It’s not just a treat; it’s our go-to for a quick, refreshing snack, a light dessert, or even a fun breakfast addition. The beauty of this Easy Yogurt Bark lies in its simplicity and endless customizability. It’s a canvas for your culinary creativity, and I’m thrilled to share my favorite way to make it, along with tips and tricks I’ve picked up along the way.
Easy Yogurt Bark: The Ultimate Refreshing Treat
This recipe is designed to be a baseline – feel free to adjust sweeteners and toppings to your personal preference. The quantities below will yield a generous bark on a standard baking sheet.
Yields: Approximately 10-12 servings
Prep time: 15 minutes
Freeze time: 3-4 hours (or until solid)
Ingredients: What You’ll Need
- Plain Greek Yogurt: 3 cups (about 750g) – Full-fat offers the creamiest texture, but low-fat or non-fat works too.
- Sweetener (Optional): 3-4 tablespoons of honey or maple syrup (adjust to taste). You can also use agave nectar or a sugar-free alternative like stevia or monk fruit sweetener.
- Vanilla Extract: 1 ½ teaspoons – For a lovely flavor base.
- Fresh or Frozen Berries: 1 ½ cups mixed (e.g., blueberries, sliced strawberries, raspberries, blackberries). If using frozen, no need to thaw.
- Chopped Nuts and/or Seeds: ½ cup (e.g., sliced almonds, chopped walnuts, pecans, pistachios, pumpkin seeds, chia seeds, flax seeds).
- Optional Add-ins:
- ¼ cup mini chocolate chips (dark, milk, or white)
- ¼ cup shredded unsweetened coconut
- 2-3 tablespoons granola for extra crunch
- Zest of 1 lemon or orange for a citrusy kick
- A pinch of sea salt to enhance flavors
Equipment:
- Large mixing bowl
- Spatula or large spoon
- Baking sheet (approximately 9×13 inches or similar)
- Parchment paper or a silicone baking mat
Step-by-Step Instructions: Crafting Your Yogurt Bark
Making yogurt bark is incredibly straightforward. Follow these simple steps for a perfect batch every time.
- Prepare Your Pan: Line your baking sheet with parchment paper or a silicone baking mat. This is crucial as it prevents the yogurt from sticking and makes removal and cleanup a breeze. Ensure the parchment paper extends slightly up the sides if possible, especially if your yogurt mixture is thinner.
- Mix the Yogurt Base: In a large mixing bowl, combine the Greek yogurt, your chosen sweetener (if using), and vanilla extract. Stir gently until everything is well incorporated. Taste and adjust sweetness if necessary. If you’re adding citrus zest or a pinch of salt, mix it in now.
- Pro Tip: Avoid overmixing, as this can make the yogurt too runny. A gentle fold is all you need.
- Spread the Yogurt: Pour the yogurt mixture onto the prepared baking sheet. Using a spatula or the back of a large spoon, spread the yogurt evenly to your desired thickness. A thickness of about ¼ to ½ inch (0.6 to 1.25 cm) is ideal. Thicker bark will be chewier, while thinner bark will be crispier and melt faster.
- Add Your Toppings: Now for the fun part! Sprinkle your chosen berries, nuts, seeds, chocolate chips, coconut, or granola evenly over the surface of the yogurt. Gently press larger toppings (like strawberry slices) into the yogurt slightly to help them adhere as it freezes.
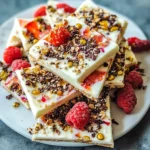
- Creative Tip: Think about color and texture combinations. A vibrant mix of red berries, green pistachios, and dark chocolate chips looks as good as it tastes!
- Freeze Solid: Carefully transfer the baking sheet to the freezer. Ensure it’s placed on a flat, level surface. Let the yogurt bark freeze completely, which typically takes 3-4 hours. For a thicker bark, it might take closer to 4-5 hours. It should be firm to the touch and easily breakable.
- Break and Store: Once frozen solid, remove the baking sheet from the freezer. Lift the parchment paper (with the bark on it) from the tray. Using your hands, break the yogurt bark into irregular pieces. You can also use a sharp knife to cut it into more uniform shapes if you prefer, but the rustic, broken look is part of its charm.
- Enjoy Immediately or Store: Serve the yogurt bark pieces immediately for the best texture. If you have leftovers, store them in an airtight container or a freezer-safe bag in the freezer. Place layers of parchment paper between the pieces to prevent them from sticking together. It’s best enjoyed within 1-2 weeks for optimal flavor and texture, though it can last longer.
Nutrition Facts (Estimated)
- Servings: Approximately 10-12 pieces
- Calories per serving (1/12th of recipe, using full-fat Greek yogurt, honey, mixed berries, and almonds): Approximately 120-150 calories.
Disclaimer: Nutritional information is an estimate and can vary significantly based on the specific ingredients used (type of yogurt, amount and type of sweetener, types and quantities of toppings). For precise nutritional values, it’s recommended to calculate based on your exact ingredients using an online nutrition calculator.
Breakdown of Potential Nutritional Benefits:
- Protein: Greek yogurt is a fantastic source of protein, which helps with satiety and muscle maintenance.
- Probiotics: Yogurt contains live and active cultures that are beneficial for gut health.
- Vitamins and Minerals: Depending on your toppings, you can get a good dose of vitamins (like Vitamin C from berries) and minerals (like magnesium from nuts).
- Healthy Fats: Nuts and seeds provide heart-healthy unsaturated fats.
- Fiber: Berries, nuts, and seeds contribute dietary fiber, aiding digestion.
Preparation Time: Quick and Easy!
- Active Preparation Time: 10-15 minutes. This includes mixing the yogurt and adding toppings.
- Freezing Time: 3-4 hours, or until completely solid.
- Total Time: Approximately 3 hours 15 minutes to 4 hours 15 minutes.
This makes yogurt bark an excellent option for a quick-to-assemble treat that you can prepare in advance. The minimal active time means you can whip it up even on a busy day, then let the freezer do the rest of the work.
How to Serve Your Delicious Yogurt Bark
Yogurt bark is wonderfully versatile! Here are some creative and enjoyable ways to serve it:
- As a Refreshing Snack:
- Perfect for a mid-afternoon pick-me-up, especially on warm days.
- A great post-workout snack to cool down and refuel with protein.
- A Healthy Dessert Option:
- Serve it after dinner as a lighter alternative to ice cream or heavy desserts.
- Offer a platter of different yogurt bark variations at a gathering.
- For Breakfast or Brunch:
- Break it into smaller pieces and sprinkle it over a bowl of oatmeal or cereal for added coolness and flavor.
- Serve alongside fresh fruit and granola for a vibrant brunch spread.
- Kid-Friendly Treat:
- Kids love breaking the bark and picking their favorite pieces.
- It’s a fantastic way to get them to eat more yogurt and fruit. Let them help choose and sprinkle the toppings!
- At Parties and Gatherings:
- Arrange pieces artfully on a chilled platter for a beautiful and healthy addition to a dessert table.
- Pack it in a cooler for picnics or beach outings (ensure it stays frozen!).
- Themed Bark:
- Tropical Twist: Use coconut yogurt, pineapple chunks, mango, and toasted coconut flakes.
- Chocolate Lover’s Dream: Swirl in some cocoa powder or melted dark chocolate into the yogurt base, then top with chocolate chips, cacao nibs, and raspberries.
- Nut Butter Delight: Swirl a tablespoon or two of peanut butter, almond butter, or tahini into the yogurt before spreading, then top with chopped nuts and banana slices.
Remember to serve it straight from the freezer, as it will start to melt at room temperature, especially on warmer days.
Additional Tips for Perfect Yogurt Bark Every Time
Unlock the full potential of your yogurt bark with these five expert tips:
- Parchment Paper is Non-Negotiable: Seriously, don’t skip this. Lining your baking sheet with parchment paper (or a silicone mat) is the golden rule. It prevents the yogurt from freezing directly onto the pan, making it incredibly easy to lift out and break once frozen. It also means cleanup is virtually non-existent.
- Control the Thickness: The thickness of your spread yogurt layer directly impacts the final texture.
- Thinner (around ¼ inch): Creates a more delicate, crispier bark that melts quickly. It’s great for a lighter bite.
- Thicker (around ½ inch): Results in a chewier, more substantial bark that takes a bit longer to melt.
Experiment to find your preferred consistency. An even spread ensures consistent freezing and texture.
- Work Quickly with Frozen Fruit: If you’re using frozen berries, add them just before freezing and try not to stir them into the yogurt too much. As they thaw slightly, their juices can bleed and create intense color swirls (which can be pretty!), but too much moisture can lead to icier spots. Adding them last and pressing gently works best.
- Smart Storage Solutions: To maintain the best quality, store your yogurt bark in an airtight container in the freezer. To prevent pieces from clumping together into one giant bark-berg, place sheets of parchment paper or wax paper between layers. This makes it easy to grab just a few pieces at a time. It’s best consumed within 1-2 weeks.
- Flavor Customization is Key: This is where yogurt bark truly shines!
- Yogurt Base: Experiment with different yogurt flavors (vanilla, coconut, berry-flavored) but be mindful of added sugars. You can also use dairy-free alternatives like coconut, almond, or soy yogurt.
- Sweeteners: Adjust the amount and type of sweetener. Some fruits are sweet enough that you might not need any extra.
- Toppings Galore: The sky’s the limit! Think dried fruit (cranberries, apricots), different types of chocolate (shaved, chunks), edible flowers for a fancy touch, pretzel pieces for a salty-sweet crunch, or even a swirl of fruit puree or jam.
Frequently Asked Questions (FAQ) About Yogurt Bark
Have questions? We’ve got answers to some common queries about making easy yogurt bark.
- Q: Can I use regular yogurt instead of Greek yogurt?
A: Yes, you can, but there’s a difference. Regular yogurt has a higher water content than Greek yogurt. This means your bark might be icier and less creamy. If using regular yogurt, you might consider straining it through a cheesecloth for a few hours to remove some excess whey, which will help achieve a thicker, creamier consistency similar to Greek yogurt. Alternatively, expect a slightly different texture. - Q: How long does yogurt bark last in the freezer?
A: When stored properly in an airtight container with parchment paper between layers to prevent sticking, yogurt bark can last for up to 1-2 months in the freezer. However, for the best taste and texture (less chance of freezer burn or ice crystals), it’s recommended to consume it within 1-2 weeks. - Q: Can I make this recipe vegan or dairy-free?
A: Absolutely! Simply substitute the Greek yogurt with your favorite plant-based yogurt. Coconut yogurt, almond yogurt, soy yogurt, or oat-based yogurts all work well. Choose a plain, unsweetened variety so you can control the sweetness. Ensure your other toppings (like chocolate chips) are also dairy-free. - Q: My yogurt bark is too icy. What did I do wrong?
A: Iciness usually comes from a high water content. This can happen if you used regular, unstrained yogurt, or if your toppings (especially fruit) released a lot of moisture. Using full-fat Greek yogurt can help, as fat inhibits ice crystal formation. Also, ensure your freezer is at an optimal temperature (0°F or -18°C) and that the bark freezes quickly and evenly. Minimizing added liquids will also reduce iciness. - Q: Is yogurt bark actually healthy?
A: Generally, yes! It can be a very healthy snack or dessert, especially when compared to traditional ice cream or sugary treats. It’s packed with protein from Greek yogurt, can be low in added sugar (if you control the sweetener), and provides vitamins, minerals, and fiber from fruit and nut toppings. The “healthiness” depends heavily on your ingredient choices. Opt for plain yogurt, natural sweeteners in moderation, and nutrient-dense toppings like fresh fruits, nuts, and seeds to maximize its benefits.
Easy Yogurt Bark Recipe
Ingredients
- Plain Greek Yogurt: 3 cups (about 750g) – Full-fat offers the creamiest texture, but low-fat or non-fat works too.
- Sweetener (Optional): 3-4 tablespoons of honey or maple syrup (adjust to taste). You can also use agave nectar or a sugar-free alternative like stevia or monk fruit sweetener.
- Vanilla Extract: 1 ½ teaspoons – For a lovely flavor base.
- Fresh or Frozen Berries: 1 ½ cups mixed (e.g., blueberries, sliced strawberries, raspberries, blackberries). If using frozen, no need to thaw.
- Chopped Nuts and/or Seeds: ½ cup (e.g., sliced almonds, chopped walnuts, pecans, pistachios, pumpkin seeds, chia seeds, flax seeds).
- Optional Add-ins:
- ¼ cup mini chocolate chips (dark, milk, or white)
- ¼ cup shredded unsweetened coconut
- 2–3 tablespoons granola for extra crunch
- Zest of 1 lemon or orange for a citrusy kick
- A pinch of sea salt to enhance flavors
Instructions
- Prepare Your Pan: Line your baking sheet with parchment paper or a silicone baking mat. This is crucial as it prevents the yogurt from sticking and makes removal and cleanup a breeze. Ensure the parchment paper extends slightly up the sides if possible, especially if your yogurt mixture is thinner.
- Mix the Yogurt Base: In a large mixing bowl, combine the Greek yogurt, your chosen sweetener (if using), and vanilla extract. Stir gently until everything is well incorporated. Taste and adjust sweetness if necessary. If you’re adding citrus zest or a pinch of salt, mix it in now.
- Pro Tip: Avoid overmixing, as this can make the yogurt too runny. A gentle fold is all you need.
- Spread the Yogurt: Pour the yogurt mixture onto the prepared baking sheet. Using a spatula or the back of a large spoon, spread the yogurt evenly to your desired thickness. A thickness of about ¼ to ½ inch (0.6 to 1.25 cm) is ideal. Thicker bark will be chewier, while thinner bark will be crispier and melt faster.
- Add Your Toppings: Now for the fun part! Sprinkle your chosen berries, nuts, seeds, chocolate chips, coconut, or granola evenly over the surface of the yogurt. Gently press larger toppings (like strawberry slices) into the yogurt slightly to help them adhere as it freezes.
- Creative Tip: Think about color and texture combinations. A vibrant mix of red berries, green pistachios, and dark chocolate chips looks as good as it tastes!
- Freeze Solid: Carefully transfer the baking sheet to the freezer. Ensure it’s placed on a flat, level surface. Let the yogurt bark freeze completely, which typically takes 3-4 hours. For a thicker bark, it might take closer to 4-5 hours. It should be firm to the touch and easily breakable.
- Break and Store: Once frozen solid, remove the baking sheet from the freezer. Lift the parchment paper (with the bark on it) from the tray. Using your hands, break the yogurt bark into irregular pieces. You can also use a sharp knife to cut it into more uniform shapes if you prefer, but the rustic, broken look is part of its charm.
- Enjoy Immediately or Store: Serve the yogurt bark pieces immediately for the best texture. If you have leftovers, store them in an airtight container or a freezer-safe bag in the freezer. Place layers of parchment paper between the pieces to prevent them from sticking together. It’s best enjoyed within 1-2 weeks for optimal flavor and texture, though it can last longer.
Nutrition
- Serving Size: One Normal Portion
- Calories: 120-150


