


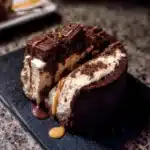
There are certain desserts that are more than just a sweet treat; they are an event. For my family, this Fudge Brownie Ice Cream Cake is exactly that. I first made it for my son’s 10th birthday, wanting to create something more spectacular than a simple store-bought cake. I still remember the look on the kids’ faces when I brought it to the table—a towering creation of dark chocolate, creamy vanilla, and glistening fudge. The silence that fell over the room, replaced only by the clinking of forks and murmurs of “wow,” was my ultimate reward. This cake isn’t just a recipe; it’s the centerpiece of a celebration. It’s the satisfyingly dense, chewy brownie base that doesn’t freeze into a brick, the layer of silky, homemade hot fudge that stays perfectly gooey even when cold, and the way the classic vanilla bean ice cream melts ever so slightly into it all. It has become our go-to for birthdays, summer parties, or any time we need a dose of pure, unadulterated joy. Making it is a labor of love, a multi-step process that is worth every single second when you take that first perfect bite.
The Ultimate Fudge Brownie Ice Cream Cake Recipe
This recipe breaks down the process of creating a show-stopping, multi-layered ice cream cake from scratch. We’ll build it from the bottom up, starting with a perfectly fudgy brownie base, followed by a rich homemade hot fudge sauce, and a thick layer of creamy ice cream. The magic of this recipe lies in the quality of each component and the way they come together to create a symphony of temperatures and textures.
Ingredients
Success in baking often comes down to using the right ingredients. For a dessert this decadent, quality matters. Here’s what you’ll need for each glorious layer.
For the Fudgy Brownie Base:
- Unsalted Butter: 1/2 cup (113g), melted, plus more for greasing the pan
- Granulated Sugar: 1 cup (200g)
- Large Eggs: 2
- Vanilla Extract: 1 teaspoon
- All-Purpose Flour: 1/2 cup (60g)
- Unsweetened Cocoa Powder: 1/3 cup (30g), good quality Dutch-processed for a richer flavor
- Salt: 1/4 teaspoon
- Baking Powder: 1/4 teaspoon
- Semi-Sweet Chocolate Chips: 1/2 cup (90g)
For the Homemade Hot Fudge Sauce:
- Heavy Cream: 2/3 cup (160ml)
- Light Corn Syrup: 1/2 cup (120ml)
- Unsalted Butter: 1/4 cup (57g)
- Brown Sugar: 1/2 cup (100g), packed
- Unsweetened Cocoa Powder: 1/2 cup (45g)
- Semi-Sweet or Bittersweet Chocolate: 4 ounces (113g), finely chopped
- Vanilla Extract: 1 teaspoon
- Salt: 1/4 teaspoon
For the Ice Cream Layer:
- Vanilla Bean Ice Cream: 1.5 quarts (approximately 6 cups), a high-quality brand with good fat content will yield the creamiest results.
Instructions
Patience is a key ingredient in this recipe. Assembling the cake is a process of layering and freezing. Follow these steps carefully for perfect, distinct layers and a flawless final product.
Part 1: Prepare the Fudgy Brownie Base
- Preheat and Prep: Preheat your oven to 350°F (175°C). Grease a 9-inch springform pan with butter and line the bottom with a circle of parchment paper. Then, line the sides of the pan with a long strip of parchment paper, leaving a 2-3 inch “collar” extending above the rim of the pan. This overhang is crucial for building the cake layers and for easy removal later.
- Mix Wet Ingredients: In a large mixing bowl, whisk together the melted butter and granulated sugar until well combined. Add the eggs one at a time, whisking vigorously after each addition until the mixture is glossy and smooth. Stir in the vanilla extract.
- Combine Dry Ingredients: In a separate, smaller bowl, sift or whisk together the all-purpose flour, cocoa powder, salt, and baking powder. This removes any lumps and ensures even distribution.
- Create the Batter: Gradually add the dry ingredients to the wet ingredients, mixing with a spatula or wooden spoon until just combined. Be careful not to overmix; a few streaks of flour are acceptable. Overmixing develops gluten and will make your brownies tough instead of fudgy.
- Add Chocolate: Gently fold in the 1/2 cup of semi-sweet chocolate chips.
- Bake: Pour the batter into your prepared springform pan and spread it into an even layer using an offset spatula. Bake for 22-25 minutes. The center should be set but still soft, and a toothpick inserted into the center should come out with moist crumbs attached, not wet batter. The key to a chewy brownie base that doesn’t freeze rock-solid is to slightly underbake it.
- Cool Completely: Remove the brownie from the oven and place the pan on a wire rack. Let it cool completely to room temperature, which will take at least 1-2 hours. Do not proceed to the next step until the brownie is 100% cool to the touch.
Part 2: Create the Homemade Hot Fudge Sauce
- Combine Ingredients: In a medium saucepan, combine the heavy cream, light corn syrup, butter, brown sugar, and cocoa powder.
- Heat and Whisk: Place the saucepan over medium heat. Whisk continuously as the butter melts and the sugar dissolves. Bring the mixture to a gentle boil, still whisking.
- Simmer: Once boiling, reduce the heat to low and let it simmer gently for 5-7 minutes, stirring occasionally, until it has thickened slightly.
- Melt the Chocolate: Remove the pan from the heat. Add the finely chopped chocolate, vanilla extract, and salt. Let it sit for 2-3 minutes to allow the residual heat to melt the chocolate, then whisk until the sauce is completely smooth, glossy, and luscious.
- Cool the Sauce: Pour the fudge sauce into a heatproof bowl or jar and let it cool to room temperature. It needs to be cool enough that it won’t melt the ice cream upon contact. You can speed this up by placing it in the refrigerator, stirring every 15 minutes. You will use about half of this sauce for the cake; the rest is perfect for serving.
Part 3: Assemble and Freeze the Cake
- Soften the Ice Cream: Take your ice cream out of the freezer and let it sit on the counter for about 15-20 minutes. You want it to be soft enough to spread easily, but not melted or soupy. You can also transfer it to a large, chilled bowl and stir it with a sturdy spoon to achieve a smooth, spreadable consistency.
- First Fudge Layer: Once the brownie base is completely cool, pour about 1 cup of the cooled hot fudge sauce over it. Use an offset spatula to spread it into a thin, even layer that covers the entire surface of the brownie.
- Flash Freeze (Optional but Recommended): For a super clean, distinct fudge layer, place the pan in the freezer for 30 minutes. This will firm up the fudge sauce so it doesn’t mix with the ice cream.
- Add the Ice Cream: Scoop the softened vanilla ice cream on top of the fudge layer. Working quickly, use your offset spatula to spread the ice cream into a thick, even layer, all the way to the edges of the parchment collar. Smooth the top as much as possible.
- Second Fudge Layer: Drizzle another 1/2 to 3/4 cup of the cooled fudge sauce over the top of the ice cream layer. You can spread it out or leave it in decorative swirls and pools.
- The Final Freeze: Cover the top of the springform pan loosely with plastic wrap, then with a layer of aluminum foil to prevent ice crystals from forming. Place the cake in the freezer for a minimum of 8 hours, but preferably overnight. This long freeze is essential for the cake to set completely, ensuring clean slices.
Nutrition Facts
- Servings: 12-16 slices
- Calories per Serving: Approximately 550-650 kcal (This is an estimate and can vary based on the specific brands of ice cream, chocolate, and butter used).
Preparation Time
- Active Time: 45 minutes (20 minutes for the brownie, 15 minutes for the fudge sauce, 10 minutes for assembly)
- Baking Time: 25 minutes
- Cooling & Freezing Time: 10+ hours
- Total Time: Approximately 11 hours, 10 minutes
How to Serve Your Masterpiece
Presentation is everything! A few simple touches can elevate this cake from homemade to gourmet.
- Thaw Slightly: Remove the cake from the freezer about 10-15 minutes before you plan to serve it. This allows it to soften just enough for easier slicing without melting.
- The Perfect Slice: To get clean, beautiful slices, use a long, sharp chef’s knife. Fill a tall glass with hot water, dip the knife into the water, and wipe it dry with a towel before each and every cut. The hot blade will glide through the frozen layers effortlessly.
- Release and Garnish: To serve, unlatch the springform pan. Carefully peel away the parchment paper collar. Use the overhanging parchment on the bottom to lift the entire cake and transfer it to a serving platter or cake stand.
- Topping Extravaganza: Serve each slice with a generous drizzle of the reserved warm hot fudge sauce. Other fantastic toppings include:
- A dollop of fresh, unsweetened whipped cream to balance the richness.
- A sprinkle of flaky sea salt to enhance the chocolate flavor.
- A scattering of chopped nuts like pecans, walnuts, or peanuts for crunch.
- Colorful sprinkles or chocolate shavings for a festive touch.
- Fresh berries, like raspberries or strawberries, to add a bright, tart contrast.
Additional Tips for Success
- Parchment Paper is Your Best Friend: Don’t skip the step of creating a parchment paper collar that extends above the pan. It contains the tall layers and is the secret to easily removing the cake from the pan without any mess or breakage.
- Don’t Rush the Cooling: The importance of cooling the brownie and the fudge sauce cannot be overstated. A warm brownie will create steam and a soggy bottom. Hot fudge sauce will instantly melt your ice cream, resulting in a messy, blended layer instead of distinct ones. Patience is a virtue in ice cream cake making.
- Invest in Quality Ice Cream: Since the ice cream layer is so prominent, its quality significantly impacts the final product. Choose a premium ice cream with a higher fat content. It will be creamier, less icy when frozen, and will have a richer flavor that stands up to the intense chocolate of the brownie and fudge.
- Master the Make-Ahead: This is the perfect dessert to make in advance. You can bake the brownie base up to two days ahead and keep it well-wrapped at room temperature. The entire cake can be assembled and stored in the freezer, tightly wrapped, for up to one week, making party prep a breeze.
- Customize Your Creation: Don’t be afraid to experiment! This recipe is a fantastic template. Swap the vanilla ice cream for coffee, mint chocolate chip, or peanut butter cup. Add a layer of crushed Oreos or chopped peanut butter cups between the fudge and the ice cream for extra texture and flavor.
Frequently Asked Questions (FAQ)
Q1: Can I use a boxed brownie mix instead of making it from scratch?
A: Absolutely! If you’re short on time, a high-quality boxed fudge brownie mix is a great shortcut. Prepare the mix according to the package directions for a 9-inch pan. The key is to bake it for the minimum time recommended to ensure it stays fudgy and doesn’t get too cakey, which can cause it to freeze too hard. Let it cool completely before proceeding with the recipe.
Q2: My brownie base is rock-hard after freezing. What went wrong?
A: This is a common issue and it’s almost always due to one of two things: the brownie was overbaked, or the recipe used was too “cakey.” An overbaked brownie has less moisture, causing it to freeze solid. A “cakey” brownie has a higher flour-to-fat ratio, which also freezes harder. This recipe is specifically designed with a high fat content (butter and eggs) to keep the base chewy and sliceable even when frozen. To avoid this, be sure to pull the brownie from the oven when a toothpick still has moist crumbs on it.
Q3: How do I store leftovers?
A: Storing an ice cream cake properly is crucial to prevent freezer burn. Wrap any leftover cake tightly in a double layer of plastic wrap, followed by a layer of aluminum foil. This creates a barrier against air and moisture. It will keep well in the freezer for up to a week. For individual slices, wrap them separately for a quick and easy single-serving dessert.
Q4: Can I make this recipe gluten-free?
A: Yes, this recipe adapts well to being gluten-free. For the brownie base, simply substitute the all-purpose flour with a good quality 1-to-1 gluten-free baking flour blend (one that contains xanthan gum). All other ingredients in the recipe are naturally gluten-free, but always double-check the labels on your chocolate chips and cocoa powder to be certain. The texture will be nearly identical.
Q5: What other ice cream flavors work well with this cake?
A: While classic vanilla bean is a perfect pairing, the possibilities are endless! For a truly decadent experience, try these combinations:
- Coffee or Mocha Ice Cream: Complements the chocolate beautifully.
- Mint Chocolate Chip: A classic and refreshing combination.
- Peanut Butter Cup or Swirl: Creates a rich, salty-sweet flavor profile.
- Salted Caramel: The caramel swirl will add another layer of gooey, delicious complexity.
- Cookie Dough or Cookies & Cream: Adds even more texture and fun to every bite.
Fudge Brownie Ice Cream Cake Recipe
Ingredients
For the Fudgy Brownie Base:
- Unsalted Butter: 1/2 cup (113g), melted, plus more for greasing the pan
- Granulated Sugar: 1 cup (200g)
- Large Eggs: 2
- Vanilla Extract: 1 teaspoon
- All-Purpose Flour: 1/2 cup (60g)
- Unsweetened Cocoa Powder: 1/3 cup (30g), good quality Dutch-processed for a richer flavor
- Salt: 1/4 teaspoon
- Baking Powder: 1/4 teaspoon
- Semi-Sweet Chocolate Chips: 1/2 cup (90g)
For the Homemade Hot Fudge Sauce:
- Heavy Cream: 2/3 cup (160ml)
- Light Corn Syrup: 1/2 cup (120ml)
- Unsalted Butter: 1/4 cup (57g)
- Brown Sugar: 1/2 cup (100g), packed
- Unsweetened Cocoa Powder: 1/2 cup (45g)
- Semi-Sweet or Bittersweet Chocolate: 4 ounces (113g), finely chopped
- Vanilla Extract: 1 teaspoon
- Salt: 1/4 teaspoon
For the Ice Cream Layer:
- Vanilla Bean Ice Cream: 1.5 quarts (approximately 6 cups), a high-quality brand with good fat content will yield the creamiest results.
Instructions
Part 1: Prepare the Fudgy Brownie Base
- Preheat and Prep: Preheat your oven to 350°F (175°C). Grease a 9-inch springform pan with butter and line the bottom with a circle of parchment paper. Then, line the sides of the pan with a long strip of parchment paper, leaving a 2-3 inch “collar” extending above the rim of the pan. This overhang is crucial for building the cake layers and for easy removal later.
- Mix Wet Ingredients: In a large mixing bowl, whisk together the melted butter and granulated sugar until well combined. Add the eggs one at a time, whisking vigorously after each addition until the mixture is glossy and smooth. Stir in the vanilla extract.
- Combine Dry Ingredients: In a separate, smaller bowl, sift or whisk together the all-purpose flour, cocoa powder, salt, and baking powder. This removes any lumps and ensures even distribution.
- Create the Batter: Gradually add the dry ingredients to the wet ingredients, mixing with a spatula or wooden spoon until just combined. Be careful not to overmix; a few streaks of flour are acceptable. Overmixing develops gluten and will make your brownies tough instead of fudgy.
- Add Chocolate: Gently fold in the 1/2 cup of semi-sweet chocolate chips.
- Bake: Pour the batter into your prepared springform pan and spread it into an even layer using an offset spatula. Bake for 22-25 minutes. The center should be set but still soft, and a toothpick inserted into the center should come out with moist crumbs attached, not wet batter. The key to a chewy brownie base that doesn’t freeze rock-solid is to slightly underbake it.
- Cool Completely: Remove the brownie from the oven and place the pan on a wire rack. Let it cool completely to room temperature, which will take at least 1-2 hours. Do not proceed to the next step until the brownie is 100% cool to the touch.
Part 2: Create the Homemade Hot Fudge Sauce
- Combine Ingredients: In a medium saucepan, combine the heavy cream, light corn syrup, butter, brown sugar, and cocoa powder.
- Heat and Whisk: Place the saucepan over medium heat. Whisk continuously as the butter melts and the sugar dissolves. Bring the mixture to a gentle boil, still whisking.
- Simmer: Once boiling, reduce the heat to low and let it simmer gently for 5-7 minutes, stirring occasionally, until it has thickened slightly.
- Melt the Chocolate: Remove the pan from the heat. Add the finely chopped chocolate, vanilla extract, and salt. Let it sit for 2-3 minutes to allow the residual heat to melt the chocolate, then whisk until the sauce is completely smooth, glossy, and luscious.
- Cool the Sauce: Pour the fudge sauce into a heatproof bowl or jar and let it cool to room temperature. It needs to be cool enough that it won’t melt the ice cream upon contact. You can speed this up by placing it in the refrigerator, stirring every 15 minutes. You will use about half of this sauce for the cake; the rest is perfect for serving.
Part 3: Assemble and Freeze the Cake
- Soften the Ice Cream: Take your ice cream out of the freezer and let it sit on the counter for about 15-20 minutes. You want it to be soft enough to spread easily, but not melted or soupy. You can also transfer it to a large, chilled bowl and stir it with a sturdy spoon to achieve a smooth, spreadable consistency.
- First Fudge Layer: Once the brownie base is completely cool, pour about 1 cup of the cooled hot fudge sauce over it. Use an offset spatula to spread it into a thin, even layer that covers the entire surface of the brownie.
- Flash Freeze (Optional but Recommended): For a super clean, distinct fudge layer, place the pan in the freezer for 30 minutes. This will firm up the fudge sauce so it doesn’t mix with the ice cream.
- Add the Ice Cream: Scoop the softened vanilla ice cream on top of the fudge layer. Working quickly, use your offset spatula to spread the ice cream into a thick, even layer, all the way to the edges of the parchment collar. Smooth the top as much as possible.
- Second Fudge Layer: Drizzle another 1/2 to 3/4 cup of the cooled fudge sauce over the top of the ice cream layer. You can spread it out or leave it in decorative swirls and pools.
- The Final Freeze: Cover the top of the springform pan loosely with plastic wrap, then with a layer of aluminum foil to prevent ice crystals from forming. Place the cake in the freezer for a minimum of 8 hours, but preferably overnight. This long freeze is essential for the cake to set completely, ensuring clean slices.
Nutrition
- Serving Size: One Normal Portion
- Calories: 550-650 kcal


