


Let me tell you, finding a weeknight dinner that gets rave reviews from everyone in the family can feel like searching for treasure. For the longest time, chicken thighs were reliable, but often just… okay. Then came the Ninja Foodi, a true game-changer in my kitchen, and along with it, this recipe for Garlic Honey Chicken Thighs. The first time I made it, the aroma alone had my kids drifting into the kitchen asking what smelled so good. That signature sweet, savory, garlicky scent filled the house. The real magic, though, happened at the dinner table. The chicken was unbelievably tender and juicy on the inside, thanks to the pressure cooker function, but the skin? Oh, the skin was perfectly crisp and lacquered with that irresistible honey garlic glaze, courtesy of the Air Crisp setting. My husband, usually a man of few words about food unless he really loves it, declared it “restaurant-quality.” The kids devoured theirs without a single complaint – a rare occurrence! It’s since become a staple in our meal rotation. It’s incredibly easy, surprisingly fast for how flavorful it is, and the Ninja Foodi contains most of the mess. If you’re looking for a foolproof way to elevate chicken thighs from mundane to magnificent, this Garlic Honey Ninja Foodi Chicken Thighs recipe is your answer. It delivers that perfect balance of sweet, savory, and garlicky goodness with textures that will make you wonder why you ever made chicken thighs any other way.
**The Ultimate Garlic Honey Ninja Foodi Chicken Thighs Recipe**
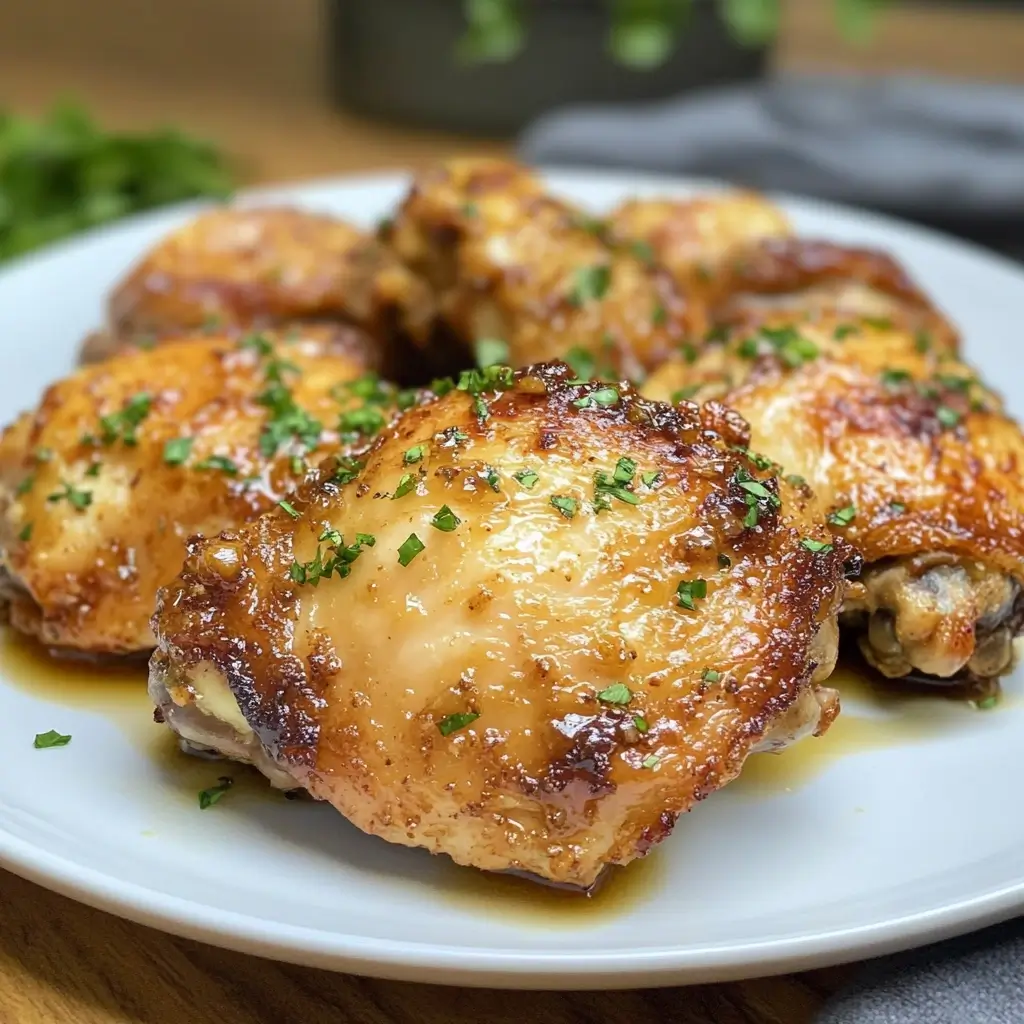
Welcome to what might just become your new favorite way to prepare chicken thighs! This recipe harnesses the dual power of the Ninja Foodi – pressure cooking for speed and tenderness, and air crisping for that glorious crispy skin and caramelized glaze. The combination of savory garlic, sweet honey, umami-rich soy sauce, and a few supporting players creates a flavor profile that is universally loved. Perfect for busy weeknights, yet impressive enough for guests, these Garlic Honey Ninja Foodi Chicken Thighs are juicy, flavorful, and boast that addictive crispy skin everyone craves. The Ninja Foodi simplifies the process, making cleanup easier and delivering consistent, delicious results every time. Prepare to be amazed by how simple ingredients transform into such a mouthwatering dish with minimal effort.
**Why You’ll Love This Ninja Foodi Chicken Recipe**
There are countless reasons why this Garlic Honey Ninja Foodi Chicken Thighs recipe deserves a permanent spot in your cooking repertoire. Here’s a breakdown of why it’s so fantastic:
- Incredible Flavor: The star is the sauce – a perfect harmony of sweet honey, pungent garlic, salty soy sauce, and tangy vinegar. It penetrates the chicken during pressure cooking and then transforms into a sticky, caramelized glaze during air crisping. It’s a flavor explosion that hits all the right notes: sweet, savory, garlicky, and deeply satisfying.
- Amazing Texture Combination: This is where the Ninja Foodi truly shines. The pressure cooker function locks in moisture, ensuring the chicken thigh meat is incredibly tender and juicy, falling off the bone (if using bone-in). Then, the Air Crisp function works its magic, rendering the fat and creating shatteringly crispy skin that provides a delightful contrast to the tender meat. It’s the best of both worlds, achieved easily in one appliance.
- Speed and Efficiency: Traditional methods for achieving both tender meat and crispy skin might involve searing, baking, and broiling – multiple steps and pans. The Ninja Foodi streamlines this. Pressure cooking significantly cuts down the initial cooking time compared to baking, and the Air Crisp function quickly achieves the desired browning and crispiness. It’s a relatively quick meal, perfect for those nights when time is short but you don’t want to compromise on taste.
- Ease of Preparation: Despite the gourmet results, this recipe is surprisingly simple. You mix a quick marinade/glaze, pressure cook the chicken, then air crisp it. The steps are straightforward, and the Ninja Foodi does most of the heavy lifting. It’s accessible even for beginner cooks or those new to using a multi-cooker.
- One-Pot Wonder (Almost!): While you might mix the sauce in a separate bowl, the main cooking process happens entirely within the Ninja Foodi pot. This means significantly less cleanup compared to using multiple pans on the stovetop and in the oven. Fewer dishes are always a win!
- Versatility: Chicken thighs are forgiving and flavorful, making them ideal for this recipe. The sauce itself is adaptable (more on variations later). Plus, the finished chicken pairs beautifully with a wide variety of side dishes, making it easy to customize your meal.
- Family-Friendly: The sweet and savory flavor profile is generally a huge hit with both adults and children. It’s not spicy (unless you choose to add heat) and has familiar, comforting flavors that appeal to a broad audience. It’s a reliable crowd-pleaser.
- Utilizes Key Ninja Foodi Features: This recipe is specifically designed to showcase the strengths of the Ninja Foodi, making you feel like you’re getting the most out of your appliance by leveraging both its pressure cooking and air frying capabilities effectively.
**Ingredients You’ll Need**
Gather these simple ingredients to create this delicious dish. Exact measurements ensure the perfect balance of flavors and optimal results in the Ninja Foodi.
- Chicken Thighs: 6-8 medium-sized bone-in, skin-on chicken thighs (about 2.5 – 3 lbs total). Bone-in, skin-on yields the most flavor and the crispiest skin. You can use boneless, skinless, but adjust cooking times (see FAQ) and you’ll miss the crispy skin element. Ensure they are patted thoroughly dry.
- Minced Garlic: 6-8 cloves garlic, finely minced (about 2-3 tablespoons). Fresh garlic provides the best, most pungent flavor. Don’t skimp here! Garlic powder can be substituted in a pinch (use about 2 teaspoons), but fresh is highly recommended.
- Honey: 1/2 cup. This provides the signature sweetness and helps create that sticky glaze. Use good quality liquid honey. Maple syrup or agave nectar can be substitutes, but will slightly alter the flavor profile.
- Soy Sauce: 1/2 cup. Provides saltiness and deep umami flavor. Use low-sodium soy sauce if you prefer to control the salt level more precisely. Tamari or coconut aminos can be used for gluten-free options.
- Apple Cider Vinegar: 2 tablespoons. Adds a crucial touch of acidity to balance the sweetness of the honey and the richness of the chicken. Rice vinegar or white wine vinegar can also work.
- Sesame Oil: 1 teaspoon. Toasted sesame oil adds a wonderful nutty aroma and depth of flavor. A little goes a long way.
- Cornstarch: 1 tablespoon (mixed with 2 tablespoons cold water to make a slurry). This is essential for thickening the sauce into a beautiful glaze during the Air Crisp stage.
- Black Pepper: 1/2 teaspoon, freshly ground. Adds a gentle warmth.
- Chicken Broth or Water: 1/2 cup. Needed to bring the Ninja Foodi up to pressure for the pressure cooking phase. Use low-sodium broth for extra flavor, or water if preferred.
- Optional Garnish: Toasted sesame seeds, thinly sliced green onions or chives. These add visual appeal and fresh flavor accents.
**Step-by-Step Instructions**
Follow these detailed steps carefully for perfectly cooked Garlic Honey Chicken Thighs in your Ninja Foodi:
1. Prepare the Sauce/Marinade:
* In a medium-sized bowl, whisk together the minced garlic, honey, soy sauce, apple cider vinegar, sesame oil, and black pepper.
* Reserve about 1/2 cup of this mixture in a separate small bowl and set it aside – this will be part of your glaze later.
2. Marinate the Chicken (Optional but Recommended):
* Pat the chicken thighs thoroughly dry with paper towels. This step is crucial for achieving crispy skin.
* Place the dried chicken thighs in the larger bowl with the remaining sauce mixture. Toss gently to ensure all thighs are evenly coated.
* If time permits, cover the bowl and refrigerate for at least 30 minutes, or up to 4 hours, to allow the flavors to penetrate the meat. If you’re short on time, you can skip the marinating time, but even 15-20 minutes helps.
3. Prepare the Ninja Foodi for Pressure Cooking:
* Pour the 1/2 cup of chicken broth or water into the inner pot of the Ninja Foodi. This liquid is necessary for the pot to build pressure.
* Place the wire rack or trivet that came with your Ninja Foodi into the pot. Ensure it’s stable.
4. Arrange Chicken for Pressure Cooking:
* Remove the chicken thighs from the marinade, letting any excess drip off. Don’t discard the marinade in the bowl yet.
* Arrange the chicken thighs in a single layer on the trivet inside the Ninja Foodi pot, skin-side up if possible. Try not to overlap them too much, although some overlap might be unavoidable depending on the size of your thighs and Foodi. Do not pour the marinade from the bowl directly over the chicken in the pot at this stage, as it can interfere with pressure building or cause a burn warning.
5. Pressure Cook the Chicken:
* Secure the Pressure Lid onto the Ninja Foodi. Ensure the pressure release valve is set to the “SEAL” position.
* Select the “PRESSURE” function. Set the temperature to “HIGH”.
* Set the cooking time:
* For bone-in thighs: Cook for 10-12 minutes (use 10 for smaller thighs, 12 for larger ones).
* For boneless thighs: Cook for 6-8 minutes.
* Once the time is set, the Ninja Foodi will begin to build pressure (this can take 5-10 minutes), then the cooking timer will start counting down.
6. Natural Pressure Release (NPR):
* When the pressure cooking time is complete, allow the pressure to release naturally for 5-10 minutes. This helps keep the chicken tender and juicy. Letting it sit allows the internal pressure to decrease gradually.
* After 5-10 minutes of natural release, carefully move the pressure release valve to the “VENT” position to quick release any remaining steam. Be cautious of the hot steam escaping.
7. Prepare the Glaze:
* While the pressure is releasing, prepare the glaze. Take the 1/2 cup of reserved sauce mixture you set aside earlier.
* In a small bowl, whisk together the 1 tablespoon of cornstarch and 2 tablespoons of cold water until smooth, creating a slurry.
* Add the cornstarch slurry to the reserved sauce mixture and whisk well to combine. This mixture will be brushed onto the chicken during the Air Crisp phase.
8. Set Up for Air Crisping:
* Once the pressure is fully released and the float valve has dropped, carefully remove the Pressure Lid.
* Using tongs, carefully lift the chicken thighs out of the pot and set them aside on a plate momentarily.
* Remove the trivet from the pot. Pour out and discard the cooking liquid (broth/water and rendered fat) from the bottom of the pot. You can optionally give the pot a quick wipe if there’s significant residue, but it’s often not necessary.
* Place the Ninja Foodi “Cook & Crisp™ Basket” or the reversible rack (in the lower position) into the pot.
9. Air Crisp the Chicken:
* Arrange the pressure-cooked chicken thighs in a single layer in the Crisp Basket or on the rack. Ensure there’s space between them for air to circulate – work in batches if necessary for maximum crispiness.
* Brush the tops (skin-side) of the chicken thighs generously with the prepared cornstarch-thickened glaze mixture.
* Close the “Crisping Lid” (the attached lid).
* Select the “AIR CRISP” function (it might be called “AIR FRY” or “BAKE/ROAST” depending on your model – choose the one best for browning and crisping).
* Set the temperature to 400°F (200°C).
* Set the time for 10-15 minutes.
* After about 5-7 minutes, open the lid and brush the chicken thighs with more glaze.
* Continue to Air Crisp for the remaining time, or until the skin is deeply golden brown, crispy, and the glaze is bubbly and caramelized. Keep a close eye during the last few minutes to prevent the honey glaze from burning.
* Check the internal temperature of the thickest part of the thigh (avoiding bone) with an instant-read thermometer. It should register at least 165°F (74°C). If needed, continue air crisping for a few more minutes.
10. Rest and Serve:
* Once cooked and perfectly crisped, carefully remove the chicken thighs from the Ninja Foodi using tongs.
* Transfer them to a clean plate or cutting board. Let the chicken rest for 5-10 minutes before serving. This allows the juices to redistribute throughout the meat, ensuring maximum tenderness.
* Garnish with toasted sesame seeds and sliced green onions, if desired. Serve immediately.
**Understanding the Ninja Foodi Functions Used**
This recipe effectively utilizes two of the Ninja Foodi’s core functionalities to achieve results that are hard to replicate with a single traditional cooking method:
- Pressure Cook Function: This function is key for speed and tenderness. By cooking under pressure, the temperature inside the pot exceeds the normal boiling point of water. This high heat and trapped steam penetrate the chicken thighs quickly, breaking down connective tissues and resulting in incredibly moist and tender meat in a fraction of the time it would take to bake or braise. The required liquid (broth or water) creates the necessary steam to build pressure. Using the trivet keeps the chicken elevated above the liquid, preventing it from boiling and helping it cook evenly.
- Air Crisp (or Air Fry / Bake/Roast) Function: After pressure cooking achieves tenderness, the Air Crisp function takes over to provide the desired texture and finish. Using the Crisping Lid, this function circulates superheated air around the chicken at high speed, much like a convection oven but more intense. This rapidly evaporates surface moisture on the chicken skin, renders fat, and creates a wonderfully crispy, golden-brown exterior. It’s also crucial for caramelizing the sugars in the honey garlic glaze, thickening it and giving the chicken that sticky, lacquered coating without needing a separate broiling step. The combination ensures you don’t have to choose between juicy meat and crispy skin – you get both.
**Nutrition Facts (Estimated)**
- Servings: This recipe makes approximately 4-6 servings, depending on the size of the chicken thighs and appetite.
- Calories per serving (Estimated): Approximately 450-600 calories per serving (assuming 1.5 – 2 thighs per serving).
Disclaimer: Nutritional information is an estimate only and will vary depending on the exact size of the chicken thighs, the specific ingredients used (e.g., regular vs. low-sodium soy sauce, fat content of thighs), and portion size. This estimate includes the glaze.
**Preparation and Cook Time Breakdown**
- Preparation Time: 15 minutes (includes mixing sauce, patting chicken dry)
- Marinating Time (Optional): 30 minutes to 4 hours
- Pressure Build Time: 5-10 minutes
- Pressure Cook Time: 10-12 minutes (for bone-in)
- Natural Pressure Release: 5-10 minutes
- Air Crisp Time: 10-15 minutes
- Resting Time: 5-10 minutes
- Total Active Time: Approximately 30-35 minutes
- Total Time (Including optional marinating and passive times): Approximately 1 hour 15 minutes (without extended marinating) to 5 hours (with 4-hour marinating).
**How to Serve Your Garlic Honey Chicken Thighs**
These versatile chicken thighs pair beautifully with a variety of side dishes. Here are some serving suggestions:
- Rice: The natural partner for the sweet and savory glaze.
- Steamed Jasmine Rice: Fluffy and aromatic.
- Basmati Rice: Slightly nutty flavor.
- Brown Rice: A healthier, whole-grain option.
- Coconut Rice: Adds a complementary tropical sweetness.
- Fried Rice: Plain or vegetable fried rice works well.
- Vegetables: Balance the richness of the chicken with fresh or roasted veggies.
- Steamed Broccoli or Broccolini: Simple, healthy, and great for soaking up extra glaze.
- Roasted Asparagus: Gets slightly caramelized and pairs nicely.
- Sautéed Green Beans: Especially good with garlic or almonds.
- Roasted Brussels Sprouts: Their slight bitterness contrasts well with the sweet glaze.
- A simple Stir-Fry Medley: Bell peppers, onions, snow peas, carrots.
- Potatoes: A heartier accompaniment.
- Creamy Mashed Potatoes: Comfort food perfection.
- Roasted Potatoes or Wedges: Crispy exteriors complement the chicken.
- Scalloped Potatoes: A richer, more indulgent option.
- Noodles:
- Plain Egg Noodles or Chow Mein Noodles: Tossed with a little sesame oil.
- Soba Noodles: A Japanese buckwheat noodle option.
- Salads:
- Simple Green Salad with a light vinaigrette: Provides a fresh counterpoint.
- Asian-inspired Slaw: With cabbage, carrots, and a sesame-ginger dressing.
- Garnishes:
- Essential: Drizzle any extra glaze from the bottom of the pot over the chicken and sides.
- Highly Recommended: Sprinkle with toasted sesame seeds and thinly sliced green onions or chives for color, texture, and fresh flavor.
**Achieving Perfect Results: Additional Tips**
Want to guarantee flawless Garlic Honey Ninja Foodi Chicken Thighs every time? Follow these five expert tips:
- Pat the Chicken Skin Exceptionally Dry: This cannot be stressed enough. Moisture is the enemy of crispy skin. Before marinating (if doing so) and especially before arranging in the Foodi for pressure cooking, use paper towels to thoroughly pat down the skin on each thigh. Even pat them dry again quickly before the Air Crisp stage if they seem moist. This allows the Air Crisp function to render the fat and crisp the skin effectively rather than just steaming it.
- Don’t Overcrowd During Air Crisping: For the crispiest skin and even browning, the hot air needs to circulate freely around each piece of chicken. While some overlap during pressure cooking is okay, ensure the thighs are in a single layer without significant touching during the Air Crisp phase. If necessary, cook them in two batches using the Air Crisp function – it’s worth the extra few minutes for superior texture.
- Use an Instant-Read Thermometer: While the cooking times provided are generally accurate, chicken thigh sizes vary. The only way to be absolutely sure your chicken is cooked through safely (and not overcooked) is to check the internal temperature. Insert an instant-read thermometer into the thickest part of the thigh, avoiding the bone. It should register at least 165°F (74°C). Pull the chicken once it hits this temperature to ensure it remains juicy.
- Apply Glaze Strategically: Don’t add the cornstarch-thickened glaze until the Air Crisp stage. If added during pressure cooking, it can thicken too much at the bottom and potentially trigger a burn warning. Brush it on during the Air Crisp phase, reapplying halfway through. The sugars in honey can burn quickly at high heat, so apply it during the final 10-15 minutes of cooking, keeping an eye on it to achieve caramelization without charring.
- Let the Chicken Rest Before Serving: Just like a good steak, chicken benefits immensely from a resting period after cooking. Tent the chicken loosely with foil for 5-10 minutes after removing it from the Ninja Foodi. This allows the muscle fibers to relax and the juices to redistribute evenly throughout the meat. Cutting into it immediately will result in juices running out and potentially drier chicken. Patience pays off with tenderness!
**Frequently Asked Questions (FAQ)**
Q1: Can I use boneless, skinless chicken thighs for this recipe?
A: Yes, you absolutely can use boneless, skinless chicken thighs. They cook faster, so you’ll need to adjust the Pressure Cook time down to about 6-8 minutes on High Pressure, followed by the same 5-10 minute natural pressure release. The Air Crisp stage will still help brown the chicken and caramelize the glaze, but you obviously won’t have the crispy skin element. The flavor will still be delicious, and the meat will be very tender.
Q2: Can I make this recipe with frozen chicken thighs?
A: Yes, you can cook chicken thighs from frozen in the Ninja Foodi, which is a huge convenience! You’ll need to significantly increase the Pressure Cook time. For frozen bone-in, skin-on thighs, plan for approximately 20-25 minutes at High Pressure. For frozen boneless, skinless thighs, aim for about 15-18 minutes. Ensure you still have the required 1/2 cup of liquid in the pot. After pressure cooking, proceed with the natural release and Air Crisp steps as usual. Note that the skin may not get quite as crispy as with thawed chicken, but the results are still very good. Always double-check the internal temperature reaches 165°F (74°C).
Q3: Can I substitute the honey with another sweetener?
A: Yes, you can substitute the honey. Maple syrup is a common and excellent substitute, offering a slightly different but equally delicious flavor profile. Agave nectar can also work, though it’s sweeter than honey, so you might want to use slightly less. Brown sugar (packed, about 1/3 to 1/2 cup) could also be used, possibly dissolved in a little hot water first or added directly to the other sauce ingredients. Keep in mind that changing the sweetener will alter the final taste and potentially the way the glaze caramelizes.
Q4: Can I prepare parts of this recipe ahead of time?
A: Yes, you can do some prep work in advance.
* Sauce/Marinade: The garlic honey sauce (both the main part and the reserved portion for glazing) can be mixed together and stored in an airtight container in the refrigerator for up to 2-3 days.
* Marinating: You can marinate the chicken thighs (after patting dry) for up to 4 hours in the refrigerator. Any longer, and the acidity might start to affect the texture of the chicken.
* Cooking: For the best texture (especially crispy skin), it’s highly recommended to cook the chicken fully just before serving. Reheating can compromise the skin’s crispiness.
Q5: How do I store and reheat leftovers?
A: Store leftover Garlic Honey Chicken Thighs in an airtight container in the refrigerator for up to 3-4 days. To reheat and try to retain some crispiness:
* Best Method (Ninja Foodi Air Crisp): Preheat the Ninja Foodi on Air Crisp at 375°F (190°C). Place the cold chicken thighs in the basket in a single layer and heat for 5-8 minutes, or until warmed through and the skin has re-crisped slightly.
* Oven: Preheat your oven to 375°F (190°C). Place chicken on a baking sheet and heat for 10-15 minutes, or until warmed through. You can switch to broil for the last minute to help crisp the skin, but watch carefully.
* Microwave: This is the quickest but will result in soft skin. Heat on medium power in 30-60 second intervals until warmed through.
Garlic Honey Ninja Foodi Chicken Thighs Recipe
Ingredients
- Chicken Thighs: 6-8 medium-sized bone-in, skin-on chicken thighs (about 2.5 – 3 lbs total). Bone-in, skin-on yields the most flavor and the crispiest skin. You can use boneless, skinless, but adjust cooking times (see FAQ) and you’ll miss the crispy skin element. Ensure they are patted thoroughly dry.
- Minced Garlic: 6-8 cloves garlic, finely minced (about 2-3 tablespoons). Fresh garlic provides the best, most pungent flavor. Don’t skimp here! Garlic powder can be substituted in a pinch (use about 2 teaspoons), but fresh is highly recommended.
- Honey: 1/2 cup. This provides the signature sweetness and helps create that sticky glaze. Use good quality liquid honey. Maple syrup or agave nectar can be substitutes, but will slightly alter the flavor profile.
- Soy Sauce: 1/2 cup. Provides saltiness and deep umami flavor. Use low-sodium soy sauce if you prefer to control the salt level more precisely. Tamari or coconut aminos can be used for gluten-free options.
- Apple Cider Vinegar: 2 tablespoons. Adds a crucial touch of acidity to balance the sweetness of the honey and the richness of the chicken. Rice vinegar or white wine vinegar can also work.
- Sesame Oil: 1 teaspoon. Toasted sesame oil adds a wonderful nutty aroma and depth of flavor. A little goes a long way.
- Cornstarch: 1 tablespoon (mixed with 2 tablespoons cold water to make a slurry). This is essential for thickening the sauce into a beautiful glaze during the Air Crisp stage.
- Black Pepper: 1/2 teaspoon, freshly ground. Adds a gentle warmth.
- Chicken Broth or Water: 1/2 cup. Needed to bring the Ninja Foodi up to pressure for the pressure cooking phase. Use low-sodium broth for extra flavor, or water if preferred.
- Optional Garnish: Toasted sesame seeds, thinly sliced green onions or chives. These add visual appeal and fresh flavor accents.
Instructions
- Chicken Thighs: 6-8 medium-sized bone-in, skin-on chicken thighs (about 2.5 – 3 lbs total). Bone-in, skin-on yields the most flavor and the crispiest skin. You can use boneless, skinless, but adjust cooking times (see FAQ) and you’ll miss the crispy skin element. Ensure they are patted thoroughly dry.
- Minced Garlic: 6-8 cloves garlic, finely minced (about 2-3 tablespoons). Fresh garlic provides the best, most pungent flavor. Don’t skimp here! Garlic powder can be substituted in a pinch (use about 2 teaspoons), but fresh is highly recommended.
- Honey: 1/2 cup. This provides the signature sweetness and helps create that sticky glaze. Use good quality liquid honey. Maple syrup or agave nectar can be substitutes, but will slightly alter the flavor profile.
- Soy Sauce: 1/2 cup. Provides saltiness and deep umami flavor. Use low-sodium soy sauce if you prefer to control the salt level more precisely. Tamari or coconut aminos can be used for gluten-free options.
- Apple Cider Vinegar: 2 tablespoons. Adds a crucial touch of acidity to balance the sweetness of the honey and the richness of the chicken. Rice vinegar or white wine vinegar can also work.
- Sesame Oil: 1 teaspoon. Toasted sesame oil adds a wonderful nutty aroma and depth of flavor. A little goes a long way.
- Cornstarch: 1 tablespoon (mixed with 2 tablespoons cold water to make a slurry). This is essential for thickening the sauce into a beautiful glaze during the Air Crisp stage.
- Black Pepper: 1/2 teaspoon, freshly ground. Adds a gentle warmth.
- Chicken Broth or Water: 1/2 cup. Needed to bring the Ninja Foodi up to pressure for the pressure cooking phase. Use low-sodium broth for extra flavor, or water if preferred.
- Optional Garnish: Toasted sesame seeds, thinly sliced green onions or chives. These add visual appeal and fresh flavor accents.
Nutrition
- Serving Size: One Normal Portion
- Calories: 450-600


