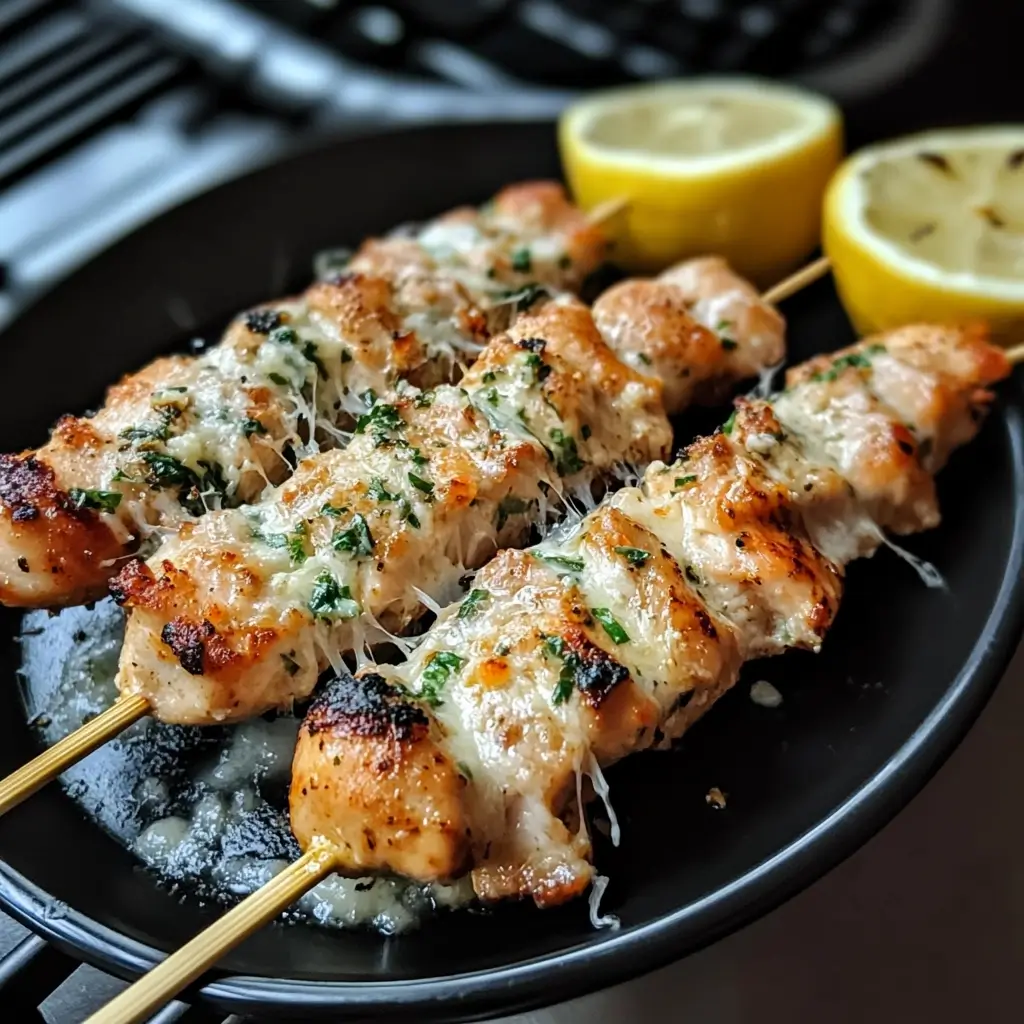
My family and I are always on the lookout for quick, flavorful meals that don’t compromise on taste. Chicken skewers are a regular feature in our summer grilling rotation, but sometimes we crave something beyond the usual marinades. That’s when I stumbled upon the magic of Garlic Parmesan Chicken Skewers. The aroma alone while these were grilling was enough to make everyone gather around the patio, forks in hand, anticipation bubbling. And let me tell you, the first bite was pure bliss. Juicy, tender chicken infused with the savory punch of garlic and the nutty richness of Parmesan, all brought together by a luscious butter sauce – it was an instant hit! Even my pickiest eater, who usually shies away from anything “too flavorful,” devoured these skewers and asked for seconds. Whether you’re firing up the grill, using your oven, or opting for the convenience of an air fryer, these Garlic Parmesan Chicken Skewers are guaranteed to become a new family favorite. Get ready for a flavor adventure that’s as easy to make as it is irresistible!
Ingredients for Irresistible Garlic Parmesan Chicken Skewers
To embark on this culinary journey, gather these fresh and flavorful ingredients. We’ll break down each component to ensure you have everything you need for chicken skewer perfection.
For the Chicken Skewers
- 2 lbs Chicken Tenders, Thighs, or Breast: The heart of our dish! Choosing the right chicken cut is key to achieving your desired texture and flavor.
- Chicken Tenders: These are incredibly convenient, pre-portioned, and cook quickly. Their uniform size ensures even cooking on the skewer. Tenders are leaner, offering a milder chicken flavor that allows the garlic parmesan sauce to truly shine.
- Chicken Thighs (Boneless, Skinless): If you crave a richer, more intense chicken flavor and incredibly juicy skewers, thighs are your best bet. Thigh meat has a higher fat content, which translates to exceptional tenderness and prevents drying out during cooking. You’ll need to cut them into skewer-friendly pieces, around 2-3 inches.
- Chicken Breast (Boneless, Skinless): For a leaner option, chicken breast works beautifully. It’s readily available and provides a clean, classic chicken taste. To keep breast meat moist on skewers, be sure not to overcook it and consider cutting it into slightly larger chunks to retain more moisture.
- Pro-Tip: Regardless of your choice, ensure your chicken is boneless and skinless for easy skewering and optimal sauce absorption. Fresh, high-quality chicken will always yield the best results. If using frozen chicken, thaw it completely in the refrigerator overnight to ensure even cooking and prevent a watery texture.
- 2 tbsp Olive Oil: This kitchen staple is essential for both flavor and function.
- Flavor Carrier: Olive oil acts as a fantastic carrier for the seasoning, helping it adhere to the chicken and penetrate deeply into the meat.
- Moisture Retention: A light coating of olive oil helps to seal in the chicken’s natural juices, keeping it succulent during grilling, baking, or air frying.
- Browning Aid: Olive oil encourages beautiful browning and slight crisping on the outside of the chicken, adding textural contrast.
- Substitution: If you don’t have olive oil on hand, avocado oil or melted coconut oil (unrefined for neutral flavor) can be used as substitutes.
For the Garlic Parmesan Butter Sauce
This luscious sauce is the soul of our Garlic Parmesan Chicken Skewers. Each ingredient plays a crucial role in building layers of flavor.
- 1 Stick (1/2 Cup) Butter: The foundation of our rich and decadent sauce.
- Flavor Base: Butter provides a creamy, savory base that complements the garlic and Parmesan perfectly. Its fat content creates a luxurious mouthfeel and helps the sauce cling beautifully to the chicken.
- Browning and Crispness: When brushed on the skewers during cooking, the butter contributes to a golden-brown exterior and delightful crisp edges.
- Unsalted vs. Salted: Unsalted butter is generally preferred in recipes as it gives you greater control over the overall saltiness. If using salted butter, you might want to slightly reduce or omit the salt in the chicken seasoning.
- Vegan Option: For a dairy-free version, you can substitute with a high-quality vegan butter alternative that melts and browns well.
- 8–10 Cloves Garlic, Minced: Garlic is the star of the show, infusing the sauce with its pungent and aromatic essence.
- Flavor Intensity: Freshly minced garlic is essential for the most robust garlic flavor. Pre-minced garlic from a jar can be used in a pinch, but the flavor will be less intense.
- Adjust to Taste: If you are a true garlic lover, feel free to add even more cloves! For a milder garlic flavor, start with 8 cloves and adjust in future batches.
- Minced Finely: Mincing the garlic finely ensures it cooks evenly in the butter and releases its flavor throughout the sauce. You can also use a garlic press for convenience.
- 1/2 cup Parmesan Cheese, Grated: Parmesan adds a salty, nutty, and umami-rich depth to the sauce that is simply irresistible.
- Freshly Grated is Key: Pre-shredded Parmesan often contains cellulose to prevent clumping, which can hinder melting and flavor. Freshly grated Parmesan, ideally from a block of Parmigiano-Reggiano, delivers the most authentic and intense flavor.
- Texture and Flavor: Parmesan not only contributes flavor but also adds a slight thickness and delightful cheesy texture to the sauce.
- Storage: Store leftover Parmesan in an airtight container in the refrigerator to maintain its freshness and flavor.
- 1 tbsp Hot Sauce (More if Desired): A touch of heat elevates the flavor profile and adds a subtle kick that balances the richness of the butter and Parmesan.
- Flavor Enhancement: Hot sauce doesn’t just add heat; it also brings a complex layer of flavor, often with notes of vinegar, spice, and sometimes sweetness, depending on the variety.
- Spice Level Control: Start with 1 tablespoon and taste the sauce. If you prefer more heat, add a little more at a time until you reach your desired level of spiciness.
- Hot Sauce Options: Frank’s RedHot, Tabasco, or Sriracha are all excellent choices. For a milder heat, consider a chili garlic sauce.
- 2 tsp Red Pepper Flakes (Optional, but Recommended): These add a visible speckle of heat and a slightly different kind of spice compared to hot sauce.
- Layered Heat: Red pepper flakes provide a dry, lingering heat that complements the wet heat of the hot sauce, creating a more complex spice profile.
- Visual Appeal: The red flakes add a pop of color to the sauce, making it visually appealing.
- Omit for No Heat: If you are sensitive to spice or cooking for children, you can easily omit the red pepper flakes without significantly altering the overall flavor.
- 1/3 cup Fresh Parsley, Minced: Fresh parsley brings a vibrant, herbaceous freshness and a pop of color to the sauce, cutting through the richness and balancing the flavors.
- Freshness and Aroma: Fresh parsley is essential for its bright, clean flavor and aromatic qualities. Dried parsley can be used in a pinch, but the flavor will be less pronounced – use about 1 teaspoon of dried parsley if substituting.
- Garnish and Flavor: Parsley is added both to the sauce and as a final garnish, enhancing both the taste and visual appeal of the skewers.
- Other Herbs: For a slightly different flavor profile, you could experiment with other fresh herbs like chives, oregano, or a mix of Italian herbs.
For the Chicken Seasoning
These simple spices create a flavorful base for the chicken, ensuring it’s delicious even before the garlic parmesan sauce is added.
- 2 tsp Paprika: Paprika adds a warm, slightly smoky, and subtly sweet flavor to the chicken.
- Flavor Depth: Paprika is more than just color; it contributes a gentle warmth and depth of flavor that enhances the overall taste of the chicken.
- Color Enhancement: Paprika gives the chicken a beautiful reddish-orange hue, making it visually appealing.
- Types of Paprika: You can use regular paprika, sweet paprika for a milder flavor, or smoked paprika for a more pronounced smoky note.
- 1 tsp Garlic Powder: Garlic powder amplifies the garlic flavor and provides a different dimension of garlic taste compared to fresh garlic.
- Umami and Depth: Garlic powder adds a savory umami note and a deeper, more mellow garlic flavor that complements the fresh garlic in the sauce.
- Convenience and Shelf Life: Garlic powder is a pantry staple that’s always readily available and has a long shelf life.
- 1 tsp Onion Powder: Onion powder adds a subtle savory sweetness and rounds out the overall spice blend.
- Savory Sweetness: Onion powder provides a gentle sweetness and savory depth that balances the other spices.
- Aromatic Complexity: It adds a subtle aromatic complexity that enhances the overall flavor profile of the chicken.
- 1/2 tsp Salt: Salt is crucial for enhancing all the flavors and seasoning the chicken properly.
- Flavor Enhancer: Salt is a fundamental flavor enhancer that brings out the best in all the other ingredients.
- Seasoning Control: Adjust the salt to your taste preference. If using salted butter, you might want to start with slightly less salt and add more if needed.
- Types of Salt: Sea salt or kosher salt are excellent choices for seasoning.
- 1/2 tsp Pepper: Black pepper adds a touch of spice and complexity, balancing the other flavors.
- Spice and Balance: Black pepper provides a subtle heat and a touch of pungency that complements the other spices.
- Freshly Ground is Best: Freshly ground black pepper has a more vibrant and aromatic flavor compared to pre-ground pepper.
Step-by-Step Instructions for Perfect Garlic Parmesan Chicken Skewers
Follow these detailed instructions to create mouthwatering Garlic Parmesan Chicken Skewers using your preferred cooking method: air fryer, oven, or grill.
Step 1: Prepare the Chicken for Skewers
This crucial step sets the foundation for juicy and flavorful skewers.
- Soak Wooden Skewers (If Using): If you are using wooden skewers, submerge them in water in a shallow dish or baking pan for at least 30 minutes, or even up to a couple of hours. This is a vital step to prevent them from catching fire or burning on the grill, in the oven, or even in the air fryer. Soaking ensures they stay moist throughout the cooking process.
- Why Soak? Dry wooden skewers are highly flammable and can easily char or burn, potentially ruining your skewers and creating an unpleasant smoky flavor. Soaking saturates the wood with water, making them much more resistant to burning.
- Alternative Skewers: If you prefer not to use wooden skewers, metal skewers are a fantastic reusable option. They don’t require soaking and are very durable.
- Season the Chicken: In a small bowl, thoroughly combine the paprika, garlic powder, onion powder, salt, and pepper. This spice blend will infuse the chicken with a delicious savory base.
- Even Mixing: Ensure the spices are well combined to distribute the flavors evenly across the chicken.
- Taste Test (Optional): For extra assurance, you can do a quick taste test of the spice blend to ensure it’s to your liking before applying it to the chicken.
- Coat the Chicken: Cut the chicken into uniform, 2-3 inch pieces. This size is ideal for even cooking on skewers and ensures they are bite-sized and easy to eat. Place the chicken pieces in a large bowl or a zip-top bag for easy mixing. Drizzle the olive oil over the chicken, then sprinkle the seasoning mixture generously over the top.
- Even Coating: Massage the olive oil and seasoning into the chicken with your hands or toss in a bowl to ensure every piece is thoroughly coated. This even coating is crucial for consistent flavor and moisture retention.
- Marinating Time (Optional for Enhanced Flavor): For an even more flavorful result, you can let the seasoned chicken marinate in the refrigerator for 30 minutes to an hour. This allows the spices to penetrate deeper into the meat. However, it’s not strictly necessary if you are short on time – the skewers will still be delicious even without marinating.
- Skewer the Chicken: Thread the seasoned chicken pieces tightly onto the soaked wooden skewers or metal skewers. Pack the chicken pieces close together, leaving minimal gaps between them. This helps to keep the chicken juicy as they cook and prevents them from drying out.
- Tight Packing: By packing the chicken tightly, you create a barrier that helps to trap moisture within the skewers.
- Skewer Length: If necessary, snip the ends of the wooden skewers with kitchen shears to ensure they fit comfortably in your air fryer basket, oven, or on your grill.
Step 2: Crafting the Irresistible Garlic Parmesan Butter Sauce
This is where the magic happens! The garlic parmesan butter sauce is the flavor powerhouse of these skewers.
- Melt Butter and Garlic: In a microwave-safe bowl, combine the butter and minced garlic. Microwave in short 30-second intervals, checking in between, until the butter is partially melted but not fully liquid. Alternatively, you can melt the butter and garlic in a small saucepan over low heat on the stovetop. Be careful not to burn the garlic.
- Gentle Melting: Melting the butter gently with the garlic allows the garlic to infuse the butter with its flavor without burning. Microwaving in intervals or using low heat on the stovetop prevents overheating.
- Aromatic Infusion: As the butter melts and warms the garlic, you’ll notice a wonderful aroma filling your kitchen – this is the garlic flavor infusing into the butter.
- Whisk in Remaining Ingredients: Once the butter and garlic are partially melted, whisk them together until combined. Then, add the red pepper flakes (if using), hot sauce, minced fresh parsley, and grated Parmesan cheese to the bowl.
- Thorough Mixing: Whisk all the ingredients together vigorously until they are well combined and the Parmesan cheese is starting to melt into the warm butter mixture.
- Adjust Seasoning (Optional): At this stage, you can taste the sauce and adjust the seasoning if needed. Add a pinch more salt, pepper, hot sauce, or red pepper flakes to your preference.
- Emulsify the Sauce (If Needed): Whisk until combined. If the sauce starts to look separated or oily (which can sometimes happen if the butter gets too hot or the Parmesan is very finely grated), add 1-2 tablespoons of softened butter to re-emulsify it. Whisk vigorously until the sauce comes back together and becomes smooth and creamy.
- Emulsification Tip: Softened butter helps to bind the sauce together, creating a smoother and more cohesive texture.
- Separate Sauce for Basting: Carefully pour or spoon out approximately one-third of the garlic parmesan butter sauce into a separate small bowl. This reserved portion will be used for basting the raw chicken skewers during cooking. Keep the remaining two-thirds of the sauce separate; this will be used to baste the cooked skewers for maximum flavor and a beautiful glossy finish.
- Prevent Cross-Contamination: Separating the sauce ensures that you are using fresh, uncontaminated sauce for the final basting after the chicken is cooked, preventing any potential cross-contamination from raw chicken.
Step 3: Cooking the Chicken Skewers – Three Delicious Methods
Choose your preferred cooking method and follow these detailed instructions to cook your Garlic Parmesan Chicken Skewers to juicy perfection.
Air Fryer Method: Quick and Crispy
The air fryer is a fantastic option for fast and evenly cooked skewers with a slightly crispy exterior.
- Preheat Air Fryer: Preheat your air fryer to 400°F (200°C). Preheating is crucial for even cooking and achieving that desirable crispy texture.
- Basket or Tray Air Fryer: This method works well in both basket-style and tray-style air fryers.
- Cook in Batches (Do Not Overcrowd): Arrange 2-3 chicken skewers in the preheated air fryer basket or on the tray in a single layer. It’s essential not to overcrowd the air fryer. Overcrowding will prevent proper air circulation, leading to uneven cooking and steaming instead of crisping.
- Air Circulation is Key: Air fryers work by circulating hot air around the food. Overcrowding hinders this circulation, resulting in less crispy and potentially undercooked chicken.
- Initial Cook Time: Cook the skewers for 5 minutes at 400°F (200°C).
- Flip and First Baste: After 5 minutes, carefully remove the air fryer basket or tray and flip the chicken skewers using tongs. Baste the skewers generously with the reserved one-third portion of the garlic parmesan butter sauce using a silicone brush. Ensure you coat all sides of the chicken with the sauce.
- Even Cooking and Flavor Infusion: Flipping ensures even cooking on both sides, and basting at this stage infuses the chicken with flavor throughout the cooking process.
- Continue Cooking and Second Baste: Return the skewers to the air fryer and cook for another 2 minutes at 400°F (200°C). Flip the skewers again, and baste them once more with the reserved sauce.
- Final Cook Time and Temperature Check: Cook for a final 5-6 minutes, or until the internal temperature of the thickest part of the chicken reaches 165°F (74°C) using an instant-read meat thermometer. Cooking time may vary slightly depending on your air fryer model and the thickness of your chicken pieces.
- Food Safety First: Ensuring the chicken reaches an internal temperature of 165°F (74°C) is crucial for food safety and to guarantee it is cooked through.
- Visual Cues: The chicken should be cooked through, no longer pink inside, and have a golden-brown exterior.
- Final Baste and Serve: Once cooked, remove the skewers from the air fryer. Give them a final, generous brush with the remaining two-thirds portion of the garlic parmesan butter sauce. Sprinkle with extra grated Parmesan cheese and freshly minced parsley for garnish. Serve immediately while hot and juicy.
Oven Method: Reliable and Flavorful
The oven provides a consistent heat source for baking the skewers evenly.
- Preheat Oven and Prepare Baking Sheet: Preheat your oven to 450°F (230°C). Line a baking sheet with aluminum foil for easy cleanup. You can also use parchment paper, but foil is slightly better for browning. Place a wire rack on top of the baking sheet if you have one. This elevates the skewers, allowing for better air circulation and crispier bottoms. If you don’t have a wire rack, you can bake them directly on the foil-lined baking sheet – they will still be delicious.
- High Heat for Browning: The high oven temperature helps to quickly cook the chicken and promote browning.
- Foil for Easy Cleanup: Lining the baking sheet with foil makes cleanup a breeze.
- Arrange Skewers and Initial Bake: Place the chicken skewers on the prepared baking sheet in a single layer. Ensure they are not overcrowded. Bake in the preheated oven for 14 minutes.
- Single Layer for Even Baking: Just like in the air fryer, arranging the skewers in a single layer is crucial for even baking and browning.
- Flip, Baste, and Continue Baking: After 7 minutes, flip the skewers using tongs. Baste them generously with the reserved one-third portion of the garlic parmesan butter sauce. Continue baking for the remaining 7 minutes. Repeat the flipping and basting process a couple of times during baking for even cooking and flavor penetration.
- Broil for Crispy Edges (Optional but Recommended): For a golden-brown and slightly crispy finish, switch the oven to broil (high heat) for the last 2 minutes of cooking. Keep a close eye on the skewers while broiling as they can brown quickly under the broiler.
- Broiling Caution: Broiling can quickly burn food, so watch carefully and adjust the broiling time as needed.
- Final Baste and Serve: Remove the baking sheet from the oven. Give the skewers a final, generous brush with the remaining two-thirds portion of the garlic parmesan butter sauce. Sprinkle with extra grated Parmesan cheese and freshly minced parsley. Serve immediately.
Grill Method: Smoky and Charred
Grilling imparts a wonderful smoky flavor and char marks to the skewers, perfect for summer cookouts.
- Preheat Grill: Preheat your grill to medium-high heat. You want the grill hot enough to sear the chicken but not so hot that it burns before cooking through. For a gas grill, preheat with all burners on medium-high, then adjust to medium heat for cooking. For a charcoal grill, wait until the coals are glowing red and covered with a light ash.
- Medium-High Heat is Ideal: Medium-high heat ensures the chicken cooks through without burning on the outside and develops beautiful grill marks.
- Grill and Baste: Place the chicken skewers directly over direct heat on the grill grates. Cook for 5-6 minutes per side, basting the skewers generously with the reserved one-third portion of the garlic parmesan butter sauce throughout the grilling process. Flip the skewers every 5-6 minutes to ensure even cooking and prevent burning.
- Frequent Basting: Basting while grilling keeps the chicken moist, adds flavor, and helps to create a beautiful caramelized glaze.
- Check for Doneness: Cook until the chicken is cooked through and the internal temperature reaches 165°F (74°C). Check the temperature with an instant-read meat thermometer inserted into the thickest part of the chicken.
- Grill Marks: Grilling will create beautiful char marks on the chicken, adding to both the flavor and visual appeal.
- Final Baste and Serve: Remove the skewers from the grill. Give them one last generous brush with the remaining two-thirds portion of the garlic parmesan butter sauce. Sprinkle with extra grated Parmesan cheese and freshly minced parsley. Serve immediately.
Nutritional Information (Estimated)
(Per Serving, approximate and may vary based on ingredient brands and portion sizes)
- Servings: Approximately 6-8 skewers (depending on skewer size and chicken amount)
- Calories Per Serving: Approximately 350-450 calories (estimated)
Please note: This is an estimate and may vary depending on specific ingredients used and portion sizes. For precise nutritional information, use a nutrition calculator with the exact brands and quantities of ingredients you use.
Preparation Time Breakdown
- Prep Time: 20 minutes (includes chicken prep, skewering, and sauce making)
- Cook Time: 15 minutes (air fryer), 20 minutes (oven), 15-20 minutes (grill)
- Total Time: 35-40 minutes
How to Serve Garlic Parmesan Chicken Skewers
These versatile Garlic Parmesan Chicken Skewers can be served in countless delicious ways! Here are some ideas to get you started:
- As an Appetizer:
- Serve them on a platter with toothpicks for easy grabbing at parties or gatherings.
- Pair them with a creamy dipping sauce like ranch dressing, blue cheese dressing, or a lemon aioli.
- Arrange them artfully on a bed of fresh greens for an elegant presentation.
- As a Main Course:
- Alongside Classic Sides: Serve with roasted vegetables (broccoli, asparagus, bell peppers), mashed potatoes, rice pilaf, or quinoa.
- With Salads: Create a balanced meal by pairing them with a fresh garden salad, Caesar salad, or a Mediterranean quinoa salad.
- In Wraps or Pitas: Slice the chicken off the skewers and stuff it into warm pita bread or tortillas with your favorite toppings like lettuce, tomatoes, onions, and a drizzle of tzatziki sauce.
- Over Pasta: Serve the skewers over a bed of creamy pasta, such as fettuccine Alfredo or a simple buttered pasta, for a satisfying Italian-inspired meal.
- For a BBQ or Cookout:
- Perfect for grilling alongside burgers, hot dogs, and other BBQ favorites.
- Serve with classic BBQ sides like corn on the cob, coleslaw, potato salad, and baked beans.
- Offer a variety of dipping sauces to cater to different tastes.
Additional Tips for Garlic Parmesan Chicken Skewer Success
- Don’t Skip Soaking Wooden Skewers: This is crucial for preventing burning, especially when grilling or using high heat methods. Soaked skewers also help to keep the chicken slightly more moist from the inside out.
- Marinate for Extra Flavor (Optional but Recommended): While the recipe is delicious without marinating, allowing the seasoned chicken to marinate for 30 minutes to an hour in the refrigerator will significantly enhance the flavor. The spices will penetrate deeper, resulting in even more flavorful skewers.
- Don’t Overcrowd Your Cooking Method: Whether you’re using an air fryer, oven, or grill, avoid overcrowding. Cooking in batches ensures proper air circulation and even cooking, leading to crispier and more perfectly cooked skewers.
- Baste Generously and Frequently: Basting the skewers with the garlic parmesan butter sauce throughout the cooking process is key to flavor infusion and keeping them moist. Don’t be shy with the sauce!
- Let the Chicken Rest Briefly Before Serving: After cooking, let the skewers rest for a few minutes before serving. This allows the juices to redistribute throughout the chicken, resulting in even more tender and flavorful skewers. Tent them loosely with foil to keep them warm while resting.
Frequently Asked Questions (FAQ) About Garlic Parmesan Chicken Skewers
Q1: Can I use frozen chicken for these skewers?
A: Yes, you can use frozen chicken, but it’s essential to thaw it completely in the refrigerator overnight before preparing the skewers. Thawing ensures even cooking and prevents a watery texture. Do not thaw chicken at room temperature for food safety reasons.
Q2: What if I don’t have an air fryer? Can I still make these?
A: Absolutely! This recipe is designed to be versatile. The oven and grill methods are both excellent alternatives and are detailed in the instructions. The oven method provides reliable, even baking, while grilling adds a delicious smoky flavor.
Q3: Can I prepare the chicken skewers ahead of time?
A: Yes, you can prepare the chicken skewers (seasoned and skewered, but un-cooked) up to a day ahead of time. Store them covered in the refrigerator. You can also make the garlic parmesan butter sauce ahead of time and store it in an airtight container in the refrigerator. When ready to cook, simply proceed with the cooking instructions.
Q4: Can I use dried parsley instead of fresh parsley in the sauce?
A: Fresh parsley is highly recommended for its bright, vibrant flavor and aroma. However, if you only have dried parsley, you can use it in a pinch. Use about 1 teaspoon of dried parsley for every 1/3 cup of fresh parsley. Keep in mind that the flavor will be less pronounced.
Q5: How do I prevent the chicken skewers from drying out while cooking?
A: Several factors contribute to keeping the chicken skewers juicy:
- Use Chicken Thighs: Thigh meat is more forgiving and less likely to dry out than chicken breast due to its higher fat content.
- Olive Oil Coating: The olive oil helps to seal in moisture.
- Don’t Overcook: Cook the chicken skewers just until they reach an internal temperature of 165°F (74°C). Overcooking will dry them out. Use a meat thermometer to ensure accurate doneness.
- Basting: Frequent basting with the garlic parmesan butter sauce during cooking adds moisture and flavor, preventing dryness.
- Tight Skewering: Packing the chicken pieces tightly on the skewers helps to retain moisture within the skewer.

Garlic Parmesan Chicken Skewers Recipe
Ingredients
For the Chicken Skewers
- 2 lbs Chicken Tenders, Thighs, or Breast: The heart of our dish! Choosing the right chicken cut is key to achieving your desired texture and flavor.
- Chicken Tenders: These are incredibly convenient, pre-portioned, and cook quickly. Their uniform size ensures even cooking on the skewer. Tenders are leaner, offering a milder chicken flavor that allows the garlic parmesan sauce to truly shine.
- Chicken Thighs (Boneless, Skinless): If you crave a richer, more intense chicken flavor and incredibly juicy skewers, thighs are your best bet. Thigh meat has a higher fat content, which translates to exceptional tenderness and prevents drying out during cooking. You’ll need to cut them into skewer-friendly pieces, around 2-3 inches.
- Chicken Breast (Boneless, Skinless): For a leaner option, chicken breast works beautifully. It’s readily available and provides a clean, classic chicken taste. To keep breast meat moist on skewers, be sure not to overcook it and consider cutting it into slightly larger chunks to retain more moisture.
- Pro-Tip: Regardless of your choice, ensure your chicken is boneless and skinless for easy skewering and optimal sauce absorption. Fresh, high-quality chicken will always yield the best results. If using frozen chicken, thaw it completely in the refrigerator overnight to ensure even cooking and prevent a watery texture.
- 2 tbsp Olive Oil: This kitchen staple is essential for both flavor and function.
- Flavor Carrier: Olive oil acts as a fantastic carrier for the seasoning, helping it adhere to the chicken and penetrate deeply into the meat.
- Moisture Retention: A light coating of olive oil helps to seal in the chicken’s natural juices, keeping it succulent during grilling, baking, or air frying.
- Browning Aid: Olive oil encourages beautiful browning and slight crisping on the outside of the chicken, adding textural contrast.
- Substitution: If you don’t have olive oil on hand, avocado oil or melted coconut oil (unrefined for neutral flavor) can be used as substitutes.
For the Garlic Parmesan Butter Sauce
This luscious sauce is the soul of our Garlic Parmesan Chicken Skewers. Each ingredient plays a crucial role in building layers of flavor.
- 1 Stick (1/2 Cup) Butter: The foundation of our rich and decadent sauce.
- Flavor Base: Butter provides a creamy, savory base that complements the garlic and Parmesan perfectly. Its fat content creates a luxurious mouthfeel and helps the sauce cling beautifully to the chicken.
- Browning and Crispness: When brushed on the skewers during cooking, the butter contributes to a golden-brown exterior and delightful crisp edges.
- Unsalted vs. Salted: Unsalted butter is generally preferred in recipes as it gives you greater control over the overall saltiness. If using salted butter, you might want to slightly reduce or omit the salt in the chicken seasoning.
- Vegan Option: For a dairy-free version, you can substitute with a high-quality vegan butter alternative that melts and browns well.
- 8–10 Cloves Garlic, Minced: Garlic is the star of the show, infusing the sauce with its pungent and aromatic essence.
- Flavor Intensity: Freshly minced garlic is essential for the most robust garlic flavor. Pre-minced garlic from a jar can be used in a pinch, but the flavor will be less intense.
- Adjust to Taste: If you are a true garlic lover, feel free to add even more cloves! For a milder garlic flavor, start with 8 cloves and adjust in future batches.
- Minced Finely: Mincing the garlic finely ensures it cooks evenly in the butter and releases its flavor throughout the sauce. You can also use a garlic press for convenience.
- 1/2 cup Parmesan Cheese, Grated: Parmesan adds a salty, nutty, and umami-rich depth to the sauce that is simply irresistible.
- Freshly Grated is Key: Pre-shredded Parmesan often contains cellulose to prevent clumping, which can hinder melting and flavor. Freshly grated Parmesan, ideally from a block of Parmigiano-Reggiano, delivers the most authentic and intense flavor.
- Texture and Flavor: Parmesan not only contributes flavor but also adds a slight thickness and delightful cheesy texture to the sauce.
- Storage: Store leftover Parmesan in an airtight container in the refrigerator to maintain its freshness and flavor.
- 1 tbsp Hot Sauce (More if Desired): A touch of heat elevates the flavor profile and adds a subtle kick that balances the richness of the butter and Parmesan.
- Flavor Enhancement: Hot sauce doesn’t just add heat; it also brings a complex layer of flavor, often with notes of vinegar, spice, and sometimes sweetness, depending on the variety.
- Spice Level Control: Start with 1 tablespoon and taste the sauce. If you prefer more heat, add a little more at a time until you reach your desired level of spiciness.
- Hot Sauce Options: Frank’s RedHot, Tabasco, or Sriracha are all excellent choices. For a milder heat, consider a chili garlic sauce.
- 2 tsp Red Pepper Flakes (Optional, but Recommended): These add a visible speckle of heat and a slightly different kind of spice compared to hot sauce.
- Layered Heat: Red pepper flakes provide a dry, lingering heat that complements the wet heat of the hot sauce, creating a more complex spice profile.
- Visual Appeal: The red flakes add a pop of color to the sauce, making it visually appealing.
- Omit for No Heat: If you are sensitive to spice or cooking for children, you can easily omit the red pepper flakes without significantly altering the overall flavor.
- 1/3 cup Fresh Parsley, Minced: Fresh parsley brings a vibrant, herbaceous freshness and a pop of color to the sauce, cutting through the richness and balancing the flavors.
- Freshness and Aroma: Fresh parsley is essential for its bright, clean flavor and aromatic qualities. Dried parsley can be used in a pinch, but the flavor will be less pronounced – use about 1 teaspoon of dried parsley if substituting.
- Garnish and Flavor: Parsley is added both to the sauce and as a final garnish, enhancing both the taste and visual appeal of the skewers.
- Other Herbs: For a slightly different flavor profile, you could experiment with other fresh herbs like chives, oregano, or a mix of Italian herbs.
For the Chicken Seasoning
These simple spices create a flavorful base for the chicken, ensuring it’s delicious even before the garlic parmesan sauce is added.
- 2 tsp Paprika: Paprika adds a warm, slightly smoky, and subtly sweet flavor to the chicken.
- Flavor Depth: Paprika is more than just color; it contributes a gentle warmth and depth of flavor that enhances the overall taste of the chicken.
- Color Enhancement: Paprika gives the chicken a beautiful reddish-orange hue, making it visually appealing.
- Types of Paprika: You can use regular paprika, sweet paprika for a milder flavor, or smoked paprika for a more pronounced smoky note.
- 1 tsp Garlic Powder: Garlic powder amplifies the garlic flavor and provides a different dimension of garlic taste compared to fresh garlic.
- Umami and Depth: Garlic powder adds a savory umami note and a deeper, more mellow garlic flavor that complements the fresh garlic in the sauce.
- Convenience and Shelf Life: Garlic powder is a pantry staple that’s always readily available and has a long shelf life.
- 1 tsp Onion Powder: Onion powder adds a subtle savory sweetness and rounds out the overall spice blend.
- Savory Sweetness: Onion powder provides a gentle sweetness and savory depth that balances the other spices.
- Aromatic Complexity: It adds a subtle aromatic complexity that enhances the overall flavor profile of the chicken.
- 1/2 tsp Salt: Salt is crucial for enhancing all the flavors and seasoning the chicken properly.
- Flavor Enhancer: Salt is a fundamental flavor enhancer that brings out the best in all the other ingredients.
- Seasoning Control: Adjust the salt to your taste preference. If using salted butter, you might want to start with slightly less salt and add more if needed.
- Types of Salt: Sea salt or kosher salt are excellent choices for seasoning.
- 1/2 tsp Pepper: Black pepper adds a touch of spice and complexity, balancing the other flavors.
- Spice and Balance: Black pepper provides a subtle heat and a touch of pungency that complements the other spices.
- Freshly Ground is Best: Freshly ground black pepper has a more vibrant and aromatic flavor compared to pre-ground pepper.
Instructions
Step 1: Prepare the Chicken for Skewers
This crucial step sets the foundation for juicy and flavorful skewers.
- Soak Wooden Skewers (If Using): If you are using wooden skewers, submerge them in water in a shallow dish or baking pan for at least 30 minutes, or even up to a couple of hours. This is a vital step to prevent them from catching fire or burning on the grill, in the oven, or even in the air fryer. Soaking ensures they stay moist throughout the cooking process.
- Why Soak? Dry wooden skewers are highly flammable and can easily char or burn, potentially ruining your skewers and creating an unpleasant smoky flavor. Soaking saturates the wood with water, making them much more resistant to burning.
- Alternative Skewers: If you prefer not to use wooden skewers, metal skewers are a fantastic reusable option. They don’t require soaking and are very durable.
- Season the Chicken: In a small bowl, thoroughly combine the paprika, garlic powder, onion powder, salt, and pepper. This spice blend will infuse the chicken with a delicious savory base.
- Even Mixing: Ensure the spices are well combined to distribute the flavors evenly across the chicken.
- Taste Test (Optional): For extra assurance, you can do a quick taste test of the spice blend to ensure it’s to your liking before applying it to the chicken.
- Coat the Chicken: Cut the chicken into uniform, 2-3 inch pieces. This size is ideal for even cooking on skewers and ensures they are bite-sized and easy to eat. Place the chicken pieces in a large bowl or a zip-top bag for easy mixing. Drizzle the olive oil over the chicken, then sprinkle the seasoning mixture generously over the top.
- Even Coating: Massage the olive oil and seasoning into the chicken with your hands or toss in a bowl to ensure every piece is thoroughly coated. This even coating is crucial for consistent flavor and moisture retention.
- Marinating Time (Optional for Enhanced Flavor): For an even more flavorful result, you can let the seasoned chicken marinate in the refrigerator for 30 minutes to an hour. This allows the spices to penetrate deeper into the meat. However, it’s not strictly necessary if you are short on time – the skewers will still be delicious even without marinating.
- Skewer the Chicken: Thread the seasoned chicken pieces tightly onto the soaked wooden skewers or metal skewers. Pack the chicken pieces close together, leaving minimal gaps between them. This helps to keep the chicken juicy as they cook and prevents them from drying out.
- Tight Packing: By packing the chicken tightly, you create a barrier that helps to trap moisture within the skewers.
- Skewer Length: If necessary, snip the ends of the wooden skewers with kitchen shears to ensure they fit comfortably in your air fryer basket, oven, or on your grill.
Step 2: Crafting the Irresistible Garlic Parmesan Butter Sauce
This is where the magic happens! The garlic parmesan butter sauce is the flavor powerhouse of these skewers.
- Melt Butter and Garlic: In a microwave-safe bowl, combine the butter and minced garlic. Microwave in short 30-second intervals, checking in between, until the butter is partially melted but not fully liquid. Alternatively, you can melt the butter and garlic in a small saucepan over low heat on the stovetop. Be careful not to burn the garlic.
- Gentle Melting: Melting the butter gently with the garlic allows the garlic to infuse the butter with its flavor without burning. Microwaving in intervals or using low heat on the stovetop prevents overheating.
- Aromatic Infusion: As the butter melts and warms the garlic, you’ll notice a wonderful aroma filling your kitchen – this is the garlic flavor infusing into the butter.
- Whisk in Remaining Ingredients: Once the butter and garlic are partially melted, whisk them together until combined. Then, add the red pepper flakes (if using), hot sauce, minced fresh parsley, and grated Parmesan cheese to the bowl.
- Thorough Mixing: Whisk all the ingredients together vigorously until they are well combined and the Parmesan cheese is starting to melt into the warm butter mixture.
- Adjust Seasoning (Optional): At this stage, you can taste the sauce and adjust the seasoning if needed. Add a pinch more salt, pepper, hot sauce, or red pepper flakes to your preference.
- Emulsify the Sauce (If Needed): Whisk until combined. If the sauce starts to look separated or oily (which can sometimes happen if the butter gets too hot or the Parmesan is very finely grated), add 1-2 tablespoons of softened butter to re-emulsify it. Whisk vigorously until the sauce comes back together and becomes smooth and creamy.
- Emulsification Tip: Softened butter helps to bind the sauce together, creating a smoother and more cohesive texture.
- Separate Sauce for Basting: Carefully pour or spoon out approximately one-third of the garlic parmesan butter sauce into a separate small bowl. This reserved portion will be used for basting the raw chicken skewers during cooking. Keep the remaining two-thirds of the sauce separate; this will be used to baste the cooked skewers for maximum flavor and a beautiful glossy finish.
- Prevent Cross-Contamination: Separating the sauce ensures that you are using fresh, uncontaminated sauce for the final basting after the chicken is cooked, preventing any potential cross-contamination from raw chicken.
Step 3: Cooking the Chicken Skewers – Three Delicious Methods
Choose your preferred cooking method and follow these detailed instructions to cook your Garlic Parmesan Chicken Skewers to juicy perfection.
Air Fryer Method: Quick and Crispy
The air fryer is a fantastic option for fast and evenly cooked skewers with a slightly crispy exterior.
- Preheat Air Fryer: Preheat your air fryer to 400°F (200°C). Preheating is crucial for even cooking and achieving that desirable crispy texture.
- Basket or Tray Air Fryer: This method works well in both basket-style and tray-style air fryers.
- Cook in Batches (Do Not Overcrowd): Arrange 2-3 chicken skewers in the preheated air fryer basket or on the tray in a single layer. It’s essential not to overcrowd the air fryer. Overcrowding will prevent proper air circulation, leading to uneven cooking and steaming instead of crisping.
- Air Circulation is Key: Air fryers work by circulating hot air around the food. Overcrowding hinders this circulation, resulting in less crispy and potentially undercooked chicken.
- Initial Cook Time: Cook the skewers for 5 minutes at 400°F (200°C).
- Flip and First Baste: After 5 minutes, carefully remove the air fryer basket or tray and flip the chicken skewers using tongs. Baste the skewers generously with the reserved one-third portion of the garlic parmesan butter sauce using a silicone brush. Ensure you coat all sides of the chicken with the sauce.
- Even Cooking and Flavor Infusion: Flipping ensures even cooking on both sides, and basting at this stage infuses the chicken with flavor throughout the cooking process.
- Continue Cooking and Second Baste: Return the skewers to the air fryer and cook for another 2 minutes at 400°F (200°C). Flip the skewers again, and baste them once more with the reserved sauce.
- Final Cook Time and Temperature Check: Cook for a final 5-6 minutes, or until the internal temperature of the thickest part of the chicken reaches 165°F (74°C) using an instant-read meat thermometer. Cooking time may vary slightly depending on your air fryer model and the thickness of your chicken pieces.
- Food Safety First: Ensuring the chicken reaches an internal temperature of 165°F (74°C) is crucial for food safety and to guarantee it is cooked through.
- Visual Cues: The chicken should be cooked through, no longer pink inside, and have a golden-brown exterior.
- Final Baste and Serve: Once cooked, remove the skewers from the air fryer. Give them a final, generous brush with the remaining two-thirds portion of the garlic parmesan butter sauce. Sprinkle with extra grated Parmesan cheese and freshly minced parsley for garnish. Serve immediately while hot and juicy.
Nutrition
- Serving Size: One Normal Portion
- Calories: 350-450