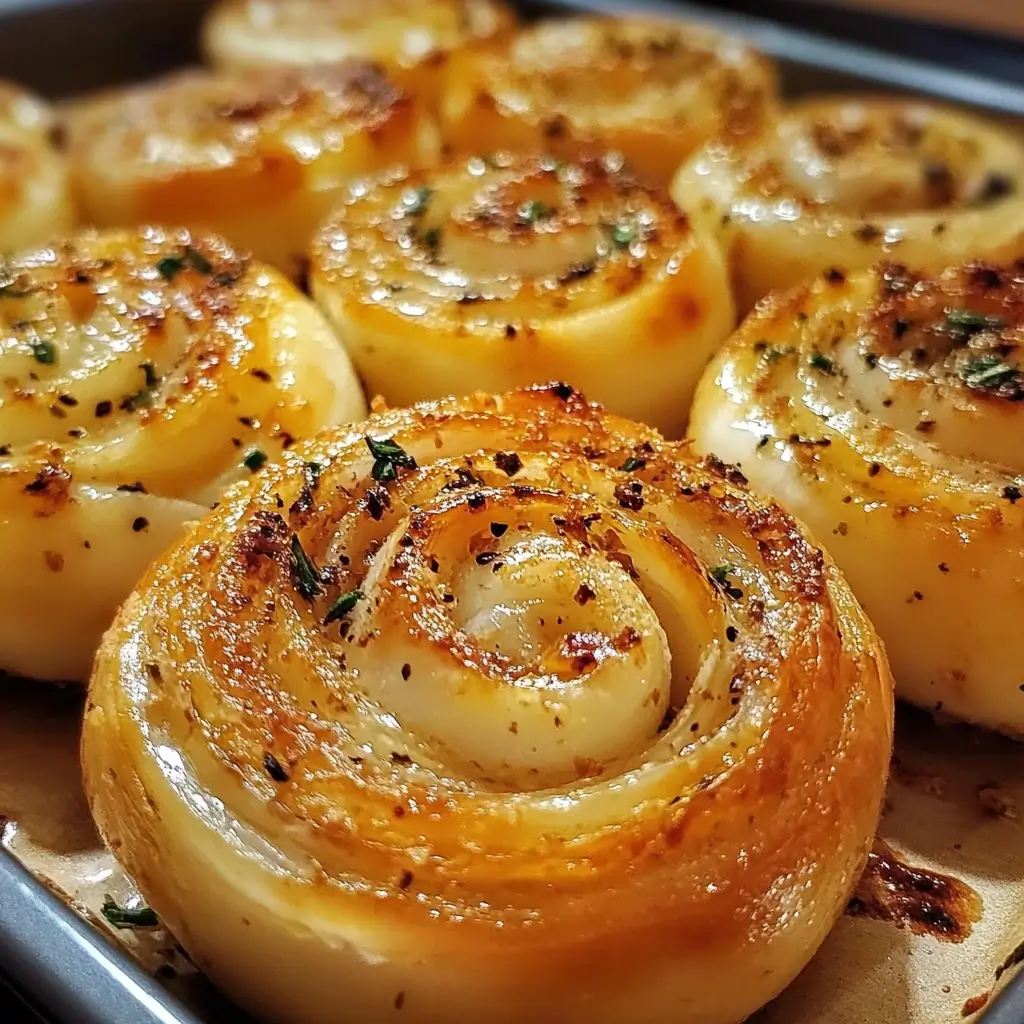
Garlic swirl rolls have become a staple in our home, and for good reason. The first time I baked these, the aroma alone was enough to draw everyone into the kitchen, their faces lighting up with anticipation. And the taste? Oh my, the taste! Soft, pillowy dough infused with the pungent, savory goodness of garlic, swirled into beautiful, golden brown rolls that are as delightful to look at as they are to eat. My family devours them in minutes, and they’ve become a requested item at every gathering, from casual weeknight dinners to festive holiday feasts. If you’re looking for a bread recipe that’s guaranteed to impress and satisfy, look no further – these garlic swirl rolls are a true crowd-pleaser.
Ingredients
To create these irresistible Garlic Swirl Rolls, you’ll need a collection of pantry staples and fresh ingredients. Each component plays a vital role in achieving the perfect texture and flavor. Let’s break down each ingredient, highlighting its purpose and offering some helpful notes for success:
- For the Dough:
- 1 cup (240ml) Warm Milk (about 105-115°F): Warm milk is essential for activating the yeast. The temperature is crucial – too cold and the yeast won’t activate properly, too hot and you risk killing it. Using a thermometer is recommended, but if you don’t have one, the milk should feel comfortably warm to the touch, like bathwater for a baby. Whole milk will give the rolls a richer flavor and softer texture, but 2% or even skim milk can be used in a pinch. Non-dairy milk alternatives like almond milk or oat milk can also work, but may slightly alter the texture and flavor.
- 2 ¼ teaspoons (7g) Active Dry Yeast or Instant Yeast: Yeast is the magic ingredient that makes the dough rise and gives the rolls their light and airy texture. Active dry yeast needs to be proofed in warm liquid before being added to the dry ingredients, while instant yeast can be added directly to the dry ingredients. If using active dry yeast, ensure it foams and bubbles after being added to the warm milk – this indicates that it’s alive and active. Fresh yeast can also be used, but requires a different conversion ratio (typically double the amount of dry yeast). Always check the expiration date of your yeast to ensure it’s still potent.
- ¼ cup (50g) Granulated Sugar: Sugar not only adds a touch of sweetness to the dough, balancing the savory garlic flavor, but it also feeds the yeast, helping it to activate and rise properly. You can also use honey or maple syrup as alternatives, though these will impart a slightly different flavor profile.
- 1 teaspoon Salt: Salt is crucial for flavor development in bread making. It controls the yeast activity, prevents the dough from becoming too sticky, and enhances the overall taste of the rolls. Don’t skip the salt! Kosher salt or sea salt are preferred for baking as they are less processed and have a cleaner flavor.
- ¼ cup (60g) Unsalted Butter, melted and cooled slightly: Melted butter adds richness, flavor, and tenderness to the dough. Unsalted butter is recommended so you can control the amount of salt in the recipe. Make sure the butter is cooled slightly before adding it to the yeast mixture – hot butter can kill the yeast. You can substitute with olive oil or another neutral vegetable oil, but butter will give the best flavor and texture.
- 1 Large Egg: An egg adds richness, moisture, and structure to the dough. It also contributes to the golden brown color of the baked rolls. Make sure your egg is at room temperature for better incorporation into the dough. For a vegan option, you can use a flax egg (1 tablespoon flaxseed meal mixed with 3 tablespoons water and allowed to sit for 5 minutes) or an apple sauce substitute, though this will alter the final texture.
- 3 ½ – 4 cups (420-480g) All-Purpose Flour, plus more for dusting: All-purpose flour provides the structure for the rolls. The amount of flour needed can vary depending on humidity and the type of flour used. Start with the lesser amount and gradually add more until the dough is smooth and slightly tacky but not sticky. Over-flouring can result in dry, dense rolls, so be mindful of adding too much. Bread flour can also be used for a slightly chewier texture, but all-purpose works perfectly well.
- For the Garlic Swirl Filling:
- ½ cup (1 stick, 113g) Unsalted Butter, softened: Softened butter is essential for creating a smooth, spreadable garlic butter that will be swirled throughout the dough. Make sure the butter is softened to room temperature, but not melted. This will allow it to cream easily with the garlic and herbs.
- 6-8 cloves Garlic, minced: Fresh garlic is key to the bold, pungent flavor of these rolls. Mincing the garlic finely ensures it distributes evenly throughout the butter and releases its flavor effectively. If you prefer a milder garlic flavor, you can use fewer cloves. Garlic powder is not a suitable substitute for fresh garlic in this filling, as it lacks the fresh, bright flavor.
- ¼ cup Fresh Parsley, chopped (optional): Fresh parsley adds a touch of brightness and freshness to the garlic butter, balancing the richness of the butter and garlic. It also adds a beautiful visual element to the rolls. Other fresh herbs like chives, thyme, or rosemary can also be used, depending on your preference. If you don’t have fresh parsley, you can omit it or use a tablespoon of dried parsley, though fresh is definitely preferred.
- ½ teaspoon Salt: A touch of salt in the garlic butter enhances the flavors and brings everything together. Adjust the amount of salt to your taste.
- For Brushing and Topping (Optional):
- 2 tablespoons Unsalted Butter, melted: Melted butter brushed over the baked rolls adds shine, flavor, and helps to keep them soft. This step is highly recommended for that extra touch of deliciousness.
- Fresh Parsley, chopped (optional): A sprinkle of fresh parsley on top of the baked rolls adds a final touch of freshness and visual appeal.
Instructions
Now, let’s embark on the step-by-step journey of creating these heavenly Garlic Swirl Rolls. Follow these instructions carefully, and you’ll be rewarded with warm, fragrant rolls that are sure to impress:
- Activate the Yeast: In a large bowl or the bowl of a stand mixer, combine the warm milk, yeast, and sugar. Gently stir to combine and let it sit for 5-10 minutes. This process, known as proofing the yeast, allows you to check if the yeast is active. You should see the mixture become foamy and bubbly, indicating that the yeast is alive and ready to work its magic. If the mixture doesn’t foam, your yeast might be old or inactive, and you’ll need to start with fresh yeast.
- Combine Wet and Dry Ingredients: Once the yeast is proofed, add the melted and slightly cooled butter, egg, and salt to the yeast mixture. Whisk to combine these wet ingredients thoroughly. Now, gradually add the flour, starting with 3 ½ cups. If using a stand mixer, use the dough hook and mix on low speed until the dough comes together. If mixing by hand, use a wooden spoon or your hands to combine the ingredients.
- Knead the Dough: Turn the dough out onto a lightly floured surface. Knead the dough for 8-10 minutes, or until it becomes smooth, elastic, and slightly tacky but not sticky. If using a stand mixer, knead with the dough hook on medium-low speed for 6-8 minutes. As you knead, the gluten in the flour develops, creating the structure and chewiness of the rolls. If the dough is too sticky, add a tablespoon of flour at a time, kneading until it reaches the desired consistency. Conversely, if the dough seems too dry, add a teaspoon of water at a time. The perfect dough should spring back slightly when you gently poke it.
- First Rise (Bulk Fermentation): Place the kneaded dough in a lightly oiled bowl, turning to coat all sides. Cover the bowl with plastic wrap or a clean kitchen towel. Let the dough rise in a warm place for 1-1.5 hours, or until it has doubled in size. This first rise, known as bulk fermentation, is crucial for developing flavor and texture in the dough. A warm place (around 75-80°F) is ideal for rising. You can place the bowl in a slightly warmed oven (turned off!), a sunny spot, or simply on your countertop if your kitchen is warm enough.
- Prepare the Garlic Butter: While the dough is rising, prepare the garlic butter filling. In a small bowl, combine the softened butter, minced garlic, parsley (if using), and salt. Mix well with a fork or spatula until everything is evenly combined and creamy. Set aside at room temperature. The aroma of this garlic butter alone is enough to make your mouth water!
- Shape the Rolls: Once the dough has doubled in size, gently punch it down to release the air. Turn the dough out onto a lightly floured surface. Roll the dough into a large rectangle, approximately 12×18 inches. Spread the prepared garlic butter evenly over the entire surface of the dough, leaving a small border at the edges.
- Swirl and Slice: Starting from one of the long edges, tightly roll the dough into a log, like you’re making a cinnamon roll. Pinch the seam to seal it. Using a sharp knife or dough scraper, slice the log into 12 equal rolls, each about 1-1.5 inches thick.
- Second Rise (Proofing): Lightly grease a 9×13 inch baking dish. Arrange the sliced rolls in the prepared baking dish, swirl side up. Cover loosely with plastic wrap or a clean kitchen towel. Let the rolls rise again in a warm place for 30-45 minutes, or until they have almost doubled in size and are puffy. This second rise, known as proofing, ensures the rolls become light and airy when baked.
- Bake the Rolls: Preheat oven to 375°F (190°C). Bake the rolls in the preheated oven for 20-25 minutes, or until they are golden brown and cooked through. The internal temperature of the rolls should reach around 200-210°F. If the tops of the rolls are browning too quickly, you can loosely tent them with foil during the last 10 minutes of baking.
- Brush with Melted Butter and Serve: Once the rolls are baked, remove them from the oven and immediately brush them generously with the melted butter. This adds a beautiful shine and extra flavor. Sprinkle with fresh parsley (if using) for garnish. Let the rolls cool in the baking dish for a few minutes before serving warm. These rolls are best enjoyed fresh out of the oven when they are at their softest and most flavorful.
Nutrition Facts
(Note: Nutritional information is an estimate and can vary based on specific ingredients and portion sizes.)
Serving Size: 1 Roll
Servings Per Recipe: 12 Rolls (approximately)
Estimated Nutrition Facts per Serving (1 roll):
- Calories: 250-300 kcal
- Fat: 12-15g
- Saturated Fat: 7-9g
- Cholesterol: 40-50mg
- Sodium: 250-350mg
- Carbohydrates: 30-35g
- Fiber: 1-2g
- Sugar: 5-7g
- Protein: 5-7g
Disclaimer: These values are approximate and for informational purposes only. For precise nutritional information, calculate based on the specific brands and quantities of ingredients used and consult a nutritional database or professional.
Preparation Time
- Prep Time: 30-40 minutes (includes active prep and rise times)
- Cook Time: 20-25 minutes
- Total Time: 1 hour 30 minutes – 1 hour 45 minutes (approximately, including rise times)
This recipe requires some time for the dough to rise, but the active preparation time is relatively short. It’s a perfect recipe for a weekend baking project or when you want to impress with homemade bread without spending all day in the kitchen.
How to Serve
Garlic Swirl Rolls are incredibly versatile and can be served in a multitude of ways. Their savory, garlicky flavor makes them a fantastic accompaniment to both casual and elegant meals. Here are some delightful serving suggestions:
- As a Side Dish:
- Pasta Night: Serve alongside your favorite pasta dishes, like spaghetti with marinara sauce, lasagna, or creamy Alfredo. They are perfect for soaking up extra sauce!
- Soup and Salad: Pair with a hearty soup like tomato soup, minestrone, or cream of mushroom soup. They also complement a fresh garden salad beautifully.
- Grilled Meats and Vegetables: Serve as a side to grilled chicken, steak, fish, or roasted vegetables. The garlic flavor enhances savory dishes.
- Holiday Meals: Include them in your holiday spread for Thanksgiving, Christmas, or Easter. They are a welcome alternative to traditional dinner rolls.
- As an Appetizer:
- Warm Appetizer Platter: Arrange warm garlic swirl rolls on a platter alongside dips like marinara sauce, pesto, or a creamy garlic dip.
- Party Food: These rolls are perfect for parties and potlucks. Their pull-apart nature makes them easy for guests to grab and enjoy.
- For Breakfast or Brunch:
- Savory Breakfast Rolls: Enjoy a warm garlic swirl roll with a fried egg, bacon, or sausage for a savory breakfast treat.
- Brunch Basket: Include them in a brunch basket along with other breakfast pastries and fruits.
- Other Serving Ideas:
- Sandwich Bread: Slice the rolls in half and use them to make delicious sandwiches. They are especially good with Italian fillings like prosciutto and mozzarella.
- Garlic Bread Croutons: Cut leftover rolls into cubes, toss with olive oil and seasonings, and bake until crispy to make flavorful garlic bread croutons for salads or soups.
Additional Tips for Perfect Garlic Swirl Rolls
To ensure your Garlic Swirl Rolls turn out perfect every time, here are five essential tips to keep in mind:
- Use Fresh, Quality Ingredients: The quality of your ingredients directly impacts the final result. Use fresh yeast, good quality butter, and fresh garlic for the best flavor and texture. Don’t skimp on quality, especially for key ingredients like butter and garlic.
- Don’t Overheat the Milk: As mentioned earlier, the temperature of the milk is crucial for yeast activation. Too hot milk will kill the yeast, and too cold milk won’t activate it properly. Aim for 105-115°F (40-46°C). Using a thermometer is the most accurate way to ensure the correct temperature.
- Knead the Dough Adequately: Kneading is essential for developing gluten, which gives the rolls their structure and chewiness. Knead for the recommended time (8-10 minutes by hand, 6-8 minutes in a stand mixer) until the dough is smooth and elastic. Proper kneading results in a lighter, airier roll.
- Allow Sufficient Rise Time: Don’t rush the rising process. Give the dough enough time to double in size during both the first and second rise. Rising in a warm environment will speed up the process. Proper rising is crucial for achieving a light and fluffy texture.
- Don’t Overbake: Overbaking can result in dry, hard rolls. Bake until golden brown and cooked through, but avoid letting them become too dark brown. Use a toothpick or cake tester to check for doneness – it should come out clean when inserted into the center of a roll. Brushing with melted butter immediately after baking helps to keep them soft and adds flavor.
FAQ Section
Q1: Can I make these rolls ahead of time?
A: Yes, you can prepare the dough up to the point of the second rise and then refrigerate it overnight. In the morning, let the dough come to room temperature for about an hour before proceeding with the second rise and baking. You can also bake the rolls ahead of time and reheat them gently in a low oven (300°F/150°C) for 10-15 minutes before serving.
Q2: Can I freeze Garlic Swirl Rolls?
A: Absolutely! Baked garlic swirl rolls freeze beautifully. Let them cool completely after baking, then wrap them tightly in plastic wrap and place them in a freezer-safe bag or container. They can be frozen for up to 2-3 months. To reheat, thaw them at room temperature or in the refrigerator, then warm them in a low oven (300°F/150°C) for 10-15 minutes until heated through.
Q3: I don’t have fresh parsley. Can I use dried parsley or another herb?
A: Yes, you can use 1 tablespoon of dried parsley as a substitute for fresh parsley. You can also use other fresh herbs like chives, thyme, or rosemary in the garlic butter filling, depending on your preference. Fresh herbs will always provide a brighter flavor, but dried herbs can work in a pinch.
Q4: My dough is too sticky. What should I do?
A: If your dough is too sticky, add flour one tablespoon at a time while kneading, until the dough becomes smooth and slightly tacky but not sticky. Be careful not to add too much flour, as this can make the rolls dry. A slightly sticky dough is actually preferable for soft rolls, but it should be manageable to handle.
Q5: Can I use instant yeast instead of active dry yeast?
A: Yes, you can use instant yeast (also called rapid-rise yeast) instead of active dry yeast. If using instant yeast, you can skip the proofing step and add the yeast directly to the dry ingredients. Follow the rest of the recipe as instructed. The rise times may be slightly shorter with instant yeast, so keep an eye on the dough.

Garlic Swirl Rolls Recipe
Ingredients
- For the Dough:
- 1 cup (240ml) Warm Milk (about 105-115°F): Warm milk is essential for activating the yeast. The temperature is crucial – too cold and the yeast won’t activate properly, too hot and you risk killing it. Using a thermometer is recommended, but if you don’t have one, the milk should feel comfortably warm to the touch, like bathwater for a baby. Whole milk will give the rolls a richer flavor and softer texture, but 2% or even skim milk can be used in a pinch. Non-dairy milk alternatives like almond milk or oat milk can also work, but may slightly alter the texture and flavor.
- 2 ¼ teaspoons (7g) Active Dry Yeast or Instant Yeast: Yeast is the magic ingredient that makes the dough rise and gives the rolls their light and airy texture. Active dry yeast needs to be proofed in warm liquid before being added to the dry ingredients, while instant yeast can be added directly to the dry ingredients. If using active dry yeast, ensure it foams and bubbles after being added to the warm milk – this indicates that it’s alive and active. Fresh yeast can also be used, but requires a different conversion ratio (typically double the amount of dry yeast). Always check the expiration date of your yeast to ensure it’s still potent.
- ¼ cup (50g) Granulated Sugar: Sugar not only adds a touch of sweetness to the dough, balancing the savory garlic flavor, but it also feeds the yeast, helping it to activate and rise properly. You can also use honey or maple syrup as alternatives, though these will impart a slightly different flavor profile.
- 1 teaspoon Salt: Salt is crucial for flavor development in bread making. It controls the yeast activity, prevents the dough from becoming too sticky, and enhances the overall taste of the rolls. Don’t skip the salt! Kosher salt or sea salt are preferred for baking as they are less processed and have a cleaner flavor.
- ¼ cup (60g) Unsalted Butter, melted and cooled slightly: Melted butter adds richness, flavor, and tenderness to the dough. Unsalted butter is recommended so you can control the amount of salt in the recipe. Make sure the butter is cooled slightly before adding it to the yeast mixture – hot butter can kill the yeast. You can substitute with olive oil or another neutral vegetable oil, but butter will give the best flavor and texture.
- 1 Large Egg: An egg adds richness, moisture, and structure to the dough. It also contributes to the golden brown color of the baked rolls. Make sure your egg is at room temperature for better incorporation into the dough. For a vegan option, you can use a flax egg (1 tablespoon flaxseed meal mixed with 3 tablespoons water and allowed to sit for 5 minutes) or an apple sauce substitute, though this will alter the final texture.
- 3 ½ – 4 cups (420-480g) All-Purpose Flour, plus more for dusting: All-purpose flour provides the structure for the rolls. The amount of flour needed can vary depending on humidity and the type of flour used. Start with the lesser amount and gradually add more until the dough is smooth and slightly tacky but not sticky. Over-flouring can result in dry, dense rolls, so be mindful of adding too much. Bread flour can also be used for a slightly chewier texture, but all-purpose works perfectly well.
- For the Garlic Swirl Filling:
- ½ cup (1 stick, 113g) Unsalted Butter, softened: Softened butter is essential for creating a smooth, spreadable garlic butter that will be swirled throughout the dough. Make sure the butter is softened to room temperature, but not melted. This will allow it to cream easily with the garlic and herbs.
- 6–8 cloves Garlic, minced: Fresh garlic is key to the bold, pungent flavor of these rolls. Mincing the garlic finely ensures it distributes evenly throughout the butter and releases its flavor effectively. If you prefer a milder garlic flavor, you can use fewer cloves. Garlic powder is not a suitable substitute for fresh garlic in this filling, as it lacks the fresh, bright flavor.
- ¼ cup Fresh Parsley, chopped (optional): Fresh parsley adds a touch of brightness and freshness to the garlic butter, balancing the richness of the butter and garlic. It also adds a beautiful visual element to the rolls. Other fresh herbs like chives, thyme, or rosemary can also be used, depending on your preference. If you don’t have fresh parsley, you can omit it or use a tablespoon of dried parsley, though fresh is definitely preferred.
- ½ teaspoon Salt: A touch of salt in the garlic butter enhances the flavors and brings everything together. Adjust the amount of salt to your taste.
- For Brushing and Topping (Optional):
- 2 tablespoons Unsalted Butter, melted: Melted butter brushed over the baked rolls adds shine, flavor, and helps to keep them soft. This step is highly recommended for that extra touch of deliciousness.
- Fresh Parsley, chopped (optional): A sprinkle of fresh parsley on top of the baked rolls adds a final touch of freshness and visual appeal.
Instructions
- Activate the Yeast: In a large bowl or the bowl of a stand mixer, combine the warm milk, yeast, and sugar. Gently stir to combine and let it sit for 5-10 minutes. This process, known as proofing the yeast, allows you to check if the yeast is active. You should see the mixture become foamy and bubbly, indicating that the yeast is alive and ready to work its magic. If the mixture doesn’t foam, your yeast might be old or inactive, and you’ll need to start with fresh yeast.
- Combine Wet and Dry Ingredients: Once the yeast is proofed, add the melted and slightly cooled butter, egg, and salt to the yeast mixture. Whisk to combine these wet ingredients thoroughly. Now, gradually add the flour, starting with 3 ½ cups. If using a stand mixer, use the dough hook and mix on low speed until the dough comes together. If mixing by hand, use a wooden spoon or your hands to combine the ingredients.
- Knead the Dough: Turn the dough out onto a lightly floured surface. Knead the dough for 8-10 minutes, or until it becomes smooth, elastic, and slightly tacky but not sticky. If using a stand mixer, knead with the dough hook on medium-low speed for 6-8 minutes. As you knead, the gluten in the flour develops, creating the structure and chewiness of the rolls. If the dough is too sticky, add a tablespoon of flour at a time, kneading until it reaches the desired consistency. Conversely, if the dough seems too dry, add a teaspoon of water at a time. The perfect dough should spring back slightly when you gently poke it.
- First Rise (Bulk Fermentation): Place the kneaded dough in a lightly oiled bowl, turning to coat all sides. Cover the bowl with plastic wrap or a clean kitchen towel. Let the dough rise in a warm place for 1-1.5 hours, or until it has doubled in size. This first rise, known as bulk fermentation, is crucial for developing flavor and texture in the dough. A warm place (around 75-80°F) is ideal for rising. You can place the bowl in a slightly warmed oven (turned off!), a sunny spot, or simply on your countertop if your kitchen is warm enough.
- Prepare the Garlic Butter: While the dough is rising, prepare the garlic butter filling. In a small bowl, combine the softened butter, minced garlic, parsley (if using), and salt. Mix well with a fork or spatula until everything is evenly combined and creamy. Set aside at room temperature. The aroma of this garlic butter alone is enough to make your mouth water!
- Shape the Rolls: Once the dough has doubled in size, gently punch it down to release the air. Turn the dough out onto a lightly floured surface. Roll the dough into a large rectangle, approximately 12×18 inches. Spread the prepared garlic butter evenly over the entire surface of the dough, leaving a small border at the edges.
- Swirl and Slice: Starting from one of the long edges, tightly roll the dough into a log, like you’re making a cinnamon roll. Pinch the seam to seal it. Using a sharp knife or dough scraper, slice the log into 12 equal rolls, each about 1-1.5 inches thick.
- Second Rise (Proofing): Lightly grease a 9×13 inch baking dish. Arrange the sliced rolls in the prepared baking dish, swirl side up. Cover loosely with plastic wrap or a clean kitchen towel. Let the rolls rise again in a warm place for 30-45 minutes, or until they have almost doubled in size and are puffy. This second rise, known as proofing, ensures the rolls become light and airy when baked.
- Bake the Rolls: Preheat oven to 375°F (190°C). Bake the rolls in the preheated oven for 20-25 minutes, or until they are golden brown and cooked through. The internal temperature of the rolls should reach around 200-210°F. If the tops of the rolls are browning too quickly, you can loosely tent them with foil during the last 10 minutes of baking.
- Brush with Melted Butter and Serve: Once the rolls are baked, remove them from the oven and immediately brush them generously with the melted butter. This adds a beautiful shine and extra flavor. Sprinkle with fresh parsley (if using) for garnish. Let the rolls cool in the baking dish for a few minutes before serving warm. These rolls are best enjoyed fresh out of the oven when they are at their softest and most flavorful.
Nutrition
- Serving Size: one normal portion
- Calories: 250-300
- Sugar: 5-7g
- Sodium: 250-350mg
- Fat: 12-15g
- Saturated Fat: 7-9g
- Carbohydrates: 30-35g
- Fiber: 1-2g
- Protein: 5-7g
- Cholesterol: 40-50mg