


Grilled corn on the cob. Just the words conjure up images of summer barbecues, smoky aromas, and the sweet, satisfying crunch of perfectly cooked kernels. For years, grilling corn on the cob has been a staple in our family gatherings. There’s something undeniably magical about taking simple ears of corn and transforming them over hot coals into a flavorful, slightly charred side dish that everyone devours. From the kids excitedly shucking the husks (sometimes more enthusiastically than effectively!) to the adults debating the best butter and seasoning combinations, grilled corn on the cob is more than just a recipe – it’s a shared experience. Honestly, no summer feels complete without the taste of grilled corn on the cob, and this recipe, honed over many happy grill sessions, is our go-to for guaranteed deliciousness every time. Get ready to elevate your summer grilling game!
Ingredients for Perfect Grilled Corn on the Cob
The beauty of grilled corn on the cob lies in its simplicity, both in preparation and ingredients. You really only need a few key components to achieve corn-on-the-cob grilling perfection. However, the quality of these ingredients, and how you choose to enhance them, will make all the difference between good grilled corn and amazing grilled corn. Let’s break down what you’ll need:
- Fresh Corn on the Cob: This is the star of the show! Aim for the freshest corn you can find. Look for ears with bright green, tightly wrapped husks that are slightly damp. The silks (the tassel-like strands protruding from the top) should be brown and slightly sticky. Avoid corn with dry, browning husks or silks that are completely dry and brittle, as this could indicate older, less flavorful corn. When you gently peel back a small section of the husk at the top, the kernels should be plump, milky, and tightly packed. Different varieties of corn will offer slightly different flavors and textures. Sweet corn is the most common and readily available, known for its sugary sweetness. However, don’t be afraid to explore other varieties if you have access to them. White corn tends to be slightly sweeter and more tender, while yellow corn offers a more robust, “corny” flavor. Bi-color corn is a delightful mix of both. For this recipe, any good quality sweet corn will work wonderfully. Calculate about one to two ears of corn per person, depending on appetites and whether it’s a side dish or part of a larger meal.
- Butter (Unsalted or Salted): Butter is essential for adding richness and flavor to grilled corn. You can use either unsalted or salted butter. Unsalted butter gives you more control over the saltiness of the final dish, while salted butter offers a convenient all-in-one flavor boost. If using unsalted butter, you’ll want to season with salt later. Consider using high-quality butter for a richer, more nuanced flavor. European-style butter, with its higher butterfat content, will impart extra luxuriousness to the corn. You’ll need about 2-4 tablespoons of butter for every 4 ears of corn, depending on how liberally you like to butter your corn.
- Olive Oil (Optional): While butter is the traditional choice, a light coating of olive oil can be used as an alternative, especially if you’re looking for a slightly lighter option or want to achieve a crispier texture. Olive oil also helps seasonings adhere to the corn. Extra virgin olive oil will provide the best flavor, but regular olive oil works well too. If using olive oil, you’ll still want to consider adding butter after grilling for that classic corn-on-the-cob taste. About 1-2 tablespoons of olive oil should be sufficient for 4 ears of corn if you choose to use it.
- Salt and Black Pepper: Simple seasoning is often the best when it comes to fresh, flavorful corn. Salt enhances the natural sweetness of the corn and pepper adds a touch of warmth and complexity. Use kosher salt or sea salt for a clean, bright flavor. Freshly ground black pepper is always preferable for its superior aroma and taste. Season generously to taste, remembering that grilling can sometimes mellow out flavors.
- Optional Seasonings (For Flavor Variations): The beauty of grilled corn on the cob is its versatility. Once you have the basic grilling technique down, you can experiment with a wide range of seasonings to customize the flavor profile. Here are a few ideas to inspire you:
- Garlic Powder or Granulated Garlic: Adds a savory, aromatic depth.
- Onion Powder: Provides a subtle, sweet onion flavor.
- Paprika (Smoked or Sweet): Smoked paprika will enhance the smoky grilled flavor, while sweet paprika offers a mild, fruity sweetness.
- Chili Powder or Cayenne Pepper: For a touch of heat. Start with a small amount and add more to taste.
- Lime or Lemon Zest and Juice: Brightens the flavor with citrusy notes.
- Fresh Herbs (Chopped Parsley, Cilantro, Chives): Add a fresh, vibrant element. Sprinkle on after grilling.
- Parmesan Cheese (Grated): Adds a salty, savory, and nutty dimension. Sprinkle on after grilling.
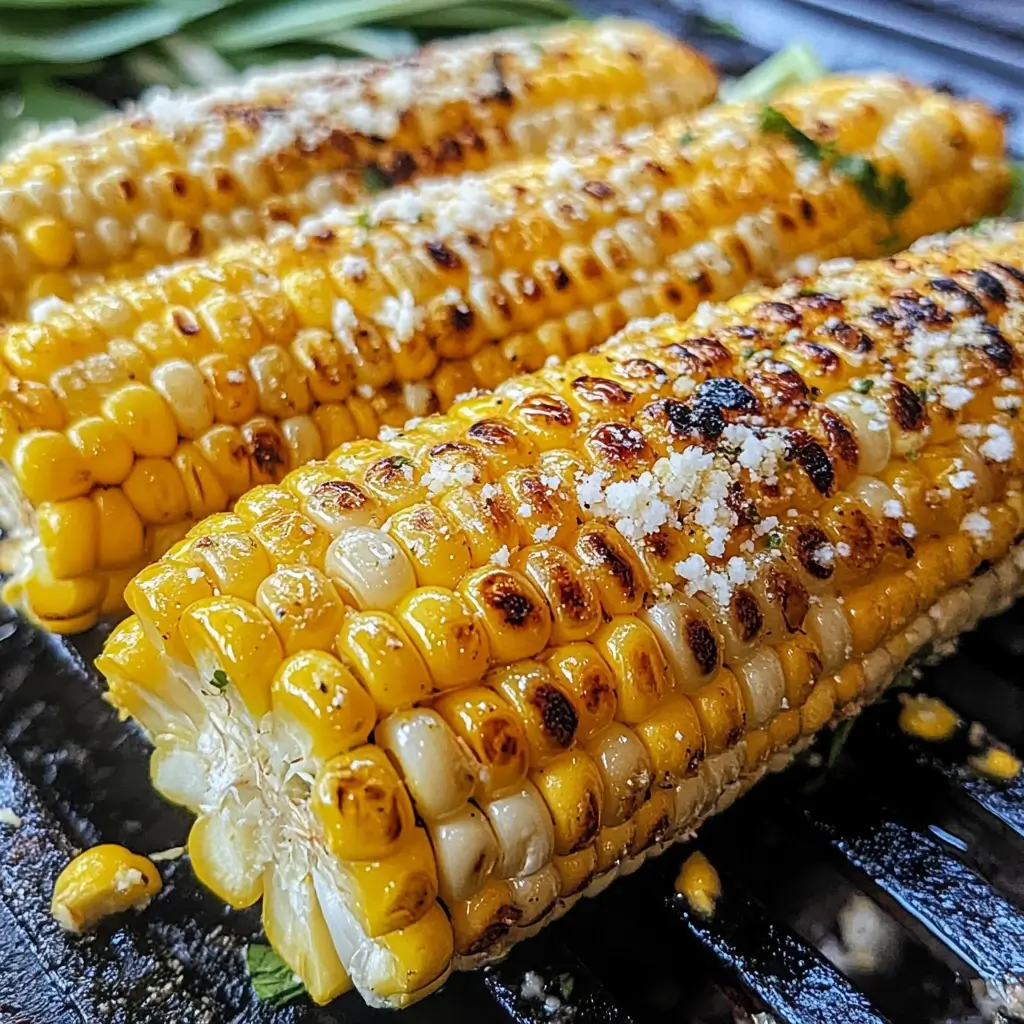
- Cotija Cheese (Crumbled): For a salty, crumbly, and slightly tangy Mexican-inspired twist.
- Everything Bagel Seasoning: A trendy and flavorful blend of sesame seeds, poppy seeds, dried garlic, dried onion, and salt.
- Italian Seasoning: A blend of dried herbs like oregano, basil, rosemary, and thyme, for a Mediterranean flair.
When choosing your seasonings, consider the overall flavor profile you want to achieve. For a classic, buttery flavor, simple salt and pepper are perfect. If you’re aiming for something more adventurous, experiment with different combinations of spices and herbs. Don’t be afraid to get creative and tailor the seasonings to your personal preferences and the rest of your meal! Remember, you can always offer a variety of seasonings and toppings at the table so everyone can customize their own grilled corn on the cob.
Step-by-Step Instructions for Grilling Corn on the Cob to Perfection
Grilling corn on the cob is a relatively straightforward process, but following these step-by-step instructions will ensure you achieve tender, juicy kernels with that desirable touch of smoky char. There are a few different methods you can use for grilling corn on the cob, and we’ll cover the most popular and effective techniques here: grilling in the husk, grilling with husks removed directly on the grill, and grilling in foil. Each method offers slightly different results in terms of texture and flavor.
Method 1: Grilling Corn in the Husk (Steaming and Roasting)
This method is excellent for producing incredibly moist and tender corn, as the husks act as a natural steamer, trapping moisture and infusing the corn with a subtle, sweet, corn-on-the-cob flavor. It’s also the most forgiving method, as the husks protect the kernels from direct heat, preventing them from drying out or burning too quickly.
- Prepare the Corn: Gently pull back the husks of each ear of corn, being careful not to detach them completely from the base. Remove the silks (the fine, thread-like strands) as thoroughly as possible. You can use a vegetable brush or your fingers to help remove them.
- Soak the Corn (Optional but Recommended): Soaking the corn in water before grilling is a debated step, but many grill masters recommend it, especially if you plan to grill for a longer period or over high heat. Soaking the husks helps to prevent them from burning excessively and keeps the corn moist during grilling. Submerge the husked corn in a large bowl or sink filled with cold water for at least 30 minutes, and up to 2 hours. If you’re short on time, even a 15-minute soak is better than nothing.
- Season (Optional, Under the Husks): If you want to infuse extra flavor into the corn while it grills, you can brush the kernels with melted butter or olive oil and sprinkle with salt, pepper, and any other desired seasonings before pulling the husks back up. This step is optional, as you can also season after grilling, but it allows the flavors to penetrate deeper into the corn during cooking.
- Re-wrap the Husks: Carefully pull the husks back up around the corn, encasing the kernels. You can tie the husks at the top with kitchen twine or strips of husk to secure them, but this isn’t strictly necessary if you are careful when placing them on the grill.
- Preheat the Grill: Preheat your grill to medium heat (about 350-450°F or 175-230°C). You should be able to hold your hand about 4-5 inches above the grates for 4-5 seconds. For charcoal grills, ensure the coals are medium-hot and covered with a light layer of ash.
- Grill the Corn: Place the wrapped corn ears directly on the grill grates. Close the grill lid. Grill for 20-25 minutes, turning the corn occasionally (every 5-7 minutes) to ensure even cooking on all sides. You’ll know the corn is done when the husks are nicely browned and slightly charred in spots, and the corn inside is tender and easily pierced with a fork. The husks will protect the corn from burning, but keep an eye on them and adjust the heat if they are charring too quickly.
- Cool and Serve: Once grilled, remove the corn from the grill and let it cool slightly for a few minutes before handling. The corn will be very hot! Carefully peel back the husks (be mindful of steam escaping) and remove the remaining silks. Serve immediately with butter, salt, pepper, and any other desired toppings.
Method 2: Grilling Corn Directly on the Grill (Husk Off, For Char)
This method is for those who love a more pronounced smoky flavor and slightly charred kernels. Grilling corn directly on the grates without the husks allows for direct heat contact, resulting in beautiful grill marks and a slightly drier, chewier texture compared to husk-on grilling.
- Husk and Clean the Corn: Completely remove the husks and silks from each ear of corn. Make sure to remove all the silks as they can burn and become bitter.
- Brush with Oil or Butter: Brush the corn kernels generously with melted butter or olive oil. This will help prevent the corn from sticking to the grill grates and promote even browning and charring.
- Season the Corn: Season the corn liberally with salt, pepper, and any other desired seasonings. Ensure the seasonings are evenly distributed over all sides of the corn.
- Preheat the Grill: Preheat your grill to medium-high heat (about 400-500°F or 200-260°C). For this method, you want a slightly hotter grill to achieve good char marks quickly.
- Grill the Corn: Place the husked and seasoned corn directly on the hot grill grates. Grill for 8-12 minutes total, turning the corn every 2-3 minutes to ensure even charring and cooking on all sides. Watch the corn closely and adjust the heat if it starts to char too quickly or burn. You want a nice golden-brown char on the kernels, but not black or burnt. The kernels should become slightly tender and plump.
- Serve Immediately: Once grilled to your desired level of char and tenderness, remove the corn from the grill and serve immediately. The corn will cook faster with this method, so it’s best to serve it right away while it’s hot and juicy. Offer butter, salt, pepper, and other toppings for guests to customize their corn.
Method 3: Grilling Corn in Foil (For Extra Tenderness and Flavor Infusion)
Grilling corn in foil is another excellent option for achieving incredibly tender and flavorful corn. The foil packets trap steam and moisture, similar to grilling in the husk, but also allow you to easily add butter, seasonings, and even other flavor-enhancing ingredients directly into the packet with the corn. This method is great for infusing deeper flavors and ensuring the corn stays exceptionally moist.
- Husk and Clean the Corn: Remove the husks and silks from each ear of corn.
- Prepare Foil Packets: For each ear of corn, tear off a large sheet of heavy-duty aluminum foil (about 12×12 inches). Place an ear of corn in the center of each foil sheet.
- Season and Flavor: Top each ear of corn with butter (about 1-2 tablespoons), salt, pepper, and any other desired seasonings or flavorings. Get creative! You can add minced garlic, herbs, spices, cheese, hot sauce, or even a drizzle of honey or maple syrup for sweetness.
- Seal the Foil Packets: Bring the long sides of the foil together over the corn and fold them over several times to create a tight seal. Then, fold in the short ends to create a completely sealed packet. Make sure the packets are well-sealed to trap steam inside.
- Preheat the Grill: Preheat your grill to medium heat (about 350-450°F or 175-230°C).
- Grill the Foil Packets: Place the foil packets directly on the grill grates. Close the grill lid and grill for 20-25 minutes, flipping the packets halfway through to ensure even cooking. The foil packets will protect the corn from direct heat and steam it to tender perfection.
- Serve Carefully: Remove the foil packets from the grill and let them rest for a few minutes before opening. Be careful when opening the packets, as steam will escape and can be very hot. Carefully open the foil packets and serve the corn directly from the foil or transfer to a serving platter. The corn will be incredibly tender and infused with the flavors you added to the packets.
Choosing the Right Method:
- For maximum moisture and subtle corn flavor: Grill in the husk (Method 1).
- For smoky char and a slightly drier texture: Grill directly on the grill (Method 2).
- For extra tenderness and flavor infusion: Grill in foil packets (Method 3).
No matter which method you choose, grilling corn on the cob is a fantastic way to enjoy this summer staple. Experiment with different techniques and seasonings to find your perfect grilled corn recipe!
Nutrition Facts for Grilled Corn on the Cob
Grilled corn on the cob is not only delicious but also offers a good source of nutrients. Here’s a general nutritional breakdown for one medium ear of grilled corn on the cob (approximately 7-8 inches long), without added butter or seasonings:
- Serving Size: 1 medium ear of corn (about 175 grams)
- Calories: Approximately 123-130 calories
- Protein: 4-5 grams
- Fat: 1.5-2 grams
- Saturated Fat: Less than 0.5 grams
- Monounsaturated Fat: Approximately 0.5 grams
- Polyunsaturated Fat: Approximately 1 gram
- Cholesterol: 0 mg
- Sodium: 15-20 mg (naturally occurring, will vary slightly depending on the corn)
- Carbohydrates: 27-30 grams
- Fiber: 3-4 grams
- Sugars: 6-7 grams (naturally occurring sugars)
- Vitamins and Minerals:
- Vitamin C: Provides a small amount, approximately 7-10% of the Daily Value (DV)
- Thiamine (Vitamin B1): Good source, approximately 15-20% DV
- Folate (Vitamin B9): Good source, approximately 10-15% DV
- Potassium: Good source, approximately 10-15% DV
- Magnesium: Provides a moderate amount, approximately 8-10% DV
- Phosphorus: Provides a moderate amount, approximately 10-12% DV
- Antioxidants: Corn contains antioxidants like lutein and zeaxanthin, which are beneficial for eye health.
Important Notes:
- These are approximate values and can vary slightly depending on the specific variety of corn, growing conditions, and size of the ear.
- Nutritional values will change significantly with the addition of butter, oil, seasonings, and toppings. Be mindful of added fats, sodium, and calories when buttering and seasoning your grilled corn.
- Corn is a starchy vegetable and is higher in carbohydrates compared to non-starchy vegetables. However, it also provides fiber, which is important for digestive health and helps regulate blood sugar levels.
- Grilled corn is naturally gluten-free and can be enjoyed by individuals following a gluten-free diet.
Calorie Considerations:
- Plain grilled corn (no butter/seasoning): Approximately 125-130 calories per ear.
- Grilled corn with 1 tablespoon of butter: Adds approximately 100 calories and 11 grams of fat.
- Grilled corn with 2 tablespoons of butter: Adds approximately 200 calories and 22 grams of fat.
When enjoying grilled corn on the cob, be mindful of portion sizes and added toppings, especially if you are watching your calorie or fat intake. Opting for lighter seasonings like herbs, spices, and lemon juice instead of heavy butter and salt can help keep the dish healthier while still being flavorful and satisfying. Grilled corn on the cob can be a part of a balanced and nutritious diet when enjoyed in moderation and prepared with healthy additions.
Preparation Time for Grilled Corn on the Cob
The preparation time for grilled corn on the cob is relatively quick and easy, making it a perfect side dish for summer barbecues and weeknight meals. Here’s a breakdown of the typical time involved:
- Prep Time: 10-15 minutes
- This includes husking the corn (if grilling husk-off or in foil), removing silks, soaking the corn (optional for husk-on grilling), and preparing any seasonings or butter.
- If grilling in foil packets, add a few extra minutes for assembling the packets.
- Cook Time:
- Husk-on grilling: 20-25 minutes
- Husk-off grilling: 8-12 minutes
- Foil packet grilling: 20-25 minutes
- Cook time will vary slightly depending on the heat of your grill, the size of the corn, and your desired level of char or tenderness.
- Total Time:
- Husk-on grilling: 30-40 minutes (including optional soaking time)
- Husk-off grilling: 20-25 minutes
- Foil packet grilling: 30-40 minutes
Time-Saving Tips:
- Prep Ahead: You can husk the corn and remove silks up to a few hours in advance and store them in the refrigerator wrapped in damp paper towels or in a resealable bag.
- Soak Corn Ahead (If Grilling Husk-On): If you plan to soak the corn, you can do this earlier in the day or even the day before and store the soaked corn in the refrigerator until you are ready to grill.
- Make Seasoned Butter in Advance: Prepare your seasoned butter or oil mixtures ahead of time and store them in the refrigerator. This will save you time when you’re ready to grill.
- Utilize Grill Space: If you’re grilling other items, plan to grill the corn alongside them to maximize your grill time. Corn can often be grilled while other meats or vegetables are resting.
Overall, grilling corn on the cob is a fast and efficient side dish option. Even with soaking time included, the total active preparation and cooking time is usually under 40 minutes. For a quicker option, husk-off grilling is the fastest method, ready in about 20-25 minutes total. This makes it a great choice for impromptu barbecues or when you need a delicious side dish in a hurry.
How to Serve Grilled Corn on the Cob: Creative Serving Suggestions
Grilled corn on the cob is a versatile side dish that can be served in a multitude of ways. While simply buttered and seasoned with salt and pepper is classic and delicious, there are countless creative serving options to elevate your grilled corn and complement your meal. Here are some ideas, categorized for easy inspiration:
Classic and Simple:
- Butter and Salt & Pepper: The quintessential way to enjoy grilled corn. Offer both salted and unsalted butter, flaky sea salt, and freshly cracked black pepper for guests to season to their liking.
- Herb Butter: Elevate your butter by mixing in finely chopped fresh herbs like parsley, chives, basil, thyme, or rosemary. This adds a layer of fresh, aromatic flavor.
- Garlic Butter: Combine softened butter with minced garlic and a pinch of salt for a savory garlic butter. Roasted garlic butter is even more flavorful!
- Lime or Lemon Butter: Brighten up your corn with citrus butter. Mix softened butter with lime or lemon zest and juice, and a pinch of salt.
- Chili Lime Butter: For a touch of heat and zesty flavor, combine softened butter with lime zest and juice, chili powder, and a pinch of salt.
Mexican-Inspired:
- Elote Style (Mexican Street Corn): This is a wildly popular and incredibly flavorful way to serve grilled corn. After grilling, brush the corn with mayonnaise or Mexican crema, then sprinkle generously with crumbled cotija cheese, chili powder, and a squeeze of lime juice. Fresh cilantro is a fantastic garnish.
- Spicy Chipotle Mayo: Mix mayonnaise with chipotle peppers in adobo sauce (finely chopped or pureed) and a squeeze of lime juice. Serve alongside grilled corn for dipping or brushing.
- Pico de Gallo Topping: Top grilled corn with fresh pico de gallo (a vibrant salsa made with diced tomatoes, onions, cilantro, jalapeños, and lime juice) for a refreshing and flavorful contrast.
- Black Bean and Corn Salsa: Serve grilled corn alongside a black bean and corn salsa made with black beans, corn kernels (you can even use some of the grilled kernels!), red onion, bell pepper, cilantro, lime juice, and a touch of cumin.
Mediterranean and Global Flavors:
- Feta and Herb Topping: Crumble feta cheese over grilled corn and sprinkle with chopped fresh oregano, mint, and a drizzle of olive oil. A squeeze of lemon juice enhances the Mediterranean flavors.
- Parmesan and Basil: Grate fresh Parmesan cheese over hot grilled corn and sprinkle with chiffonade-cut fresh basil leaves. A drizzle of balsamic glaze adds a touch of sweetness and tang.
- Everything Bagel Seasoning: Brush grilled corn with butter or olive oil and sprinkle generously with everything bagel seasoning for a trendy and flavorful twist.
- Curry Butter: Combine softened butter with curry powder, turmeric, and a pinch of salt for an exotic and aromatic curry butter.
- Soy Sauce and Sesame Oil Glaze: Brush grilled corn with a mixture of soy sauce, sesame oil, rice vinegar, and a touch of honey or brown sugar for an Asian-inspired glaze. Garnish with sesame seeds and chopped scallions.
Hearty and Salad-Inspired:
- Grilled Corn Salad: Cut the kernels off the grilled corn and toss them in a salad with cherry tomatoes, cucumber, red onion, bell peppers, avocado, and a light vinaigrette dressing. Add grilled chicken or shrimp for a complete meal.
- Grilled Corn and Bean Salad: Combine grilled corn kernels with black beans, kidney beans, or cannellini beans, diced bell peppers, red onion, cilantro, and a lime vinaigrette.
- Corn and Avocado Salsa: Create a chunky salsa by combining grilled corn kernels with diced avocado, red onion, jalapeño, cilantro, lime juice, and a pinch of salt. Serve as a topping for grilled chicken, fish, or tacos.
Serving Presentation:
- On the Cob: Serve the corn on the cob as is for a classic presentation. Provide corn holders for easier handling and eating.
- Kernels Only: Cut the kernels off the cob and serve them in a bowl as a side dish or as an ingredient in salads, salsas, or other recipes.
- Skewered Corn: Cut the corn cobs into smaller sections (halves or thirds) and thread them onto skewers before grilling. This makes them easier to handle and serve, especially for parties.
- Corn Ribs: Cut the corn cobs lengthwise into quarters or sixths to create “corn ribs.” Grill these corn ribs and serve them as a fun and unique appetizer or side dish.
No matter how you choose to serve it, grilled corn on the cob is sure to be a crowd-pleaser. Encourage your guests to get creative with toppings and enjoy the delicious flavors of summer!
Additional Tips for Grilling the Best Corn on the Cob
Grilling corn on the cob is a simple process, but a few key tips can help you elevate your results from good to truly exceptional. Here are five additional tips to ensure grilling success every time:
- Choose the Freshest Corn Possible: The quality of your corn is paramount. The fresher the corn, the sweeter and more flavorful it will be. Look for corn that is recently harvested and has bright green husks, plump kernels, and moist silks. If possible, buy corn the same day you plan to grill it for the best taste. Farmer’s markets and farm stands are often great sources for fresh, locally grown corn.
- Don’t Overcook It: Overcooked corn can become dry and tough. Aim for tender, juicy kernels with a slight bite. For husk-on grilling, 20-25 minutes is usually sufficient. For husk-off grilling, 8-12 minutes is typically enough. Use a fork to gently pierce a kernel to check for tenderness. It should be easily pierced but not mushy. Remember that corn will continue to cook slightly off the grill.
- Control the Heat: Maintaining the right grill temperature is crucial. Medium heat (350-450°F) is generally ideal for husk-on and foil packet grilling, allowing the corn to cook through without burning the husks or foil. Medium-high heat (400-500°F) works well for husk-off grilling to achieve nice char marks quickly. Avoid grilling over very high heat, as this can cause the outside of the corn to burn before the inside is cooked through. If your grill is running hot, you can lower the heat or move the corn to a cooler part of the grill.
- Experiment with Flavor Infusions: Don’t be afraid to get creative with flavor! Beyond basic butter and salt, explore different seasonings, herb butters, and glazes. Try brushing the corn with flavored oils or marinades before grilling or creating foil packets with butter, herbs, spices, cheese, or even a splash of wine or beer for extra flavor depth. Consider the overall flavor profile of your meal and choose seasonings that complement it.
- Rest Before Serving (Especially Husk-On): After grilling husk-on corn, allow it to rest for a few minutes before peeling back the husks. This resting period allows the steam to redistribute within the corn, resulting in even juicier kernels. It also makes the corn slightly cooler to handle. When grilling husk-off or in foil, resting is less critical but still beneficial.
By following these tips, along with the instructions provided earlier, you’ll be well on your way to grilling perfectly delicious corn on the cob every time. Enjoy the process and savor the taste of summer!
Frequently Asked Questions (FAQ) About Grilled Corn on the Cob
Here are some frequently asked questions about grilling corn on the cob to help you troubleshoot and achieve grilling success:
Q1: Should I soak corn on the cob before grilling?
A: Soaking corn on the cob before grilling, especially when grilling in the husk, is generally recommended. Soaking the husks in water for at least 30 minutes helps to prevent them from burning excessively on the grill and keeps the corn moist as it steams inside the husks. While not strictly necessary, soaking is a good practice for husk-on grilling, particularly if you are grilling for a longer period or over higher heat. For husk-off or foil packet grilling, soaking is not required.
Q2: How do I know when grilled corn on the cob is done?
A: The cooking time for grilled corn varies depending on the method and heat. For husk-on grilling, the husks will be browned and slightly charred, and the corn inside should be tender when pierced with a fork (about 20-25 minutes). For husk-off grilling, look for golden-brown char marks on the kernels and kernels that are slightly plump and tender (about 8-12 minutes). For foil packet grilling, the foil packets will be hot, and the corn inside should be tender and easily pierced with a fork (about 20-25 minutes). The best way to check for doneness is to carefully peel back a small section of husk (for husk-on) or use a fork to test the kernels for tenderness.
Q3: Can I grill corn on the cob ahead of time?
A: Grilled corn on the cob is best enjoyed fresh off the grill for optimal flavor and texture. However, if you need to grill it ahead of time, you can grill it until slightly underdone and then reheat it briefly on the grill or in the oven just before serving. To reheat, wrap the grilled corn in foil with a little butter or water and warm it in a preheated oven at 350°F (175°C) or on a medium-heat grill for about 10-15 minutes, or until heated through. Be careful not to overcook it when reheating, as it can dry out.
Q4: What’s the best way to remove silks from corn on the cob?
A: Removing silks can sometimes be a bit tedious, but there are a few effective methods. One common method is to gently pull back the husks and then use your fingers or a vegetable brush to remove the silks. Another trick is to dampen a paper towel or clean kitchen towel and use it to wipe away the silks. Some people find it easier to remove silks after briefly microwaving the corn (in the husk) for a minute or two, or after quickly blanching it in boiling water for a minute. Experiment to find the method that works best for you.
Q5: Can I freeze grilled corn on the cob?
A: Yes, you can freeze grilled corn on the cob, although the texture may change slightly after thawing. To freeze grilled corn, allow it to cool completely after grilling. You can freeze it on the cob or cut the kernels off the cob. For freezing on the cob, wrap each ear tightly in plastic wrap and then place them in a freezer bag. For freezing kernels, cut the kernels off the cob and spread them in a single layer on a baking sheet lined with parchment paper. Freeze for about 1-2 hours until kernels are solid, then transfer them to a freezer bag. Freezing the kernels individually first prevents them from clumping together. Frozen grilled corn can be stored in the freezer for up to 2-3 months. To use frozen grilled corn, you can thaw it in the refrigerator overnight or cook it directly from frozen in soups, stews, casseroles, or stir-fries. You can also reheat thawed kernels in a skillet with a little butter or oil.
Print
Grilled Corn on the Cob Recipe
Ingredients
- Fresh Corn on the Cob: This is the star of the show! Aim for the freshest corn you can find. Look for ears with bright green, tightly wrapped husks that are slightly damp. The silks (the tassel-like strands protruding from the top) should be brown and slightly sticky. Avoid corn with dry, browning husks or silks that are completely dry and brittle, as this could indicate older, less flavorful corn. When you gently peel back a small section of the husk at the top, the kernels should be plump, milky, and tightly packed. Different varieties of corn will offer slightly different flavors and textures. Sweet corn is the most common and readily available, known for its sugary sweetness. However, don’t be afraid to explore other varieties if you have access to them. White corn tends to be slightly sweeter and more tender, while yellow corn offers a more robust, “corny” flavor. Bi-color corn is a delightful mix of both. For this recipe, any good quality sweet corn will work wonderfully. Calculate about one to two ears of corn per person, depending on appetites and whether it’s a side dish or part of a larger meal.
- Butter (Unsalted or Salted): Butter is essential for adding richness and flavor to grilled corn. You can use either unsalted or salted butter. Unsalted butter gives you more control over the saltiness of the final dish, while salted butter offers a convenient all-in-one flavor boost. If using unsalted butter, you’ll want to season with salt later. Consider using high-quality butter for a richer, more nuanced flavor. European-style butter, with its higher butterfat content, will impart extra luxuriousness to the corn. You’ll need about 2-4 tablespoons of butter for every 4 ears of corn, depending on how liberally you like to butter your corn.
- Olive Oil (Optional): While butter is the traditional choice, a light coating of olive oil can be used as an alternative, especially if you’re looking for a slightly lighter option or want to achieve a crispier texture. Olive oil also helps seasonings adhere to the corn. Extra virgin olive oil will provide the best flavor, but regular olive oil works well too. If using olive oil, you’ll still want to consider adding butter after grilling for that classic corn-on-the-cob taste. About 1-2 tablespoons of olive oil should be sufficient for 4 ears of corn if you choose to use it.
- Salt and Black Pepper: Simple seasoning is often the best when it comes to fresh, flavorful corn. Salt enhances the natural sweetness of the corn and pepper adds a touch of warmth and complexity. Use kosher salt or sea salt for a clean, bright flavor. Freshly ground black pepper is always preferable for its superior aroma and taste. Season generously to taste, remembering that grilling can sometimes mellow out flavors.
- Optional Seasonings (For Flavor Variations): The beauty of grilled corn on the cob is its versatility. Once you have the basic grilling technique down, you can experiment with a wide range of seasonings to customize the flavor profile. Here are a few ideas to inspire you:
- Garlic Powder or Granulated Garlic: Adds a savory, aromatic depth.
- Onion Powder: Provides a subtle, sweet onion flavor.
- Paprika (Smoked or Sweet): Smoked paprika will enhance the smoky grilled flavor, while sweet paprika offers a mild, fruity sweetness.
- Chili Powder or Cayenne Pepper: For a touch of heat. Start with a small amount and add more to taste.
- Lime or Lemon Zest and Juice: Brightens the flavor with citrusy notes.
- Fresh Herbs (Chopped Parsley, Cilantro, Chives): Add a fresh, vibrant element. Sprinkle on after grilling.
- Parmesan Cheese (Grated): Adds a salty, savory, and nutty dimension. Sprinkle on after grilling.
- Cotija Cheese (Crumbled): For a salty, crumbly, and slightly tangy Mexican-inspired twist.
- Everything Bagel Seasoning: A trendy and flavorful blend of sesame seeds, poppy seeds, dried garlic, dried onion, and salt.
- Italian Seasoning: A blend of dried herbs like oregano, basil, rosemary, and thyme, for a Mediterranean flair.
Instructions
Method 1: Grilling Corn in the Husk (Steaming and Roasting)
This method is excellent for producing incredibly moist and tender corn, as the husks act as a natural steamer, trapping moisture and infusing the corn with a subtle, sweet, corn-on-the-cob flavor. It’s also the most forgiving method, as the husks protect the kernels from direct heat, preventing them from drying out or burning too quickly.
- Prepare the Corn: Gently pull back the husks of each ear of corn, being careful not to detach them completely from the base. Remove the silks (the fine, thread-like strands) as thoroughly as possible. You can use a vegetable brush or your fingers to help remove them.
- Soak the Corn (Optional but Recommended): Soaking the corn in water before grilling is a debated step, but many grill masters recommend it, especially if you plan to grill for a longer period or over high heat. Soaking the husks helps to prevent them from burning excessively and keeps the corn moist during grilling. Submerge the husked corn in a large bowl or sink filled with cold water for at least 30 minutes, and up to 2 hours. If you’re short on time, even a 15-minute soak is better than nothing.
- Season (Optional, Under the Husks): If you want to infuse extra flavor into the corn while it grills, you can brush the kernels with melted butter or olive oil and sprinkle with salt, pepper, and any other desired seasonings before pulling the husks back up. This step is optional, as you can also season after grilling, but it allows the flavors to penetrate deeper into the corn during cooking.
- Re-wrap the Husks: Carefully pull the husks back up around the corn, encasing the kernels. You can tie the husks at the top with kitchen twine or strips of husk to secure them, but this isn’t strictly necessary if you are careful when placing them on the grill.
- Preheat the Grill: Preheat your grill to medium heat (about 350-450°F or 175-230°C). You should be able to hold your hand about 4-5 inches above the grates for 4-5 seconds. For charcoal grills, ensure the coals are medium-hot and covered with a light layer of ash.
- Grill the Corn: Place the wrapped corn ears directly on the grill grates. Close the grill lid. Grill for 20-25 minutes, turning the corn occasionally (every 5-7 minutes) to ensure even cooking on all sides. You’ll know the corn is done when the husks are nicely browned and slightly charred in spots, and the corn inside is tender and easily pierced with a fork. The husks will protect the corn from burning, but keep an eye on them and adjust the heat if they are charring too quickly.
- Cool and Serve: Once grilled, remove the corn from the grill and let it cool slightly for a few minutes before handling. The corn will be very hot! Carefully peel back the husks (be mindful of steam escaping) and remove the remaining silks. Serve immediately with butter, salt, pepper, and any other desired toppings.
Method 2: Grilling Corn Directly on the Grill (Husk Off, For Char)
This method is for those who love a more pronounced smoky flavor and slightly charred kernels. Grilling corn directly on the grates without the husks allows for direct heat contact, resulting in beautiful grill marks and a slightly drier, chewier texture compared to husk-on grilling.
- Husk and Clean the Corn: Completely remove the husks and silks from each ear of corn. Make sure to remove all the silks as they can burn and become bitter.
- Brush with Oil or Butter: Brush the corn kernels generously with melted butter or olive oil. This will help prevent the corn from sticking to the grill grates and promote even browning and charring.
- Season the Corn: Season the corn liberally with salt, pepper, and any other desired seasonings. Ensure the seasonings are evenly distributed over all sides of the corn.
- Preheat the Grill: Preheat your grill to medium-high heat (about 400-500°F or 200-260°C). For this method, you want a slightly hotter grill to achieve good char marks quickly.
- Grill the Corn: Place the husked and seasoned corn directly on the hot grill grates. Grill for 8-12 minutes total, turning the corn every 2-3 minutes to ensure even charring and cooking on all sides. Watch the corn closely and adjust the heat if it starts to char too quickly or burn. You want a nice golden-brown char on the kernels, but not black or burnt. The kernels should become slightly tender and plump.
- Serve Immediately: Once grilled to your desired level of char and tenderness, remove the corn from the grill and serve immediately. The corn will cook faster with this method, so it’s best to serve it right away while it’s hot and juicy. Offer butter, salt, pepper, and other toppings for guests to customize their corn.
Method 3: Grilling Corn in Foil (For Extra Tenderness and Flavor Infusion)
Grilling corn in foil is another excellent option for achieving incredibly tender and flavorful corn. The foil packets trap steam and moisture, similar to grilling in the husk, but also allow you to easily add butter, seasonings, and even other flavor-enhancing ingredients directly into the packet with the corn. This method is great for infusing deeper flavors and ensuring the corn stays exceptionally moist.
- Husk and Clean the Corn: Remove the husks and silks from each ear of corn.
- Prepare Foil Packets: For each ear of corn, tear off a large sheet of heavy-duty aluminum foil (about 12×12 inches). Place an ear of corn in the center of each foil sheet.
- Season and Flavor: Top each ear of corn with butter (about 1-2 tablespoons), salt, pepper, and any other desired seasonings or flavorings. Get creative! You can add minced garlic, herbs, spices, cheese, hot sauce, or even a drizzle of honey or maple syrup for sweetness.
- Seal the Foil Packets: Bring the long sides of the foil together over the corn and fold them over several times to create a tight seal. Then, fold in the short ends to create a completely sealed packet. Make sure the packets are well-sealed to trap steam inside.
- Preheat the Grill: Preheat your grill to medium heat (about 350-450°F or 175-230°C).
- Grill the Foil Packets: Place the foil packets directly on the grill grates. Close the grill lid and grill for 20-25 minutes, flipping the packets halfway through to ensure even cooking. The foil packets will protect the corn from direct heat and steam it to tender perfection.
- Serve Carefully: Remove the foil packets from the grill and let them rest for a few minutes before opening. Be careful when opening the packets, as steam will escape and can be very hot. Carefully open the foil packets and serve the corn directly from the foil or transfer to a serving platter. The corn will be incredibly tender and infused with the flavors you added to the packets.
Nutrition
- Serving Size: One Normal Portion
- Calories: 123-130
- Sugar: 6-7 grams
- Sodium: 15-20 mg
- Fat: 1.5-2 grams
- Saturated Fat: Less than 0.5 grams
- Carbohydrates: 27-30 grams
- Fiber: 3-4 grams
- Protein: 4-5 grams
- Cholesterol: 0 mg


