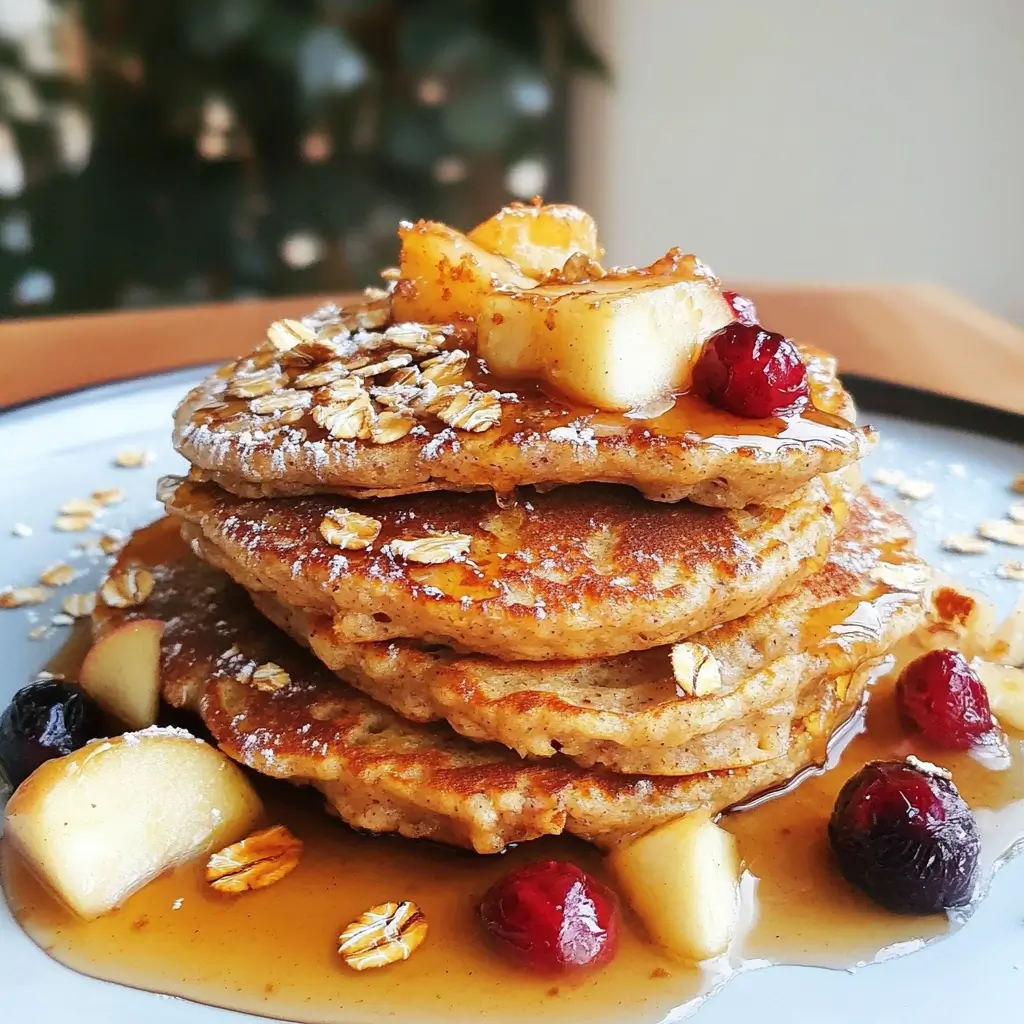
There’s a particular kind of magic that fills our home on a crisp Saturday morning, especially when the scent of cinnamon and warm apples begins to waft from the kitchen. These Easy and Healthy Apple Pancakes with Oats have become a beloved ritual, a testament to how something so simple can bring so much joy and nourishment. The kids, initially skeptical of ‘healthy’ pancakes, now request them specifically, devouring stack after stack with delighted giggles, usually slathered in a touch of maple syrup and a dollop of Greek yogurt. For me, it’s the perfect guilt-free indulgence – a breakfast that feels like a treat but is packed with wholesome goodness from the oats and fresh apples. They are surprisingly light yet satisfying, keeping us fueled for our weekend adventures without the sugar crash that often follows traditional pancake breakfasts. The combination of tender, slightly tart apple pieces, the hearty texture of oats, and the warm spice of cinnamon creates a symphony of flavors that’s both comforting and invigorating. I’ve tweaked this recipe over time to get it just right, and I’m thrilled to share what has become a family-favorite way to start the day.
Ingredients for Easy And Healthy Apple Pancakes With Oats
This recipe aims for a balance of wholesome ingredients and delicious flavor. The amounts provided will yield a generous batch, perfect for a family breakfast or for having leftovers.
- For the Pancakes:
- 1 ½ cups rolled oats (old-fashioned oats), or use quick-cooking oats
- 1 cup all-purpose flour (or whole wheat flour for extra fiber, or a gluten-free blend)
- 2 teaspoons baking powder
- ½ teaspoon baking soda
- 1 teaspoon ground cinnamon
- ¼ teaspoon ground nutmeg (optional, but recommended)
- ¼ teaspoon salt
- 1 ½ cups milk (dairy, almond, soy, or oat milk all work well)
- 2 large eggs, lightly beaten
- 2 tablespoons maple syrup or honey (optional, for added sweetness)
- 1 teaspoon vanilla extract
- 2 tablespoons melted unsalted butter or coconut oil, plus more for greasing the pan
- 1 large apple (or 2 small), peeled, cored, and finely diced or grated (about 1 to 1 ½ cups) – Granny Smith, Fuji, or Honeycrisp work well.
- Why these ingredients?
- Rolled Oats: These provide a wonderful, slightly chewy texture and are packed with soluble fiber, particularly beta-glucan, which is known for its heart-health benefits and ability to help regulate blood sugar.
- Flour: All-purpose flour gives a classic pancake texture. Whole wheat flour adds more fiber and a nuttier taste. Gluten-free all-purpose blends can be substituted for those with sensitivities.
- Baking Powder & Baking Soda: These are our leavening agents, crucial for making the pancakes light and fluffy. Baking soda reacts with acidic components (like buttermilk if you were using it, or sometimes even the apple), while baking powder provides a more sustained lift.
- Cinnamon & Nutmeg: These warm spices are a classic pairing with apples and oats, adding depth of flavor and a cozy aroma.
- Milk: Provides moisture and richness. The type of milk can be adjusted based on dietary preferences without significantly altering the outcome.
- Eggs: Act as a binder, holding the pancakes together, and contribute to their richness and structure.
- Maple Syrup/Honey: While optional, a touch of natural sweetener can enhance the overall flavor profile, especially if using tarter apples.
- Vanilla Extract: A flavor enhancer that complements the sweet and spicy notes.
- Melted Butter/Coconut Oil: Adds richness, flavor, and helps prevent sticking. Coconut oil can add a subtle tropical hint.
- Apples: The star of the show! They provide natural sweetness, moisture, a pleasant tartness (depending on the variety), and additional fiber and vitamins. Dicing gives you tender chunks, while grating incorporates the apple more subtly into the batter.
Instructions: Crafting Your Perfect Apple Oat Pancakes
Follow these simple steps to create a delicious and wholesome breakfast treat. The key is to not overmix the batter for the fluffiest results!
- Prepare the Dry Ingredients:
- In a large mixing bowl, whisk together the rolled oats, flour (all-purpose, whole wheat, or GF blend), baking powder, baking soda, ground cinnamon, ground nutmeg (if using), and salt. Whisking helps to combine them evenly and aerate the mixture, contributing to lighter pancakes. Set aside.
- Why this step is important: Evenly distributing the leavening agents (baking powder and soda) and spices is crucial for consistent flavor and rise in every pancake.
- Prepare the Wet Ingredients:
- In a separate medium mixing bowl, whisk together the milk, lightly beaten eggs, maple syrup or honey (if using), and vanilla extract until well combined.
- Stir in the melted butter or coconut oil. If your butter/oil is hot, you might want to let it cool slightly or temper it by adding a little of the milk mixture to it first, to avoid scrambling the eggs.
- Why this step is important: Combining wet ingredients separately ensures they are fully incorporated before being added to the dry, which helps prevent overmixing.
- Combine Wet and Dry Ingredients:
- Pour the wet ingredient mixture into the dry ingredient mixture.
- Using a spatula or wooden spoon, gently stir until just combined. It’s perfectly fine if there are still a few lumps in the batter. Overmixing develops the gluten in the flour too much, which can result in tough, chewy pancakes instead of light and fluffy ones.
- The “just combined” rule: This is perhaps the most critical rule for tender pancakes. Stop mixing as soon as you no longer see large streaks of dry flour.
- Fold in the Apples:
- Gently fold the finely diced or grated apple into the batter. Try to distribute them evenly without overmixing.
- Tip for apples: If you dice your apples, aim for small pieces (about ¼-inch) so they cook through and don’t make the pancakes too chunky or difficult to flip. Grating them on the large holes of a box grater works wonderfully for a more integrated apple flavor and texture.
- Rest the Batter (Optional but Recommended):
- If you have time, let the batter rest for 5-10 minutes. This allows the oats to absorb some of the liquid and the gluten to relax, which can result in even tenderer pancakes. The baking powder will also start to work its magic.
- Cook the Pancakes:
- Heat a lightly oiled griddle or non-stick frying pan over medium heat. The pan is ready when a drop of water sizzles and evaporates quickly. You can use a knob of butter, a drizzle of oil, or cooking spray.
- Pour or scoop the batter onto the hot griddle, using approximately ¼ to ⅓ cup of batter per pancake, depending on your desired size. Leave some space between pancakes for easy flipping.
- Cook for about 2-4 minutes on the first side, or until bubbles start to appear on the surface and the edges look set and slightly dry. The underside should be golden brown.
- Temperature control: If the pancakes are browning too quickly before the inside is cooked, reduce the heat slightly.
- Carefully flip the pancakes with a thin, wide spatula and cook for another 2-3 minutes on the other side, or until golden brown and cooked through. The center should spring back when lightly touched.
- Avoid pressing down: Resist the urge to press down on the pancakes with the spatula while they cook, as this will deflate them and make them dense.
- Serve and Repeat:
- Transfer the cooked pancakes to a plate. You can keep them warm in a low oven (around 200°F or 90°C) on an oven-safe plate while you cook the remaining batter.
- Repeat with the remaining batter, adding more butter or oil to the pan as needed between batches.
Nutrition Facts
- Servings: This recipe makes approximately 10-12 medium-sized pancakes.
- Serving Size: Considered to be 2-3 pancakes.
- Calories per serving (approximate for 2 pancakes, may vary based on exact ingredients like type of milk, flour, and optional sweetener): 280-350 calories.
Approximate Nutritional Breakdown (per 2 pancakes):
- Fat: 10-14g (depending on butter/oil and milk choice)
- Saturated Fat: 4-7g
- Cholesterol: 70-90mg
- Sodium: 300-400mg
- Carbohydrates: 35-45g
- Fiber: 4-6g (higher if using whole wheat flour)
- Sugar: 8-12g (natural sugars from apple and milk, plus any added sweetener)
- Protein: 8-10g
Disclaimer: These are estimates. Actual nutritional values will vary based on specific brands, ingredient choices, and exact serving sizes.
Key Nutritional Highlights:
- Rich in Fiber: Thanks to the rolled oats and apples (and whole wheat flour, if used), these pancakes are a good source of dietary fiber, which aids digestion, promotes satiety, and can help manage blood sugar levels.
- Source of Protein: Eggs and milk contribute to the protein content, making these pancakes more satisfying and helping to build and repair tissues.
- Vitamins and Minerals: Apples provide Vitamin C and various antioxidants. Oats offer B vitamins and minerals like manganese and phosphorus.
Preparation Time
Understanding the time commitment helps in planning your delicious breakfast:
- Prep Time (Mixing Batter & Preparing Apples): 15-20 minutes
- Peeling and dicing/grating apple: 5-7 minutes
- Measuring and mixing ingredients: 10-13 minutes
- Cook Time (per batch of 3-4 pancakes): 5-7 minutes
- Total Cook Time (for all pancakes, depending on pan size): 20-25 minutes
- Total Time (from start to serving): Approximately 35-45 minutes
This timing makes them feasible for a special weekday breakfast if you’re efficient, but they are truly perfect for a more relaxed weekend morning.
How to Serve Your Apple Oat Pancakes
These pancakes are delicious on their own, but toppings can elevate them to a new level of breakfast perfection! Here are some ideas, ranging from classic to creative:
- Classic Comforts:
- Maple Syrup: A drizzle of pure maple syrup is a timeless choice.
- Butter: A small pat of butter melting over the warm stack.
- Honey: A lighter, floral alternative to maple syrup.
- Healthy & Wholesome Additions:
- Greek Yogurt or Plain Yogurt: Adds a creamy, tangy element and a protein boost. A dollop on top or on the side.
- Fresh Berries: Blueberries, raspberries, strawberries, or a mixed berry compote provide extra vitamins and antioxidants.
- Sliced Banana: Adds natural sweetness and potassium.
- Toasted Nuts: Chopped walnuts, pecans, or almonds for a delightful crunch and healthy fats.
- Seeds: Chia seeds, flax seeds, or hemp seeds for an extra fiber and omega-3 boost.
- Apple Slices (thinly sliced, fresh or sautéed): Double down on the apple flavor! Sautéed apple slices with a sprinkle of cinnamon are particularly decadent.
- A dusting of Powdered Sugar (use sparingly for a healthier option) or extra Cinnamon.
- More Indulgent Toppings (for a special treat):
- Whipped Cream: For a truly dessert-like breakfast.
- Nut Butters: A smear of almond butter, peanut butter, or cashew butter for added protein and flavor.
- Chocolate Chips: A few dark chocolate chips sprinkled on top while the pancakes are warm.
- Caramel Drizzle: If you’re feeling extra decadent.
- Serving Suggestions for a Complete Meal:
- Pair with a side of scrambled eggs or a breakfast sausage for extra protein.
- Serve alongside a fresh fruit salad.
- Enjoy with a cup of coffee, tea, or a glass of milk.
- Presentation Matters:
- Stack them high! A tall stack always looks inviting.
- Arrange toppings artfully rather than just dumping them on.
- Serve on warm plates to keep the pancakes from cooling too quickly.
Additional Tips for Pancake Perfection (5 Tips)
- Choosing Your Apples: The type of apple you use can significantly impact the flavor.
- Tart: Granny Smith apples provide a nice tart counterpoint to the sweetness of the pancake and any syrup. They also hold their shape well when diced.
- Sweet: Fuji, Gala, or Honeycrisp apples will lend a sweeter, milder apple flavor. They tend to be softer and might meld more into the batter, especially if grated.
- Combination: Using a mix (e.g., one tart, one sweet) can offer a complex and balanced apple flavor. Avoid apples that get mushy quickly, like McIntosh, unless you prefer that texture.
- Making Ahead & Storage:
- Batter: While pancake batter is best used fresh (due to the leavening agents losing potency over time), you can make this batter the night before. Store it in an airtight container in the refrigerator. It might thicken slightly, so you may need to stir in a tablespoon or two of milk before cooking. The pancakes might not be quite as fluffy as with freshly made batter, but still delicious.
- Cooked Pancakes: Leftover pancakes can be stored in an airtight container in the refrigerator for 2-3 days. To reheat, you can microwave them, toast them in a toaster or toaster oven (for a slightly crispy edge), or warm them in a low oven.
- Freezing: These pancakes freeze beautifully! Let them cool completely, then stack them with small squares of parchment paper between each pancake to prevent sticking. Place the stack in a freezer-safe bag or container. They can be frozen for up to 2-3 months. Reheat from frozen in the microwave, toaster, or oven until warmed through.
- Customization & Flavor Boosts:
- Spices: Feel free to adjust the spices. Add a pinch of ground ginger or allspice for extra warmth. A tiny bit of cardamom can also be lovely.
- Extracts: Instead of or in addition to vanilla, try a ½ teaspoon of almond extract for a different flavor note.
- Add-ins (use sparingly): Consider adding ¼ cup of chopped walnuts or pecans directly into the batter for a nutty crunch. A few tablespoons of shredded coconut or mini chocolate chips could also be folded in.
- Zest: A teaspoon of lemon or orange zest added to the wet ingredients can brighten the flavors.
- Achieving the Perfect Flip:
- Patience is Key: Don’t rush the flip. Wait for those bubbles to appear across the surface and for the edges to look set. Peeking underneath with your spatula is allowed!
- The Right Spatula: Use a thin, wide, flexible spatula. This makes it easier to get fully under the pancake for a clean flip.
- The Motion: Slide the spatula decisively under the center of the pancake and flip it quickly and confidently in one smooth motion. Hesitation can lead to a messy flip.
- Gluten-Free and Vegan Adaptations:
- Gluten-Free: Ensure you use certified gluten-free rolled oats. Substitute the all-purpose flour with a good quality gluten-free all-purpose flour blend (one that contains xanthan gum or add it if your blend doesn’t). The texture might be slightly different, but still delicious.
- Vegan:
- Eggs: Replace the 2 eggs with 2 “flax eggs” (2 tablespoons ground flaxseed mixed with 6 tablespoons water, let sit for 5-10 minutes to thicken) or a commercial egg replacer. Mashed banana (about ½ cup) can also work but will add banana flavor.
- Milk: Use any plant-based milk (almond, soy, oat, cashew).
- Butter/Oil: Use melted coconut oil or another plant-based butter/oil.
- Sweetener: Ensure your maple syrup is pure or use another vegan sweetener.
The pancakes might be a bit denser but will still be very tasty.
FAQ Section: Your Apple Oat Pancake Questions Answered
Q1: Can I use quick-cooking oats instead of rolled oats?
A1: Yes, you can use quick-cooking oats. The main difference will be in the texture. Rolled oats (old-fashioned) provide a chewier, more distinct oat texture in the finished pancake. Quick-cooking oats are more processed and cut finer, so they will blend more into the batter, resulting in a slightly softer, less “oaty” texture. Both work well, it’s just a matter of preference. Avoid steel-cut oats for this recipe as they require much longer cooking times.
Q2: Can I make these pancakes gluten-free?
A2: Absolutely! To make these gluten-free, ensure you use certified gluten-free rolled oats (oats can be cross-contaminated with wheat during processing). Replace the all-purpose flour with a good quality gluten-free all-purpose flour blend. Look for a blend designed for baking, ideally one that already contains xanthan gum or guar gum, or add about ½ – ¾ teaspoon if your blend doesn’t include it, as this helps with binding. The texture might be a little different from wheat-based pancakes, but they will still be delicious and healthy.
Q3: How do I store leftover pancakes, and how long do they last?
A3: Let the pancakes cool completely to room temperature. Then, you can store them in an airtight container or a resealable plastic bag:
- Refrigerator: They will keep well in the fridge for 2-3 days.
- Freezer: For longer storage (up to 2-3 months), stack cooled pancakes with a small piece of parchment paper or wax paper between each one to prevent sticking. Place the stack in a freezer-safe bag or container.
To reheat, you can use a microwave (30-60 seconds), a toaster or toaster oven (great for a slightly crispy edge), or warm them in a preheated oven at around 300°F (150°C) for 5-10 minutes.
Q4: Can I use applesauce instead of fresh apples?
A4: Yes, you can substitute unsweetened applesauce for fresh apples, though it will change the texture – you won’t get the little tender pieces of apple. If using applesauce, try replacing the 1 to 1 ½ cups of diced apple with about ¾ to 1 cup of applesauce. You might need to slightly reduce the amount of milk in the recipe (perhaps by 2-3 tablespoons) as applesauce adds more moisture than diced apples. Taste the batter; if using sweetened applesauce, you might want to reduce or omit the maple syrup/honey in the batter.
Q5: Are these apple oat pancakes suitable for toddlers and kids?
A5: Yes, they are generally very suitable and often a hit with toddlers and kids! The oats provide great fiber, and apples add natural sweetness and nutrients. For very young toddlers, ensure the apple pieces are diced very small or grate the apple to avoid any choking hazards. You can also cut the pancakes into small, manageable pieces. If you’re concerned about added sugar, you can omit the optional maple syrup/honey in the batter itself, as the apples provide natural sweetness. Always supervise young children while eating. They’re a fantastic way to introduce more whole grains and fruit into their diet in a fun and appealing form.
Healthy Apple Pancakes With Oats Recipe
Ingredients
- For the Pancakes:
- 1 ½ cups rolled oats (old-fashioned oats), or use quick-cooking oats
- 1 cup all-purpose flour (or whole wheat flour for extra fiber, or a gluten-free blend)
- 2 teaspoons baking powder
- ½ teaspoon baking soda
- 1 teaspoon ground cinnamon
- ¼ teaspoon ground nutmeg (optional, but recommended)
- ¼ teaspoon salt
- 1 ½ cups milk (dairy, almond, soy, or oat milk all work well)
- 2 large eggs, lightly beaten
- 2 tablespoons maple syrup or honey (optional, for added sweetness)
- 1 teaspoon vanilla extract
- 2 tablespoons melted unsalted butter or coconut oil, plus more for greasing the pan
- 1 large apple (or 2 small), peeled, cored, and finely diced or grated (about 1 to 1 ½ cups) – Granny Smith, Fuji, or Honeycrisp work well.
- Why these ingredients?
- Rolled Oats: These provide a wonderful, slightly chewy texture and are packed with soluble fiber, particularly beta-glucan, which is known for its heart-health benefits and ability to help regulate blood sugar.
- Flour: All-purpose flour gives a classic pancake texture. Whole wheat flour adds more fiber and a nuttier taste. Gluten-free all-purpose blends can be substituted for those with sensitivities.
- Baking Powder & Baking Soda: These are our leavening agents, crucial for making the pancakes light and fluffy. Baking soda reacts with acidic components (like buttermilk if you were using it, or sometimes even the apple), while baking powder provides a more sustained lift.
- Cinnamon & Nutmeg: These warm spices are a classic pairing with apples and oats, adding depth of flavor and a cozy aroma.
- Milk: Provides moisture and richness. The type of milk can be adjusted based on dietary preferences without significantly altering the outcome.
- Eggs: Act as a binder, holding the pancakes together, and contribute to their richness and structure.
- Maple Syrup/Honey: While optional, a touch of natural sweetener can enhance the overall flavor profile, especially if using tarter apples.
- Vanilla Extract: A flavor enhancer that complements the sweet and spicy notes.
- Melted Butter/Coconut Oil: Adds richness, flavor, and helps prevent sticking. Coconut oil can add a subtle tropical hint.
- Apples: The star of the show! They provide natural sweetness, moisture, a pleasant tartness (depending on the variety), and additional fiber and vitamins. Dicing gives you tender chunks, while grating incorporates the apple more subtly into the batter.
Instructions
- Prepare the Dry Ingredients:
- In a large mixing bowl, whisk together the rolled oats, flour (all-purpose, whole wheat, or GF blend), baking powder, baking soda, ground cinnamon, ground nutmeg (if using), and salt. Whisking helps to combine them evenly and aerate the mixture, contributing to lighter pancakes. Set aside.
- Why this step is important: Evenly distributing the leavening agents (baking powder and soda) and spices is crucial for consistent flavor and rise in every pancake.
- Prepare the Wet Ingredients:
- In a separate medium mixing bowl, whisk together the milk, lightly beaten eggs, maple syrup or honey (if using), and vanilla extract until well combined.
- Stir in the melted butter or coconut oil. If your butter/oil is hot, you might want to let it cool slightly or temper it by adding a little of the milk mixture to it first, to avoid scrambling the eggs.
- Why this step is important: Combining wet ingredients separately ensures they are fully incorporated before being added to the dry, which helps prevent overmixing.
- Combine Wet and Dry Ingredients:
- Pour the wet ingredient mixture into the dry ingredient mixture.
- Using a spatula or wooden spoon, gently stir until just combined. It’s perfectly fine if there are still a few lumps in the batter. Overmixing develops the gluten in the flour too much, which can result in tough, chewy pancakes instead of light and fluffy ones.
- The “just combined” rule: This is perhaps the most critical rule for tender pancakes. Stop mixing as soon as you no longer see large streaks of dry flour.
- Fold in the Apples:
- Gently fold the finely diced or grated apple into the batter. Try to distribute them evenly without overmixing.
- Tip for apples: If you dice your apples, aim for small pieces (about ¼-inch) so they cook through and don’t make the pancakes too chunky or difficult to flip. Grating them on the large holes of a box grater works wonderfully for a more integrated apple flavor and texture.
- Rest the Batter (Optional but Recommended):
- If you have time, let the batter rest for 5-10 minutes. This allows the oats to absorb some of the liquid and the gluten to relax, which can result in even tenderer pancakes. The baking powder will also start to work its magic.
- Cook the Pancakes:
- Heat a lightly oiled griddle or non-stick frying pan over medium heat. The pan is ready when a drop of water sizzles and evaporates quickly. You can use a knob of butter, a drizzle of oil, or cooking spray.
- Pour or scoop the batter onto the hot griddle, using approximately ¼ to ⅓ cup of batter per pancake, depending on your desired size. Leave some space between pancakes for easy flipping.
- Cook for about 2-4 minutes on the first side, or until bubbles start to appear on the surface and the edges look set and slightly dry. The underside should be golden brown.
- Temperature control: If the pancakes are browning too quickly before the inside is cooked, reduce the heat slightly.
- Carefully flip the pancakes with a thin, wide spatula and cook for another 2-3 minutes on the other side, or until golden brown and cooked through. The center should spring back when lightly touched.
- Avoid pressing down: Resist the urge to press down on the pancakes with the spatula while they cook, as this will deflate them and make them dense.
- Serve and Repeat:
- Transfer the cooked pancakes to a plate. You can keep them warm in a low oven (around 200°F or 90°C) on an oven-safe plate while you cook the remaining batter.
- Repeat with the remaining batter, adding more butter or oil to the pan as needed between batches.
Nutrition
- Serving Size: One Normal Portion
- Calories: 280-350
- Sugar: 8-12g
- Sodium: 300-400mg
- Fat: 10-14g
- Saturated Fat: 4-7g
- Carbohydrates: 35-45g
- Fiber: 4-6g
- Protein: 8-10g
- Cholesterol: 70-90mg