

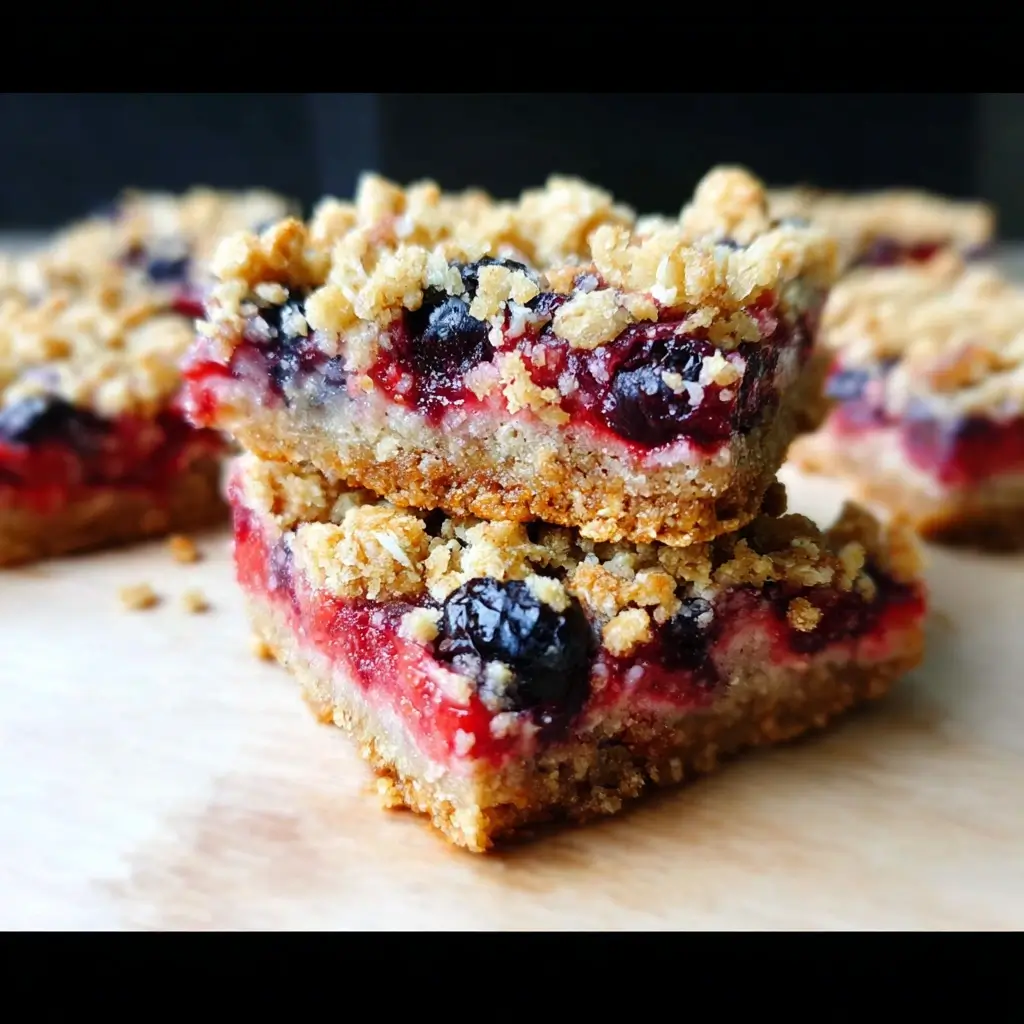

Our family gatherings, especially around patriotic holidays like the Fourth of July or Memorial Day, are always bustling with energy, laughter, and, of course, food. I’m constantly on the lookout for desserts that are not only crowd-pleasing but also align with our efforts to eat a bit healthier without sacrificing flavor. When I first stumbled upon the idea of a Red, White, and Blueberry Crumb Bar, I was intrigued. Could I make a version that was both vibrant and festive, yet packed with wholesome ingredients? The first batch I whipped up was an experiment – a little less sugar here, some whole grains there. The aroma wafting from the oven was a good sign, a warm, fruity, oaty perfume that drew everyone to the kitchen. When they finally cooled enough to slice, the reaction was immediate. My kids, usually skeptical of anything labeled “healthy,” devoured them. My husband, a man of few words but strong opinions on desserts, gave a resounding “these are keepers!” The combination of the slightly tart berries, the sweet, chewy base, and the buttery, crumbly topping was a symphony of textures and flavors. They were an instant hit, becoming our go-to treat for summer celebrations, potlucks, and even as a special after-school snack. These Healthy Red White and Blueberry Crumb Bars are more than just a recipe; they’re a testament to how delicious healthy eating can be, and they bring a little bit of joy and patriotic flair to our table every time.
Why You’ll Fall in Love with These Healthy Red White and Blueberry Crumb Bars
Before we dive into the delicious details, let’s talk about why this recipe will quickly become a favorite in your baking repertoire. These aren’t just any fruit bars; they’re a carefully crafted concoction designed to delight your taste buds while nourishing your body.
- Festively Delicious: The vibrant colors of strawberries, raspberries, and blueberries make these bars a visual showstopper, perfect for patriotic holidays like the 4th of July, Memorial Day, or any summer gathering. The “red, white, and blue” theme is naturally achieved with these beautiful berries.
- Healthier Indulgence: We’ve made smart swaps to boost the nutritional profile. Think whole grains for sustained energy, natural sweeteners for a gentler impact on blood sugar, and antioxidant-rich berries. You can feel good about serving these to your family and friends.
- Incredibly Easy to Make: Despite their impressive appearance, these crumb bars are surprisingly simple to assemble. The same mixture is used for both the base and the topping, saving you time and effort.
- Versatile Treat: Enjoy them as a dessert, a sweet breakfast bar, an afternoon snack, or pack them for picnics. They hold up well and are perfectly portable.
- Customizable: Feel free to play around with the berry combination based on what’s in season or your personal preferences. The recipe is quite forgiving!
- Crowd-Pleaser: The combination of a buttery, oaty crumb and a sweet-tart berry filling is universally loved. Kids and adults alike will be reaching for seconds.
Ingredients for Your Healthy Red White and Blueberry Crumb Bars
Gather these wholesome ingredients to create a truly spectacular and guilt-free treat. We’re focusing on whole foods and natural flavors to make these bars as nutritious as they are delicious.
For the Oat Crumb Base and Topping:
- Whole Wheat Flour: 1 cup (provides structure and fiber)
- Rolled Oats (Old-Fashioned): 1 ½ cups (for that classic crumb texture and heart-healthy benefits)
- Almond Flour: ½ cup (adds a lovely nutty flavor and healthy fats – optional, can sub with more whole wheat or oat flour)
- Coconut Sugar or Maple Syrup: ¾ cup (natural, unrefined sweetener; adjust to your preference)
- Ground Cinnamon: 1 teaspoon (for warmth and flavor)
- Baking Powder: ½ teaspoon (helps with a little lift)
- Salt: ¼ teaspoon (enhances all the flavors)
- Cold Unsalted Butter, cut into small cubes: ½ cup (1 stick) (or use cold solid coconut oil for a dairy-free option)
- Large Egg: 1 (acts as a binder for the base)
- Vanilla Extract: 1 teaspoon
For the Red, White, and Blueberry Filling:
- Fresh Blueberries: 1 ½ cups
- Fresh Strawberries: 1 cup, hulled and sliced or diced
- Fresh Raspberries: 1 cup (adds tartness and vibrant red color)
- Maple Syrup or Honey: ¼ cup (adjust to the sweetness of your berries)
- Lemon Zest: 1 teaspoon (brightens the berry flavors)
- Fresh Lemon Juice: 1 tablespoon
- Cornstarch (or Arrowroot Starch): 2 tablespoons (to thicken the filling)
- Optional “White” Element: ¼ cup unsweetened shredded coconut or a drizzle of white chocolate/yogurt glaze after baking and cooling. For this recipe, we’ll focus on the berries providing the red and blue, and the crumb providing a lighter, “white-ish” contrast, but you can enhance the white if desired.
Step-by-Step Instructions to Bake the Perfect Bars
Follow these simple steps, and you’ll have a pan of irresistible, healthy crumb bars ready to enjoy!
1. Prepare Your Equipment:
* Preheat your oven to 375°F (190°C).
* Grease and line a 9×13 inch baking pan (or an 8×8 inch pan for thicker bars) with parchment paper, leaving an overhang on two sides. This will make it easy to lift the bars out once they’re baked and cooled.
2. Make the Oat Crumb Mixture:
* In a large mixing bowl, whisk together the whole wheat flour, rolled oats, almond flour (if using), coconut sugar (if using granulated), cinnamon, baking powder, and salt.
* Add the cold, cubed butter (or solid coconut oil) to the dry ingredients. Using a pastry blender, your fingertips, or a food processor on pulse mode, cut the butter into the flour mixture until it resembles coarse crumbs or wet sand. Don’t overmix; some small pea-sized butter pieces are fine.
* If using maple syrup instead of coconut sugar, and for the egg and vanilla: In a small separate bowl, whisk together the egg, maple syrup (if using liquid sweetener for the crumb), and vanilla extract. Pour this wet mixture into the flour-butter mixture. Stir with a fork until just combined and the mixture starts to clump together. It will still be crumbly.
3. Create the Base:
* Reserve about 1 ½ cups of the crumb mixture for the topping.
* Press the remaining crumb mixture evenly into the bottom of your prepared baking pan. Use the bottom of a glass or your fingers to create a firm, even base.
4. Prepare the Berry Filling:
* In a separate medium bowl, gently combine the fresh blueberries, sliced/diced strawberries, and raspberries.
* In a small bowl, whisk together the maple syrup (or honey), lemon zest, lemon juice, and cornstarch (or arrowroot starch) until the cornstarch is fully dissolved and no lumps remain. This prevents clumps in your filling.
* Pour the cornstarch slurry over the berries and toss gently to coat them evenly.
5. Assemble the Bars:
* Spread the berry filling evenly over the pressed crumb base in the baking pan.
* Sprinkle the reserved 1 ½ cups of crumb mixture evenly over the top of the berry layer. If you’re using shredded coconut for an extra “white” element, you can mix it into this reserved crumb topping before sprinkling.
6. Bake to Golden Perfection:
* Place the baking pan in the preheated oven.
* Bake for 35-45 minutes, or until the topping is golden brown and the berry filling is bubbly around the edges. If the topping starts to brown too quickly, you can loosely tent the pan with aluminum foil for the last 10-15 minutes.
7. Cool Completely (Crucial Step!):
* Once baked, remove the pan from the oven and place it on a wire rack to cool completely. This is very important – allow at least 2-3 hours for cooling at room temperature, or you can expedite the process by placing it in the refrigerator for about 1-2 hours after it has cooled down a bit on the counter.
* Do not attempt to cut the bars while they are warm, as they will be too soft and fall apart. Cooling allows the filling to set and the bars to firm up.
8. Slice and Serve:
* Once completely cooled, use the parchment paper overhangs to lift the entire block of bars out of the pan.
* Place it on a cutting board and use a sharp knife to cut into squares or bars. For clean cuts, you can wipe the knife clean between slices.
Nutrition Facts
- Servings: This recipe yields approximately 16-20 bars, depending on how large you cut them (based on a 9×13 inch pan). For an 8×8 inch pan, you’ll get 9-12 thicker bars.
- Calories per serving (approximate): Around 180-250 calories per bar (for 16 servings from a 9×13 pan). This is an estimate and can vary based on the exact ingredients used (e.g., type of sweetener, addition of almond flour, butter vs. coconut oil).
Disclaimer: The nutritional information provided is an estimate and will vary depending on the specific ingredients and brands used, as well as the exact serving size.
Preparation & Cook Time
- Preparation Time: 20-25 minutes (includes making the crumb and assembling)
- Cook Time: 35-45 minutes
- Cooling Time: 2-3 hours (essential for setting)
- Total Time: Approximately 3-4 hours (mostly inactive cooling time)
How to Serve Your Healthy Red White and Blueberry Crumb Bars
These versatile bars can be enjoyed in numerous ways, making them perfect for various occasions:
- As a Standalone Dessert:
- Serve them at room temperature for the best texture and flavor.
- Perfect for potlucks, BBQs, and family gatherings.
- With a Dollop of Creaminess:
- Greek Yogurt: A scoop of plain or vanilla Greek yogurt adds a tangy contrast and a protein boost.
- Whipped Cream: For a more indulgent treat, a swirl of lightly sweetened whipped cream or coconut cream is delightful.
- Vanilla Ice Cream: Warm a bar slightly (after it has fully set and been cut) and serve with a scoop of good quality vanilla bean ice cream for a classic à la mode experience.
- For Breakfast or Brunch:
- Their wholesome ingredients make them a more indulgent but still reasonable breakfast option alongside a cup of coffee or tea.
- Festive Presentation:
- Arrange them on a platter with extra fresh berries scattered around for a beautiful presentation, especially for patriotic holidays.
- Dust lightly with powdered sugar (using a fine-mesh sieve) just before serving for an elegant touch, though this adds refined sugar.
- Packed for On-the-Go:
- Once cooled and cut, they are sturdy enough to be packed in lunchboxes or taken on picnics. Wrap individual bars in parchment paper or beeswax wraps.
- Paired with Beverages:
- Coffee or Tea: An excellent accompaniment for an afternoon pick-me-up.
- Milk: Kids (and adults!) will love them with a cold glass of milk.
- Lemonade or Iced Tea: Perfect for a summer afternoon treat.
Additional Tips for Baking Success
Unlock the full potential of your Healthy Red White and Blueberry Crumb Bars with these five expert tips:
- Don’t Overwork the Crumb Mixture: When cutting in the butter (or coconut oil), aim for a coarse, mealy texture. Overmixing can develop the gluten in the flour too much, leading to a tougher base and topping rather than a tender, crumbly one. If using a food processor, use short pulses.
- Fresh vs. Frozen Berries: While fresh berries are recommended for the best texture and to avoid excess moisture, you can use frozen berries. If using frozen, do NOT thaw them beforehand. Add them to the filling mixture while still frozen and toss with the cornstarch. You may need to increase the bake time by 5-10 minutes to account for the extra coldness and moisture.
- The Importance of Cooling Completely: This cannot be stressed enough! Warm crumb bars, especially those with a juicy berry filling, are very fragile. Allowing them to cool completely (preferably for several hours or even chilling them slightly) lets the filling set and the crumb structure to firm up, ensuring clean slices and preventing them from falling apart.
- Parchment Paper Sling is Your Best Friend: Using parchment paper with an overhang on at least two sides of the baking pan makes removal a breeze. Once cooled, you can simply lift the entire slab of bars out onto a cutting board, making for neater cutting and easier cleanup.
- Taste and Adjust Sweetness: The natural sweetness of berries can vary greatly depending on the season and ripeness. Taste your berries before making the filling. If they are very tart, you might want to add an extra tablespoon of maple syrup or honey to the filling. Conversely, if your berries are exceptionally sweet, you can slightly reduce the sweetener.
Frequently Asked Questions (FAQ)
Here are answers to some common questions you might have about making these delightful bars:
- Q: Can I make these Red White and Blueberry Crumb Bars gluten-free?
- A: Absolutely! To make them gluten-free, substitute the whole wheat flour with a good quality gluten-free all-purpose baking blend (one that contains xanthan gum or add it if it doesn’t). Ensure your rolled oats are certified gluten-free, as oats can often be cross-contaminated with wheat during processing. The almond flour is naturally gluten-free.
- Q: Can I use different types of berries or fruits?
- A: Yes, this recipe is very adaptable! While the “Red, White, and Blueberry” theme is specific, you can certainly use other fruits. Consider:
- All Blueberries: For classic blueberry crumb bars.
- Mixed Berries: Any combination of strawberries, blueberries, raspberries, blackberries.
- Peach or Apple: Diced peaches or apples (peeled and cored) would make a lovely seasonal variation, perhaps with a pinch more cinnamon or nutmeg in the crumb. You may need to adjust the cornstarch depending on the fruit’s juiciness.
- A: Yes, this recipe is very adaptable! While the “Red, White, and Blueberry” theme is specific, you can certainly use other fruits. Consider:
- Q: How do I know when the crumb bars are perfectly baked?
- A: Look for a few key indicators: The crumb topping should be a beautiful golden brown. The berry filling should be visibly bubbling, especially around the edges of the pan – this indicates that the cornstarch has activated and will thicken the filling as it cools. The edges of the base should also look set and lightly browned.
- Q: How should I store leftover crumb bars, and how long will they last?
- A: Once completely cooled, store the crumb bars in an airtight container. They can be kept at room temperature for up to 2-3 days. For longer storage, you can refrigerate them for up to 5-7 days. If refrigerated, you might want to let them come to room temperature before serving for the best texture, or gently warm them. They can also be frozen for up to 3 months; thaw overnight in the refrigerator.
- Q: My berry filling seems too runny, even after cooling. What went wrong?
- A: There are a few potential reasons for a runny filling:
- Not enough thickener: Ensure you used the correct amount of cornstarch or arrowroot starch. Some berries are juicier than others, so occasionally a tad more might be needed.
- Not baked long enough: The filling needs to bubble to activate the cornstarch. If it didn’t reach a sufficient temperature, it wouldn’t thicken properly.
- Cut too soon: The bars must cool completely. The filling sets significantly as it cools. Cutting them while warm is the most common culprit for a runny mess.
- Excess moisture from berries: If using very ripe or previously frozen (and thawed) berries, they might release more liquid. If using frozen, add them directly from frozen.
- A: There are a few potential reasons for a runny filling:
Enjoy baking and sharing these wonderful, healthy Red White and Blueberry Crumb Bars! They’re a true celebration of flavor, color, and wholesome goodness, perfect for any occasion that calls for a touch of sweetness and patriotic pride.
Print
Healthy Red White and Blueberry Crumb Bars Recipe
Ingredients
For the Oat Crumb Base and Topping:
-
- Whole Wheat Flour: 1 cup (provides structure and fiber)
-
- Rolled Oats (Old-Fashioned): 1 ½ cups (for that classic crumb texture and heart-healthy benefits)
-
- Almond Flour: ½ cup (adds a lovely nutty flavor and healthy fats – optional, can sub with more whole wheat or oat flour)
-
- Coconut Sugar or Maple Syrup: ¾ cup (natural, unrefined sweetener; adjust to your preference)
-
- Ground Cinnamon: 1 teaspoon (for warmth and flavor)
-
- Baking Powder: ½ teaspoon (helps with a little lift)
-
- Salt: ¼ teaspoon (enhances all the flavors)
-
- Cold Unsalted Butter, cut into small cubes: ½ cup (1 stick) (or use cold solid coconut oil for a dairy-free option)
-
- Large Egg: 1 (acts as a binder for the base)
-
- Vanilla Extract: 1 teaspoon
For the Red, White, and Blueberry Filling:
-
- Fresh Blueberries: 1 ½ cups
-
- Fresh Strawberries: 1 cup, hulled and sliced or diced
-
- Fresh Raspberries: 1 cup (adds tartness and vibrant red color)
-
- Maple Syrup or Honey: ¼ cup (adjust to the sweetness of your berries)
-
- Lemon Zest: 1 teaspoon (brightens the berry flavors)
-
- Fresh Lemon Juice: 1 tablespoon
-
- Cornstarch (or Arrowroot Starch): 2 tablespoons (to thicken the filling)
-
- Optional “White” Element: ¼ cup unsweetened shredded coconut or a drizzle of white chocolate/yogurt glaze after baking and cooling. For this recipe, we’ll focus on the berries providing the red and blue, and the crumb providing a lighter, “white-ish” contrast, but you can enhance the white if desired.
Instructions
1. Prepare Your Equipment:
* Preheat your oven to 375°F (190°C).
* Grease and line a 9×13 inch baking pan (or an 8×8 inch pan for thicker bars) with parchment paper, leaving an overhang on two sides. This will make it easy to lift the bars out once they’re baked and cooled.
2. Make the Oat Crumb Mixture:
* In a large mixing bowl, whisk together the whole wheat flour, rolled oats, almond flour (if using), coconut sugar (if using granulated), cinnamon, baking powder, and salt.
* Add the cold, cubed butter (or solid coconut oil) to the dry ingredients. Using a pastry blender, your fingertips, or a food processor on pulse mode, cut the butter into the flour mixture until it resembles coarse crumbs or wet sand. Don’t overmix; some small pea-sized butter pieces are fine.
* If using maple syrup instead of coconut sugar, and for the egg and vanilla: In a small separate bowl, whisk together the egg, maple syrup (if using liquid sweetener for the crumb), and vanilla extract. Pour this wet mixture into the flour-butter mixture. Stir with a fork until just combined and the mixture starts to clump together. It will still be crumbly.
3. Create the Base:
* Reserve about 1 ½ cups of the crumb mixture for the topping.
* Press the remaining crumb mixture evenly into the bottom of your prepared baking pan. Use the bottom of a glass or your fingers to create a firm, even base.
4. Prepare the Berry Filling:
* In a separate medium bowl, gently combine the fresh blueberries, sliced/diced strawberries, and raspberries.
* In a small bowl, whisk together the maple syrup (or honey), lemon zest, lemon juice, and cornstarch (or arrowroot starch) until the cornstarch is fully dissolved and no lumps remain. This prevents clumps in your filling.
* Pour the cornstarch slurry over the berries and toss gently to coat them evenly.
5. Assemble the Bars:
* Spread the berry filling evenly over the pressed crumb base in the baking pan.
* Sprinkle the reserved 1 ½ cups of crumb mixture evenly over the top of the berry layer. If you’re using shredded coconut for an extra “white” element, you can mix it into this reserved crumb topping before sprinkling.
6. Bake to Golden Perfection:
* Place the baking pan in the preheated oven.
* Bake for 35-45 minutes, or until the topping is golden brown and the berry filling is bubbly around the edges. If the topping starts to brown too quickly, you can loosely tent the pan with aluminum foil for the last 10-15 minutes.
7. Cool Completely (Crucial Step!):
* Once baked, remove the pan from the oven and place it on a wire rack to cool completely. This is very important – allow at least 2-3 hours for cooling at room temperature, or you can expedite the process by placing it in the refrigerator for about 1-2 hours after it has cooled down a bit on the counter.
* Do not attempt to cut the bars while they are warm, as they will be too soft and fall apart. Cooling allows the filling to set and the bars to firm up.
8. Slice and Serve:
* Once completely cooled, use the parchment paper overhangs to lift the entire block of bars out of the pan.
* Place it on a cutting board and use a sharp knife to cut into squares or bars. For clean cuts, you can wipe the knife clean between slices.
Nutrition
- Serving Size: One Normal Portion
- Calories: 180-250


