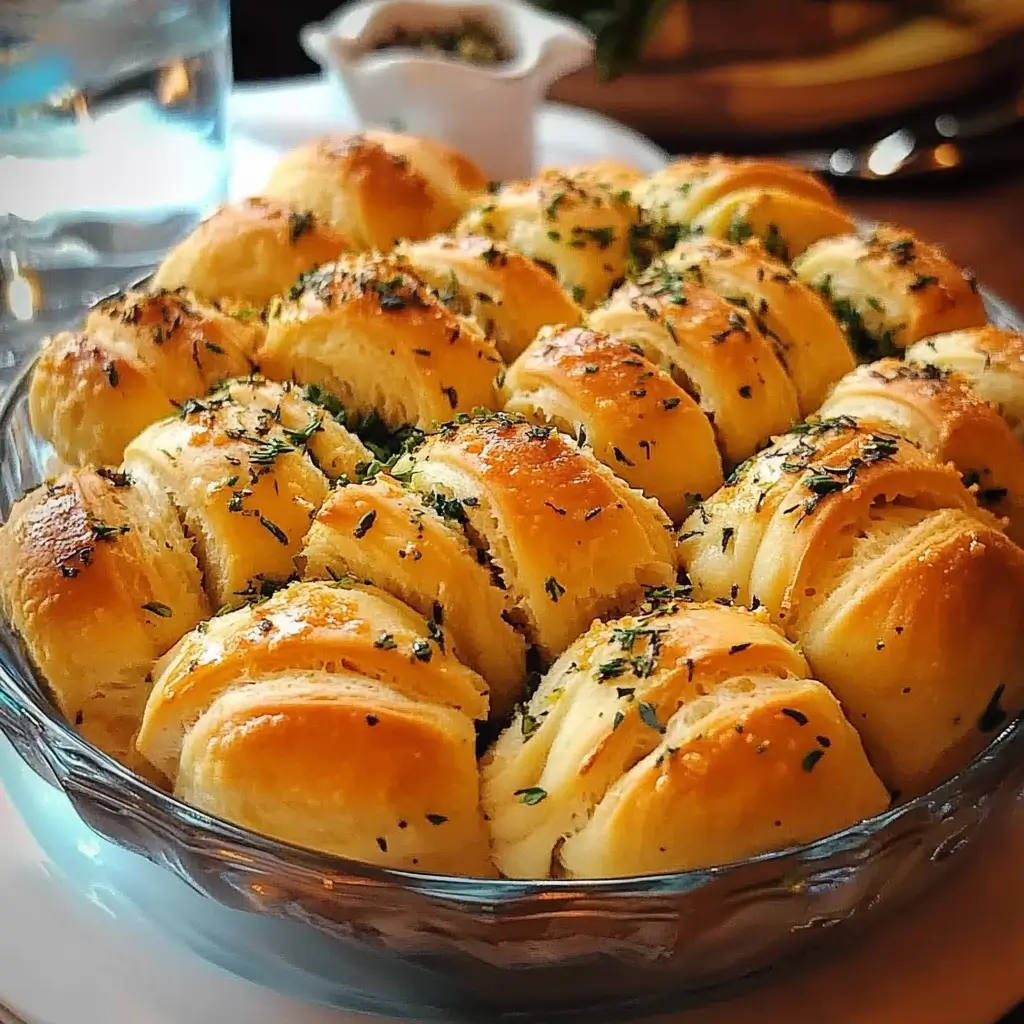
There’s something truly magical about the aroma of freshly baked bread wafting through your home. It’s an instant mood booster, a promise of comfort and warmth, and a surefire way to gather everyone around the table. For years, our family dinners were perfectly pleasant, but they always felt like they were missing a certain je ne sais quoi until I stumbled upon the recipe for Herbed Accordion Dinner Rolls. Let me tell you, these aren’t just any dinner rolls; they’re a game-changer. The first time I made them, the reaction was immediate and overwhelmingly positive. The kids, usually picky eaters, devoured them, slathering them with butter and asking for seconds (and thirds!). My partner declared them the best rolls he’d ever tasted, and even my usually quiet mother-in-law couldn’t stop praising them. What makes these rolls so special? It’s the perfect combination of a soft, pillowy interior, a slightly crisp exterior, and the delightful herbaceous notes that elevate them from ordinary to extraordinary. The accordion shape isn’t just visually appealing; it creates more surface area for that glorious herb butter to seep into every nook and cranny, ensuring each bite is bursting with flavor. Since that first batch, Herbed Accordion Dinner Rolls have become a staple in our household, gracing our holiday tables, Sunday suppers, and even making appearances at casual weeknight meals. If you’re looking to impress your family and friends with a bread that’s both beautiful and incredibly delicious, look no further. These rolls are surprisingly easy to make, and the reward is well worth the minimal effort. Prepare to be amazed by the aroma, the taste, and the sheer joy these Herbed Accordion Dinner Rolls will bring to your table.
Ingredients
To create these delectable Herbed Accordion Dinner Rolls, you’ll need a collection of simple yet essential ingredients. Each component plays a vital role in achieving the perfect texture and flavor profile that defines these rolls. Let’s break down the ingredient list into two key parts: the dough ingredients and the herb butter ingredients. Using high-quality ingredients will significantly enhance the final product, so opt for fresh herbs and good quality butter whenever possible.
For the Dough:
- 1 cup (240ml) Warm Milk: The milk should be comfortably warm to the touch, around 105-115°F (40-46°C). This warmth is crucial for activating the yeast. Milk adds richness and tenderness to the dough, contributing to the soft interior of the rolls. You can use whole milk for the best flavor and texture, but 2% milk or even non-dairy milk alternatives like almond milk or oat milk can also work, though they might slightly alter the richness.
- 2 ¼ teaspoons (1 packet) Active Dry Yeast: Yeast is the heart of any good bread recipe, responsible for the rise and airy texture. Active dry yeast needs to be proofed in warm liquid before being added to the dry ingredients. Ensure your yeast is fresh for optimal rising power. If you’re using instant yeast, you can skip the proofing step and add it directly to the dry ingredients.
- 2 tablespoons Granulated Sugar: Sugar not only adds a touch of sweetness but also feeds the yeast, aiding in its activation and the dough’s rise. It also contributes to the golden-brown color of the crust during baking.
- 1 teaspoon Salt: Salt is essential for controlling yeast activity and enhancing the flavor of the bread. It balances the sweetness and prevents the rolls from tasting bland. Don’t skip the salt, as it plays a crucial role in the overall taste and texture.
- ¼ cup (60g) Unsalted Butter, Melted and Cooled: Melted butter adds richness, moisture, and tenderness to the dough. Using unsalted butter allows you to control the salt content precisely. Make sure the butter is cooled slightly before adding it to the yeast mixture, as hot butter can kill the yeast.
- 1 Large Egg: The egg adds richness, structure, and color to the dough. It helps to create a softer crumb and contributes to the golden-brown crust. For best results, use a large egg at room temperature.
- 3 ½ – 4 cups (420-480g) All-Purpose Flour, plus more for dusting: Flour is the foundation of the dough, providing structure and elasticity. All-purpose flour is versatile and works well for dinner rolls. The amount of flour may vary depending on humidity and flour type. Start with 3 ½ cups and gradually add more until the dough is smooth and slightly sticky but not overly wet. Having extra flour for dusting is crucial for preventing the dough from sticking during kneading and shaping.
For the Herb Butter:
- ½ cup (1 stick) Unsalted Butter, Softened: Softened butter is essential for creating a smooth and spreadable herb butter. Ensure the butter is at room temperature, allowing it to easily incorporate with the herbs and garlic.
- 2 cloves Garlic, minced: Garlic adds a pungent and savory flavor that complements the herbs beautifully. Mince the garlic finely to distribute its flavor evenly throughout the butter. You can also use roasted garlic for a milder, sweeter garlic flavor.
- ¼ cup Fresh Parsley, chopped: Fresh parsley provides a bright, clean, and slightly peppery flavor. Flat-leaf parsley (Italian parsley) is often preferred for its more robust flavor compared to curly parsley.
- 2 tablespoons Fresh Chives, chopped: Chives offer a mild onion-like flavor that adds a delicate sharpness to the herb butter. Their subtle flavor blends well with other herbs without being overpowering.
- 1 tablespoon Fresh Thyme leaves: Fresh thyme brings an earthy, slightly lemony, and aromatic flavor. Strip the leaves from the thyme sprigs for the best texture and flavor distribution. Dried thyme can be used as a substitute, but fresh thyme provides a brighter and more vibrant taste.
- ¼ teaspoon Salt: A pinch of salt in the herb butter enhances the flavors of the herbs and garlic and balances the richness of the butter.
- ¼ teaspoon Black Pepper: Freshly ground black pepper adds a subtle warmth and spice to the herb butter, complementing the other flavors.
Having all these ingredients prepared and measured beforehand will make the baking process smoother and more enjoyable. Gather your ingredients and get ready to create these irresistible Herbed Accordion Dinner Rolls!
Instructions
Creating these Herbed Accordion Dinner Rolls is a rewarding process, and following these detailed instructions step-by-step will ensure baking success. From activating the yeast to shaping the accordion folds and finally baking to golden perfection, each step is crucial for achieving those soft, flavorful, and visually stunning rolls.
Step 1: Proof the Yeast
- In a large bowl or the bowl of a stand mixer, gently warm the milk to 105-115°F (40-46°C). You can use a microwave or heat it gently on the stovetop. Ensure it’s warm, not hot, as excessive heat can kill the yeast.
- Add the sugar and active dry yeast to the warm milk. Stir gently to combine.
- Let the mixture stand for 5-10 minutes. This process, called proofing, allows you to check if the yeast is active. You should see foamy bubbles forming on the surface, indicating that the yeast is alive and ready to work its magic. If no bubbles appear, your yeast might be old or inactive, and you’ll need to use fresh yeast.
Step 2: Combine Wet and Dry Ingredients
- Once the yeast is proofed and bubbly, add the melted and cooled butter, egg, and salt to the yeast mixture. Whisk to combine all the wet ingredients thoroughly.
- Gradually add the flour, starting with 3 ½ cups. If using a stand mixer, use the dough hook attachment. If mixing by hand, use a wooden spoon or your hands.
- Mix on low speed (or stir by hand) until the dough comes together and is mostly smooth. If the dough is very sticky and not pulling away from the sides of the bowl, gradually add more flour, a tablespoon at a time, until it forms a soft, slightly sticky dough. You may need up to 4 cups of flour, depending on your flour and humidity.
- Turn the dough out onto a lightly floured surface.
Step 3: Knead the Dough
- Knead the dough for 6-8 minutes if using a stand mixer with a dough hook, or 8-10 minutes by hand. Kneading develops the gluten in the flour, which is essential for creating the structure and chewy texture of the rolls.
- To knead by hand, push the dough away from you with the heel of your hand, fold it in half, and turn it 90 degrees. Repeat this process, adding a little flour if the dough becomes too sticky, until the dough is smooth, elastic, and springs back when gently poked.
- The dough should be soft and slightly tacky but not sticky. It should feel smooth and supple after kneading.
Step 4: First Rise (Bulk Fermentation)
- Lightly grease a large bowl with oil or butter. Place the kneaded dough in the bowl and turn it to coat all sides with the grease.
- Cover the bowl tightly with plastic wrap or a clean kitchen towel.
- Let the dough rise in a warm place for 1-1 ½ hours, or until it has doubled in size. The ideal temperature for rising is around 75-80°F (24-27°C). You can place the bowl in a slightly warm oven (turned off), a warm spot in your kitchen, or use a proofing box if you have one.
- The first rise allows the yeast to ferment and produce carbon dioxide, which creates the airy texture of the rolls.
Step 5: Prepare the Herb Butter
- While the dough is rising, prepare the herb butter. In a small bowl, combine the softened butter, minced garlic, chopped parsley, chopped chives, thyme leaves, salt, and black pepper.
- Mix well with a fork or spatula until all ingredients are evenly incorporated and the herb butter is smooth and fragrant.
- Set aside the herb butter at room temperature until ready to use.
Step 6: Shape the Accordion Rolls
- Once the dough has doubled in size, gently punch it down to release the air.
- Turn the dough out onto a lightly floured surface.
- Divide the dough into 12 equal portions. You can use a kitchen scale for precise division, or simply eyeball it.
- Roll each portion of dough into a small oval, about 6-7 inches long and 3-4 inches wide.
- Brush the surface of each oval generously with the prepared herb butter.
- Fold the oval in half lengthwise to create a semi-circle. Brush the top of the semi-circle with more herb butter.
- Using a sharp knife or pizza cutter, make 4-5 vertical cuts along the folded edge of the semi-circle, being careful not to cut all the way through to the unfolded edge. Leave about ¾ inch uncut at the unfolded edge.
- Gently open the cut semi-circle and stretch it out slightly to fan out the accordion folds.
- Starting from one end of the unfolded edge, roll up the dough tightly to form a roll, similar to rolling a jelly roll.
- Pinch the seam to seal and place the roll, seam-side down, in a greased 9×13 inch baking pan or a large cast iron skillet.
- Repeat this shaping process with the remaining dough portions, placing them side-by-side in the baking pan.
Step 7: Second Rise (Proofing)
- Cover the baking pan with plastic wrap or a clean kitchen towel.
- Let the shaped rolls rise again in a warm place for 30-45 minutes, or until they have almost doubled in size and look puffy.
- This second rise allows the rolls to become light and airy before baking.
Step 8: Bake the Rolls
- Preheat your oven to 375°F (190°C).
- Once the rolls have completed their second rise, brush the tops lightly with any remaining herb butter (or melted butter if you run out of herb butter). This will enhance their flavor and give them a beautiful golden-brown crust.
- Bake for 20-25 minutes, or until the rolls are golden brown and sound hollow when tapped on the bottom. The internal temperature should reach 200-210°F (93-99°C) for perfect doneness.
- If the tops are browning too quickly, you can loosely tent the pan with aluminum foil for the last 5-10 minutes of baking.
Step 9: Cool and Serve
- Remove the baked rolls from the oven and let them cool in the pan for a few minutes before transferring them to a wire rack to cool slightly.
- Brush the tops of the warm rolls with any remaining herb butter for extra flavor and shine.
- Serve warm and enjoy the incredible aroma and taste of your homemade Herbed Accordion Dinner Rolls!
These detailed instructions, when followed carefully, will guide you to create a batch of Herbed Accordion Dinner Rolls that are sure to impress. Don’t be intimidated by the steps; bread making is a rewarding process, and the result is well worth the effort.
Nutrition Facts
Understanding the nutritional content of your food is important, especially when incorporating new recipes into your regular meals. While homemade bread can be a delightful treat, it’s good to be aware of the approximate nutritional values. Please note that these are estimates and can vary based on specific ingredients, portion sizes, and brands used.
Servings: Approximately 12 rolls
Serving Size: 1 roll
Approximate Nutrition Facts Per Serving (1 roll):
- Calories: 220-250 kcal
- Total Fat: 10-12g
- Saturated Fat: 6-8g
- Trans Fat: 0g
- Cholesterol: 30-40mg
- Sodium: 250-300mg
- Total Carbohydrates: 28-32g
- Dietary Fiber: 1-2g
- Sugars: 4-6g
- Protein: 5-6g
Important Notes:
- Calorie Range: The calorie count can vary depending on the exact amount of flour and butter used, as well as the size of the rolls.
- Fat Content: The fat content primarily comes from the butter used in the dough and herb butter. You can reduce the fat content slightly by using less butter in the dough, but it will affect the richness and tenderness.
- Carbohydrates: The carbohydrates mainly come from the flour and sugar. While these rolls are not low-carb, they can be enjoyed in moderation as part of a balanced diet.
- Sodium: The sodium content comes from the salt added to the dough and herb butter. You can reduce the sodium slightly, but salt is essential for flavor and yeast control.
- Protein: The protein content is contributed by the flour, milk, and egg.
- Vitamins and Minerals: These rolls also contain small amounts of vitamins and minerals from the milk, egg, and herbs.
Disclaimer:
These nutrition facts are estimates based on common ingredients and standard serving sizes. For precise nutritional information, you can use online nutrition calculators and input the exact ingredients and quantities you use in your recipe. This information is for general guidance and should not be considered a substitute for professional dietary advice.
Preparation Time
Planning your baking schedule is crucial for successful bread making. Understanding the different stages and their respective time requirements will help you manage your time effectively and ensure your Herbed Accordion Dinner Rolls are ready when you need them.
Total Preparation Time: Approximately 2 hours 45 minutes – 3 hours 15 minutes (This includes both active and inactive time)
Breakdown of Time:
- Active Time (Hands-on time): Approximately 45-60 minutes
- Mixing and Kneading Dough: 15-20 minutes
- Preparing Herb Butter: 5-10 minutes
- Shaping Rolls: 20-30 minutes
- Baking: 20-25 minutes
- Inactive Time (Rising/Proofing Time): Approximately 2 hours – 2 hours 30 minutes
- First Rise (Bulk Fermentation): 1 hour – 1 hour 30 minutes
- Second Rise (Proofing Shaped Rolls): 30-45 minutes
- Cooling Time (After Baking): 15-20 minutes
Detailed Time Allocation:
- Yeast Proofing: 5-10 minutes (Active)
- Mixing Wet and Dry Ingredients: 5-10 minutes (Active)
- Kneading Dough: 8-10 minutes (Stand Mixer) or 10-15 minutes (By Hand) (Active)
- First Rise (Bulk Fermentation): 1 hour – 1 hour 30 minutes (Inactive)
- Preparing Herb Butter: 5-10 minutes (Active) – Can be done while dough is rising.
- Punching Down and Dividing Dough: 5 minutes (Active)
- Shaping Accordion Rolls: 20-30 minutes (Active)
- Second Rise (Proofing Shaped Rolls): 30-45 minutes (Inactive)
- Preheating Oven: 10-15 minutes (Inactive, can be done during the second rise)
- Baking: 20-25 minutes (Inactive)
- Cooling and Brushing with Butter: 15-20 minutes (Inactive/Active)
Tips for Time Management:
- Start Early: If you plan to serve these rolls for dinner, start the dough making process in the late morning or early afternoon to allow ample time for rising and baking.
- Prepare Herb Butter Ahead: The herb butter can be made a day in advance and stored in the refrigerator. Bring it to room temperature before using.
- Warm Place for Rising: Ensure your dough rises in a warm environment to expedite the rising process. A slightly warm oven (turned off) or a warm spot in your kitchen works well.
- Multitask: While the dough is rising, you can prepare other parts of your meal or clean up your kitchen.
- Adjust Rising Time: Rising times are estimates and can vary based on room temperature. Judge the rise by the dough’s volume, not just the time.
By understanding the preparation time breakdown, you can plan your baking schedule effectively and enjoy the delightful aroma and taste of freshly baked Herbed Accordion Dinner Rolls without feeling rushed.
How to Serve
Herbed Accordion Dinner Rolls are incredibly versatile and can elevate any meal. Their delightful flavor and beautiful presentation make them a perfect accompaniment for a wide range of dishes and occasions. Here are some serving suggestions to inspire you:
- Classic Dinner Side:
- Serve alongside hearty main courses like roasted chicken, turkey, pot roast, or ham.
- Pair them with comforting soups and stews such as beef stew, French onion soup, or creamy tomato soup for dipping and soaking up delicious broth.
- Complement pasta dishes like lasagna, spaghetti and meatballs, or creamy fettuccine Alfredo.
- Holiday Feasts:
- A must-have for Thanksgiving, Christmas, Easter, and other holiday gatherings.
- Perfect for serving with holiday roasts, stuffings, and gravy.
- Their elegant accordion shape makes them a visually appealing addition to any holiday table setting.
- Casual Meals & BBQs:
- Enjoy them with grilled burgers, hot dogs, or pulled pork sandwiches.
- Serve alongside salads like Caesar salad, garden salad, or potato salad for a satisfying lunch or light dinner.
- Perfect for picnics and potlucks; they travel well and are always a crowd-pleaser.
- Breakfast or Brunch:
- While traditionally dinner rolls, they can be enjoyed for a special breakfast or brunch.
- Serve warm with butter, jam, or honey.
- Pair them with scrambled eggs, bacon, sausage, or a frittata for a more substantial brunch.
- Special Occasions & Entertaining:
- Impress guests at dinner parties or special celebrations with these beautifully shaped rolls.
- Offer them as part of a bread basket alongside other artisan breads.
- They make a lovely hostess gift when brought to a dinner party.
- Serving Suggestions for Enhanced Flavor:
- Flavored Butters: Serve with a variety of flavored butters such as garlic butter, honey butter, cinnamon butter, or sun-dried tomato butter for extra indulgence.
- Dipping Oils: Offer dipping oils infused with herbs and spices like rosemary olive oil or balsamic-herb oil.
- Cheese Platter: Pair them with a cheese platter featuring soft cheeses like brie or goat cheese, which complement the herbed flavor.
- Presentation Tips:
- Arrange the warm rolls in a bread basket lined with a cloth napkin for an inviting presentation.
- Serve them on a platter garnished with fresh herbs like parsley or thyme sprigs.
- For a rustic look, serve them in a cast iron skillet directly from the oven (be cautious as the skillet will be hot).
Herbed Accordion Dinner Rolls are more than just bread; they are a delightful culinary experience. No matter how you choose to serve them, their irresistible aroma, soft texture, and herbaceous flavor will surely be a hit.
Additional Tips for Perfect Herbed Accordion Dinner Rolls
To consistently achieve bakery-worthy Herbed Accordion Dinner Rolls, consider these helpful tips gleaned from years of baking experience and perfecting this recipe. These tips will address common challenges and elevate your baking skills, ensuring soft, flavorful, and beautifully shaped rolls every time.
- Master the Kneading Technique: Proper kneading is paramount for developing gluten, which gives the rolls their desirable texture. Knead the dough sufficiently until it becomes smooth, elastic, and slightly tacky but not sticky. Over-kneading can make the rolls tough, while under-kneading can result in dense, less airy rolls. If kneading by hand, use a consistent rhythm and ensure you’re pushing, folding, and turning the dough effectively. For stand mixers, let the dough hook do the work for the recommended time. A well-kneaded dough will bounce back when gently poked and feel supple to the touch.
- Optimize Proofing Environments: Yeast is sensitive to temperature, and the proofing environment significantly impacts the rise of your dough. For the first and second rise, aim for a warm, draft-free place, ideally around 75-80°F (24-27°C). In colder kitchens, you can create a warmer environment by:
- Slightly Warm Oven: Preheat your oven to the lowest setting for just a minute or two, then turn it off. Place the covered dough bowl inside the slightly warm oven.
- Warm Water Bath: Place the dough bowl in a larger bowl filled with warm water.
- Proofing Box (Optional): If you bake frequently, consider investing in a proofing box for consistent temperature control.
Avoid overly hot temperatures as they can kill the yeast or cause the dough to rise too quickly and then collapse. A slow, steady rise in a warm environment is key for optimal flavor and texture development.
- Perfect the Accordion Shaping: The accordion shape is not just for aesthetics; it also creates more surface area for the herb butter and allows for even baking. When shaping:
- Even Cuts: Ensure your cuts are evenly spaced and go deep enough but not all the way through the unfolded edge. This creates distinct accordion folds.
- Gentle Handling: Be gentle when stretching and fanning out the cut dough. Avoid tearing the dough.
- Tight Rolling: Roll the dough up tightly from the unfolded edge to maintain the accordion layers and prevent them from unraveling during baking.
- Consistent Size: Aim for consistent size and shape when dividing and rolling the dough portions for uniform baking.
- Herb Butter Customization: While the recipe provides a delicious herb butter blend, feel free to customize it to your preferences and available herbs.
- Herb Variations: Experiment with other fresh herbs like rosemary, oregano, basil, or dill. You can use a single herb or a combination.
- Spice Infusion: Add a pinch of red pepper flakes for a subtle heat, or smoked paprika for a smoky flavor.
- Cheese Incorporation: For an even richer flavor, finely grated Parmesan cheese or Pecorino Romano can be added to the herb butter.
- Lemon Zest: A touch of lemon zest brightens the herb butter and adds a fresh citrusy note.
- Garlic Intensity: Adjust the amount of garlic based on your preference. Roasted garlic offers a milder, sweeter flavor.
- Storing and Reheating Leftover Rolls: These rolls are best enjoyed fresh, but leftovers can be stored and reheated to retain their deliciousness.
- Storing: Let the rolls cool completely. Store them in an airtight container at room temperature for up to 2 days, or in the refrigerator for up to 4 days.
- Reheating:
- Oven: Preheat oven to 350°F (175°C). Wrap the rolls loosely in foil and reheat for 8-10 minutes until warmed through. This method helps retain moisture and crisp the crust slightly.
- Microwave: For a quick reheat, microwave individual rolls for 15-20 seconds. Microwave reheating can make them slightly softer, so consume them immediately.
- Air Fryer: Reheat in an air fryer at 320°F (160°C) for 3-5 minutes for a crispy exterior and warm interior.
- Freezing (For Longer Storage): For longer storage, freeze the baked rolls. Wrap them individually in plastic wrap, then place them in a freezer-safe bag. Freeze for up to 2-3 months. Thaw at room temperature or in the refrigerator, then reheat using the oven method.
By incorporating these additional tips, you’ll be well-equipped to bake Herbed Accordion Dinner Rolls that are consistently perfect – soft, flavorful, and a delightful addition to any meal.
Frequently Asked Questions (FAQ)
Baking bread, especially yeast-based recipes, can sometimes bring up questions. Here are answers to some frequently asked questions about Herbed Accordion Dinner Rolls to help you navigate any potential queries and ensure baking success.
Q1: Can I use different types of flour for these rolls?
A: Yes, you can experiment with different flours, but all-purpose flour is generally recommended for its balance of gluten and texture.
- Bread Flour: Using bread flour, which has a higher protein content, will result in chewier rolls with a slightly more robust texture. You can substitute up to half of the all-purpose flour with bread flour for added chewiness.
- Whole Wheat Flour: You can incorporate whole wheat flour for a nuttier flavor and added fiber. Start by substituting up to 25% of the all-purpose flour with whole wheat flour. Whole wheat flour absorbs more liquid, so you might need to slightly increase the liquid content or reduce the amount of flour to maintain the dough’s consistency. 100% whole wheat rolls will be denser and have a different texture compared to all-purpose flour rolls.
- Gluten-Free Flour Blend: For a gluten-free version, use a high-quality gluten-free all-purpose flour blend specifically designed for baking yeast breads. Gluten-free baking can be different, so follow the instructions on your flour blend and expect a slightly denser texture. You may also need to add xanthan gum or guar gum to improve structure and elasticity in gluten-free dough.
Q2: Can I make the dough ahead of time and bake the rolls later?
A: Yes, making the dough ahead of time can be convenient. There are two main methods:
- Cold Fermentation (Refrigerator Rise): After the first rise at room temperature (Step 4 in Instructions), punch down the dough, place it in a greased bowl, cover tightly, and refrigerate for 12-24 hours. The slow, cold rise develops deeper flavor. When ready to bake, remove the dough from the refrigerator, let it sit at room temperature for about 30-60 minutes to warm up slightly before shaping (Step 6) and proceeding with the second rise and baking.
- Freezing Dough: After the first rise, punch down the dough, divide and shape the rolls (Step 6), and place them in a freezer-safe pan. Freeze until solid, then wrap tightly in plastic wrap and place in a freezer bag. Freeze for up to 1 month. To bake, remove from freezer, let rise, covered, at room temperature for several hours (it will take longer than usual) until doubled, then bake as directed. Alternatively, you can thaw overnight in the refrigerator and then let rise at room temperature for a shorter time.
Q3: How do I know when the rolls are done baking?
A: Several indicators will help you determine when the rolls are perfectly baked:
- Golden Brown Color: The tops of the rolls should be a beautiful golden brown color.
- Hollow Sound: Gently tap the bottom of one roll; it should sound hollow, indicating that it’s cooked through.
- Internal Temperature: For the most accurate measure, use a food thermometer. The internal temperature of the rolls should reach 200-210°F (93-99°C). Insert the thermometer into the center of a roll to check.
- Texture: The rolls should be set and no longer doughy in the center. They should spring back lightly when gently pressed.
Q4: Can I freeze these rolls after they are baked?
A: Yes, baked Herbed Accordion Dinner Rolls freeze well. Freezing baked rolls is a great way to have them on hand for future meals.
- Cool Completely: Allow the baked rolls to cool completely to room temperature before freezing.
- Wrap Properly: Wrap each roll individually in plastic wrap, then place them in a freezer-safe bag or container. This prevents freezer burn and maintains freshness.
- Freezing Time: Freeze for up to 2-3 months for best quality.
- Thawing and Reheating: Thaw frozen rolls at room temperature or in the refrigerator. Reheat them in a 350°F (175°C) oven for 8-10 minutes, wrapped loosely in foil, until warmed through. You can also microwave them for a quicker reheat, but oven reheating is preferred for texture.
Q5: What other herbs can I use in these rolls besides parsley, chives, and thyme?
A: You can get creative with the herb combinations! Here are some other delicious herb options:
- Rosemary: Adds a piney, aromatic flavor. Use fresh rosemary, finely chopped.
- Oregano: Provides a slightly peppery and earthy flavor, often associated with Mediterranean cuisine. Fresh oregano is best.
- Basil: Offers a sweet, slightly peppery, and fragrant flavor. Fresh basil, thinly sliced or chopped, works wonderfully.
- Dill: Brings a fresh, slightly tangy, and grassy flavor. Fresh dill, chopped, is a great addition.
- Sage: Imparts an earthy, slightly peppery, and savory flavor, often used in fall and winter dishes. Fresh sage, finely chopped, is recommended.
- Garlic Powder/Onion Powder: For a simpler herb butter, you can use garlic powder or onion powder in combination with or instead of fresh garlic and herbs.
Feel free to experiment with different herb combinations to find your favorite flavor profile. You can also adjust the amounts of herbs to suit your taste preferences.
We hope these FAQs address your questions and make your Herbed Accordion Dinner Roll baking experience even smoother and more enjoyable! Happy Baking!
Print
Herbed Accordion Dinner Rolls Recipe
Ingredients
For the Dough:
- 1 cup (240ml) Warm Milk: The milk should be comfortably warm to the touch, around 105-115°F (40-46°C). This warmth is crucial for activating the yeast. Milk adds richness and tenderness to the dough, contributing to the soft interior of the rolls. You can use whole milk for the best flavor and texture, but 2% milk or even non-dairy milk alternatives like almond milk or oat milk can also work, though they might slightly alter the richness.
- 2 ¼ teaspoons (1 packet) Active Dry Yeast: Yeast is the heart of any good bread recipe, responsible for the rise and airy texture. Active dry yeast needs to be proofed in warm liquid before being added to the dry ingredients. Ensure your yeast is fresh for optimal rising power. If you’re using instant yeast, you can skip the proofing step and add it directly to the dry ingredients.
- 2 tablespoons Granulated Sugar: Sugar not only adds a touch of sweetness but also feeds the yeast, aiding in its activation and the dough’s rise. It also contributes to the golden-brown color of the crust during baking.
- 1 teaspoon Salt: Salt is essential for controlling yeast activity and enhancing the flavor of the bread. It balances the sweetness and prevents the rolls from tasting bland. Don’t skip the salt, as it plays a crucial role in the overall taste and texture.
- ¼ cup (60g) Unsalted Butter, Melted and Cooled: Melted butter adds richness, moisture, and tenderness to the dough. Using unsalted butter allows you to control the salt content precisely. Make sure the butter is cooled slightly before adding it to the yeast mixture, as hot butter can kill the yeast.
- 1 Large Egg: The egg adds richness, structure, and color to the dough. It helps to create a softer crumb and contributes to the golden-brown crust. For best results, use a large egg at room temperature.
- 3 ½ – 4 cups (420-480g) All-Purpose Flour, plus more for dusting: Flour is the foundation of the dough, providing structure and elasticity. All-purpose flour is versatile and works well for dinner rolls. The amount of flour may vary depending on humidity and flour type. Start with 3 ½ cups and gradually add more until the dough is smooth and slightly sticky but not overly wet. Having extra flour for dusting is crucial for preventing the dough from sticking during kneading and shaping.
For the Herb Butter:
- ½ cup (1 stick) Unsalted Butter, Softened: Softened butter is essential for creating a smooth and spreadable herb butter. Ensure the butter is at room temperature, allowing it to easily incorporate with the herbs and garlic.
- 2 cloves Garlic, minced: Garlic adds a pungent and savory flavor that complements the herbs beautifully. Mince the garlic finely to distribute its flavor evenly throughout the butter. You can also use roasted garlic for a milder, sweeter garlic flavor.
- ¼ cup Fresh Parsley, chopped: Fresh parsley provides a bright, clean, and slightly peppery flavor. Flat-leaf parsley (Italian parsley) is often preferred for its more robust flavor compared to curly parsley.
- 2 tablespoons Fresh Chives, chopped: Chives offer a mild onion-like flavor that adds a delicate sharpness to the herb butter. Their subtle flavor blends well with other herbs without being overpowering.
- 1 tablespoon Fresh Thyme leaves: Fresh thyme brings an earthy, slightly lemony, and aromatic flavor. Strip the leaves from the thyme sprigs for the best texture and flavor distribution. Dried thyme can be used as a substitute, but fresh thyme provides a brighter and more vibrant taste.
- ¼ teaspoon Salt: A pinch of salt in the herb butter enhances the flavors of the herbs and garlic and balances the richness of the butter.
- ¼ teaspoon Black Pepper: Freshly ground black pepper adds a subtle warmth and spice to the herb butter, complementing the other flavors.
Instructions
Step 1: Proof the Yeast
- In a large bowl or the bowl of a stand mixer, gently warm the milk to 105-115°F (40-46°C). You can use a microwave or heat it gently on the stovetop. Ensure it’s warm, not hot, as excessive heat can kill the yeast.
- Add the sugar and active dry yeast to the warm milk. Stir gently to combine.
- Let the mixture stand for 5-10 minutes. This process, called proofing, allows you to check if the yeast is active. You should see foamy bubbles forming on the surface, indicating that the yeast is alive and ready to work its magic. If no bubbles appear, your yeast might be old or inactive, and you’ll need to use fresh yeast.
Step 2: Combine Wet and Dry Ingredients
- Once the yeast is proofed and bubbly, add the melted and cooled butter, egg, and salt to the yeast mixture. Whisk to combine all the wet ingredients thoroughly.
- Gradually add the flour, starting with 3 ½ cups. If using a stand mixer, use the dough hook attachment. If mixing by hand, use a wooden spoon or your hands.
- Mix on low speed (or stir by hand) until the dough comes together and is mostly smooth. If the dough is very sticky and not pulling away from the sides of the bowl, gradually add more flour, a tablespoon at a time, until it forms a soft, slightly sticky dough. You may need up to 4 cups of flour, depending on your flour and humidity.
- Turn the dough out onto a lightly floured surface.
Step 3: Knead the Dough
- Knead the dough for 6-8 minutes if using a stand mixer with a dough hook, or 8-10 minutes by hand. Kneading develops the gluten in the flour, which is essential for creating the structure and chewy texture of the rolls.
- To knead by hand, push the dough away from you with the heel of your hand, fold it in half, and turn it 90 degrees. Repeat this process, adding a little flour if the dough becomes too sticky, until the dough is smooth, elastic, and springs back when gently poked.
- The dough should be soft and slightly tacky but not sticky. It should feel smooth and supple after kneading.
Step 4: First Rise (Bulk Fermentation)
- Lightly grease a large bowl with oil or butter. Place the kneaded dough in the bowl and turn it to coat all sides with the grease.
- Cover the bowl tightly with plastic wrap or a clean kitchen towel.
- Let the dough rise in a warm place for 1-1 ½ hours, or until it has doubled in size. The ideal temperature for rising is around 75-80°F (24-27°C). You can place the bowl in a slightly warm oven (turned off), a warm spot in your kitchen, or use a proofing box if you have one.
- The first rise allows the yeast to ferment and produce carbon dioxide, which creates the airy texture of the rolls.
Step 5: Prepare the Herb Butter
- While the dough is rising, prepare the herb butter. In a small bowl, combine the softened butter, minced garlic, chopped parsley, chopped chives, thyme leaves, salt, and black pepper.
- Mix well with a fork or spatula until all ingredients are evenly incorporated and the herb butter is smooth and fragrant.
- Set aside the herb butter at room temperature until ready to use.
Step 6: Shape the Accordion Rolls
- Once the dough has doubled in size, gently punch it down to release the air.
- Turn the dough out onto a lightly floured surface.
- Divide the dough into 12 equal portions. You can use a kitchen scale for precise division, or simply eyeball it.
- Roll each portion of dough into a small oval, about 6-7 inches long and 3-4 inches wide.
- Brush the surface of each oval generously with the prepared herb butter.
- Fold the oval in half lengthwise to create a semi-circle. Brush the top of the semi-circle with more herb butter.
- Using a sharp knife or pizza cutter, make 4-5 vertical cuts along the folded edge of the semi-circle, being careful not to cut all the way through to the unfolded edge. Leave about ¾ inch uncut at the unfolded edge.
- Gently open the cut semi-circle and stretch it out slightly to fan out the accordion folds.
- Starting from one end of the unfolded edge, roll up the dough tightly to form a roll, similar to rolling a jelly roll.
- Pinch the seam to seal and place the roll, seam-side down, in a greased 9×13 inch baking pan or a large cast iron skillet.
- Repeat this shaping process with the remaining dough portions, placing them side-by-side in the baking pan.
Step 7: Second Rise (Proofing)
- Cover the baking pan with plastic wrap or a clean kitchen towel.
- Let the shaped rolls rise again in a warm place for 30-45 minutes, or until they have almost doubled in size and look puffy.
- This second rise allows the rolls to become light and airy before baking.
Step 8: Bake the Rolls
- Preheat your oven to 375°F (190°C).
- Once the rolls have completed their second rise, brush the tops lightly with any remaining herb butter (or melted butter if you run out of herb butter). This will enhance their flavor and give them a beautiful golden-brown crust.
- Bake for 20-25 minutes, or until the rolls are golden brown and sound hollow when tapped on the bottom. The internal temperature should reach 200-210°F (93-99°C) for perfect doneness.
- If the tops are browning too quickly, you can loosely tent the pan with aluminum foil for the last 5-10 minutes of baking.
Step 9: Cool and Serve
- Remove the baked rolls from the oven and let them cool in the pan for a few minutes before transferring them to a wire rack to cool slightly.
- Brush the tops of the warm rolls with any remaining herb butter for extra flavor and shine.
- Serve warm and enjoy the incredible aroma and taste of your homemade Herbed Accordion Dinner Rolls!
Nutrition
- Serving Size: one normal portion
- Calories: 220-250
- Sugar: 4-6g
- Sodium: 250-300mg
- Fat: 10-12g
- Saturated Fat: 6-8g
- Trans Fat: 0g
- Carbohydrates: 28-32g
- Fiber: 1-2g
- Protein: 5-6g
- Cholesterol: 30-40mg