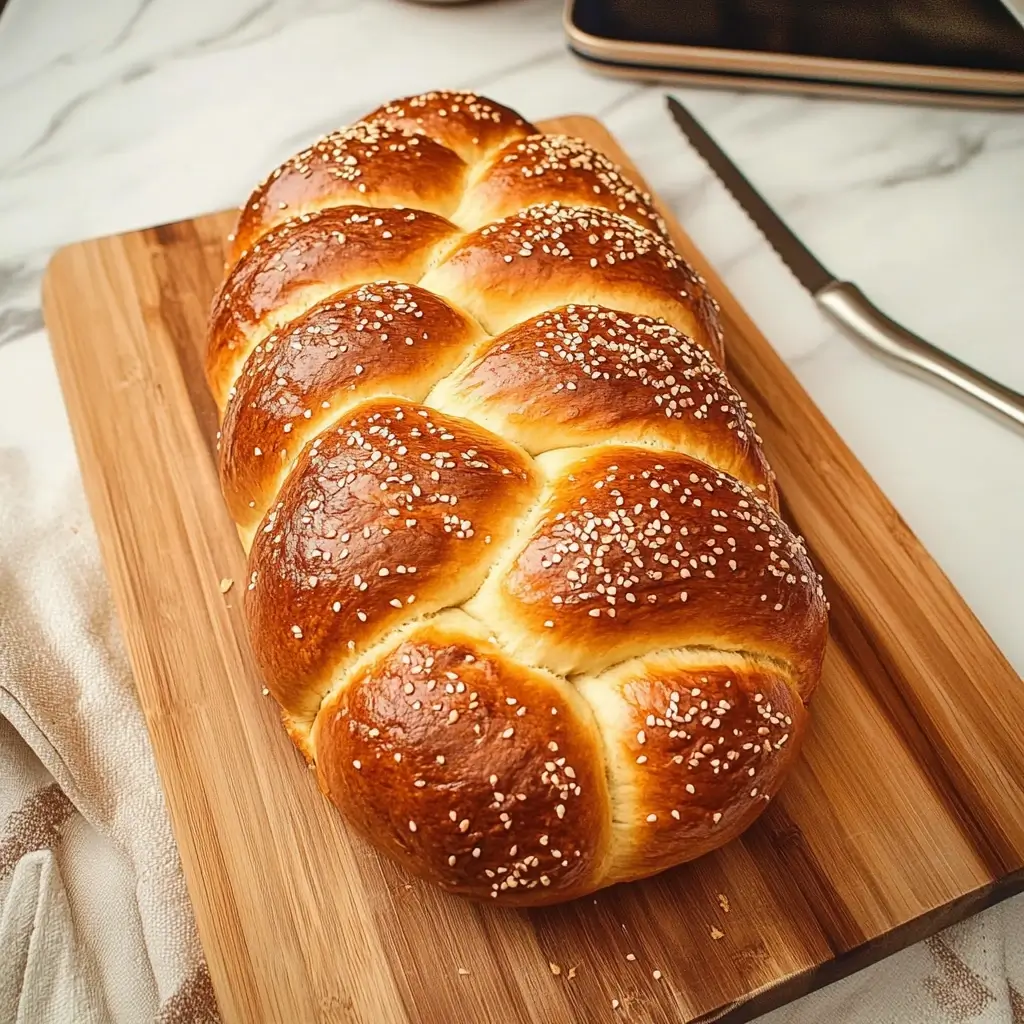

The aroma of freshly baked Challah bread wafting through my home is, without a doubt, one of life’s simplest yet most profound pleasures. There’s something almost magical about transforming a few humble ingredients into a magnificent, golden-brown loaf, its braided strands hinting at the soft, pillowy interior. This Challah bread recipe has become a treasured staple in our household. The first time I successfully baked it, my family gathered around the warm loaf, oohs and aahs filling the kitchen. The children couldn’t wait to tear off a piece, their eyes wide with anticipation. That slightly sweet, eggy richness, combined with the incredibly tender crumb, made it an instant hit. It’s not just bread; it’s a centerpiece, a conversation starter, and a symbol of warmth and togetherness. Whether it’s for a special occasion or simply a weekend treat, this Challah never fails to impress and bring smiles to everyone’s faces. The process itself, from activating the yeast to the meditative act of braiding, is incredibly rewarding. I invite you to embark on this baking adventure – the results are truly worth every moment.
The Ultimate Homemade Challah Bread Recipe
This recipe yields two beautiful, traditional Challah loaves, perfect for sharing or enjoying throughout the week. It balances a delightful sweetness with a rich, eggy flavor and an incredibly soft texture. While Challah is deeply rooted in Jewish tradition, particularly for Shabbat and holidays, its universal appeal makes it a beloved bread for any occasion. This guide will walk you through each step, ensuring your Challah turns out perfectly every time.
Ingredients for Perfect Challah Bread
Carefully measured ingredients are key to successful bread making. Here’s what you’ll need to create two magnificent loaves:
- For the Dough:
- 1 ½ cups (360ml) lukewarm water (about 105-115°F or 40-46°C)
- 1 tablespoon (12g) granulated sugar (to activate yeast)
- 2 ¼ teaspoons (7g or 1 standard packet) active dry yeast
- ½ cup (100g) granulated sugar (for the dough)
- ½ cup (120ml) neutral-flavored vegetable oil (like canola or sunflower), plus extra for greasing the bowl
- 4 large eggs, at room temperature (3 for the dough, 1 for the egg wash)
- 2 teaspoons (12g) fine sea salt
- 7 to 8 cups (840g to 960g) bread flour (or all-purpose flour), plus more for dusting
- For the Egg Wash & Topping (Optional):
- 1 large egg (the remaining one from above)
- 1 tablespoon water
- Poppy seeds or sesame seeds for sprinkling (optional)
A Note on Flour: Bread flour, with its higher protein content, typically yields a chewier, more structured Challah. However, all-purpose flour will also produce a delicious loaf, albeit slightly softer. You may need to adjust the total amount of flour slightly depending on humidity and the specific flour you use. Start with 7 cups and add more gradually as needed.
Step-by-Step Instructions for Baking Challah Bread
Follow these detailed instructions to guide you through the Challah-making process, from activating the yeast to pulling golden loaves from your oven.
- Activate the Yeast (Proofing):
In a large mixing bowl (or the bowl of your stand mixer), combine the lukewarm water and 1 tablespoon of granulated sugar. Sprinkle the active dry yeast over the top. Let it sit for 5-10 minutes, or until the mixture becomes foamy and frothy. This indicates the yeast is alive and active. If it doesn’t foam, your yeast may be old, and you should start over with fresh yeast. - Mix the Wet Ingredients:
Once the yeast is proofed, add the ½ cup of granulated sugar, vegetable oil, and 3 of the large eggs (save the 4th egg for the wash later) to the yeast mixture. Whisk gently to combine everything thoroughly. - Add Dry Ingredients:
To the wet ingredients, add the 2 teaspoons of salt and 7 cups of bread flour. If using a stand mixer, attach the dough hook and mix on low speed until a shaggy dough begins to form. If mixing by hand, use a sturdy wooden spoon or spatula to combine the ingredients until a cohesive dough forms. - Knead the Dough:
- Stand Mixer Method: Increase the mixer speed to medium-low and knead for 8-10 minutes. The dough should become smooth, elastic, and pull away from the sides of the bowl. If the dough is too sticky after a few minutes of kneading, add more flour, 1 tablespoon at a time, until it reaches the right consistency. It should be soft and slightly tacky, but not overly sticky.
- Hand Kneading Method: Turn the shaggy dough out onto a lightly floured surface. Knead for 10-15 minutes, adding small amounts of flour as needed to prevent sticking. Fold the dough over itself, push down and away with the heel of your hand, rotate, and repeat. Continue until the dough is smooth, elastic, and springs back when gently poked. To check for proper gluten development, perform the “windowpane test”: stretch a small piece of dough thinly; if you can see light through it without it tearing easily, it’s ready.
- First Rise (Bulk Fermentation):
Lightly grease a large, clean bowl with a bit of vegetable oil. Form the kneaded dough into a ball and place it in the greased bowl, turning it once to coat all sides with oil. Cover the bowl tightly with plastic wrap or a clean kitchen towel. Let the dough rise in a warm, draft-free place for 1.5 to 2 hours, or until it has doubled in size. The exact time will depend on the temperature of your kitchen. - Punch Down and Divide:
Once the dough has doubled, gently punch it down to release the air. Turn the dough out onto a lightly floured surface. For two loaves, divide the dough into two equal portions. Then, decide on your braid:- For a classic 3-strand braid (per loaf): Divide each portion into 3 equal pieces.
- For a 4-strand braid (per loaf): Divide each portion into 4 equal pieces.
- For a 6-strand braid (per loaf): Divide each portion into 6 equal pieces.
Use a kitchen scale for the most accurate divisions.
- Shape the Strands:
Take each small piece of dough and gently roll it into a long, even rope, about 12-16 inches long, depending on your preference for loaf size. Taper the ends slightly. If the dough resists stretching, let it rest for 5-10 minutes, covered, to allow the gluten to relax, then try again. Repeat with all pieces. - Braid the Loaves:
Line two baking sheets with parchment paper.- For a 3-Strand Braid: Place three strands side-by-side on the prepared baking sheet. Pinch the top ends together firmly. Braid the strands just like you would braid hair: cross the right strand over the middle, then the left strand over the new middle. Continue until you reach the end, then pinch the bottom ends together and tuck them under the loaf for a neat finish.
- For other braids (4-strand, 6-strand): These are more complex. It’s highly recommended to look up visual tutorials online for these techniques if you’re unfamiliar. The principle involves a specific sequence of crossing strands.
Place each braided loaf on a separate prepared baking sheet, or side-by-side on one large sheet if there’s enough space.
- Second Rise (Proofing):
Loosely cover the braided loaves with plastic wrap (lightly greased on the side facing the dough to prevent sticking) or a clean kitchen towel. Let them rise in a warm, draft-free place for another 45 minutes to 1 hour, or until they have increased in size by about 50-75% and look puffy. They won’t necessarily double fully on the second rise. - Preheat Oven and Prepare Egg Wash:
About 20 minutes before the second rise is complete, preheat your oven to 350°F (175°C). Position an oven rack in the center.
In a small bowl, whisk the remaining large egg with 1 tablespoon of water until well combined. This is your egg wash. - Apply Egg Wash and Bake:
Once the loaves have finished their second rise, gently brush them all over with the prepared egg wash. Be thorough, covering the tops and sides, but try not to let too much egg wash pool around the base. If desired, sprinkle generously with poppy seeds or sesame seeds.
Carefully place the baking sheets in the preheated oven. Bake for 30-40 minutes, or until the Challah is a deep golden brown and sounds hollow when tapped on the bottom. If the loaves start to brown too quickly, you can loosely tent them with aluminum foil for the remainder of the baking time. The internal temperature of the bread should reach 190-200°F (88-93°C) when measured with an instant-read thermometer. - Cool the Challah:
Once baked, carefully remove the Challah loaves from the oven and transfer them to a wire cooling rack. Let them cool completely, or at least for an hour, before slicing and serving. This allows the crumb structure to set properly. Slicing too early can result in a gummy texture.
Nutrition Facts
- Servings: This recipe makes 2 loaves, with approximately 12-14 generous slices per loaf.
- Total Servings: Approximately 24-28 slices.
- Calories per serving (1 slice, estimated): Approximately 160-190 calories.
Disclaimer: Nutritional information is an estimate and can vary depending on the exact ingredients used, portion sizes, and any modifications made to the recipe. It is calculated using standard nutritional databases.
Preparation Time
Understanding the time commitment is crucial for planning your baking day.
- Active Preparation Time:
- Yeast proofing: 5-10 minutes
- Mixing ingredients: 5-10 minutes
- Kneading: 10-15 minutes
- Dividing and shaping strands: 15-20 minutes
- Braiding: 5-10 minutes per loaf
- Total Active Time: Approximately 40 – 65 minutes
- Inactive Time (Rising & Baking):
- First Rise: 1.5 – 2 hours
- Second Rise: 45 minutes – 1 hour
- Baking Time: 30 – 40 minutes
- Total Inactive Time: Approximately 2 hours 45 minutes – 3 hours 40 minutes
- Total Overall Time: Approximately 3 hours 25 minutes to 4 hours 45 minutes (plus cooling time)
This timeline highlights that while Challah requires patience for rising, the hands-on time is relatively manageable.
How to Serve Your Delicious Homemade Challah Bread
Challah is wonderfully versatile. Here are some delightful ways to enjoy your freshly baked loaves:
- Simply on its Own:
- Tear off a piece while it’s still slightly warm (after an initial cooling period) for an unforgettable experience.
- Slice and enjoy plain to fully appreciate its rich flavor and soft texture.
- With Spreads:
- Serve slices with good quality butter.
- Spread with your favorite jam, marmalade, or fruit preserves.
- A drizzle of honey complements its sweetness perfectly.
- Try it with cream cheese for a richer treat.
- As Part of a Meal:
- Shabbat & Holiday Meals: Challah is traditionally served at Jewish Sabbath and holiday meals, often blessed before being eaten.
- Alongside Soups and Stews: Its soft texture is perfect for soaking up flavorful broths.
- As Sandwich Bread: Makes fantastic sandwiches, especially for sweeter fillings like peanut butter and jelly, or even savory ones like chicken salad if you enjoy a slightly sweet bread.
- For Breakfast or Brunch:
- The ULTIMATE French Toast: Thick slices of day-old Challah make the most incredible French toast – custardy on the inside and golden-brown on the outside.
- Bread Pudding: Stale Challah is an excellent base for a rich and comforting bread pudding.
- Toasted and served with eggs and bacon.
- As Croutons:
- Cut leftover Challah into cubes, toss with olive oil and herbs, and bake until crispy for delicious homemade croutons for salads or soups.
Additional Tips for Challah Bread Success
Elevate your Challah baking with these five expert tips:
- Don’t Rush the Rise: Patience is a virtue in bread making. Ensure your dough has truly doubled during the first rise and has become visibly puffy during the second. Insufficient rising can lead to a dense, heavy loaf. A warm (but not hot) environment aids rising; a slightly warmed (then turned off) oven or a spot near a sunny window can work well.
- Achieve the Perfect Dough Consistency: The dough should be soft, supple, and slightly tacky, but not so sticky that it’s unmanageable. If it’s too wet, add flour sparingly (1 tablespoon at a time) during kneading. If it feels too dry and stiff, add a tiny bit of lukewarm water (1 teaspoon at a time). The windowpane test is your best friend for knowing when gluten is adequately developed.
- Master the Egg Wash: For that signature deep golden, glossy crust, don’t skip the egg wash. A second coat of egg wash applied about 10-15 minutes into baking can enhance the color and shine even further, though this is optional. Be gentle when applying it to avoid deflating the risen loaves.
- Proper Cooling is Crucial: As tempting as it is to slice into a hot loaf, allow your Challah to cool on a wire rack for at least an hour. This completes the cooking process (the internal structure continues to set as it cools) and prevents a gummy texture.
- Storage Savvy:
- Room Temperature: Challah is best enjoyed within 1-2 days of baking. Store it in a bread box or a loosely sealed bag at room temperature. A tightly sealed plastic bag can make the crust soft.
- Freezing: For longer storage, Challah freezes beautifully. Wrap the completely cooled loaves tightly in plastic wrap, then in aluminum foil or a freezer-safe bag. It can be frozen for up to 2-3 months. Thaw at room temperature or gently reheat in the oven.
Frequently Asked Questions (FAQ) about Challah Bread
Here are answers to some common questions you might have about making Challah:
- Q: Can I make this Challah recipe dairy-free or pareve?
- A: Yes! This particular recipe is already inherently dairy-free (pareve) as it uses vegetable oil instead of butter and water instead of milk. This makes it suitable for serving with meat meals according to kosher dietary laws.
- Q: Why is my Challah dense and heavy instead of light and fluffy?
- A: Several factors can contribute to a dense Challah:
- Old or inactive yeast: Always proof your yeast to ensure it’s active.
- Under-kneading: Kneading develops gluten, which gives the bread structure and airiness. Ensure you knead until the dough is smooth and elastic.
- Not enough rising time: Both the first and second rises are crucial for a light texture. Don’t rush them.
- Too much flour: Adding too much flour can make the dough heavy. Aim for a soft, slightly tacky dough.
- Killing the yeast: Water that is too hot can kill the yeast. Ensure your water is lukewarm (105-115°F or 40-46°C).
- A: Several factors can contribute to a dense Challah:
- Q: Can I use whole wheat flour in this recipe?
- A: Yes, you can substitute a portion of the bread flour with whole wheat flour (e.g., 1-2 cups). However, whole wheat flour absorbs more liquid, so you might need to add a bit more water. It will also result in a denser, nuttier-flavored loaf. For a lighter texture, start by replacing no more than 25-30% of the white flour with whole wheat.
- Q: My braided Challah sometimes unravels or looks messy after baking. Any tips?
- A: Ensure you pinch the ends of the strands together very firmly both before and after braiding. Tucking the pinched ends underneath the loaf can also help maintain a neat shape. Also, try to make your strands as even in thickness as possible for a uniform braid. Don’t over-proof on the second rise, as this can sometimes cause loaves to lose shape or collapse.
- Q: What’s the best way to learn more complex Challah braids like 4-strand or 6-strand?
- A: Visual guides are your best bet! There are many excellent video tutorials available online (e.g., on YouTube) that clearly demonstrate the braiding techniques step-by-step. Start with a 3-strand braid to get comfortable, then practice the more intricate ones. Using different colored play-dough strands can be a fun way to practice the weaving patterns before trying with actual dough.
Homemade Challah Bread Recipe
Ingredients
- For the Dough:
- 1 ½ cups (360ml) lukewarm water (about 105-115°F or 40-46°C)
- 1 tablespoon (12g) granulated sugar (to activate yeast)
- 2 ¼ teaspoons (7g or 1 standard packet) active dry yeast
- ½ cup (100g) granulated sugar (for the dough)
- ½ cup (120ml) neutral-flavored vegetable oil (like canola or sunflower), plus extra for greasing the bowl
- 4 large eggs, at room temperature (3 for the dough, 1 for the egg wash)
- 2 teaspoons (12g) fine sea salt
- 7 to 8 cups (840g to 960g) bread flour (or all-purpose flour), plus more for dusting
- For the Egg Wash & Topping (Optional):
- 1 large egg (the remaining one from above)
- 1 tablespoon water
- Poppy seeds or sesame seeds for sprinkling (optional)
Instructions
- Activate the Yeast (Proofing):
In a large mixing bowl (or the bowl of your stand mixer), combine the lukewarm water and 1 tablespoon of granulated sugar. Sprinkle the active dry yeast over the top. Let it sit for 5-10 minutes, or until the mixture becomes foamy and frothy. This indicates the yeast is alive and active. If it doesn’t foam, your yeast may be old, and you should start over with fresh yeast. - Mix the Wet Ingredients:
Once the yeast is proofed, add the ½ cup of granulated sugar, vegetable oil, and 3 of the large eggs (save the 4th egg for the wash later) to the yeast mixture. Whisk gently to combine everything thoroughly. - Add Dry Ingredients:
To the wet ingredients, add the 2 teaspoons of salt and 7 cups of bread flour. If using a stand mixer, attach the dough hook and mix on low speed until a shaggy dough begins to form. If mixing by hand, use a sturdy wooden spoon or spatula to combine the ingredients until a cohesive dough forms. - Knead the Dough:
- Stand Mixer Method: Increase the mixer speed to medium-low and knead for 8-10 minutes. The dough should become smooth, elastic, and pull away from the sides of the bowl. If the dough is too sticky after a few minutes of kneading, add more flour, 1 tablespoon at a time, until it reaches the right consistency. It should be soft and slightly tacky, but not overly sticky.
- Hand Kneading Method: Turn the shaggy dough out onto a lightly floured surface. Knead for 10-15 minutes, adding small amounts of flour as needed to prevent sticking. Fold the dough over itself, push down and away with the heel of your hand, rotate, and repeat. Continue until the dough is smooth, elastic, and springs back when gently poked. To check for proper gluten development, perform the “windowpane test”: stretch a small piece of dough thinly; if you can see light through it without it tearing easily, it’s ready.
- First Rise (Bulk Fermentation):
Lightly grease a large, clean bowl with a bit of vegetable oil. Form the kneaded dough into a ball and place it in the greased bowl, turning it once to coat all sides with oil. Cover the bowl tightly with plastic wrap or a clean kitchen towel. Let the dough rise in a warm, draft-free place for 1.5 to 2 hours, or until it has doubled in size. The exact time will depend on the temperature of your kitchen. - Punch Down and Divide:
Once the dough has doubled, gently punch it down to release the air. Turn the dough out onto a lightly floured surface. For two loaves, divide the dough into two equal portions. Then, decide on your braid:- For a classic 3-strand braid (per loaf): Divide each portion into 3 equal pieces.
- For a 4-strand braid (per loaf): Divide each portion into 4 equal pieces.
- For a 6-strand braid (per loaf): Divide each portion into 6 equal pieces.
Use a kitchen scale for the most accurate divisions.
- Shape the Strands:
Take each small piece of dough and gently roll it into a long, even rope, about 12-16 inches long, depending on your preference for loaf size. Taper the ends slightly. If the dough resists stretching, let it rest for 5-10 minutes, covered, to allow the gluten to relax, then try again. Repeat with all pieces. - Braid the Loaves:
Line two baking sheets with parchment paper.- For a 3-Strand Braid: Place three strands side-by-side on the prepared baking sheet. Pinch the top ends together firmly. Braid the strands just like you would braid hair: cross the right strand over the middle, then the left strand over the new middle. Continue until you reach the end, then pinch the bottom ends together and tuck them under the loaf for a neat finish.
- For other braids (4-strand, 6-strand): These are more complex. It’s highly recommended to look up visual tutorials online for these techniques if you’re unfamiliar. The principle involves a specific sequence of crossing strands.
Place each braided loaf on a separate prepared baking sheet, or side-by-side on one large sheet if there’s enough space.
- Second Rise (Proofing):
Loosely cover the braided loaves with plastic wrap (lightly greased on the side facing the dough to prevent sticking) or a clean kitchen towel. Let them rise in a warm, draft-free place for another 45 minutes to 1 hour, or until they have increased in size by about 50-75% and look puffy. They won’t necessarily double fully on the second rise. - Preheat Oven and Prepare Egg Wash:
About 20 minutes before the second rise is complete, preheat your oven to 350°F (175°C). Position an oven rack in the center.
In a small bowl, whisk the remaining large egg with 1 tablespoon of water until well combined. This is your egg wash. - Apply Egg Wash and Bake:
Once the loaves have finished their second rise, gently brush them all over with the prepared egg wash. Be thorough, covering the tops and sides, but try not to let too much egg wash pool around the base. If desired, sprinkle generously with poppy seeds or sesame seeds.
Carefully place the baking sheets in the preheated oven. Bake for 30-40 minutes, or until the Challah is a deep golden brown and sounds hollow when tapped on the bottom. If the loaves start to brown too quickly, you can loosely tent them with aluminum foil for the remainder of the baking time. The internal temperature of the bread should reach 190-200°F (88-93°C) when measured with an instant-read thermometer. - Cool the Challah:
Once baked, carefully remove the Challah loaves from the oven and transfer them to a wire cooling rack. Let them cool completely, or at least for an hour, before slicing and serving. This allows the crumb structure to set properly. Slicing too early can result in a gummy texture.
Nutrition
- Serving Size: One Normal Portion
- Calories: 160-190