Of all the creations that can emerge from a home kitchen, few command the same level of awe and pure, unadulterated delight as a freshly baked Chocolate Babka. I’ll never forget the first time I successfully pulled one of these beauties from my oven. The air in my home, already warm and inviting, became intoxicating with the rich aroma of yeasted dough, dark chocolate, and caramelized sugar. As I sliced into the still-warm loaf, the knife revealed a stunning, intricate labyrinth of dark, fudgy filling woven through a pillowy, golden crumb. My family gathered around the cutting board, eyes wide, and the silence that followed the first bite was the highest compliment I could ever receive. It was a moment of pure culinary bliss. This wasn’t just a cake or a bread; it was an event. It was the rich, decadent, show-stopping centerpiece that turned a regular Sunday afternoon into a cherished memory. This recipe is the culmination of many trials and a few happy errors, perfected to ensure that you can create that same magical moment in your own kitchen. It strikes the perfect balance: a dough that is buttery and brioche-like yet easy to handle, and a chocolate filling so intensely fudgy it will haunt your dreams in the best way possible. Prepare to bake what might just become your family’s most requested treat.
The Ultimate Homemade Chocolate Babka Recipe
This guide will walk you through every step of creating a bakery-worthy chocolate babka. From the enriched dough to the glossy sugar syrup, we’ve covered all the details to ensure your success.
What is Chocolate Babka? A Brief History
Before we dive into the flour and chocolate, let’s appreciate the rich history of this celebrated bread. Babka, which means “grandmother” in several Slavic languages like Polish and Ukrainian, has its roots in the Jewish communities of early 19th-century Eastern Europe. Thrifty and inventive home bakers would take leftover challah dough from the Sabbath, spread it with seeds or a cinnamon-sugar mixture, and roll it up to bake alongside the main bread. The chocolate version is a more modern, decidedly American-Jewish evolution, popularized by New York City bakeries in the mid-20th century. These bakeries transformed the humble babka into the decadent, rich, brioche-like loaf we adore today, packed with layers of luscious chocolate or cinnamon. It gained mainstream fame thanks to a memorable episode of “Seinfeld,” but its place in the hearts of food lovers was already firmly cemented by its irresistible texture and flavor.
Why This Recipe is the Best
- Perfectly Pillowy Dough: We use a combination of bread flour for structure and all-purpose flour for tenderness, enriched with eggs, sugar, and butter to create a soft, brioche-style dough that is a dream to work with.
- Intensely Fudgy Filling: This isn’t just a sprinkle of chocolate. Our filling creates thick, decadent, brownie-like ribbons throughout the loaf.
- The Signature Syrup Soak: The secret to a moist, glossy, professional-looking babka is the sugar syrup brushed on top the moment it comes out of the oven. It locks in moisture and adds a beautiful sheen.
- Foolproof Instructions: We’ve broken down the shaping and twisting process into simple, easy-to-follow steps, ensuring you get that beautiful, iconic babka swirl every time.
Ingredients for a Perfect Chocolate Babka
Accuracy is key in baking. For the best results, we highly recommend using a kitchen scale to measure your ingredients, especially the flour.
For the Enriched Babka Dough:
- Yeast: 2 ¼ teaspoons (7g) instant yeast (1 standard packet)
- Milk: ½ cup (120ml) whole milk, warmed to about 110°F (43°C)
- Sugar: ½ cup (100g) granulated sugar, plus 1 teaspoon for activating the yeast
- Flour: 3 ¼ cups (420g) all-purpose flour or bread flour (or a 50/50 mix), plus more for dusting
- Salt: 1 teaspoon (6g) fine sea salt
- Eggs: 2 large eggs plus 1 egg yolk, at room temperature
- Vanilla: 1 teaspoon pure vanilla extract
- Butter: ½ cup (113g) unsalted butter, softened to room temperature and cut into small cubes
For the Rich Chocolate Filling:
- Chocolate: 6 ounces (170g) high-quality bittersweet or semi-sweet chocolate, finely chopped
- Butter: ½ cup (113g) unsalted butter, melted
- Cocoa Powder: ⅓ cup (35g) unsweetened Dutch-processed cocoa powder
- Confectioners’ Sugar: ¾ cup (90g) confectioners’ sugar (powdered sugar)
- Salt: ¼ teaspoon fine sea salt
For the Simple Sugar Syrup:
- Sugar: ⅓ cup (67g) granulated sugar
- Water: ⅓ cup (80ml) water
Step-by-Step Instructions
Follow these detailed instructions carefully for a flawless result. The process involves several stages, but each one is simple and crucial to the final product.
Part 1: Making the Babka Dough
- Activate the Yeast: In a small bowl, combine the warm milk, 1 teaspoon of granulated sugar, and the instant yeast. Give it a gentle stir and let it sit for 5-10 minutes until it becomes foamy and frothy. This proves your yeast is alive and active. If it doesn’t foam, your yeast may be old, and you should start over with a fresh packet.
- Combine Dry Ingredients: In the bowl of a stand mixer fitted with the dough hook attachment, whisk together the flour, the remaining ½ cup of sugar, and the salt.
- Mix Wet Ingredients: Add the foamy yeast mixture, the 2 whole eggs, the egg yolk, and the vanilla extract to the dry ingredients.
- Knead the Dough (Initial Stage): Mix on low speed until a shaggy dough begins to form. Increase the speed to medium-low and knead for about 5 minutes, until the dough comes together and starts to pull away from the sides of the bowl. The dough will still look a bit rough at this stage.
- Incorporate the Butter: With the mixer still on medium-low, begin adding the softened butter, one or two small cubes at a time. Wait until each addition is mostly incorporated before adding the next. This process will take about 5-8 minutes. The dough may look greasy or separate at first—this is normal. Keep kneading, and it will come back together.
- Final Knead: Once all the butter is incorporated, increase the mixer speed to medium and knead for another 8-10 minutes. The dough should become smooth, elastic, and slightly tacky. A key test is the “windowpane test”: take a small piece of dough and gently stretch it between your fingers. It should stretch thin enough to see light through it without tearing easily.
- First Rise (Bulk Fermentation): Lightly grease a large bowl with oil or non-stick spray. Form the dough into a smooth ball and place it in the bowl, turning it once to coat it lightly in oil. Cover the bowl tightly with plastic wrap or a damp kitchen towel. Let it rise in a warm, draft-free place for 1.5 to 2 hours, or until it has doubled in size.
- Overnight Cold Ferment (Optional but Recommended): For an even better flavor and an easier-to-handle dough, you can perform the first rise in the refrigerator. After kneading, place the dough in the greased bowl, cover it, and refrigerate for at least 8 hours or up to 24 hours. This slow, cold fermentation develops a deeper, more complex flavor. The dough will rise slowly in the fridge.
Part 2: Making the Filling and Assembling the Babka
- Prepare the Filling: While the dough is on its final stages of rising, prepare the chocolate filling. In a medium heatproof bowl, combine the finely chopped chocolate, melted butter, cocoa powder, confectioners’ sugar, and salt. Whisk until the mixture is completely smooth, glossy, and has the consistency of a thick, spreadable paste. Set aside to cool slightly.
- Roll Out the Dough: Punch down the risen dough to release the air. If you did the cold ferment, let the dough sit at room temperature for 30-45 minutes to make it easier to roll. On a lightly floured surface, roll the dough into a large rectangle, approximately 12 inches by 16 inches (30×40 cm), with the longer side facing you.
- Spread the Filling: Using an offset spatula or the back of a spoon, spread the chocolate filling evenly over the surface of the dough, leaving a ½-inch border along the long edge farthest from you.
- Roll the Log: Starting from the long edge closest to you, roll the dough up into a tight, neat log, like a jelly roll. Pinch the seam at the end to seal it tightly.
- Chill the Log (Crucial Step!): Place the log, seam-side down, on a baking sheet lined with parchment paper. Cover it with plastic wrap and transfer it to the freezer for 15-20 minutes (or the refrigerator for 30-40 minutes). Chilling the log solidifies the filling, making it much easier to cut cleanly without smearing chocolate everywhere. Do not skip this step!
- Prepare the Pan: While the log is chilling, grease a 9×5-inch loaf pan with butter and line it with parchment paper, leaving an overhang on the two long sides to act as “handles” for easy removal later.
Part 3: Shaping, Rising, and Baking
- Cut and Twist the Babka: Remove the chilled log from the freezer. Using a long, sharp serrated knife, carefully slice the log in half lengthwise, from top to bottom, exposing the beautiful layers of dough and filling. You will now have two long, separate strands.
- Form the Braid: Position the two strands side-by-side with the cut sides facing up. Carefully lift one strand over the other to form an “X” in the middle. Continue this “braiding” motion, lifting one strand over the other, until you have a two-stranded twist. Keep the cut sides facing up as much as possible to showcase the layers.
- Place in the Pan: Gently pinch the ends of the twist together. Carefully lift the entire twisted loaf and place it into your prepared loaf pan. It might seem a bit long, but you can gently squish it to fit.
- Second Rise: Cover the loaf pan loosely with plastic wrap. Let it rise in a warm place for another 1 to 1.5 hours, or until it has risen about an inch above the rim of the pan and looks puffy.
- Preheat Oven: Towards the end of the second rise, preheat your oven to 350°F (175°C). Position a rack in the middle of the oven.
- Bake the Babka: Bake for 40-50 minutes. About halfway through the baking time, if you notice the top is browning too quickly, loosely tent it with a piece of aluminum foil. The babka is done when it’s deep golden brown and a skewer or instant-read thermometer inserted into the center comes out clean or reads 190°F (88°C).
- Prepare the Syrup: While the babka is baking, make the simple syrup. In a small saucepan, combine the ⅓ cup of sugar and ⅓ cup of water. Bring to a boil over medium heat, stirring until the sugar is completely dissolved. Remove from heat and set aside.
- Apply the Syrup: As soon as you remove the babka from the oven, while it is still piping hot in its pan, immediately and generously brush the entire surface with the prepared sugar syrup. You might not use all of it, but be liberal. The hot bread will absorb the syrup, which keeps it moist and gives it a beautiful, professional-looking sheen.
- Cool: Let the babka cool in the pan for 15-20 minutes before using the parchment paper handles to lift it out onto a wire rack to cool completely before slicing. This is the hardest part—patience is a virtue! Slicing it while too hot can cause it to be gummy.
Nutrition Facts
- Servings: 1 loaf (makes approximately 10-12 slices)
- Calories per serving: Approximately 480-550 kcal
Disclaimer: The nutritional information is an estimate and will vary depending on the specific ingredients and brands used.
Preparation Time
- Active Time: 45 minutes
- Inactive Time (Rising & Chilling): 3.5 – 4.5 hours (or up to 25 hours with an overnight cold ferment)
- Baking Time: 40-50 minutes
- Total Time: Approximately 5 – 6 hours (or longer with the cold ferment)
How to Serve Your Chocolate Babka
Babka is magnificent on its own, but it can also be the star of a more elaborate presentation. Here are some wonderful ways to serve it:
- The Classic Way:
- Serve thick slices at room temperature or slightly warmed.
- Perfect alongside a cup of hot coffee, a cappuccino, or a strong black tea.
- A simple glass of cold milk is a classic pairing for children and adults alike.
- As a Decadent Dessert:
- Lightly toast a slice and top it with a scoop of high-quality vanilla bean or coffee ice cream.
- Drizzle with a bit of extra melted chocolate or a caramel sauce.
- Serve with a dollop of freshly whipped cream or tangy crème fraîche to cut through the richness.
- For a Show-Stopping Brunch:
- Make the babka the centerpiece of your brunch spread, alongside fresh fruit, yogurt, and savory items like quiche or eggs.
- Get Creative with Leftovers (If You Have Any!):
- Babka French Toast: This is truly next-level. Dip thick, day-old slices of babka in a classic egg-and-milk mixture and pan-fry in butter until golden and crispy.
- Babka Bread Pudding: Tear leftover babka into chunks and use it as the base for an incredibly rich and delicious bread pudding.
Additional Tips for Babka Perfection
- Trust the Dough’s Journey: The enriched dough will feel very soft and sticky, especially after adding the butter. Resist the temptation to add too much extra flour, as this will make your final product dry and dense. Trust the kneading process; the gluten will develop, and the dough will become smooth and manageable.
- Don’t Skip the Chill: Chilling the rolled-up log before cutting is a non-negotiable step for a clean, beautiful swirl. It prevents the filling from oozing out and smearing, which makes the twisting process messy and less defined. A short stint in the freezer works wonders.
- Use an Instant-Read Thermometer: The most reliable way to know if your babka is perfectly baked is to check its internal temperature. Ovens can vary, and color isn’t always a perfect indicator. An internal temperature of 190°F (88°C) ensures the inside is cooked through without being dry.
- Embrace the Overnight Ferment: If you have the time, the overnight cold ferment in the refrigerator is highly recommended. It not only breaks the process into more manageable steps but also significantly enhances the flavor of the dough, giving it a more complex, brioche-like taste.
- Quality Ingredients Shine: With a recipe this special, your choice of ingredients makes a big impact. Use a good quality European-style butter (which has a higher fat content), high-quality dark chocolate (60-70% cacao), and Dutch-processed cocoa powder for the richest, most decadent flavor.
Frequently Asked Questions (FAQ)
1. Q: Why did my babka turn out dry?
A: There are a few common culprits for a dry babka. First is over-baking. Be sure to check for doneness on the earlier side and use a thermometer for accuracy. The second reason could be adding too much flour during the kneading process. The dough should be soft and slightly tacky. Finally, don’t skip the sugar syrup! Brushing the syrup onto the hot babka is the crucial final step that locks in moisture and keeps it tender for days.
2. Q: Can I use a different filling?
A: Absolutely! Babka is incredibly versatile. You can replace the chocolate filling with a classic cinnamon filling (brown sugar, cinnamon, and butter), a Nutella spread, a fruit jam or preserve (use a thick one to prevent it from leaking), or a nut-based filling like almond paste or a mixture of chopped pecans, sugar, and butter.
3. Q: Can I make this recipe without a stand mixer?
A: Yes, you can, but be prepared for a good arm workout! You will need to knead the dough by hand on a lightly floured surface. The process of incorporating the soft butter will be messy at first, but keep working the dough until it becomes smooth and elastic. It will take longer, likely 15-20 minutes of vigorous kneading, to achieve the same smooth texture and pass the windowpane test.
4. Q: My dough didn’t rise. What went wrong?
A: The most common reason for dough not rising is inactive or dead yeast. This can happen if the yeast is past its expiration date or if the milk was too hot, which kills the yeast. Your milk should be warm to the touch, not hot (around 110°F / 43°C). Another reason could be that the room is too cold. Find a warm, draft-free spot for your dough to rise, like inside an oven with just the light on.
5. Q: How should I store leftover babka?
A: For optimal freshness, store the cooled babka in an airtight container or wrap it tightly in plastic wrap. It will stay moist and delicious at room temperature for up to 3-4 days. For longer storage, you can freeze it. Wrap the entire loaf or individual slices tightly in plastic wrap, then a layer of aluminum foil, and freeze for up to 2 months. To serve, thaw at room temperature or gently reheat a slice in the microwave or toaster oven.
Print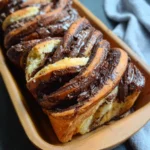
Homemade Chocolate Babka Recipe
Ingredients
For the Enriched Babka Dough:
- Yeast: 2 ¼ teaspoons (7g) instant yeast (1 standard packet)
- Milk: ½ cup (120ml) whole milk, warmed to about 110°F (43°C)
- Sugar: ½ cup (100g) granulated sugar, plus 1 teaspoon for activating the yeast
- Flour: 3 ¼ cups (420g) all-purpose flour or bread flour (or a 50/50 mix), plus more for dusting
- Salt: 1 teaspoon (6g) fine sea salt
- Eggs: 2 large eggs plus 1 egg yolk, at room temperature
- Vanilla: 1 teaspoon pure vanilla extract
- Butter: ½ cup (113g) unsalted butter, softened to room temperature and cut into small cubes
For the Rich Chocolate Filling:
- Chocolate: 6 ounces (170g) high-quality bittersweet or semi-sweet chocolate, finely chopped
- Butter: ½ cup (113g) unsalted butter, melted
- Cocoa Powder: ⅓ cup (35g) unsweetened Dutch-processed cocoa powder
- Confectioners’ Sugar: ¾ cup (90g) confectioners’ sugar (powdered sugar)
- Salt: ¼ teaspoon fine sea salt
For the Simple Sugar Syrup:
- Sugar: ⅓ cup (67g) granulated sugar
- Water: ⅓ cup (80ml) water
Instructions
Part 1: Making the Babka Dough
- Activate the Yeast: In a small bowl, combine the warm milk, 1 teaspoon of granulated sugar, and the instant yeast. Give it a gentle stir and let it sit for 5-10 minutes until it becomes foamy and frothy. This proves your yeast is alive and active. If it doesn’t foam, your yeast may be old, and you should start over with a fresh packet.
- Combine Dry Ingredients: In the bowl of a stand mixer fitted with the dough hook attachment, whisk together the flour, the remaining ½ cup of sugar, and the salt.
- Mix Wet Ingredients: Add the foamy yeast mixture, the 2 whole eggs, the egg yolk, and the vanilla extract to the dry ingredients.
- Knead the Dough (Initial Stage): Mix on low speed until a shaggy dough begins to form. Increase the speed to medium-low and knead for about 5 minutes, until the dough comes together and starts to pull away from the sides of the bowl. The dough will still look a bit rough at this stage.
- Incorporate the Butter: With the mixer still on medium-low, begin adding the softened butter, one or two small cubes at a time. Wait until each addition is mostly incorporated before adding the next. This process will take about 5-8 minutes. The dough may look greasy or separate at first—this is normal. Keep kneading, and it will come back together.
- Final Knead: Once all the butter is incorporated, increase the mixer speed to medium and knead for another 8-10 minutes. The dough should become smooth, elastic, and slightly tacky. A key test is the “windowpane test”: take a small piece of dough and gently stretch it between your fingers. It should stretch thin enough to see light through it without tearing easily.
- First Rise (Bulk Fermentation): Lightly grease a large bowl with oil or non-stick spray. Form the dough into a smooth ball and place it in the bowl, turning it once to coat it lightly in oil. Cover the bowl tightly with plastic wrap or a damp kitchen towel. Let it rise in a warm, draft-free place for 1.5 to 2 hours, or until it has doubled in size.
- Overnight Cold Ferment (Optional but Recommended): For an even better flavor and an easier-to-handle dough, you can perform the first rise in the refrigerator. After kneading, place the dough in the greased bowl, cover it, and refrigerate for at least 8 hours or up to 24 hours. This slow, cold fermentation develops a deeper, more complex flavor. The dough will rise slowly in the fridge.
Part 2: Making the Filling and Assembling the Babka
- Prepare the Filling: While the dough is on its final stages of rising, prepare the chocolate filling. In a medium heatproof bowl, combine the finely chopped chocolate, melted butter, cocoa powder, confectioners’ sugar, and salt. Whisk until the mixture is completely smooth, glossy, and has the consistency of a thick, spreadable paste. Set aside to cool slightly.
- Roll Out the Dough: Punch down the risen dough to release the air. If you did the cold ferment, let the dough sit at room temperature for 30-45 minutes to make it easier to roll. On a lightly floured surface, roll the dough into a large rectangle, approximately 12 inches by 16 inches (30×40 cm), with the longer side facing you.
- Spread the Filling: Using an offset spatula or the back of a spoon, spread the chocolate filling evenly over the surface of the dough, leaving a ½-inch border along the long edge farthest from you.
- Roll the Log: Starting from the long edge closest to you, roll the dough up into a tight, neat log, like a jelly roll. Pinch the seam at the end to seal it tightly.
- Chill the Log (Crucial Step!): Place the log, seam-side down, on a baking sheet lined with parchment paper. Cover it with plastic wrap and transfer it to the freezer for 15-20 minutes (or the refrigerator for 30-40 minutes). Chilling the log solidifies the filling, making it much easier to cut cleanly without smearing chocolate everywhere. Do not skip this step!
- Prepare the Pan: While the log is chilling, grease a 9×5-inch loaf pan with butter and line it with parchment paper, leaving an overhang on the two long sides to act as “handles” for easy removal later.
Part 3: Shaping, Rising, and Baking
- Cut and Twist the Babka: Remove the chilled log from the freezer. Using a long, sharp serrated knife, carefully slice the log in half lengthwise, from top to bottom, exposing the beautiful layers of dough and filling. You will now have two long, separate strands.
- Form the Braid: Position the two strands side-by-side with the cut sides facing up. Carefully lift one strand over the other to form an “X” in the middle. Continue this “braiding” motion, lifting one strand over the other, until you have a two-stranded twist. Keep the cut sides facing up as much as possible to showcase the layers.
- Place in the Pan: Gently pinch the ends of the twist together. Carefully lift the entire twisted loaf and place it into your prepared loaf pan. It might seem a bit long, but you can gently squish it to fit.
- Second Rise: Cover the loaf pan loosely with plastic wrap. Let it rise in a warm place for another 1 to 1.5 hours, or until it has risen about an inch above the rim of the pan and looks puffy.
- Preheat Oven: Towards the end of the second rise, preheat your oven to 350°F (175°C). Position a rack in the middle of the oven.
- Bake the Babka: Bake for 40-50 minutes. About halfway through the baking time, if you notice the top is browning too quickly, loosely tent it with a piece of aluminum foil. The babka is done when it’s deep golden brown and a skewer or instant-read thermometer inserted into the center comes out clean or reads 190°F (88°C).
- Prepare the Syrup: While the babka is baking, make the simple syrup. In a small saucepan, combine the ⅓ cup of sugar and ⅓ cup of water. Bring to a boil over medium heat, stirring until the sugar is completely dissolved. Remove from heat and set aside.
- Apply the Syrup: As soon as you remove the babka from the oven, while it is still piping hot in its pan, immediately and generously brush the entire surface with the prepared sugar syrup. You might not use all of it, but be liberal. The hot bread will absorb the syrup, which keeps it moist and gives it a beautiful, professional-looking sheen.
- Cool: Let the babka cool in the pan for 15-20 minutes before using the parchment paper handles to lift it out onto a wire rack to cool completely before slicing. This is the hardest part—patience is a virtue! Slicing it while too hot can cause it to be gummy.
Nutrition
- Serving Size: One Normal Portion
- Calories: 480-550