

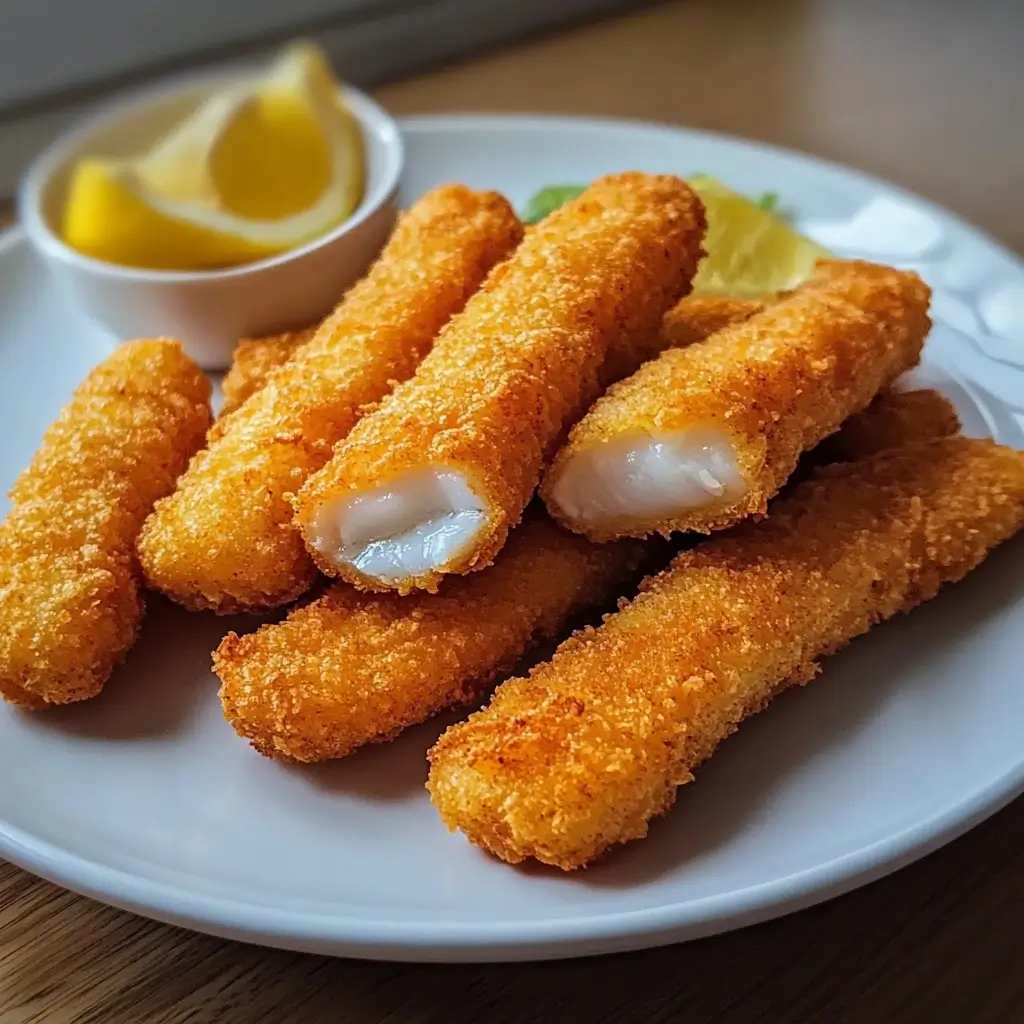

It’s funny how some of the simplest recipes can bring the most joy. Fish fingers, for example, were a staple in my childhood, but the store-bought versions always felt… lacking. They were often bland, overly processed, and just didn’t have that fresh, flaky fish taste I craved. So, I decided to take matters into my own hands and create my own homemade fish finger recipe. Let me tell you, the difference is night and day! The first time I made these, my family devoured them. Even my pickiest eater, who usually turns his nose up at anything remotely “fishy,” was asking for seconds. The crispy, golden breadcrumb coating, the tender, flaky fish inside, and the subtle hint of paprika – it’s a combination that’s simply irresistible. This recipe is now a regular in our household, and I’m so excited to share it with you. Get ready to experience fish fingers like never before – fresh, flavorful, and made with love!
Ingredients
- 2 fish fillets (cod or haddock)
- 1 cup breadcrumbs
- 1/2 cup flour
- 1 egg, beaten
- 1 tsp paprika
- Salt and pepper to taste
- Cooking oil for frying
Instructions
Making homemade fish fingers is surprisingly easy and incredibly rewarding. Follow these step-by-step instructions to create perfectly crispy and delicious fish fingers every time. We’ll break down each stage to ensure you have all the details you need for success, from preparing the fish to achieving that perfect golden-brown fry. Get ready to enjoy a healthier and tastier alternative to store-bought fish fingers that your whole family will love!
Step 1: Prepare the Fish Fillets – Cutting for Uniformity and Even Cooking
The foundation of any great fish finger is, of course, the fish itself. For this recipe, we recommend using firm white fish fillets like cod or haddock. These fish are perfect because they are mild in flavor, flake beautifully when cooked, and hold their shape well during the breading and frying process. You can often find fresh or frozen fillets at your local grocery store. If using frozen fillets, ensure they are fully thawed before you begin. Pat them dry with paper towels to remove any excess moisture – this helps the breading adhere better.
Now, let’s talk about cutting the fish. The goal here is uniformity. Consistent size ensures that all your fish fingers cook evenly. Start by placing your fish fillets on a clean cutting board. Inspect them for any stray bones and remove them if necessary. Using a sharp knife, cut the fillets lengthwise into strips, about 1 inch wide and 3-4 inches long. Think of the size of a typical store-bought fish finger as your guide. If your fillets are thicker, you might need to slice them in half horizontally first before cutting into strips to achieve the desired thickness and cooking time. Aim for pieces that are roughly the same size and thickness. This attention to detail will make a significant difference in the final result, ensuring each fish finger is cooked through and perfectly crispy. Once cut, set aside your fish strips and let’s move on to preparing the flavorful breading.
Step 2: Season the Flour – Layering Flavors from the Start
The seasoned flour is the first layer of flavor in our homemade fish fingers, and it’s a step you definitely don’t want to skip. While plain flour provides the base for the breading to stick, adding seasonings directly to the flour infuses a subtle yet noticeable flavor into the fish itself. This prevents the fish fingers from tasting bland and elevates the overall taste experience.
For our seasoning mix, we’re using a simple but effective combination of salt, pepper, and paprika. Salt enhances the natural flavor of the fish, while pepper adds a touch of warmth and spice. Paprika brings in a beautiful color and a slightly smoky, sweet note that complements the fish perfectly. Feel free to experiment with other spices as well! Garlic powder, onion powder, dried herbs like oregano or thyme, or even a pinch of cayenne pepper for a little heat can be fantastic additions.
To prepare the seasoned flour, grab a shallow dish – a pie plate or a wide bowl works perfectly. In this dish, combine the ½ cup of flour with 1 teaspoon of paprika, and salt and pepper to taste. Start with about ½ teaspoon of salt and ¼ teaspoon of black pepper, and adjust to your preference. Whisk everything together thoroughly with a fork or a small whisk until the spices are evenly distributed throughout the flour. This ensures that every fish finger gets a consistent and flavorful coating. Set aside the seasoned flour dish, as we’ll be using it in the next step to begin the breading process.
Step 3: The Breading Process – Achieving the Perfect Crispy Coating
Now for the fun part – breading the fish! This three-step process is what gives our homemade fish fingers their signature crispy and golden crust. We’ll be using a classic breading technique involving flour, egg, and breadcrumbs. Each layer plays a crucial role in creating the perfect texture and ensuring the breadcrumbs adhere properly to the fish.
Flour Coating: Take your dish of seasoned flour and one of the fish strips you prepared earlier. Dip the fish strip into the seasoned flour, making sure to coat it evenly on all sides. Use your hands to gently press the flour onto the fish, ensuring good coverage. Shake off any excess flour. The flour layer serves as a base for the egg to stick to and helps to create a drier surface on the fish, which in turn helps the breadcrumbs crisp up beautifully during frying.
Egg Wash: Next, prepare your egg wash. In another shallow dish, lightly beat one egg using a fork until the yolk and white are fully combined. Dip the floured fish strip into the beaten egg, making sure it is completely submerged. Allow any excess egg to drip off back into the dish. The egg wash acts as a “glue” that helps the breadcrumbs adhere to the floured fish. It also adds richness and contributes to the golden-brown color of the final product.
Breadcrumb Coating: Finally, it’s time for the breadcrumbs. In a third shallow dish, place your breadcrumbs. We recommend using panko breadcrumbs for extra crispiness, but regular breadcrumbs will also work. Take the egg-washed fish strip and roll it in the breadcrumbs until it is entirely covered. Again, gently press the breadcrumbs onto the fish to ensure they stick well. Make sure every surface is coated for maximum crispiness. Once breaded, place the fish finger on a plate or baking sheet lined with parchment paper. Repeat this three-step breading process for all the remaining fish strips. If you are not frying them immediately, you can cover the breaded fish fingers and refrigerate them for up to 30 minutes. This can actually help the breading set and adhere even better during frying.
Step 4: Heating the Oil – The Key to Crispy Frying
Properly heating the oil is crucial for achieving perfectly fried, crispy fish fingers. The oil temperature needs to be hot enough to cook the fish quickly and create that golden-brown crust, but not so hot that it burns the breadcrumbs before the fish is cooked through. Medium heat is generally ideal for frying fish fingers.
Pour a generous amount of cooking oil into a skillet. You want enough oil to cover the bottom of the pan to a depth of about ½ inch. This shallow frying method is sufficient for fish fingers and uses less oil than deep frying. Vegetable oil, canola oil, or sunflower oil are all good choices for frying as they have a neutral flavor and a high smoke point.
Place the skillet over medium heat. Allow the oil to heat up gradually. To test if the oil is hot enough, you can carefully drop a few breadcrumbs into the oil. If they sizzle immediately and turn golden brown within a few seconds, the oil is ready. Alternatively, if you have a kitchen thermometer, aim for an oil temperature of around 325-350°F (160-175°C). Be patient and let the oil heat up properly before adding the fish fingers. If the oil is not hot enough, the fish fingers will absorb too much oil and become greasy rather than crispy. Once the oil is heated to the correct temperature, we are ready to start frying!
Step 5: Frying the Fish Fingers – Achieving Golden Perfection
Now comes the moment we’ve been waiting for – frying the fish fingers to golden, crispy perfection! Carefully and gently place the breaded fish strips into the hot oil. Do not overcrowd the pan, as this will lower the oil temperature and result in uneven cooking and less crispy fish fingers. Fry in batches if necessary, ensuring there is enough space between each fish finger in the pan.
Fry the fish fingers for about 3-4 minutes on each side, or until they are golden brown and crispy. Keep an eye on them and adjust the heat if needed. If they are browning too quickly, lower the heat slightly. If they are not browning enough, you can increase the heat a bit, but be careful not to burn them. The cooking time will depend on the thickness of your fish fingers and the temperature of your oil, so use visual cues to determine when they are ready. You are looking for a beautiful golden-brown color and a crispy exterior.
The fish is cooked through when it is opaque and flakes easily with a fork. Since fish fillets cook relatively quickly, especially when cut into strips, they should be cooked through by the time they are golden brown. To ensure even cooking, you can flip the fish fingers halfway through the frying time. Use tongs or a slotted spatula to carefully turn them over. Once both sides are golden and crispy and the fish is cooked through, it’s time to remove them from the pan.
Step 6: Draining and Serving – Finishing Touches for Deliciousness
Once the fish fingers are cooked to golden perfection, it’s important to drain off any excess oil to maintain their crispiness and prevent them from becoming soggy. Remove the fish fingers from the skillet using tongs or a slotted spatula and place them on a plate lined with paper towels. The paper towels will absorb the excess oil, keeping your fish fingers light and crispy. Let them drain for a minute or two before serving.
Now comes the best part – serving and enjoying your homemade fish fingers! Serve them warm immediately for the best taste and texture. Homemade fish fingers are incredibly versatile and can be served in so many delicious ways. They are fantastic on their own with your favorite dipping sauces, or as part of a larger meal. Consider serving them alongside classic sides like French fries, potato wedges, or a fresh salad. They also make a great addition to fish tacos or wraps. Get creative with your serving suggestions and enjoy the fruits of your labor – perfectly crispy, flavorful homemade fish fingers that are sure to be a hit with everyone!
Nutrition Facts
(Note: Nutritional values are approximate and can vary based on specific ingredients and portion sizes. These values are estimates per serving, assuming the recipe is divided into 4 servings.)
- Servings: 4
- Calories per serving: Approximately 350-450 kcal
(This estimation is based on average values for cod or haddock, breadcrumbs, flour, egg, and cooking oil used in shallow frying. For more precise nutritional information, you can use online nutritional calculators and input the specific brands and quantities of ingredients you use.)
Preparation Time
- Prep time: 20 minutes (including fish cutting and breading)
- Cook time: 15 minutes (frying time, approximately 3-4 minutes per batch)
- Total time: 35 minutes
This recipe is relatively quick and easy to make, perfect for a weeknight dinner or a fun weekend meal. The active cooking time is short, making it a great option when you want a delicious homemade meal without spending hours in the kitchen.
How to Serve
Homemade fish fingers are incredibly versatile and can be enjoyed in countless ways. Here are some delicious serving suggestions to elevate your fish finger experience:
- Classic Dipping Sauces:
- Tartar Sauce: A must-have classic! Creamy, tangy, and perfectly complements the crispy fish.
- Ketchup: Simple, timeless, and always a crowd-pleaser, especially with kids.
- Mayonnaise: A creamy and rich option that adds a smooth texture.
- Lemon Aioli: Elevate your dipping game with a zesty lemon aioli for a sophisticated touch.
- Sweet Chili Sauce: For a touch of sweetness and a hint of spice.
- Side Dishes for a Complete Meal:
- French Fries or Potato Wedges: The quintessential pairing for fish fingers – crispy potatoes and crispy fish!
- Sweet Potato Fries: A healthier and equally delicious alternative to regular fries.
- Coleslaw: A refreshing and crunchy side that cuts through the richness of the fried fish.
- Green Salad: A simple green salad with a light vinaigrette adds freshness and balance.
- Peas or Mushy Peas: A classic British side that pairs wonderfully with fish fingers.
- Creative Serving Ideas:
- Fish Finger Sandwiches or Wraps: Stuff fish fingers into soft rolls or wraps with lettuce, tomato, and your favorite sauce for a fun and satisfying meal.
- Fish Finger Tacos: Get creative and use fish fingers as the filling for tacos! Add shredded cabbage, salsa, and a squeeze of lime.
- Fish Finger Bowl Meals: Create a balanced bowl with fish fingers, quinoa or rice, roasted vegetables, and a flavorful dressing.
- Appetizer Platter: Serve fish fingers as part of a party appetizer platter with other finger foods like mozzarella sticks, onion rings, and dipping sauces.
- Garnishes for Extra Flair:
- Lemon Wedges: A squeeze of fresh lemon juice brightens up the flavor of the fish fingers.
- Fresh Parsley or Dill: Chopped fresh herbs add a pop of color and freshness.
- Sprinkle of Paprika: Enhance the visual appeal with a light sprinkle of paprika on top.
Additional Tips for Perfect Homemade Fish Fingers
Want to take your homemade fish fingers to the next level? Here are five essential tips to ensure crispy, flavorful, and perfectly cooked fish fingers every time:
- Choose the Right Fish: While cod and haddock are excellent choices, you can also experiment with other firm white fish like pollock, hake, or even tilapia. The key is to use a fish that is relatively mild in flavor and holds its shape well during cooking. Avoid oily fish like salmon or mackerel, as they are not ideal for frying in this style. Fresh or frozen (thawed) fillets both work well, just ensure the fish is patted dry before breading.
- Customize Your Breading: Don’t be afraid to get creative with your breadcrumb mixture! For extra flavor, try using seasoned breadcrumbs or adding grated Parmesan cheese, dried herbs like Italian seasoning or oregano, or even a pinch of garlic powder or onion powder to the breadcrumbs themselves. For a gluten-free option, use gluten-free breadcrumbs or almond flour. Panko breadcrumbs will give you the crispiest result due to their coarser texture.
- Control the Oil Temperature: Maintaining the correct oil temperature is crucial for crispy, non-greasy fish fingers. If the oil is too cold, the fish fingers will absorb too much oil and become soggy. If the oil is too hot, the breadcrumbs will burn before the fish is cooked through. Use a kitchen thermometer to monitor the oil temperature and keep it between 325-350°F (160-175°C). If you don’t have a thermometer, test the oil by dropping a few breadcrumbs in; they should sizzle and turn golden brown in seconds.
- Don’t Overcrowd the Pan: Frying in batches is essential for maintaining the oil temperature and ensuring crispy fish fingers. Overcrowding the pan will lower the oil temperature, leading to uneven cooking and soggy results. Fry only a few fish fingers at a time, leaving space between them in the skillet. This allows the oil to circulate properly and cook each fish finger evenly. Once one batch is done, remove them and let the oil temperature recover before adding the next batch.
- Bake for a Healthier Option: If you prefer a healthier, less oily version, you can bake the fish fingers instead of frying. Preheat your oven to 400°F (200°C). Place the breaded fish fingers on a baking sheet lined with parchment paper. Drizzle or spray them lightly with olive oil or cooking spray. Bake for 15-20 minutes, flipping halfway through, or until golden brown and cooked through. While baked fish fingers won’t be quite as crispy as fried ones, they are still a delicious and healthier alternative.
FAQ Section
Here are some frequently asked questions about making homemade fish fingers to help you troubleshoot and perfect your recipe:
Question 1: Can I use frozen fish fillets?
Yes, you can definitely use frozen fish fillets. However, it’s crucial to thaw them completely before starting the recipe. The best way to thaw frozen fish is to place it in the refrigerator overnight. If you need to thaw it quickly, you can place the sealed fish fillet package in a bowl of cold water. Change the water every 30 minutes until the fish is thawed. Once thawed, pat the fish fillets thoroughly dry with paper towels to remove excess moisture. This step is important because excess moisture can prevent the breading from sticking properly and result in soggy fish fingers.
Question 2: What kind of breadcrumbs are best for fish fingers?
Panko breadcrumbs are highly recommended for homemade fish fingers because they are coarser and lighter than regular breadcrumbs, resulting in a significantly crispier coating. Regular breadcrumbs will also work, but the texture might be slightly less crispy. You can also use seasoned breadcrumbs for added flavor. If you are looking for a gluten-free option, use gluten-free breadcrumbs or finely ground almond flour. Experiment with different types of breadcrumbs to find your preferred texture and flavor.
Question 3: How do I keep the breadcrumbs from falling off during frying?
To prevent the breadcrumbs from falling off, ensure you follow the breading process correctly. First, make sure the fish is patted dry. Second, coat the fish thoroughly with seasoned flour, shaking off any excess. Third, dip it in beaten egg, allowing excess egg to drip off. Finally, press the breadcrumbs firmly onto the fish, ensuring complete coverage. Refrigerating the breaded fish fingers for 15-30 minutes before frying can also help the breading set and adhere better. Handle the breaded fish fingers gently when transferring them to the hot oil to avoid dislodging the breadcrumbs.
Question 4: Can I make fish fingers ahead of time?
Yes, you can prepare the breaded fish fingers ahead of time. Once breaded, place them on a baking sheet lined with parchment paper and cover them tightly with plastic wrap. You can refrigerate them for up to 2-3 hours before frying. It’s not recommended to prepare them further in advance, as the breading may become soggy if stored for too long. When you are ready to cook, fry them directly from the refrigerator. Cooked fish fingers are best served immediately for optimal crispiness. If you have leftovers, store them in an airtight container in the refrigerator and reheat them in the oven or air fryer to try and regain some crispness, although they will be best fresh.
Question 5: What dipping sauces go well with fish fingers?
There are many delicious dipping sauces that complement fish fingers perfectly! Classic choices include tartar sauce, ketchup, and mayonnaise. For a tangy and flavorful option, try lemon aioli or a remoulade sauce. Sweet chili sauce provides a sweet and spicy kick. Ranch dressing, honey mustard, or even a simple sriracha mayo are also great choices. Get creative and experiment with different sauces to find your favorite pairings! Consider what flavors your family enjoys and offer a variety of options to make serving fish fingers even more fun and appealing.
Print
Homemade Fish Fingers Recipe
Ingredients
- 2 fish fillets (cod or haddock)
- 1 cup breadcrumbs
- 1/2 cup flour
- 1 egg, beaten
- 1 tsp paprika
- Salt and pepper to taste
- Cooking oil for frying
Instructions
The foundation of any great fish finger is, of course, the fish itself. For this recipe, we recommend using firm white fish fillets like cod or haddock. These fish are perfect because they are mild in flavor, flake beautifully when cooked, and hold their shape well during the breading and frying process. You can often find fresh or frozen fillets at your local grocery store. If using frozen fillets, ensure they are fully thawed before you begin. Pat them dry with paper towels to remove any excess moisture – this helps the breading adhere better.
Now, let’s talk about cutting the fish. The goal here is uniformity. Consistent size ensures that all your fish fingers cook evenly. Start by placing your fish fillets on a clean cutting board. Inspect them for any stray bones and remove them if necessary. Using a sharp knife, cut the fillets lengthwise into strips, about 1 inch wide and 3-4 inches long. Think of the size of a typical store-bought fish finger as your guide. If your fillets are thicker, you might need to slice them in half horizontally first before cutting into strips to achieve the desired thickness and cooking time. Aim for pieces that are roughly the same size and thickness. This attention to detail will make a significant difference in the final result, ensuring each fish finger is cooked through and perfectly crispy. Once cut, set aside your fish strips and let’s move on to preparing the flavorful breading.
The seasoned flour is the first layer of flavor in our homemade fish fingers, and it’s a step you definitely don’t want to skip. While plain flour provides the base for the breading to stick, adding seasonings directly to the flour infuses a subtle yet noticeable flavor into the fish itself. This prevents the fish fingers from tasting bland and elevates the overall taste experience.
For our seasoning mix, we’re using a simple but effective combination of salt, pepper, and paprika. Salt enhances the natural flavor of the fish, while pepper adds a touch of warmth and spice. Paprika brings in a beautiful color and a slightly smoky, sweet note that complements the fish perfectly. Feel free to experiment with other spices as well! Garlic powder, onion powder, dried herbs like oregano or thyme, or even a pinch of cayenne pepper for a little heat can be fantastic additions.
To prepare the seasoned flour, grab a shallow dish – a pie plate or a wide bowl works perfectly. In this dish, combine the ½ cup of flour with 1 teaspoon of paprika, and salt and pepper to taste. Start with about ½ teaspoon of salt and ¼ teaspoon of black pepper, and adjust to your preference. Whisk everything together thoroughly with a fork or a small whisk until the spices are evenly distributed throughout the flour. This ensures that every fish finger gets a consistent and flavorful coating. Set aside the seasoned flour dish, as we’ll be using it in the next step to begin the breading process.
Now for the fun part – breading the fish! This three-step process is what gives our homemade fish fingers their signature crispy and golden crust. We’ll be using a classic breading technique involving flour, egg, and breadcrumbs. Each layer plays a crucial role in creating the perfect texture and ensuring the breadcrumbs adhere properly to the fish.
Flour Coating: Take your dish of seasoned flour and one of the fish strips you prepared earlier. Dip the fish strip into the seasoned flour, making sure to coat it evenly on all sides. Use your hands to gently press the flour onto the fish, ensuring good coverage. Shake off any excess flour. The flour layer serves as a base for the egg to stick to and helps to create a drier surface on the fish, which in turn helps the breadcrumbs crisp up beautifully during frying.
Egg Wash: Next, prepare your egg wash. In another shallow dish, lightly beat one egg using a fork until the yolk and white are fully combined. Dip the floured fish strip into the beaten egg, making sure it is completely submerged. Allow any excess egg to drip off back into the dish. The egg wash acts as a “glue” that helps the breadcrumbs adhere to the floured fish. It also adds richness and contributes to the golden-brown color of the final product.
Breadcrumb Coating: Finally, it’s time for the breadcrumbs. In a third shallow dish, place your breadcrumbs. We recommend using panko breadcrumbs for extra crispiness, but regular breadcrumbs will also work. Take the egg-washed fish strip and roll it in the breadcrumbs until it is entirely covered. Again, gently press the breadcrumbs onto the fish to ensure they stick well. Make sure every surface is coated for maximum crispiness. Once breaded, place the fish finger on a plate or baking sheet lined with parchment paper. Repeat this three-step breading process for all the remaining fish strips. If you are not frying them immediately, you can cover the breaded fish fingers and refrigerate them for up to 30 minutes. This can actually help the breading set and adhere even better during frying.
Properly heating the oil is crucial for achieving perfectly fried, crispy fish fingers. The oil temperature needs to be hot enough to cook the fish quickly and create that golden-brown crust, but not so hot that it burns the breadcrumbs before the fish is cooked through. Medium heat is generally ideal for frying fish fingers.
Pour a generous amount of cooking oil into a skillet. You want enough oil to cover the bottom of the pan to a depth of about ½ inch. This shallow frying method is sufficient for fish fingers and uses less oil than deep frying. Vegetable oil, canola oil, or sunflower oil are all good choices for frying as they have a neutral flavor and a high smoke point.
Place the skillet over medium heat. Allow the oil to heat up gradually. To test if the oil is hot enough, you can carefully drop a few breadcrumbs into the oil. If they sizzle immediately and turn golden brown within a few seconds, the oil is ready. Alternatively, if you have a kitchen thermometer, aim for an oil temperature of around 325-350°F (160-175°C). Be patient and let the oil heat up properly before adding the fish fingers. If the oil is not hot enough, the fish fingers will absorb too much oil and become greasy rather than crispy. Once the oil is heated to the correct temperature, we are ready to start frying!
Now comes the moment we’ve been waiting for – frying the fish fingers to golden, crispy perfection! Carefully and gently place the breaded fish strips into the hot oil. Do not overcrowd the pan, as this will lower the oil temperature and result in uneven cooking and less crispy fish fingers. Fry in batches if necessary, ensuring there is enough space between each fish finger in the pan.
Fry the fish fingers for about 3-4 minutes on each side, or until they are golden brown and crispy. Keep an eye on them and adjust the heat if needed. If they are browning too quickly, lower the heat slightly. If they are not browning enough, you can increase the heat a bit, but be careful not to burn them. The cooking time will depend on the thickness of your fish fingers and the temperature of your oil, so use visual cues to determine when they are ready. You are looking for a beautiful golden-brown color and a crispy exterior.
The fish is cooked through when it is opaque and flakes easily with a fork. Since fish fillets cook relatively quickly, especially when cut into strips, they should be cooked through by the time they are golden brown. To ensure even cooking, you can flip the fish fingers halfway through the frying time. Use tongs or a slotted spatula to carefully turn them over. Once both sides are golden and crispy and the fish is cooked through, it’s time to remove them from the pan.
Once the fish fingers are cooked to golden perfection, it’s important to drain off any excess oil to maintain their crispiness and prevent them from becoming soggy. Remove the fish fingers from the skillet using tongs or a slotted spatula and place them on a plate lined with paper towels. The paper towels will absorb the excess oil, keeping your fish fingers light and crispy. Let them drain for a minute or two before serving.
Nutrition
- Serving Size: One Normal Portion
- Calories: 350-450 kcal


