

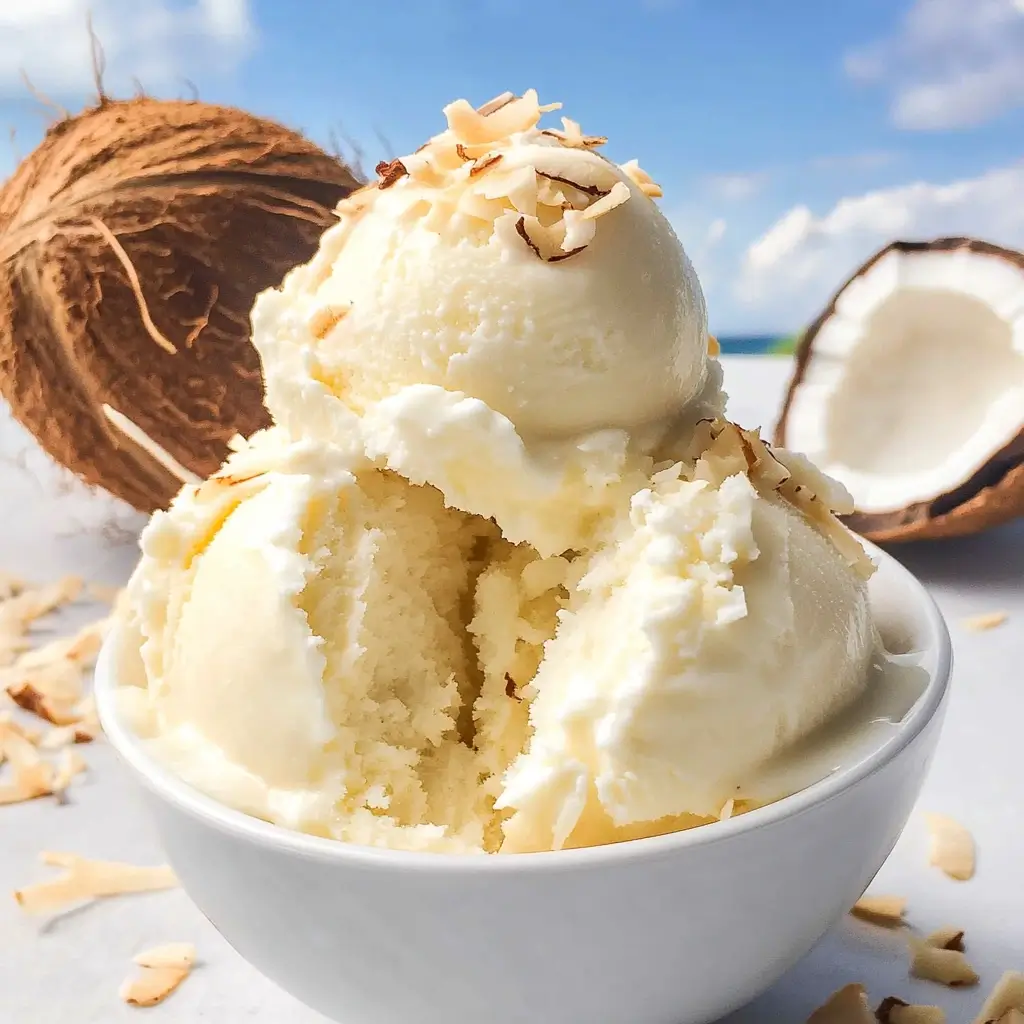

Okay, let’s dive into the creamy, dreamy world of homemade no-churn coconut ice cream! This recipe has become an absolute staple in our household, especially during those warm summer months, or frankly, any time a tropical craving hits. The first time I made it, I was skeptical. No ice cream maker? Could it really be that good? The answer was a resounding YES! My kids, who are usually picky about “healthy” treats, devoured their bowls and immediately asked for seconds. My partner, a self-proclaimed ice cream connoisseur, declared it one of the best coconut ice creams he’d ever had, praising its intense coconut flavor and incredibly smooth texture. It’s the simplicity that seals the deal – minimal ingredients, minimal effort, maximum deliciousness. The aroma of coconut filling the kitchen as you prepare it is just a delightful bonus. It’s become our go-to for an easy dessert that always impresses guests, and the pure, unadulterated coconut taste transports us straight to a sunny beach, no matter the weather outside.
The Allure of Homemade No-Churn Coconut Ice Cream
There’s something incredibly satisfying about making ice cream from scratch. The process, often perceived as complicated and requiring specialized equipment, becomes wonderfully accessible with a no-churn recipe. And when that recipe centers around the exotic, tropical goodness of coconut, the allure is simply irresistible. Coconut, with its distinct sweet, nutty, and slightly floral notes, lends itself beautifully to frozen desserts. Its natural creaminess, especially when using full-fat coconut milk or cream, provides a luxurious mouthfeel that can rival even the most premium store-bought ice creams.
This No-Churn Coconut Ice Cream recipe is a celebration of simplicity and flavor. It harnesses the inherent richness of coconut and combines it with the magic of sweetened condensed milk to create a base that freezes beautifully without the need for constant churning. The result is an ice cream that is not only intensely coconutty but also remarkably smooth and scoopable, free from the icy crystals that can plague improperly made homemade ice cream. Whether you’re a seasoned home cook or a complete novice in the kitchen, this recipe promises a delightful journey to a delicious, homemade tropical treat. It’s an invitation to slow down, enjoy the process, and indulge in a dessert that tastes like sunshine in a bowl.
Why You’ll Love This No-Churn Coconut Ice Cream Recipe
Beyond the incredible taste and texture, there are numerous reasons why this No-Churn Coconut Ice Cream will quickly become a favorite in your dessert repertoire:
- Unbelievably Easy: This is the star attraction. No special ice cream maker is needed! If you have a hand mixer (or even just a good whisk and some elbow grease) and a freezer, you’re all set. The “no-churn” method simplifies the process dramatically, making homemade ice cream accessible to everyone.
- Minimal Ingredients: You likely already have some of these ingredients in your pantry, or they’re readily available at any grocery store. We’re talking about a handful of components to create something truly special.
- Intense, Pure Coconut Flavor: By using quality coconut milk and shredded coconut, this ice cream delivers an authentic, robust coconut taste that isn’t masked by artificial flavors or excessive sweetness. It’s a true tribute to the tropical fruit.
- Incredibly Creamy Texture: The combination of full-fat coconut milk and sweetened condensed milk is key to its luscious, smooth texture. It’s surprisingly rich and decadent for such a simple recipe.
- Naturally Dairy-Free Potential: By its very nature, using coconut milk as the base makes this an excellent option for those avoiding dairy. If you use dairy-free sweetened condensed milk (readily available or homemade), it becomes fully dairy-free and vegan-friendly.
- Customizable: While delicious on its own, this ice cream is a fantastic canvas for your culinary creativity. Add mix-ins like toasted nuts, chocolate chips, fruit swirls, or a dash of rum for an adult twist.
- Perfect for Any Occasion: Whether it’s a casual weeknight treat, a dessert for a summer barbecue, or a sophisticated end to a dinner party, this coconut ice cream fits the bill. It feels special without requiring hours of laborious preparation.
- Crowd-Pleaser: It’s hard to find someone who doesn’t love a good coconut dessert. This ice cream is consistently a hit with both adults and children, bringing a taste of the tropics to any gathering.
This recipe isn’t just about making ice cream; it’s about creating moments of joy and indulgence with minimal fuss. It’s the kind of treat that makes you feel like a kitchen superstar without breaking a sweat.
Ingredients for Your Tropical No-Churn Coconut Delight
Crafting this heavenly No-Churn Coconut Ice Cream requires just a few key ingredients. Quality matters here, especially with the coconut milk, as it forms the heart and soul of the flavor and texture.
- Full-Fat Canned Coconut Milk: 2 cans (13.5 oz / 400ml each), chilled in the refrigerator for at least 12 hours, preferably 24 hours. Do not use light coconut milk; the fat is crucial for creaminess.
- Sweetened Condensed Milk: 1 can (14 oz / 397g). For a vegan version, use sweetened condensed coconut milk.
- Pure Vanilla Extract: 2 teaspoons. This enhances the coconut flavor beautifully.
- Unsweetened Shredded Coconut: 1 cup (about 80-90g), lightly toasted if desired for extra flavor. You can use sweetened if you prefer, but adjust overall sweetness if necessary.
- Cream of Coconut (Optional but Recommended for extra richness & flavor): 1/4 cup (60ml). Brands like Coco Lopez work well. This is different from coconut cream; it’s a sweet, syrupy coconut product. If using, you might slightly reduce the sweetened condensed milk if you’re sensitive to sweetness.
- Pinch of Salt: About 1/4 teaspoon. This balances the sweetness and brings out the flavors.
- Fresh Lime Zest (Optional): Zest of 1 lime, for a bright, tropical counterpoint.
A Note on Coconut Milk: Chilling the cans of full-fat coconut milk is essential. This allows the thick, solid coconut cream to separate from the watery liquid. You’ll primarily be using the thick cream for the richest result, though some recipes incorporate a bit of the liquid too. For this recipe, we aim to use mostly the solid cream.
Step-by-Step: Crafting Your Creamy No-Churn Coconut Ice Cream
Follow these simple steps to create a batch of incredibly delicious and creamy coconut ice cream without an ice cream maker.
- Prepare the Coconut Cream:
- Carefully open the chilled cans of full-fat coconut milk without shaking them.
- Scoop out only the thick, solidified coconut cream from the top of the cans into a large, chilled mixing bowl. Try to leave behind as much of the clear watery liquid as possible. (You can save this liquid for smoothies or other recipes). You should get about 1.5 to 2 cups of thick cream.
- Whip the Coconut Cream:
- Using an electric hand mixer (or a stand mixer with the whisk attachment), beat the thick coconut cream on medium-high speed for about 3-5 minutes, or until it becomes light, fluffy, and forms soft peaks. Be careful not to overbeat, especially if it starts to look grainy. If you don’t have an electric mixer, you can do this by hand with a whisk, but it will take more time and effort.
- Combine Wet Ingredients:
- In a separate medium bowl, whisk together the sweetened condensed milk, vanilla extract, optional cream of coconut, and the pinch of salt until well combined and smooth.
- Fold Mixtures Together:
- Gently pour the sweetened condensed milk mixture into the whipped coconut cream.
- Using a spatula, carefully fold the two mixtures together until just combined. Be gentle to maintain as much airiness as possible from the whipped coconut cream. Avoid overmixing.
- Add Mix-ins:
- Gently fold in the toasted (or untoasted) shredded coconut and the optional lime zest until evenly distributed.
- Freeze the Ice Cream:
- Pour the mixture into a freezer-safe container, preferably a loaf pan (around 9×5 inches) or a similar-sized container with a lid. Metal pans tend to help the ice cream freeze faster.
- Smooth the top with your spatula.
- Cover the surface of the ice cream directly with a piece of plastic wrap or parchment paper, pressing it down gently to prevent ice crystals from forming. Then, cover the container tightly with a lid or another layer of plastic wrap or aluminum foil.
- Chill Thoroughly:
- Place the container in the coldest part of your freezer.
- Freeze for at least 6-8 hours, or preferably overnight, until the ice cream is firm.
- Serve and Enjoy:
- When ready to serve, let the ice cream sit at room temperature for 5-10 minutes to soften slightly, making it easier to scoop.
- Scoop into bowls or cones and enjoy your homemade tropical delight!
This process, while requiring some chilling time, is remarkably hands-off for the active preparation part. The reward is a truly spectacular homemade ice cream.
Nutritional Snapshot: Understanding Your Indulgence
Understanding the nutritional aspect of your homemade treats can be helpful. Please note that these are approximate values and can vary based on the specific brands of ingredients used, the exact amount of coconut cream yielded from the cans, and whether optional ingredients like cream of coconut are included.
- Servings: This recipe typically yields about 8-10 servings.
- Approximate Calories per Serving (assuming 8 servings): Around 350-450 calories.
Breakdown of Key Contributors:
- Full-Fat Coconut Milk: The primary source of fat (mostly saturated, from a plant source) and calories. It’s what gives the ice cream its incredible richness and creaminess.
- Sweetened Condensed Milk: Contributes significantly to the sugar content and calories, and is crucial for the no-churn texture, preventing large ice crystals.
- Shredded Coconut: Adds more coconut fat, some fiber, and calories.
- Cream of Coconut (if used): Adds additional sugar and calories.
While this No-Churn Coconut Ice Cream is undoubtedly an indulgent treat, its homemade nature means you have control over the quality of ingredients. It’s free from artificial preservatives, colors, and stabilizers often found in commercial ice creams. Enjoy it as a special dessert, savoring each creamy, coconut-infused bite. For a lighter version, you could try to reduce the sweetened condensed milk slightly, but this may affect the final texture and sweetness. This recipe is designed for full-flavored indulgence.
Time Investment: Quick Prep for a Chilled Treat
One of the most appealing aspects of this No-Churn Coconut Ice Cream is how little active time it requires, despite the luxurious results.
- Chilling Time for Coconut Milk Cans: Minimum 12 hours, preferably 24 hours in the refrigerator. This is passive time but crucial for separating the cream.
- Active Preparation Time: Approximately 15-20 minutes. This includes:
- Toasting the coconut (if doing so): 5-7 minutes (can be done while cans chill or as a first step).
- Scooping coconut cream: 2-3 minutes.
- Whipping coconut cream: 3-5 minutes.
- Mixing other ingredients and folding: 5-7 minutes.
- Freezing Time: Minimum 6-8 hours, ideally overnight. This is also passive time.
Total Active Time: Roughly 15-20 minutes.
Total Passive Chilling/Freezing Time: Approximately 18-32+ hours (mostly for initial can chilling and final freezing).
So, while you do need to plan ahead, particularly for chilling the coconut milk and allowing the ice cream to freeze solid, the actual hands-on work is incredibly brief. This makes it a fantastic make-ahead dessert for parties, gatherings, or simply to have a delicious treat ready in your freezer.
Serving Suggestions: Elevating Your Coconut Ice Cream Experience
This No-Churn Coconut Ice Cream is divine on its own, but a few simple additions can elevate it to a truly show-stopping dessert. Here are some ideas:
- Classic Scoop:
- Serve generous scoops in chilled bowls or waffle cones.
- Garnish with extra toasted shredded coconut for added texture and visual appeal.
- A sprig of fresh mint can add a pop of color.
- Tropical Parfait:
- Layer the coconut ice cream in glasses with:
- Diced fresh mango or pineapple.
- Crushed macadamia nuts or almonds.
- A drizzle of passion fruit puree or lime syrup.
- Layer the coconut ice cream in glasses with:
- With Grilled Fruit:
- A scoop of coconut ice cream is the perfect accompaniment to warm, caramelized grilled pineapple slices or peaches. The contrast of warm and cold, sweet and tangy, is delightful.
- Chocolate Lover’s Dream:
- Drizzle with a rich dark chocolate fudge sauce or magic shell.
- Sprinkle with dark chocolate shavings or mini chocolate chips.
- A few fresh raspberries on top would provide a lovely color and flavor contrast.
- Adults-Only Twist:
- Drizzle a small amount of dark rum or coconut liqueur (like Malibu) over the ice cream just before serving.
- Serve alongside a shot of chilled espresso for an “Affogato Cocco.”
- Ice Cream Sandwich:
- Sandwich a scoop between two chewy coconut cookies, chocolate chip cookies, or gingersnaps.
- On Top of Warm Desserts:
- Add a scoop to warm brownies, a slice of pineapple upside-down cake, or a fruit crumble.
- Garnishes Galore:
- Nuts: Toasted slivered almonds, chopped macadamia nuts, pecans.
- Fruit: Fresh berries (raspberries, blueberries), diced mango, kiwi, passion fruit seeds.
- Sauces: Caramel sauce, pineapple sauce, mango coulis.
- Crunch: Crushed cookies (like Biscoff or shortbread), granola.
- Zest: A final grating of fresh lime or lemon zest for brightness.
Experiment with these suggestions or come up with your own creative pairings! The pure coconut flavor provides a versatile base for many delicious combinations.
Additional Tips for Perfect No-Churn Coconut Ice Cream Every Time
To ensure your homemade coconut ice cream is the best it can be, keep these five pro tips in mind:
- Chill Everything (Seriously!): Beyond chilling the cans of coconut milk, consider chilling your mixing bowl and beaters (if using an electric mixer) for about 15-20 minutes in the freezer before you start whipping the coconut cream. A cold environment helps the cream whip up fluffier and maintain its volume, which contributes to a lighter, creamier final texture.
- Don’t Skimp on Fat: This recipe needs full-fat canned coconut milk. Light coconut milk simply doesn’t have enough fat content to create the necessary creaminess or to whip up properly. The fat is what prevents large ice crystals and gives the ice cream its luxurious mouthfeel. Also, ensure you’re scooping out mostly the thick, solid cream and leaving the watery liquid behind.
- Gentle Folding is Key: Once you’ve whipped the coconut cream to soft peaks, and you’re combining it with the sweetened condensed milk mixture, use a gentle folding technique with a spatula. Overmixing at this stage will deflate the air you’ve incorporated, leading to a denser, less airy ice cream. Fold until just combined.
- Toast the Coconut for Depth: While optional, toasting the shredded coconut before adding it to the ice cream mixture significantly enhances its nutty flavor and adds a delightful textural contrast. Spread it on a baking sheet and toast at 325°F (160°C) for 5-7 minutes, watching carefully as it can burn quickly. Let it cool completely before adding.
- Prevent Ice Crystals: Cover the surface of the ice cream mixture directly with plastic wrap or parchment paper before putting the lid on your container. This minimizes air exposure to the surface, which helps prevent pesky ice crystals from forming, ensuring a smoother texture. Also, store it in the coldest part of your freezer, away from the door.
By following these tips, you’ll be well on your way to creating a batch of no-churn coconut ice cream that is consistently smooth, creamy, and bursting with tropical flavor.
Frequently Asked Questions (FAQ) About No-Churn Coconut Ice Cream
Here are answers to some common questions you might have about making and enjoying this delicious no-churn coconut ice cream:
- Q: Can I make this recipe vegan?
- A: Absolutely! The base of this ice cream is coconut milk, which is naturally vegan. The main dairy component is the sweetened condensed milk. Simply substitute it with a can of sweetened condensed coconut milk, which is readily available in many supermarkets or can be made at home. Ensure your vanilla extract is also vegan-friendly.
- Q: How long will this homemade ice cream last in the freezer?
- A: For the best taste and texture, it’s recommended to consume your homemade no-churn coconut ice cream within 1-2 weeks. Ensure it’s stored in an airtight, freezer-safe container, with plastic wrap pressed against the surface to minimize ice crystal formation and freezer burn. While it might be safe to eat beyond that, the texture can degrade over time.
- Q: My ice cream is too hard to scoop straight from the freezer. What can I do?
- A: Homemade no-churn ice creams, especially those rich in coconut fat, can freeze quite solidly. This is normal. Simply let the container sit at room temperature for about 5-10 minutes (or a bit longer depending on your room temperature) before scooping. This will soften it just enough to make scooping easier without melting it too much. You can also dip your ice cream scoop in hot water before each scoop.
- Q: Can I add other flavors or mix-ins to this coconut ice cream?
- A: Yes, definitely! This recipe is a wonderful base for experimentation. Consider folding in things like:
- Mini chocolate chips or chunks (dark chocolate pairs beautifully).
- Toasted chopped nuts (almonds, macadamias, pecans).
- A swirl of fruit puree (mango, passion fruit, raspberry).
- A tablespoon or two of dark rum or coconut liqueur for an adult version (add with the condensed milk).
- A pinch of cardamom or cinnamon for a spiced twist.
Gently fold in mix-ins during the last step before freezing.
- A: Yes, definitely! This recipe is a wonderful base for experimentation. Consider folding in things like:
- Q: Why use sweetened condensed milk? Can I substitute it?
- A: Sweetened condensed milk is a key ingredient in many no-churn ice cream recipes for several reasons. Its high sugar content lowers the freezing point of the mixture, which helps prevent the formation of large ice crystals and results in a smoother, more scoopable ice cream. It also adds sweetness and richness. While you could experiment with other sweeteners (like maple syrup or agave combined with more coconut cream), the texture might be different and potentially icier. For the classic no-churn result, sweetened condensed milk (dairy or coconut-based) is highly recommended.

Homemade No-Churn Coconut Ice Cream Recipe
Ingredients
- Full-Fat Canned Coconut Milk: 2 cans (13.5 oz / 400ml each), chilled in the refrigerator for at least 12 hours, preferably 24 hours. Do not use light coconut milk; the fat is crucial for creaminess.
- Sweetened Condensed Milk: 1 can (14 oz / 397g). For a vegan version, use sweetened condensed coconut milk.
- Pure Vanilla Extract: 2 teaspoons. This enhances the coconut flavor beautifully.
- Unsweetened Shredded Coconut: 1 cup (about 80-90g), lightly toasted if desired for extra flavor. You can use sweetened if you prefer, but adjust overall sweetness if necessary.
- Cream of Coconut (Optional but Recommended for extra richness & flavor): 1/4 cup (60ml). Brands like Coco Lopez work well. This is different from coconut cream; it’s a sweet, syrupy coconut product. If using, you might slightly reduce the sweetened condensed milk if you’re sensitive to sweetness.
- Pinch of Salt: About 1/4 teaspoon. This balances the sweetness and brings out the flavors.
- Fresh Lime Zest (Optional): Zest of 1 lime, for a bright, tropical counterpoint.
Instructions
- Prepare the Coconut Cream:
- Carefully open the chilled cans of full-fat coconut milk without shaking them.
- Scoop out only the thick, solidified coconut cream from the top of the cans into a large, chilled mixing bowl. Try to leave behind as much of the clear watery liquid as possible. (You can save this liquid for smoothies or other recipes). You should get about 1.5 to 2 cups of thick cream.
- Whip the Coconut Cream:
- Using an electric hand mixer (or a stand mixer with the whisk attachment), beat the thick coconut cream on medium-high speed for about 3-5 minutes, or until it becomes light, fluffy, and forms soft peaks. Be careful not to overbeat, especially if it starts to look grainy. If you don’t have an electric mixer, you can do this by hand with a whisk, but it will take more time and effort.
- Combine Wet Ingredients:
- In a separate medium bowl, whisk together the sweetened condensed milk, vanilla extract, optional cream of coconut, and the pinch of salt until well combined and smooth.
- Fold Mixtures Together:
- Gently pour the sweetened condensed milk mixture into the whipped coconut cream.
- Using a spatula, carefully fold the two mixtures together until just combined. Be gentle to maintain as much airiness as possible from the whipped coconut cream. Avoid overmixing.
- Add Mix-ins:
- Gently fold in the toasted (or untoasted) shredded coconut and the optional lime zest until evenly distributed.
- Freeze the Ice Cream:
- Pour the mixture into a freezer-safe container, preferably a loaf pan (around 9×5 inches) or a similar-sized container with a lid. Metal pans tend to help the ice cream freeze faster.
- Smooth the top with your spatula.
- Cover the surface of the ice cream directly with a piece of plastic wrap or parchment paper, pressing it down gently to prevent ice crystals from forming. Then, cover the container tightly with a lid or another layer of plastic wrap or aluminum foil.
- Chill Thoroughly:
- Place the container in the coldest part of your freezer.
- Freeze for at least 6-8 hours, or preferably overnight, until the ice cream is firm.
- Serve and Enjoy:
- When ready to serve, let the ice cream sit at room temperature for 5-10 minutes to soften slightly, making it easier to scoop.
- Scoop into bowls or cones and enjoy your homemade tropical delight!
Nutrition
- Serving Size: One Normal Portion
- Calories: 350-450


