


There’s a certain magic that happens when ripe, juicy peaches meet a warm, cake-like blanket of batter in the oven. For me, that magic is the smell of my grandmother’s kitchen on a late summer afternoon. This isn’t just a recipe; it’s a legacy baked into a 9×13 inch pan. I remember the first time I tried to make it on my own, nervously following her handwritten, butter-stained recipe card. The result was a bubbling, golden-crowned masterpiece that tasted like pure sunshine and comfort. When I served it to my own family, the silence that fell over the table, punctuated only by the clinking of spoons against bowls, was the highest compliment I could have received. This recipe is a direct descendant of that beloved family heirloom, tweaked slightly over the years for perfect consistency but losing none of its rustic, soul-warming charm. It’s the dessert that signals the end of summer, the one requested for potlucks, and the sweet treat that can turn any ordinary day into a special occasion. Prepare to fill your home with the intoxicating aroma of baked peaches and cinnamon and create your own sweet memories.
The Ultimate Homemade Peach Cobbler Recipe
This recipe strikes the perfect balance between sweet, jammy fruit and a soft, slightly crisp, cake-style topping. It’s designed to be straightforward, forgiving, and outrageously delicious.
For the Peach Filling:
- 8 medium ripe peaches, peeled, pitted, and sliced (about 6-7 cups) OR 2 (29-ounce) cans of sliced peaches in juice, well-drained
- 1/2 cup (100g) granulated white sugar
- 1/4 cup (55g) packed light brown sugar
- 1/4 teaspoon ground cinnamon
- 1/8 teaspoon ground nutmeg
- A pinch of ground ginger (optional, but recommended for warmth)
- 1 tablespoon fresh lemon juice (to brighten the flavor and prevent browning)
- 2 tablespoons cornstarch (to thicken the filling)
For the Cobbler Topping:
- 1 1/2 cups (180g) all-purpose flour
- 3/4 cup (150g) granulated white sugar
- 2 teaspoons baking powder
- 1/2 teaspoon salt
- 1/2 cup (113g or 1 stick) cold unsalted butter, cut into small cubes
- 3/4 cup (180ml) whole milk or buttermilk
- 1 teaspoon vanilla extract
- Coarse sugar (like turbinado or demerara) for sprinkling, optional for a crunchy top
Instructions: Your Step-by-Step Guide to Perfection
Follow these detailed steps carefully to ensure a flawless peach cobbler every time. The key is in the technique, especially when preparing the topping.
Step 1: Preheat and Prepare Your Pan
First things first, preheat your oven to 375°F (190°C). Generously butter a 9×13 inch baking dish or a similar 3-quart casserole dish. Set it aside. This preparation ensures the cobbler doesn’t stick and helps the edges get beautifully caramelized.
Step 2: Create the Luscious Peach Filling
In a large mixing bowl, combine the sliced peaches, granulated sugar, brown sugar, cinnamon, nutmeg, ginger (if using), lemon juice, and cornstarch. Toss everything together gently with a spatula until the peaches are evenly coated. The cornstarch may look a little chalky at first, but it will dissolve as the peaches release their juices. Pour this entire mixture into your prepared baking dish and spread it into an even layer.
Step 3: Prepare the Cobbler Topping (The Dry Ingredients)
In a separate medium-sized bowl, whisk together the all-purpose flour, granulated sugar, baking powder, and salt. Whisking ensures the leavening agent (baking powder) and salt are evenly distributed, which is crucial for a uniform rise and flavor in your topping.
Step 4: Cut in the Cold Butter
Add the cold, cubed butter to the dry ingredients. Using a pastry blender, two knives, or your fingertips, cut the butter into the flour mixture. The goal is to work the butter in until the mixture resembles coarse crumbs with some pea-sized pieces of butter still visible. It’s vital that the butter stays cold; these cold pockets of butter will melt during baking, creating steam that results in a tender, flaky, and light topping. Avoid overworking the mixture or letting the butter melt from the heat of your hands.
Step 5: Add the Wet Ingredients
In a small liquid measuring cup, stir the vanilla extract into the milk or buttermilk. Pour this liquid mixture into the flour and butter mixture. Use a fork or spatula to gently stir until the ingredients are just combined. The batter will be thick and a little lumpy, which is exactly what you want. Do not overmix! Over-mixing develops gluten, which will lead to a tough, bready topping instead of the desired soft, cake-like texture.
Step 6: Assemble the Cobbler
Drop large spoonfuls of the cobbler topping batter evenly over the peach filling in the baking dish. You don’t need to spread it perfectly or cover every single inch of the fruit. Leaving some gaps allows the vibrant, bubbly peach filling to peek through, which looks beautiful and helps steam escape.
Step 7: The Finishing Touch and Baking
For a professional, bakery-style finish, sprinkle the top of the batter with a tablespoon or two of coarse turbinado sugar. This adds a delightful crunch and a beautiful sparkle to the finished cobbler. Place the baking dish on a foil-lined baking sheet to catch any potential drips or bubbling over in the oven (a lifesaver for cleanup).
Bake for 40-50 minutes at 375°F (190°C). The cobbler is done when the topping is a deep golden brown and a toothpick inserted into the center of the topping comes out clean. You should also see the peach filling bubbling thickly around the edges.
Step 8: Rest and Cool
This might be the hardest step! Once you remove the cobbler from the oven, let it cool on a wire rack for at least 20-30 minutes before serving. This crucial resting period allows the molten, bubbly filling to set and thicken properly. If you cut into it too soon, it will be runny. The cobbler is best served warm, not piping hot.
Nutrition Facts
- Servings: 8-10 servings
- Calories per serving: Approximately 380-450 kcal
Disclaimer: The nutritional information provided is an estimate and can vary based on the specific ingredients used (e.g., ripeness and sweetness of peaches, type of milk, etc.).
Preparation Time
- Prep Time: 20 minutes (includes peeling and slicing peaches)
- Cook Time: 40-50 minutes
- Cooling Time: 20-30 minutes
- Total Time: Approximately 1 hour 30 minutes
How to Serve Peach Cobbler
Serving peach cobbler is all about celebrating its comforting warmth and rustic charm. Elevate the experience by pairing it with accompaniments that complement its flavors and textures.
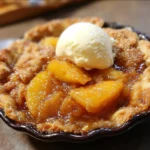
- Classic à la Mode: The most iconic way to serve cobbler.
- Place a generous, warm scoop of peach cobbler in a bowl.
- Top with a large scoop of high-quality vanilla bean ice cream. The contrast between the warm, sweet cobbler and the cold, creamy ice cream is pure bliss. The melting ice cream creates a delicious cream sauce that mingles with the peach juices.
- With a Dollop of Cream: For a slightly less sweet but equally decadent option.
- Whipped Cream: A light, airy cloud of freshly whipped cream (lightly sweetened or unsweetened) provides a lovely contrast.
- Clotted Cream: A nod to British tradition, thick and luxurious clotted cream is a fantastic pairing.
- Crème Fraîche: For those who enjoy a bit of tang, the slight sourness of crème fraîche beautifully cuts through the sweetness of the cobbler.
- Simple and Unadorned:
- Sometimes, the best way is the simplest. Serve a warm slice on its own to let the pure flavor of the peaches and the tender topping shine through without distraction.
- Dusted with Spice:
- Just before serving, give the top of your portion a very light dusting of ground cinnamon or nutmeg to enhance the baked-in spice aroma.
- The Morning After:
- Don’t shy away from a leftover slice for breakfast. It pairs wonderfully with a strong cup of black coffee or a latte. It’s like having a decadent baked oatmeal, but so much better.
Additional Tips for a Flawless Cobbler
- Prevent a Soggy Bottom: The number one enemy of a good cobbler is a runny, watery filling that turns the bottom of the topping into mush. The cornstarch in this recipe is your primary defense. If your peaches are exceptionally juicy, you can give the filling a head start. After mixing the filling ingredients, place them in a saucepan and cook over medium heat for 3-5 minutes, just until the mixture begins to thicken slightly. Let it cool for a few minutes before pouring it into the baking dish and proceeding with the recipe. This pre-thickens the juices, guaranteeing a jammy, not watery, result.
- The Secret to the Perfect Topping is Temperature: The key to a tender, light, cake-like topping with a slightly crisp exterior is cold butter. Don’t let your butter soften on the counter. Use it straight from the fridge and work quickly when cutting it into the flour. Those small, solid pieces of butter are essential. Similarly, using cold milk or buttermilk helps keep the overall temperature of the dough down. This prevents the gluten from overdeveloping, ensuring maximum tenderness.
- Use a Cast Iron Skillet for a Rustic Twist: For an impressive presentation and incredible heat distribution, bake your cobbler in a 10 or 12-inch cast iron skillet. The skillet retains heat exceptionally well, resulting in wonderfully crispy, caramelized edges on both the filling and the topping. Simply prepare the recipe as directed, but assemble and bake it in a well-buttered cast-iron skillet. It’s a showstopper that can go straight from the oven to the center of the table.
- Don’t Be Afraid to Improvise with Spices and Flavors: This recipe is a fantastic canvas for your creativity. Feel free to adjust the spices to your liking. Add a pinch of cardamom for an exotic note, or a quarter teaspoon of almond extract to the filling to beautifully complement the peach flavor. You can also add a handful of chopped pecans or walnuts to the topping mixture for added crunch and nutty flavor.
- Master the Art of Peeling Peaches: If using fresh peaches, peeling them can feel like a chore. The easiest method is to blanch them. Bring a large pot of water to a boil and have a large bowl of ice water ready. Score a small “X” on the bottom of each peach. Drop the peaches into the boiling water for 30-60 seconds. Using a slotted spoon, immediately transfer them to the ice water bath. Once they are cool enough to handle, the skins will slip off effortlessly with your fingers.
Frequently Asked Questions (FAQ)
1. Can I use frozen or canned peaches for this recipe?
Absolutely! This recipe is very versatile.
- For Frozen Peaches: Do not thaw them first. Thawing will make them release too much water and turn mushy. Use them straight from the freezer, toss them with the other filling ingredients, and add an extra tablespoon of cornstarch to absorb the excess moisture. You may also need to add 5-10 minutes to the baking time.
- For Canned Peaches: Choose peaches packed in 100% juice, not heavy syrup. Drain them very, very well in a colander. You may want to reduce the amount of granulated sugar in the filling by a couple of tablespoons, as canned peaches are often sweeter than fresh ones.
2. Why is my peach cobbler runny or watery?
This is a common issue with a few possible causes. First, your peaches may have been extremely juicy, releasing more liquid than the cornstarch could handle. Second, you may not have used enough cornstarch. Third, the cobbler might not have been baked long enough for the filling to bubble and thicken properly. Lastly, and most commonly, it wasn’t allowed to rest and cool for at least 20-30 minutes after baking. This resting period is critical for the molten filling to set.
3. What is the difference between a peach cobbler, a crisp, and a crumble?
It’s all about the topping!
- Cobbler: Traditionally has a biscuit-style or cake-like batter topping that is dropped or dolloped over the fruit, creating a “cobbled” appearance.
- Crisp: Has a streusel-like topping that includes oats. The oats bake up into a crispy, crunchy texture.
- Crumble: Is very similar to a crisp but its streusel topping typically does not contain oats. The topping is a simple mixture of flour, sugar, and butter that bakes into a crumbly, sandy texture.
4. How should I store and reheat leftover peach cobbler?
To store leftovers, allow the cobbler to cool completely to room temperature. Cover the dish tightly with plastic wrap or foil, or transfer the leftovers to an airtight container. It can be stored in the refrigerator for up to 4-5 days. To reheat, you can microwave individual portions for about 45-60 seconds. For the best result and to re-crisp the topping, reheat it in an oven or toaster oven at 350°F (175°C) for 15-20 minutes, or until warmed through.
5. Can I make this peach cobbler recipe gluten-free?
Yes, you can adapt this recipe to be gluten-free. For the topping, substitute the all-purpose flour with a high-quality “cup-for-cup” or “1-to-1” gluten-free baking flour blend that already contains xanthan gum. These blends are designed to mimic the properties of regular flour. For the filling, ensure your cornstarch is certified gluten-free, as some brands can have cross-contamination issues. The rest of the ingredients are naturally gluten-free, but always double-check labels to be safe.
Homemade Peach Cobbler Recipe
Ingredients
For the Peach Filling:
- 8 medium ripe peaches, peeled, pitted, and sliced (about 6–7 cups) OR 2 (29-ounce) cans of sliced peaches in juice, well-drained
- 1/2 cup (100g) granulated white sugar
- 1/4 cup (55g) packed light brown sugar
- 1/4 teaspoon ground cinnamon
- 1/8 teaspoon ground nutmeg
- A pinch of ground ginger (optional, but recommended for warmth)
- 1 tablespoon fresh lemon juice (to brighten the flavor and prevent browning)
- 2 tablespoons cornstarch (to thicken the filling)
For the Cobbler Topping:
- 1 1/2 cups (180g) all-purpose flour
- 3/4 cup (150g) granulated white sugar
- 2 teaspoons baking powder
- 1/2 teaspoon salt
- 1/2 cup (113g or 1 stick) cold unsalted butter, cut into small cubes
- 3/4 cup (180ml) whole milk or buttermilk
- 1 teaspoon vanilla extract
- Coarse sugar (like turbinado or demerara) for sprinkling, optional for a crunchy top
Instructions
Step 1: Preheat and Prepare Your Pan
First things first, preheat your oven to 375°F (190°C). Generously butter a 9×13 inch baking dish or a similar 3-quart casserole dish. Set it aside. This preparation ensures the cobbler doesn’t stick and helps the edges get beautifully caramelized.
Step 2: Create the Luscious Peach Filling
In a large mixing bowl, combine the sliced peaches, granulated sugar, brown sugar, cinnamon, nutmeg, ginger (if using), lemon juice, and cornstarch. Toss everything together gently with a spatula until the peaches are evenly coated. The cornstarch may look a little chalky at first, but it will dissolve as the peaches release their juices. Pour this entire mixture into your prepared baking dish and spread it into an even layer.
Step 3: Prepare the Cobbler Topping (The Dry Ingredients)
In a separate medium-sized bowl, whisk together the all-purpose flour, granulated sugar, baking powder, and salt. Whisking ensures the leavening agent (baking powder) and salt are evenly distributed, which is crucial for a uniform rise and flavor in your topping.
Step 4: Cut in the Cold Butter
Add the cold, cubed butter to the dry ingredients. Using a pastry blender, two knives, or your fingertips, cut the butter into the flour mixture. The goal is to work the butter in until the mixture resembles coarse crumbs with some pea-sized pieces of butter still visible. It’s vital that the butter stays cold; these cold pockets of butter will melt during baking, creating steam that results in a tender, flaky, and light topping. Avoid overworking the mixture or letting the butter melt from the heat of your hands.
Step 5: Add the Wet Ingredients
In a small liquid measuring cup, stir the vanilla extract into the milk or buttermilk. Pour this liquid mixture into the flour and butter mixture. Use a fork or spatula to gently stir until the ingredients are just combined. The batter will be thick and a little lumpy, which is exactly what you want. Do not overmix! Over-mixing develops gluten, which will lead to a tough, bready topping instead of the desired soft, cake-like texture.
Step 6: Assemble the Cobbler
Drop large spoonfuls of the cobbler topping batter evenly over the peach filling in the baking dish. You don’t need to spread it perfectly or cover every single inch of the fruit. Leaving some gaps allows the vibrant, bubbly peach filling to peek through, which looks beautiful and helps steam escape.
Step 7: The Finishing Touch and Baking
For a professional, bakery-style finish, sprinkle the top of the batter with a tablespoon or two of coarse turbinado sugar. This adds a delightful crunch and a beautiful sparkle to the finished cobbler. Place the baking dish on a foil-lined baking sheet to catch any potential drips or bubbling over in the oven (a lifesaver for cleanup).
Bake for 40-50 minutes at 375°F (190°C). The cobbler is done when the topping is a deep golden brown and a toothpick inserted into the center of the topping comes out clean. You should also see the peach filling bubbling thickly around the edges.
Step 8: Rest and Cool
This might be the hardest step! Once you remove the cobbler from the oven, let it cool on a wire rack for at least 20-30 minutes before serving. This crucial resting period allows the molten, bubbly filling to set and thicken properly. If you cut into it too soon, it will be runny. The cobbler is best served warm, not piping hot.
Nutrition
- Serving Size: One Normal Portion
- Calories: 380-450


