Every Easter, our family table bursts with vibrant colors and the aroma of freshly baked goods. But amidst the painted eggs and chocolate bunnies, there’s always been a special place for these Honey Buns. The first time I made them, I was looking for something a little different than the usual hot cross buns, something that felt both celebratory and comforting for the spring equinox, Ostara. What I discovered was a recipe that quickly became a family favorite. The soft, pillowy dough, infused with the warmth of honey and cinnamon, and then generously glazed with a sweet, sticky honey coating – they are simply irresistible. Even my usually picky kids devoured them, and my husband, a self-proclaimed bread connoisseur, declared them “bakery-worthy.” This year, as we prepare for Ostara and Easter once again, these Honey Buns are not just a treat; they’re a symbol of springtime sweetness and the joy of sharing delicious food with loved ones. Trust me, once you try this recipe, it will become a cherished part of your own holiday traditions too.
Ingredients
To create these delightful Honey Buns, you’ll need a combination of pantry staples and fresh ingredients that come together to form a truly special treat. We’ve broken down the ingredients into categories for easier organization and shopping.
For the Dough:
- 1 cup (240ml) Warm Milk: The milk should be lukewarm, around 105-115°F (40-46°C), to activate the yeast properly. Whole milk will provide a richer flavor and softer texture, but 2% milk can also be used.
- 2 ¼ teaspoons (7g) Active Dry Yeast: This is one standard packet of active dry yeast. Ensure your yeast is fresh for optimal rising.
- ¼ cup (50g) Granulated Sugar: Sugar not only sweetens the dough but also feeds the yeast, helping it to rise.
- ½ cup (120ml) Vegetable Oil: Vegetable oil keeps the buns moist and tender. You can substitute with melted coconut oil or another neutral oil if preferred.
- 1 teaspoon Salt: Salt is crucial for balancing the sweetness and enhancing the flavors in the dough. It also controls yeast activity.
- 1 large Egg: The egg adds richness, structure, and moisture to the dough.
- 4 cups (500g) All-Purpose Flour: All-purpose flour provides the structure for the buns. Measure your flour correctly by spooning it into the measuring cup and leveling it off, rather than scooping directly from the bag, to avoid using too much flour.
For the Honey Cinnamon Filling:
- ½ cup (1 stick) Unsalted Butter, softened: Softened butter is essential for spreading easily and creating a rich, flavorful filling. Ensure it’s at room temperature, but not melted.
- ½ cup (120ml) Honey: The star ingredient! Use a good quality honey for the best flavor. A wildflower or clover honey works beautifully.
- 2 tablespoons Ground Cinnamon: Cinnamon provides warmth and a classic honey bun flavor. Freshly ground cinnamon will offer a more intense aroma.
For the Honey Glaze:
- ¼ cup (½ stick) Unsalted Butter: Butter forms the base of the glaze, adding richness and shine.
- ¼ cup (60ml) Honey: More honey to amplify the honey flavor in the glaze.
- 2 cups (240g) Powdered Sugar: Powdered sugar creates the smooth, sweet glaze. Sift it before measuring to remove any lumps.
- 2-4 tablespoons Milk or Heavy Cream: Milk or heavy cream is used to adjust the consistency of the glaze. Start with 2 tablespoons and add more as needed to reach your desired thickness.
- ½ teaspoon Vanilla Extract (optional): Vanilla extract enhances the sweetness and adds a touch of warmth to the glaze.
Instructions
Follow these step-by-step instructions to bake perfect, golden-brown Honey Buns that will be the highlight of your Ostara or Easter celebration.
Getting Started with the Dough:
- Activate the Yeast: In a large mixing bowl or the bowl of a stand mixer, warm the milk to 105-115°F (40-46°C). Sprinkle the active dry yeast and granulated sugar over the warm milk. Let it stand for 5-10 minutes, or until the mixture becomes foamy. This indicates that the yeast is active and ready to use.
- Combine Wet Ingredients: Once the yeast mixture is foamy, add the vegetable oil, salt, and egg to the bowl. Whisk together until well combined.
- Gradually Add Flour: Begin adding the all-purpose flour, one cup at a time, to the wet ingredients. If using a stand mixer, use the dough hook attachment. Mix on low speed until the dough starts to come together.
- Knead the Dough: Once most of the flour is incorporated, increase the mixer speed to medium-low and knead for 5-7 minutes, or until the dough is smooth, elastic, and slightly tacky but not sticky. If kneading by hand, turn the dough out onto a lightly floured surface and knead for 8-10 minutes. Add a little more flour, if needed, to prevent sticking, but be careful not to add too much, as this can make the buns tough.
- First Rise (Bulk Fermentation): Place the kneaded dough in a lightly oiled bowl, turning to coat all sides. Cover the bowl with plastic wrap or a clean kitchen towel. Let the dough rise in a warm place for 1-1.5 hours, or until it has doubled in size. This first rise is crucial for developing flavor and texture.
Preparing the Honey Cinnamon Filling and Shaping the Buns:
- Prepare Filling Ingredients: While the dough is rising, soften the butter for the filling and measure out the honey and cinnamon.
- Punch Down Dough: Once the dough has doubled, gently punch it down to release the air. Turn the dough out onto a lightly floured surface.
- Roll Out Dough: Using a rolling pin, roll the dough into a large rectangle, approximately 12×18 inches (30×45 cm) and about ¼ inch (0.6 cm) thick. Try to keep the rectangle as even as possible for uniform buns.
- Spread Filling: Spread the softened butter evenly over the rolled-out dough, leaving a small border at the edges. Drizzle the honey evenly over the butter, and then sprinkle the ground cinnamon over the honey.
- Roll Up Dough: Starting from one of the long edges, tightly roll up the dough rectangle into a log. Pinch the seam to seal it closed.
- Cut into Buns: Using a sharp knife or dental floss (dental floss creates cleaner cuts), cut the dough log into 12-15 equal slices, each about 1-1.5 inches (2.5-4 cm) thick.
- Second Rise (Proofing): Grease a 9×13 inch (23×33 cm) baking pan. Arrange the honey bun slices in the prepared pan, leaving a little space between each bun for expansion. Cover the pan loosely with plastic wrap or a clean kitchen towel. Let the buns rise again in a warm place for 30-45 minutes, or until they are puffy and almost doubled in size.
Baking and Glazing:
- Preheat Oven: Preheat your oven to 350°F (175°C).
- Bake Buns: Bake the Honey Buns in the preheated oven for 20-25 minutes, or until they are golden brown on top and cooked through. A toothpick inserted into the center of a bun should come out clean.
- Prepare Honey Glaze: While the buns are baking, prepare the honey glaze. In a saucepan over medium heat, melt the butter and honey together. Remove from heat and whisk in the powdered sugar until smooth. Stir in the milk or heavy cream, starting with 2 tablespoons, and add more as needed until you reach a smooth, pourable consistency. Stir in the vanilla extract, if using.
- Glaze Warm Buns: Once the Honey Buns are baked, remove them from the oven and let them cool in the pan for a few minutes. While they are still warm, generously drizzle the honey glaze over the buns, ensuring each bun is well coated.
- Cool and Serve: Let the glazed Honey Buns cool slightly in the pan before serving. They are best enjoyed warm but can also be served at room temperature.
Nutrition Facts
(Note: Nutritional information is an estimate and can vary based on specific ingredients and serving sizes.)
- Servings: Approximately 12-15 Honey Buns
- Serving Size: 1 Honey Bun
- Calories per Serving (estimated): 350-450 calories
Approximate Nutritional Breakdown per Serving:
- Fat: 15-20g (primarily from butter and oil)
- Saturated Fat: 8-12g
- Cholesterol: 40-50mg
- Sodium: 150-200mg
- Carbohydrates: 50-60g (primarily from flour, sugar, and honey)
- Fiber: 1-2g
- Sugar: 25-35g (from sugar and honey)
- Protein: 5-7g
For more precise nutritional information, you can use online recipe analyzers with the specific brands and quantities of ingredients you use.
Preparation Time
- Prep Time: 45 minutes (includes measuring ingredients, making dough, and preparing filling)
- Rise Time (First Rise): 1-1.5 hours
- Rise Time (Second Rise/Proofing): 30-45 minutes
- Bake Time: 20-25 minutes
- Total Time: Approximately 2 hours 35 minutes – 3 hours 20 minutes
While the total time may seem lengthy, much of it is hands-off rise time, allowing you to prepare other aspects of your Ostara or Easter meal or simply relax while the delicious aroma fills your kitchen. The active time involved in making these Honey Buns is relatively short and well worth the effort for the incredible result.
How to Serve
These Honey Buns are incredibly versatile and can be served in various ways to enhance your Ostara or Easter celebration:
- Warm and Freshly Baked: The absolute best way to enjoy Honey Buns is warm, right after they’ve been glazed and cooled slightly. The warmth enhances the soft texture and gooey glaze.
- With a Hot Beverage: Pair them with a steaming cup of coffee, tea, or hot chocolate for a comforting breakfast, brunch, or afternoon treat. The sweetness of the buns complements the warmth of the drink perfectly.
- As Part of an Easter Brunch: Include Honey Buns as a sweet addition to your Easter brunch spread. They pair wonderfully with savory dishes like quiche, frittatas, or ham.
- Dessert Option: Serve them as a delightful dessert after your Easter dinner. Their sweetness and comforting flavors make them a crowd-pleasing end to a festive meal.
- Garnished with Spring Sprinkles: For an extra touch of Easter festivity, sprinkle the glazed Honey Buns with pastel-colored sprinkles or edible flowers while the glaze is still wet.
- Alongside Fresh Fruit: Serve Honey Buns with a side of fresh spring fruits like strawberries, blueberries, or raspberries to balance the sweetness and add a touch of freshness.
- With a Dollop of Whipped Cream or Ice Cream: For an even more indulgent dessert, serve warm Honey Buns with a dollop of freshly whipped cream or a scoop of vanilla ice cream.
- Gift Giving: Honey Buns make a thoughtful homemade gift. Wrap a few in parchment paper and tie with a ribbon to share the springtime sweetness with friends and neighbors.
Additional Tips for Perfect Honey Buns
To ensure your Honey Buns turn out perfectly every time, here are five helpful tips:
- Use Fresh Yeast: Always check the expiration date of your yeast to ensure it’s fresh. If you are unsure, you can test your yeast by proofing it in warm water with a pinch of sugar. If it foams up within 5-10 minutes, it’s active and good to use. Fresh yeast is crucial for a good rise and light, airy buns.
- Don’t Overheat the Milk: Warm milk is essential for activating yeast, but milk that is too hot will kill the yeast. Aim for lukewarm milk, around 105-115°F (40-46°C). If you don’t have a thermometer, test it by dipping your finger in – it should feel comfortably warm, not hot.
- Proper Dough Kneading: Kneading is vital for developing gluten, which gives the buns their structure and chewiness. Knead the dough for the recommended time until it becomes smooth and elastic. If using a stand mixer, don’t be tempted to over-knead, as this can also lead to tough buns.
- Warm Place for Rising: Yeast thrives in warm environments. Find a warm, draft-free place for your dough to rise. A slightly warmed oven (turned off!), a sunny spot on the counter, or even placing the bowl in a slightly warm water bath can help create the ideal rising conditions.
- Don’t Overbake: Overbaking Honey Buns can make them dry and tough. Bake them until they are golden brown on top and a toothpick inserted into the center comes out clean. Keep a close eye on them during the last few minutes of baking, as ovens can vary in temperature.
FAQ Section
Q1: Can I make these Honey Buns ahead of time?
A: Yes, you can prepare the dough ahead of time. After the first rise, you can punch down the dough, wrap it tightly in plastic wrap, and store it in the refrigerator for up to 24 hours. When ready to bake, let the dough come to room temperature for about 30 minutes, then proceed with rolling, filling, shaping, and the second rise. Baked and glazed Honey Buns are best enjoyed fresh but can be stored in an airtight container at room temperature for 1-2 days, or in the refrigerator for up to 3-4 days. Reheat gently in the microwave or oven before serving.
Q2: Can I use instant yeast instead of active dry yeast?
A: Yes, you can substitute instant yeast for active dry yeast. Use the same amount (2 ¼ teaspoons or 7g). Instant yeast does not need to be proofed in liquid first. You can add it directly to the dry ingredients. However, for this recipe, proofing the yeast in warm milk with sugar still helps to ensure it’s active and gives a good start to the dough.
Q3: Can I freeze Honey Buns?
A: Yes, Honey Buns freeze well. For best results, freeze them before glazing. Bake the buns as directed, let them cool completely, and then wrap them individually in plastic wrap and place them in a freezer-safe bag or container. Freeze for up to 2-3 months. To thaw, remove them from the freezer and let them thaw at room temperature. Once thawed, you can glaze them and reheat gently before serving. You can also freeze glazed Honey Buns, but the glaze may become slightly sticky upon thawing.
Q4: Can I add nuts or raisins to the filling?
A: Absolutely! Chopped pecans, walnuts, or raisins would be delicious additions to the honey cinnamon filling. Sprinkle them over the honey and cinnamon before rolling up the dough. You can also add a sprinkle of chopped nuts on top of the glaze for extra texture and flavor.
Q5: What can I use if I don’t have vegetable oil?
A: If you don’t have vegetable oil, you can substitute it with another neutral oil like canola oil, grapeseed oil, or melted coconut oil. You can also use melted unsalted butter for a richer flavor, but be aware that it might slightly change the texture of the buns. Olive oil is generally not recommended as it has a stronger flavor that might compete with the honey and cinnamon.
Print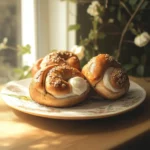
Honey Buns For Ostara Recipe
Ingredients
For the Dough:
- 1 cup (240ml) Warm Milk: The milk should be lukewarm, around 105-115°F (40-46°C), to activate the yeast properly. Whole milk will provide a richer flavor and softer texture, but 2% milk can also be used.
- 2 ¼ teaspoons (7g) Active Dry Yeast: This is one standard packet of active dry yeast. Ensure your yeast is fresh for optimal rising.
- ¼ cup (50g) Granulated Sugar: Sugar not only sweetens the dough but also feeds the yeast, helping it to rise.
- ½ cup (120ml) Vegetable Oil: Vegetable oil keeps the buns moist and tender. You can substitute with melted coconut oil or another neutral oil if preferred.
- 1 teaspoon Salt: Salt is crucial for balancing the sweetness and enhancing the flavors in the dough. It also controls yeast activity.
- 1 large Egg: The egg adds richness, structure, and moisture to the dough.
- 4 cups (500g) All-Purpose Flour: All-purpose flour provides the structure for the buns. Measure your flour correctly by spooning it into the measuring cup and leveling it off, rather than scooping directly from the bag, to avoid using too much flour.
For the Honey Cinnamon Filling:
- ½ cup (1 stick) Unsalted Butter, softened: Softened butter is essential for spreading easily and creating a rich, flavorful filling. Ensure it’s at room temperature, but not melted.
- ½ cup (120ml) Honey: The star ingredient! Use a good quality honey for the best flavor. A wildflower or clover honey works beautifully.
- 2 tablespoons Ground Cinnamon: Cinnamon provides warmth and a classic honey bun flavor. Freshly ground cinnamon will offer a more intense aroma.
For the Honey Glaze:
- ¼ cup (½ stick) Unsalted Butter: Butter forms the base of the glaze, adding richness and shine.
- ¼ cup (60ml) Honey: More honey to amplify the honey flavor in the glaze.
- 2 cups (240g) Powdered Sugar: Powdered sugar creates the smooth, sweet glaze. Sift it before measuring to remove any lumps.
- 2–4 tablespoons Milk or Heavy Cream: Milk or heavy cream is used to adjust the consistency of the glaze. Start with 2 tablespoons and add more as needed to reach your desired thickness.
- ½ teaspoon Vanilla Extract (optional): Vanilla extract enhances the sweetness and adds a touch of warmth to the glaze.
Instructions
Getting Started with the Dough:
- Activate the Yeast: In a large mixing bowl or the bowl of a stand mixer, warm the milk to 105-115°F (40-46°C). Sprinkle the active dry yeast and granulated sugar over the warm milk. Let it stand for 5-10 minutes, or until the mixture becomes foamy. This indicates that the yeast is active and ready to use.
- Combine Wet Ingredients: Once the yeast mixture is foamy, add the vegetable oil, salt, and egg to the bowl. Whisk together until well combined.
- Gradually Add Flour: Begin adding the all-purpose flour, one cup at a time, to the wet ingredients. If using a stand mixer, use the dough hook attachment. Mix on low speed until the dough starts to come together.
- Knead the Dough: Once most of the flour is incorporated, increase the mixer speed to medium-low and knead for 5-7 minutes, or until the dough is smooth, elastic, and slightly tacky but not sticky. If kneading by hand, turn the dough out onto a lightly floured surface and knead for 8-10 minutes. Add a little more flour, if needed, to prevent sticking, but be careful not to add too much, as this can make the buns tough.
- First Rise (Bulk Fermentation): Place the kneaded dough in a lightly oiled bowl, turning to coat all sides. Cover the bowl with plastic wrap or a clean kitchen towel. Let the dough rise in a warm place for 1-1.5 hours, or until it has doubled in size. This first rise is crucial for developing flavor and texture.
Preparing the Honey Cinnamon Filling and Shaping the Buns:
- Prepare Filling Ingredients: While the dough is rising, soften the butter for the filling and measure out the honey and cinnamon.
- Punch Down Dough: Once the dough has doubled, gently punch it down to release the air. Turn the dough out onto a lightly floured surface.
- Roll Out Dough: Using a rolling pin, roll the dough into a large rectangle, approximately 12×18 inches (30×45 cm) and about ¼ inch (0.6 cm) thick. Try to keep the rectangle as even as possible for uniform buns.
- Spread Filling: Spread the softened butter evenly over the rolled-out dough, leaving a small border at the edges. Drizzle the honey evenly over the butter, and then sprinkle the ground cinnamon over the honey.
- Roll Up Dough: Starting from one of the long edges, tightly roll up the dough rectangle into a log. Pinch the seam to seal it closed.
- Cut into Buns: Using a sharp knife or dental floss (dental floss creates cleaner cuts), cut the dough log into 12-15 equal slices, each about 1-1.5 inches (2.5-4 cm) thick.
- Second Rise (Proofing): Grease a 9×13 inch (23×33 cm) baking pan. Arrange the honey bun slices in the prepared pan, leaving a little space between each bun for expansion. Cover the pan loosely with plastic wrap or a clean kitchen towel. Let the buns rise again in a warm place for 30-45 minutes, or until they are puffy and almost doubled in size.
Baking and Glazing:
- Preheat Oven: Preheat your oven to 350°F (175°C).
- Bake Buns: Bake the Honey Buns in the preheated oven for 20-25 minutes, or until they are golden brown on top and cooked through. A toothpick inserted into the center of a bun should come out clean.
- Prepare Honey Glaze: While the buns are baking, prepare the honey glaze. In a saucepan over medium heat, melt the butter and honey together. Remove from heat and whisk in the powdered sugar until smooth. Stir in the milk or heavy cream, starting with 2 tablespoons, and add more as needed until you reach a smooth, pourable consistency. Stir in the vanilla extract, if using.
- Glaze Warm Buns: Once the Honey Buns are baked, remove them from the oven and let them cool in the pan for a few minutes. While they are still warm, generously drizzle the honey glaze over the buns, ensuring each bun is well coated.
- Cool and Serve: Let the glazed Honey Buns cool slightly in the pan before serving. They are best enjoyed warm but can also be served at room temperature.
Nutrition
- Serving Size: one normal portion
- Calories: 350-450
- Sugar: 25-35g
- Sodium: 150-200mg
- Fat: 15-20g
- Saturated Fat: 8-12g
- Carbohydrates: 50-60g
- Fiber: Fiber: 1-2g
- Protein: 5-7g
- Cholesterol: 40-50mg