


This honey chicken recipe has become an absolute legend in our household. The first time I made it, my kids, who can be notoriously picky, devoured their plates and immediately asked when we could have it again. My partner, a self-proclaimed connoisseur of all things crispy and sweet-savory, declared it “better than any takeout.” The magic lies in the trifecta of perfectly crispy chicken, a lusciously sticky honey glaze that’s not too sweet, and the sheer simplicity of bringing it all together. It’s that go-to dish for a weeknight when you want something comforting and impressive without spending hours in the kitchen. The delightful crunch as you bite into a piece, followed by the explosion of honey, soy, and garlic, is genuinely addictive. It’s a recipe that makes you feel like a kitchen hero, and I’m thrilled to share it with you so you can experience that same joy.
The Ultimate Crispy Honey Chicken Recipe
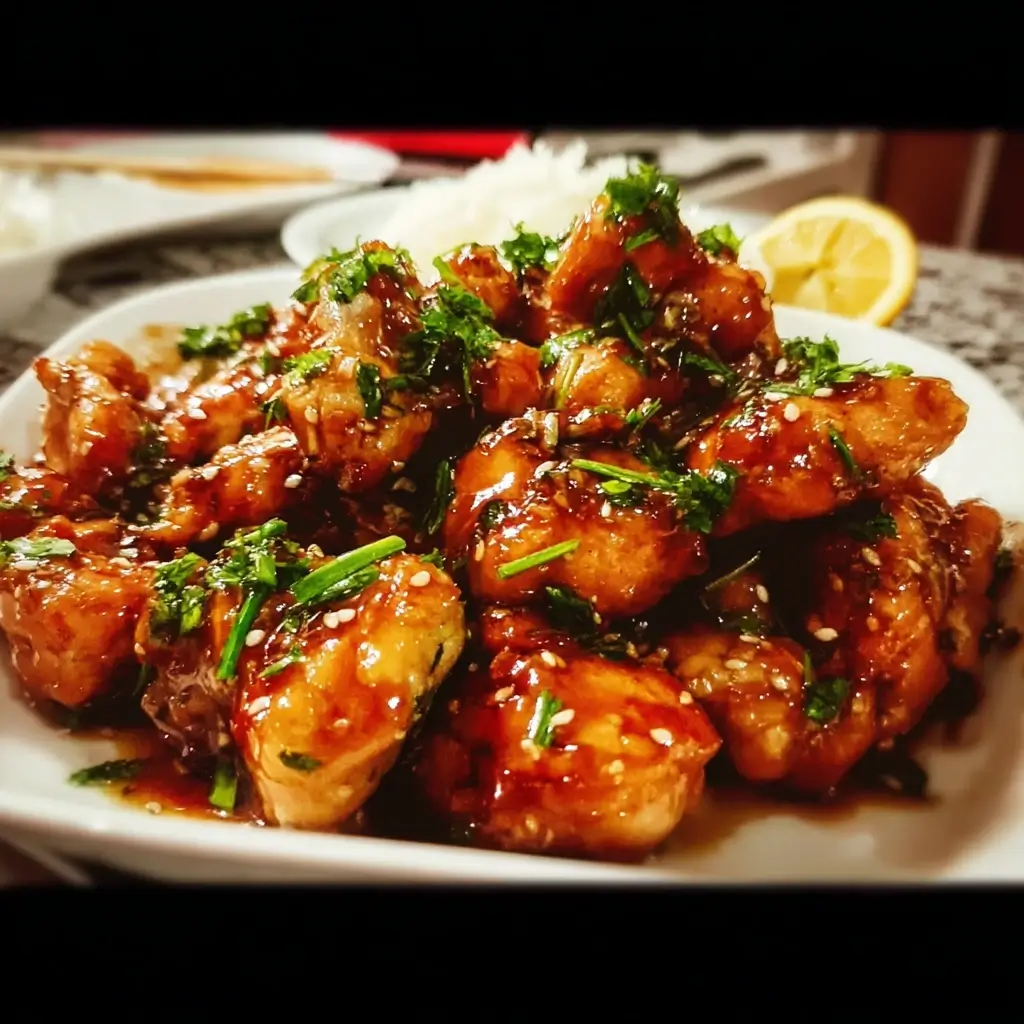
This recipe breaks down how to achieve that coveted crispy chicken texture, drenched in a perfectly balanced, sticky, and utterly irresistible honey sauce. Prepare for this to become a new family favorite!
Ingredients for Irresistible Honey Chicken
To create this show-stopping dish, you’ll need components for the chicken, the batter, and of course, that glorious honey sauce.
For the Chicken:
- 1.5 lbs (approx. 680g) boneless, skinless chicken thighs or breasts, cut into 1-inch bite-sized pieces
- 1 teaspoon salt
- 1/2 teaspoon black pepper
- 1/2 teaspoon garlic powder
- 1/2 teaspoon onion powder
For the Crispy Batter:
- 1 cup (125g) all-purpose flour
- 1/2 cup (60g) cornstarch (cornflour) – this is key for crispiness!
- 1 large egg, lightly beaten
- 1/2 cup (120ml) cold water (you might need a tablespoon more or less to get the right consistency)
- 1/2 teaspoon salt
- 1/4 teaspoon white pepper (optional, for a subtle kick)
For the Luscious Honey Sauce:
- 1/2 cup (170g or 120ml) good quality runny honey
- 1/4 cup (60ml) low-sodium soy sauce (or tamari for gluten-free)
- 2 tablespoons rice vinegar (unseasoned)
- 2 cloves garlic, minced (about 2 teaspoons)
- 1 teaspoon fresh ginger, grated (or 1/2 teaspoon ground ginger)
- 1 teaspoon sesame oil (toasted, for aroma)
- 1 tablespoon cornstarch (cornflour) mixed with 2 tablespoons cold water (this is your slurry for thickening)
- Optional: 1/4 – 1/2 teaspoon red pepper flakes for a hint of spice
For Frying:
- 3-4 cups (700-950ml) neutral-flavored oil with a high smoke point (e.g., canola, vegetable, peanut, or sunflower oil)
For Garnish (Optional):
- Toasted sesame seeds
- Thinly sliced green onions (scallions)
Crafting Your Crispy Honey Chicken: Step-by-Step Instructions
Follow these steps carefully to achieve chicken that is perfectly crispy on the outside, tender on the inside, and beautifully coated in a glossy honey sauce.
1. Prepare the Chicken:
* Pat the cut chicken pieces dry with paper towels. This helps the seasoning and batter adhere better.
* In a medium bowl, toss the chicken pieces with 1 teaspoon salt, 1/2 teaspoon black pepper, 1/2 teaspoon garlic powder, and 1/2 teaspoon onion powder. Ensure each piece is evenly coated. Set aside while you prepare the batter.
2. Make the Crispy Batter:
* In a separate large bowl, whisk together the all-purpose flour, 1/2 cup cornstarch, 1/2 teaspoon salt, and optional white pepper.
* Create a well in the center of the dry ingredients. Add the lightly beaten egg and 1/2 cup of cold water.
* Whisk from the center outwards, gradually incorporating the dry ingredients until you have a smooth, relatively thick batter, similar to pancake batter. If it’s too thick, add a tablespoon more cold water at a time. If it’s too thin, add a tablespoon more flour. Avoid overmixing.
* Add the seasoned chicken pieces to the batter and toss gently to ensure every piece is thoroughly coated.
3. Fry the Chicken (First Fry for Crispiness):
* Pour your frying oil into a large, deep skillet, Dutch oven, or wok until it’s about 1.5 – 2 inches deep.
* Heat the oil over medium-high heat until it reaches 350-360°F (175-180°C). Use a cooking thermometer for accuracy. If you don’t have one, a small drop of batter should sizzle vigorously and float to the top within a few seconds.
* Carefully, using tongs or a spider skimmer, add the battered chicken pieces to the hot oil one by one, ensuring not to overcrowd the pan. Fry in batches (2-3 batches should be sufficient). Overcrowding will lower the oil temperature, resulting in soggy chicken.
* Fry for about 3-5 minutes per batch, turning occasionally, until the chicken is lightly golden and cooked through. The chicken doesn’t need to be deeply browned at this stage, as we might do a second fry for extra crispiness.
* Remove the cooked chicken from the oil using a slotted spoon or spider skimmer and transfer to a wire rack set over a baking sheet lined with paper towels. This allows air to circulate, keeping the bottom crispy.
* Allow the oil temperature to return to 350-360°F before frying the next batch.
4. (Optional but Recommended) Second Fry for Ultimate Crispiness:
* Once all chicken has been fried once, increase the oil temperature slightly to 375°F (190°C).
* Carefully return the cooked chicken pieces (again, in batches if necessary, though you can usually do larger batches here) to the hot oil and fry for another 1-2 minutes, or until they are a deep golden brown and exceptionally crispy.
* Remove and drain on the wire rack again. This double-frying method is a secret to incredibly crispy results that stay crispy even after saucing.
5. Prepare the Honey Sauce:
* While the chicken is resting (or while the oil is heating for the second fry), prepare the sauce. In a medium saucepan or a clean wok, combine the honey, soy sauce, rice vinegar, minced garlic, grated ginger, and sesame oil. If using, add the red pepper flakes.
* Whisk everything together and bring the mixture to a gentle simmer over medium heat, stirring occasionally. Let it simmer for 1-2 minutes to allow the flavors to meld.
* In a small bowl, whisk together the 1 tablespoon of cornstarch with 2 tablespoons of cold water to create a smooth slurry.
* Pour the cornstarch slurry into the simmering sauce, whisking continuously. Continue to cook and stir for another 1-2 minutes, or until the sauce thickens to a glossy, coating consistency – it should nicely coat the back of a spoon. Be careful not to over-thicken it, as it will thicken further as it cools slightly.
* Remove the sauce from the heat.
6. Coat the Chicken and Serve:
* Add the crispy fried chicken pieces to the saucepan with the thickened honey sauce (or pour the sauce over the chicken in a large clean bowl).
* Gently toss the chicken with a spatula or by shaking the pan/bowl until every piece is evenly coated in the glorious sticky sauce. Work quickly to maintain the chicken’s crispiness.
* Serve immediately for the best texture. Garnish with toasted sesame seeds and thinly sliced green onions if desired.
Enjoy your incredibly delicious, homemade crispy honey chicken!
Nutrition Facts (Approximate)
- Servings: This recipe generously serves 4-6 people, depending on appetite and what it’s served with.
- Calories per serving (approximate, based on 4 servings): 650-750 calories.
Disclaimer: Nutritional information is an estimate and can vary significantly based on specific ingredient brands, exact quantities used, oil absorption during frying, and portion sizes. The frying process inherently adds a considerable amount of calories from fat. For a lower-calorie version, consider baking or air-frying the chicken, though the texture will be different.
Preparation & Cooking Time
Understanding the time commitment helps in planning your meal.
- Preparation Time: 20-25 minutes (includes cutting chicken, making batter, and measuring sauce ingredients).
- Cooking Time:
- Frying: 15-20 minutes (depending on batch size and if doing a double fry).
- Sauce: 5-7 minutes.
- Total Time: Approximately 40-50 minutes from start to finish.
This timing makes it a feasible option for a special weeknight dinner or a relaxed weekend meal.
How to Serve Your Glorious Honey Chicken
This versatile honey chicken can be the star of many different meal setups. Here are some popular and delicious ways to serve it:
- Classic Takeout Style:
- Serve over a bed of fluffy steamed Jasmine rice or Basmati rice. The rice soaks up any extra sauce beautifully.
- Pair with a side of steamed broccoli florets or stir-fried mixed vegetables (like bell peppers, carrots, snow peas, and baby corn) for a balanced meal.
- Noodle Delight:
- Toss with plain egg noodles or ramen noodles for a satisfying honey chicken noodle bowl.
- Add some blanched bok choy or spinach to the noodles.
- Lower Carb Options:
- Serve alongside cauliflower rice for a lighter alternative.
- Pair with a crisp Asian-inspired slaw (cabbage, carrots, sesame dressing).
- Enjoy with roasted vegetables like zucchini, bell peppers, and onions.
- Appetizer Style:
- Serve in smaller portions with toothpicks as a crowd-pleasing appetizer for parties.
- Offer a side of lettuce cups (like butter lettuce or romaine hearts) for guests to make their own honey chicken lettuce wraps.
- Creative Twists:
- Use as a filling for bao buns with a sprinkle of pickled cucumber.
- Top a simple fried rice with the honey chicken for an extra indulgent meal.
Garnish Power:
Don’t underestimate the power of garnishes!
- Toasted Sesame Seeds: Add a nutty flavor and visual appeal.
- Sliced Green Onions (Scallions): Provide a fresh, mild oniony bite and a pop of color.
- Fresh Cilantro Leaves: For those who enjoy its bright, herbaceous notes.
- A sprinkle of extra Red Pepper Flakes: For those who like it spicier.
Additional Tips for Honey Chicken Perfection
To elevate your honey chicken from great to absolutely phenomenal, consider these expert tips:
- Don’t Overcrowd the Pan When Frying: This is crucial. Adding too much chicken at once drastically lowers the oil temperature. This leads to the batter absorbing more oil, resulting in greasy, soggy chicken instead of crispy perfection. Fry in batches for the best results, allowing the oil to come back up to temperature between each batch.
- Monitor Oil Temperature: Use a kitchen thermometer if possible. The ideal temperature range for the first fry is 350-360°F (175-180°C), and for the optional second fry, 375°F (190°C). If the oil is too cool, the chicken will be oily; if it’s too hot, the batter will burn before the chicken cooks through.
- Achieve the Right Sauce Consistency: The cornstarch slurry is key to thickening the sauce. Add it while whisking to prevent lumps. The sauce should be thick enough to coat the chicken beautifully but not so thick that it becomes gloopy. Remember, it will thicken a bit more as it cools. If it gets too thick, you can whisk in a tablespoon of hot water or chicken broth to thin it out.
- Double Fry for Maximum Crispiness: While optional, the second, shorter fry at a slightly higher temperature is a game-changer for achieving an incredibly crispy coating that holds up well, even after being tossed in the sauce. This technique is often used in restaurants for that signature crunch.
- Sauce the Chicken Just Before Serving: To maintain the maximum crispiness of the chicken, toss it with the warm honey sauce right before you plan to eat. If it sits in the sauce for too long, even the crispiest chicken will eventually soften. Have your rice, noodles, or sides ready to go!
Honey Chicken FAQs: Your Questions Answered
Here are answers to some common questions you might have about making this delicious honey chicken:
Q1: Can I bake the chicken instead of frying it for a healthier version?
A: Yes, you can bake the chicken, though the texture will be different – less crispy than fried, but still delicious. To bake: Preheat your oven to 400°F (200°C). Prepare the chicken and batter as directed. Place the battered chicken pieces in a single layer on a lightly greased baking sheet or a wire rack set inside a baking sheet. You might want to spray the chicken pieces lightly with cooking oil. Bake for 20-25 minutes, flipping halfway, until golden brown and cooked through. Then, toss with the prepared sauce. For an air fryer, cook at 380°F (190°C) for 10-15 minutes, shaking the basket a few times, until crispy and cooked.
Q2: How can I make this recipe gluten-free?
A: Easily! For the batter, replace the all-purpose flour with a good quality gluten-free all-purpose flour blend. Ensure your cornstarch is certified gluten-free (most are, but it’s good to check). For the sauce, use tamari instead of soy sauce, as tamari is typically gluten-free (always check the label). All other ingredients are generally naturally gluten-free, but always double-check labels if celiac disease or severe gluten sensitivity is a concern.
Q3: How do I store and reheat leftover honey chicken?
A: Store leftover honey chicken in an airtight container in the refrigerator for up to 3-4 days. To reheat and try to regain some crispiness, the best methods are:
* Oven/Toaster Oven: Preheat to 350°F (175°C). Spread the chicken in a single layer on a baking sheet and heat for 10-15 minutes, or until warmed through and slightly re-crisped.
* Air Fryer: Reheat at 350-375°F (175-190°C) for 5-8 minutes, shaking the basket occasionally, until hot and crispy.
* Skillet: You can reheat it in a lightly oiled skillet over medium heat, stirring occasionally, but it may not get as crispy.
Avoid reheating in the microwave if you want to preserve any crispiness, as it tends to make the coating soft.
Q4: Can I use different types of honey? Will it affect the taste?
A: Yes, you can use different types of honey, and it will subtly affect the taste. A standard, mild clover honey or a wildflower honey works great for a classic flavor. Darker honeys like buckwheat will impart a stronger, more robust molasses-like flavor. Orange blossom honey could add a slight citrus note. It’s best to use a runny honey for easy incorporation into the sauce. Avoid very thick, crystallized, or creamed honey unless you melt it down first.
Q5: What’s the best cut of chicken to use? Can I use bone-in chicken?
A: Boneless, skinless chicken thighs are highly recommended for this recipe because they are more flavorful and tend to stay juicier than chicken breasts. However, boneless, skinless chicken breasts also work well; just be careful not to overcook them as they can dry out more easily. Cut them into uniform 1-inch pieces.
Using bone-in chicken pieces is not ideal for this style of honey chicken, as the battering and quick-frying method is designed for bite-sized, boneless pieces that cook through quickly and evenly. If you want to use bone-in chicken, you would need to adjust the cooking method significantly (e.g., par-baking before frying or a much longer fry time at a lower temperature), and it wouldn’t quite be the same dish.

Honey Chicken Recipe
Ingredients
For the Chicken:
- 1.5 lbs (approx. 680g) boneless, skinless chicken thighs or breasts, cut into 1-inch bite-sized pieces
- 1 teaspoon salt
- 1/2 teaspoon black pepper
- 1/2 teaspoon garlic powder
- 1/2 teaspoon onion powder
For the Crispy Batter:
- 1 cup (125g) all-purpose flour
- 1/2 cup (60g) cornstarch (cornflour) – this is key for crispiness!
- 1 large egg, lightly beaten
- 1/2 cup (120ml) cold water (you might need a tablespoon more or less to get the right consistency)
- 1/2 teaspoon salt
- 1/4 teaspoon white pepper (optional, for a subtle kick)
For the Luscious Honey Sauce:
- 1/2 cup (170g or 120ml) good quality runny honey
- 1/4 cup (60ml) low-sodium soy sauce (or tamari for gluten-free)
- 2 tablespoons rice vinegar (unseasoned)
- 2 cloves garlic, minced (about 2 teaspoons)
- 1 teaspoon fresh ginger, grated (or 1/2 teaspoon ground ginger)
- 1 teaspoon sesame oil (toasted, for aroma)
- 1 tablespoon cornstarch (cornflour) mixed with 2 tablespoons cold water (this is your slurry for thickening)
- Optional: 1/4 – 1/2 teaspoon red pepper flakes for a hint of spice
For Frying:
- 3–4 cups (700-950ml) neutral-flavored oil with a high smoke point (e.g., canola, vegetable, peanut, or sunflower oil)
Instructions
1. Prepare the Chicken:
* Pat the cut chicken pieces dry with paper towels. This helps the seasoning and batter adhere better.
* In a medium bowl, toss the chicken pieces with 1 teaspoon salt, 1/2 teaspoon black pepper, 1/2 teaspoon garlic powder, and 1/2 teaspoon onion powder. Ensure each piece is evenly coated. Set aside while you prepare the batter.
2. Make the Crispy Batter:
* In a separate large bowl, whisk together the all-purpose flour, 1/2 cup cornstarch, 1/2 teaspoon salt, and optional white pepper.
* Create a well in the center of the dry ingredients. Add the lightly beaten egg and 1/2 cup of cold water.
* Whisk from the center outwards, gradually incorporating the dry ingredients until you have a smooth, relatively thick batter, similar to pancake batter. If it’s too thick, add a tablespoon more cold water at a time. If it’s too thin, add a tablespoon more flour. Avoid overmixing.
* Add the seasoned chicken pieces to the batter and toss gently to ensure every piece is thoroughly coated.
3. Fry the Chicken (First Fry for Crispiness):
* Pour your frying oil into a large, deep skillet, Dutch oven, or wok until it’s about 1.5 – 2 inches deep.
* Heat the oil over medium-high heat until it reaches 350-360°F (175-180°C). Use a cooking thermometer for accuracy. If you don’t have one, a small drop of batter should sizzle vigorously and float to the top within a few seconds.
* Carefully, using tongs or a spider skimmer, add the battered chicken pieces to the hot oil one by one, ensuring not to overcrowd the pan. Fry in batches (2-3 batches should be sufficient). Overcrowding will lower the oil temperature, resulting in soggy chicken.
* Fry for about 3-5 minutes per batch, turning occasionally, until the chicken is lightly golden and cooked through. The chicken doesn’t need to be deeply browned at this stage, as we might do a second fry for extra crispiness.
* Remove the cooked chicken from the oil using a slotted spoon or spider skimmer and transfer to a wire rack set over a baking sheet lined with paper towels. This allows air to circulate, keeping the bottom crispy.
* Allow the oil temperature to return to 350-360°F before frying the next batch.
4. (Optional but Recommended) Second Fry for Ultimate Crispiness:
* Once all chicken has been fried once, increase the oil temperature slightly to 375°F (190°C).
* Carefully return the cooked chicken pieces (again, in batches if necessary, though you can usually do larger batches here) to the hot oil and fry for another 1-2 minutes, or until they are a deep golden brown and exceptionally crispy.
* Remove and drain on the wire rack again. This double-frying method is a secret to incredibly crispy results that stay crispy even after saucing.
5. Prepare the Honey Sauce:
* While the chicken is resting (or while the oil is heating for the second fry), prepare the sauce. In a medium saucepan or a clean wok, combine the honey, soy sauce, rice vinegar, minced garlic, grated ginger, and sesame oil. If using, add the red pepper flakes.
* Whisk everything together and bring the mixture to a gentle simmer over medium heat, stirring occasionally. Let it simmer for 1-2 minutes to allow the flavors to meld.
* In a small bowl, whisk together the 1 tablespoon of cornstarch with 2 tablespoons of cold water to create a smooth slurry.
* Pour the cornstarch slurry into the simmering sauce, whisking continuously. Continue to cook and stir for another 1-2 minutes, or until the sauce thickens to a glossy, coating consistency – it should nicely coat the back of a spoon. Be careful not to over-thicken it, as it will thicken further as it cools slightly.
* Remove the sauce from the heat.
6. Coat the Chicken and Serve:
* Add the crispy fried chicken pieces to the saucepan with the thickened honey sauce (or pour the sauce over the chicken in a large clean bowl).
* Gently toss the chicken with a spatula or by shaking the pan/bowl until every piece is evenly coated in the glorious sticky sauce. Work quickly to maintain the chicken’s crispiness.
* Serve immediately for the best texture. Garnish with toasted sesame seeds and thinly sliced green onions if desired.
Nutrition
- Serving Size: One Normal Portion
- Calories: 650-750


