
It was one of those typically grey British afternoons, the kind where you crave a little sunshine in edible form. My family, particularly my usually stoic husband, had been hinting (not so subtly) about wanting “something special” for dessert. I’d recently come across a half-forgotten bag of Key limes from a trip to a speciality grocer, and inspiration struck: Key Lime Pound Cake. I’d always loved the tangy punch of Key lime pie, but the buttery richness of a pound cake felt like the perfect vehicle for that zesty flavour, especially on a dreary day. The aroma as it baked was transformative, filling the kitchen with a bright, citrusy perfume that promised warmth and cheer. When I finally sliced into the golden-crusted cake, revealing the tender, moist crumb, and drizzled it with that vibrant Key lime glaze, the anticipation was palpable. The first bite was everything I’d hoped for – a harmonious blend of sweet, buttery cake and a sharp, refreshing lime kick. My husband, after his first mouthful, simply closed his eyes and smiled. The kids? They were already asking for seconds before they’d finished their first slice. It wasn’t just a cake; it was a little slice of Florida sunshine, a mood-lifter, and an instant family favourite that has been requested repeatedly ever since.
The Allure of Key Lime Pound Cake: A Taste of Sunshine
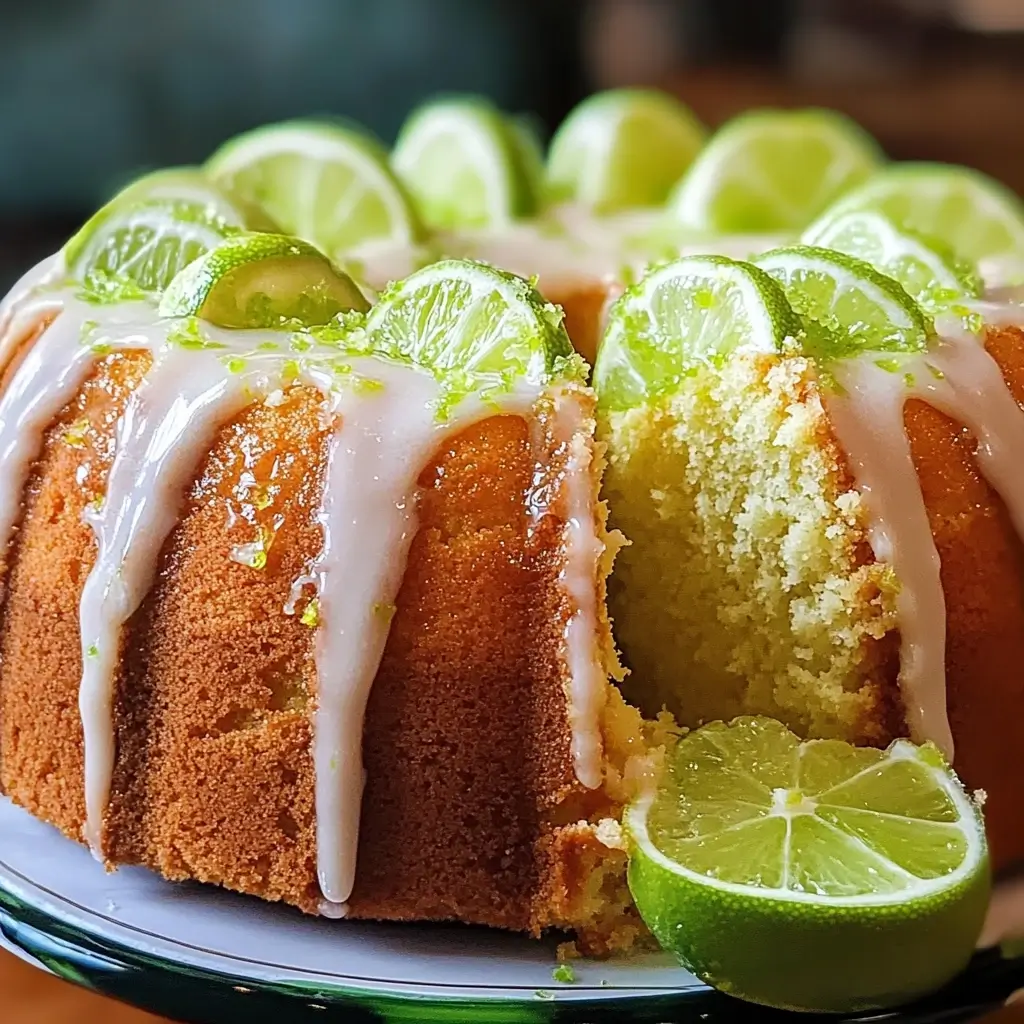
There’s something undeniably magical about a Key Lime Pound Cake. It’s a dessert that effortlessly bridges the gap between comforting classic and zesty exotic. The traditional pound cake, with its rich, buttery crumb and satisfying density, provides the perfect canvas for the bright, aromatic, and uniquely tart flavour of Key limes. Unlike its larger Persian lime cousin, the Key lime boasts a more intense fragrance and a flavour profile that is both tarter and more complex, with subtle floral notes. When this vibrant citrus is incorporated into a pound cake, the result is a culinary masterpiece – a cake that is moist, tender, and bursting with a tangy sweetness that dances on the palate. The crowning glory, a glistening Key lime glaze, adds an extra layer of citrus punch and visual appeal, making each slice an irresistible treat. This cake is more than just a dessert; it’s an experience, evoking images of sun-drenched citrus groves and lazy summer afternoons.
Why This Key Lime Pound Cake Recipe is a Winner
While there are many pound cake recipes out there, this particular Key Lime Pound Cake stands out for several reasons:
- Perfect Texture: The recipe is meticulously balanced to achieve that sought-after pound cake texture: dense yet incredibly moist and tender, never dry or crumbly. The use of sour cream or buttermilk contributes significantly to this luxurious mouthfeel.
- Intense Key Lime Flavor: We don’t skimp on the Key lime! Both zest and juice are used in the batter and the glaze, ensuring that a bright, authentic citrus flavour permeates every bite. Using fresh Key limes is paramount for achieving this depth of taste.
- Balanced Sweetness and Tartness: The sweetness of the pound cake beautifully complements the natural tartness of the Key limes. The glaze adds another dimension, cutting through the richness with its zesty punch, creating a harmonious flavour profile that is neither too sweet nor overly sour.
- Visually Stunning: With its golden-brown crust and the pale green, glistening glaze often adorned with extra zest, this cake is a showstopper. It’s impressive enough for special occasions yet simple enough for a delightful weekend treat.
- Foolproof Results: The instructions are clear and straightforward, guiding even novice bakers to success. Tips on ingredient temperature and mixing techniques help ensure a perfect bake every time.
Gathering Your Key Lime Pound Cake Ingredients
Precision is key in baking, and using high-quality ingredients will elevate your Key Lime Pound Cake from good to extraordinary. Ensure your butter, eggs, and sour cream (or buttermilk) are at room temperature for optimal incorporation.
For the Cake:
- All-Purpose Flour: 3 cups (approximately 360g), spooned and leveled
- Baking Soda: ½ teaspoon (essential for reacting with the acidic Key lime juice and sour cream for lift)
- Salt: ½ teaspoon (balances the sweetness and enhances flavours)
- Unsalted Butter: 1 ½ cups (3 sticks or 340g), softened to room temperature
- Granulated Sugar: 3 cups (approximately 600g)
- Large Eggs: 6, at room temperature
- Full-Fat Sour Cream (or Buttermilk): 1 cup (240ml), at room temperature
- Fresh Key Lime Juice: ¼ cup (60ml) (from approximately 8-12 Key limes)
- Key Lime Zest: 2 tablespoons, finely grated (from approximately 4-6 Key limes)
- Vanilla Extract: 1 teaspoon
For the Key Lime Glaze:
- Powdered Sugar (Confectioners’ Sugar): 2 cups (approximately 240g), sifted
- Fresh Key Lime Juice: 3-4 tablespoons (adjust for desired consistency)
- Unsalted Butter: 1 tablespoon, melted (optional, for richness and shine)
- Key Lime Zest: 1 teaspoon (for garnish, optional)
- Pinch of Salt: (optional, to balance sweetness)
Step-by-Step: Baking Your Perfect Key Lime Pound Cake
Follow these instructions carefully, and you’ll be rewarded with a delectable Key Lime Pound Cake that will have everyone asking for the recipe.
H3: Preparing the Pan and Oven
- Preheat Oven: Adjust your oven rack to the middle position and preheat to 325°F (160°C). A lower, slower bake is crucial for pound cakes to cook through without over-browning.
- Prepare the Pan: Generously grease a 10- or 12-cup Bundt pan or a 10-inch tube pan. Make sure to get into all the crevices. Flour the greased pan, tapping out any excess flour. Alternatively, use a baking spray that contains flour. Proper pan preparation is vital to prevent the cake from sticking.
H3: Creaming Butter and Sugar: The Foundation of Fluffiness
- Combine Dry Ingredients: In a medium bowl, whisk together the 3 cups of all-purpose flour, ½ teaspoon baking soda, and ½ teaspoon salt. Set aside.
- Cream Butter and Sugar: In the bowl of a stand mixer fitted with the paddle attachment (or using a large bowl and a hand mixer), beat the 1 ½ cups of softened unsalted butter on medium speed until creamy and smooth, about 1-2 minutes.
- Gradually Add Sugar: With the mixer on low, gradually add the 3 cups of granulated sugar. Once all the sugar is added, increase the speed to medium-high and beat for a full 5-7 minutes. The mixture should become very light, pale, and fluffy. This step is crucial as it incorporates air into the batter, which contributes to the cake’s lift and tender texture. Scrape down the sides and bottom of the bowl occasionally.
H3: Incorporating Eggs and Flavor
- Add Eggs: Add the 6 room temperature eggs one at a time, beating well (about 30 seconds) after each addition. Ensure each egg is fully incorporated before adding the next. Scrape down the bowl after adding the last egg. If the mixture looks slightly curdled at this stage, don’t worry; it will come together.
- Add Flavorings: Beat in the ¼ cup Key lime juice, 2 tablespoons Key lime zest, and 1 teaspoon vanilla extract until just combined.
H3: Alternating Wet and Dry Ingredients
- Combine Wet and Dry: With the mixer on low speed, add the flour mixture in three additions, alternating with the 1 cup of room temperature sour cream (or buttermilk) in two additions. Begin and end with the dry ingredients. (Flour -> Sour Cream -> Flour -> Sour Cream -> Flour).
- Mix Until Just Combined: Mix on low speed only until each addition is just incorporated. Be very careful not to overmix at this stage. Overmixing develops gluten, which can result in a tough cake. Stop the mixer as soon as the last streaks of flour disappear. Gently fold the batter a couple of times with a spatula to ensure everything is combined and there are no pockets of flour at the bottom of the bowl.
H3: Baking to Golden Perfection
- Transfer Batter: Carefully spoon the thick batter into your prepared Bundt or tube pan, spreading it evenly. Gently tap the pan on the counter a few times to release any large air bubbles.
- Bake: Bake in the preheated 325°F (160°C) oven for 65-80 minutes, or until a long wooden skewer or cake tester inserted into the center of the cake comes out clean or with a few moist crumbs attached. Baking times can vary depending on your oven and pan type. Start checking for doneness around the 60-minute mark.
- Cool in Pan: Once baked, remove the cake from the oven and let it cool in the pan on a wire rack for 15-20 minutes. This allows the cake to set slightly, making it easier to invert without breaking.
- Invert and Cool Completely: Carefully invert the cake onto the wire rack. If properly greased, it should release easily. Let the cake cool completely before glazing, which can take 2-3 hours. Glazing a warm cake will result in the glaze melting and soaking in too much.
H3: Crafting the Luscious Key Lime Glaze
- Whisk Ingredients: While the cake is cooling, prepare the glaze. In a small bowl, whisk together the 2 cups of sifted powdered sugar, 3 tablespoons of Key lime juice, and the optional 1 tablespoon of melted butter and pinch of salt.
- Adjust Consistency: Add more Key lime juice, a teaspoon at a time, if the glaze is too thick, or more sifted powdered sugar if it’s too thin. It should be thick but pourable – think the consistency of honey or maple syrup.
H3: Glazing and Finishing Touches
- Glaze the Cake: Once the cake is completely cool, place the wire rack with the cake over a sheet of parchment paper or a baking tray to catch any drips. Slowly drizzle or pour the Key lime glaze evenly over the top of the cake, allowing it to drip down the sides.
- Garnish (Optional): If desired, sprinkle the still-wet glaze with the additional 1 teaspoon of Key lime zest for an extra pop of color and flavour.
- Set the Glaze: Allow the glaze to set for at least 30 minutes before slicing and serving. This will prevent it from being too sticky.
Key Lime Pound Cake Nutrition Facts
- Servings: This recipe typically yields 12-16 servings, depending on the slice size.
- Calories per Serving (Approximate): Based on 14 servings, each slice contains approximately 450-550 calories. This is an estimate and can vary based on exact ingredient brands, portion sizes, and whether optional ingredients like butter in the glaze are used.
Disclaimer: The nutritional information provided is an estimate and should be used as a guideline only. Actual values may vary.
Preparation and Baking Time Breakdown
- Active Preparation Time: Approximately 30-40 minutes (includes zesting/juicing limes, measuring ingredients, mixing batter, and preparing glaze).
- Baking Time: 65-80 minutes.
- Cooling Time:
- In pan: 15-20 minutes.
- On wire rack (completely): 2-3 hours.
- Glaze Setting Time: At least 30 minutes.
- Total Time (from start to serving): Approximately 4.5 – 6 hours (largely due to cooling).
How to Serve Your Masterpiece: Key Lime Pound Cake Presentation Ideas
This Key Lime Pound Cake is delightful on its own, but here are a few ways to elevate its presentation and enjoyment:
- Simply Sliced: A classic, unadorned slice allows the cake’s flavour and texture to shine. Perfect with a cup of coffee or tea.
- With Fresh Berries:
- A small handful of fresh raspberries, blueberries, or sliced strawberries alongside a slice adds a beautiful color contrast and complementary fruity notes.
- A light berry coulis drizzled around the plate also works wonderfully.
- A Dollop of Cream:
- Whipped Cream: A generous dollop of lightly sweetened homemade whipped cream balances the tartness of the lime.
- Crème Fraîche: For a more sophisticated tang, serve with a spoonful of crème fraîche.
- Ice Cream Pairing:
- A scoop of high-quality vanilla bean ice cream is a classic accompaniment.
- Coconut ice cream or sorbet would also pair beautifully with the Key lime.
- Extra Zest or Candied Lime:
- A final, light grating of fresh Key lime zest just before serving can awaken the aromas.
- Thinly sliced candied Key limes make an elegant and edible garnish.
- Dessert Platter Star: Include slices as part of a larger dessert platter with other mini pastries, fruits, and chocolates for a special occasion.
- Edible Flowers: For a truly stunning presentation, especially for spring or summer gatherings, garnish the cake or individual plates with a few delicate edible flowers like violas or pansies.
Pro Baker’s Secrets: Additional Tips for Key Lime Pound Cake Success
- Room Temperature Ingredients are Non-Negotiable: This is perhaps the most crucial tip for pound cake success. Softened butter, room temperature eggs, and room temperature sour cream/buttermilk emulsify better, creating a smoother batter that traps air more efficiently. This results in a lighter, more tender crumb. Take them out of the fridge at least 1-2 hours before you begin.
- Don’t Overmix the Flour: Once you start adding the flour, mix only until it’s just combined. Overmixing develops the gluten in the flour, leading to a tough, dense, and sometimes rubbery cake. It’s better to have a few tiny streaks of flour and finish incorporating by hand with a spatula than to overbeat.
- Fresh Key Limes are Best: While bottled Key lime juice can be used in a pinch, the flavour of freshly squeezed Key lime juice and freshly grated zest is vastly superior. Key limes have a distinct aroma and tartness that bottled versions often lack. If you can’t find Key limes, Persian limes can be substituted, but the flavour will be slightly different (less intense, more straightforwardly tart).
- Proper Pan Preparation is Key: Bundt pans, with their intricate designs, can be notorious for cakes sticking. Grease every nook and cranny thoroughly with butter or shortening, then dust with flour, tapping out the excess. Alternatively, use a good quality baking spray that includes flour. This ensures a clean release and preserves the beautiful shape of your cake.
- Trust the Skewer Test, Not Just Time: Oven temperatures can vary, so relying solely on baking time can be misleading. Start checking for doneness about 10-15 minutes before the recipe’s minimum suggested time. Insert a long wooden skewer or cake tester into the thickest part of the cake. It should come out clean or with a few moist (not wet) crumbs attached. If it comes out with wet batter, it needs more time.
Your Key Lime Pound Cake Questions Answered: FAQ
Q1: Can I use regular Persian limes instead of Key limes?
A: Yes, you can. However, the flavour profile will be slightly different. Key limes are more aromatic, tarter, and have a unique floral note. Persian limes will still provide a lovely citrusy flavour, but it will be a bit milder and less complex. If using Persian limes, you might need slightly more zest to achieve a comparable lime intensity.
Q2: Why did my pound cake turn out dry or tough?
A: Several factors can contribute to this:
* Overmixing: Especially after adding the flour, overmixing develops gluten, leading to a tough texture.
* Overbaking: Baking the cake for too long will dry it out. Always use the skewer test.
* Incorrect Flour Measurement: Scooping flour directly from the bag can pack it down, resulting in too much flour. Spoon flour into your measuring cup and level it off for accuracy.
* Ingredients Not at Room Temperature: Cold ingredients don’t emulsify properly, affecting the texture.
Q3: How should I store my Key Lime Pound Cake?
A: Store the cake in an airtight container at room temperature for up to 3-4 days. If your kitchen is very warm, or if you prefer, you can store it in the refrigerator for up to a week. Note that refrigeration can sometimes dry out cakes slightly; bring it to room temperature before serving for the best flavour and texture.
Q4: Can I freeze Key Lime Pound Cake?
A: Yes, pound cake freezes beautifully! For best results, freeze it without the glaze. Wrap the completely cooled cake tightly in plastic wrap, then in a layer of aluminum foil, or place it in a freezer-safe container. It can be frozen for up to 3 months. Thaw overnight in the refrigerator or at room temperature. Prepare and add the glaze after thawing and just before serving. You can also freeze individual slices the same way.
Q5: My glaze is too thin/thick. How can I fix it?
A: Glaze consistency is easily adjustable.
* Too Thin: Add more sifted powdered sugar, a tablespoon at a time, whisking well after each addition until it reaches your desired thickness.
* Too Thick: Add more Key lime juice (or a tiny bit of milk/water), ½ teaspoon at a time, whisking until it’s pourable but still thick enough to coat the cake nicely.
This Key Lime Pound Cake is more than just a recipe; it’s an invitation to brighten your day and delight your senses. Enjoy the process of baking this zesty, buttery creation, and even more, enjoy sharing it with those you love!
Print
Key Lime Pound Cake Recipe
Ingredients
For the Cake:
- All-Purpose Flour: 3 cups (approximately 360g), spooned and leveled
- Baking Soda: ½ teaspoon (essential for reacting with the acidic Key lime juice and sour cream for lift)
- Salt: ½ teaspoon (balances the sweetness and enhances flavours)
- Unsalted Butter: 1 ½ cups (3 sticks or 340g), softened to room temperature
- Granulated Sugar: 3 cups (approximately 600g)
- Large Eggs: 6, at room temperature
- Full-Fat Sour Cream (or Buttermilk): 1 cup (240ml), at room temperature
- Fresh Key Lime Juice: ¼ cup (60ml) (from approximately 8-12 Key limes)
- Key Lime Zest: 2 tablespoons, finely grated (from approximately 4-6 Key limes)
- Vanilla Extract: 1 teaspoon
For the Key Lime Glaze:
- Powdered Sugar (Confectioners’ Sugar): 2 cups (approximately 240g), sifted
- Fresh Key Lime Juice: 3-4 tablespoons (adjust for desired consistency)
- Unsalted Butter: 1 tablespoon, melted (optional, for richness and shine)
- Key Lime Zest: 1 teaspoon (for garnish, optional)
- Pinch of Salt: (optional, to balance sweetness)
Instructions
H3: Preparing the Pan and Oven
- Preheat Oven: Adjust your oven rack to the middle position and preheat to 325°F (160°C). A lower, slower bake is crucial for pound cakes to cook through without over-browning.
- Prepare the Pan: Generously grease a 10- or 12-cup Bundt pan or a 10-inch tube pan. Make sure to get into all the crevices. Flour the greased pan, tapping out any excess flour. Alternatively, use a baking spray that contains flour. Proper pan preparation is vital to prevent the cake from sticking.
H3: Creaming Butter and Sugar: The Foundation of Fluffiness
- Combine Dry Ingredients: In a medium bowl, whisk together the 3 cups of all-purpose flour, ½ teaspoon baking soda, and ½ teaspoon salt. Set aside.
- Cream Butter and Sugar: In the bowl of a stand mixer fitted with the paddle attachment (or using a large bowl and a hand mixer), beat the 1 ½ cups of softened unsalted butter on medium speed until creamy and smooth, about 1-2 minutes.
- Gradually Add Sugar: With the mixer on low, gradually add the 3 cups of granulated sugar. Once all the sugar is added, increase the speed to medium-high and beat for a full 5-7 minutes. The mixture should become very light, pale, and fluffy. This step is crucial as it incorporates air into the batter, which contributes to the cake’s lift and tender texture. Scrape down the sides and bottom of the bowl occasionally.
H3: Incorporating Eggs and Flavor
- Add Eggs: Add the 6 room temperature eggs one at a time, beating well (about 30 seconds) after each addition. Ensure each egg is fully incorporated before adding the next. Scrape down the bowl after adding the last egg. If the mixture looks slightly curdled at this stage, don’t worry; it will come together.
- Add Flavorings: Beat in the ¼ cup Key lime juice, 2 tablespoons Key lime zest, and 1 teaspoon vanilla extract until just combined.
H3: Alternating Wet and Dry Ingredients
- Combine Wet and Dry: With the mixer on low speed, add the flour mixture in three additions, alternating with the 1 cup of room temperature sour cream (or buttermilk) in two additions. Begin and end with the dry ingredients. (Flour -> Sour Cream -> Flour -> Sour Cream -> Flour).
- Mix Until Just Combined: Mix on low speed only until each addition is just incorporated. Be very careful not to overmix at this stage. Overmixing develops gluten, which can result in a tough cake. Stop the mixer as soon as the last streaks of flour disappear. Gently fold the batter a couple of times with a spatula to ensure everything is combined and there are no pockets of flour at the bottom of the bowl.
H3: Baking to Golden Perfection
- Transfer Batter: Carefully spoon the thick batter into your prepared Bundt or tube pan, spreading it evenly. Gently tap the pan on the counter a few times to release any large air bubbles.
- Bake: Bake in the preheated 325°F (160°C) oven for 65-80 minutes, or until a long wooden skewer or cake tester inserted into the center of the cake comes out clean or with a few moist crumbs attached. Baking times can vary depending on your oven and pan type. Start checking for doneness around the 60-minute mark.
- Cool in Pan: Once baked, remove the cake from the oven and let it cool in the pan on a wire rack for 15-20 minutes. This allows the cake to set slightly, making it easier to invert without breaking.
- Invert and Cool Completely: Carefully invert the cake onto the wire rack. If properly greased, it should release easily. Let the cake cool completely before glazing, which can take 2-3 hours. Glazing a warm cake will result in the glaze melting and soaking in too much.
H3: Crafting the Luscious Key Lime Glaze
- Whisk Ingredients: While the cake is cooling, prepare the glaze. In a small bowl, whisk together the 2 cups of sifted powdered sugar, 3 tablespoons of Key lime juice, and the optional 1 tablespoon of melted butter and pinch of salt.
- Adjust Consistency: Add more Key lime juice, a teaspoon at a time, if the glaze is too thick, or more sifted powdered sugar if it’s too thin. It should be thick but pourable – think the consistency of honey or maple syrup.
H3: Glazing and Finishing Touches
- Glaze the Cake: Once the cake is completely cool, place the wire rack with the cake over a sheet of parchment paper or a baking tray to catch any drips. Slowly drizzle or pour the Key lime glaze evenly over the top of the cake, allowing it to drip down the sides.
- Garnish (Optional): If desired, sprinkle the still-wet glaze with the additional 1 teaspoon of Key lime zest for an extra pop of color and flavour.
- Set the Glaze: Allow the glaze to set for at least 30 minutes before slicing and serving. This will prevent it from being too sticky.
Nutrition
- Serving Size: One Normal Portion
- Calories: 450-550