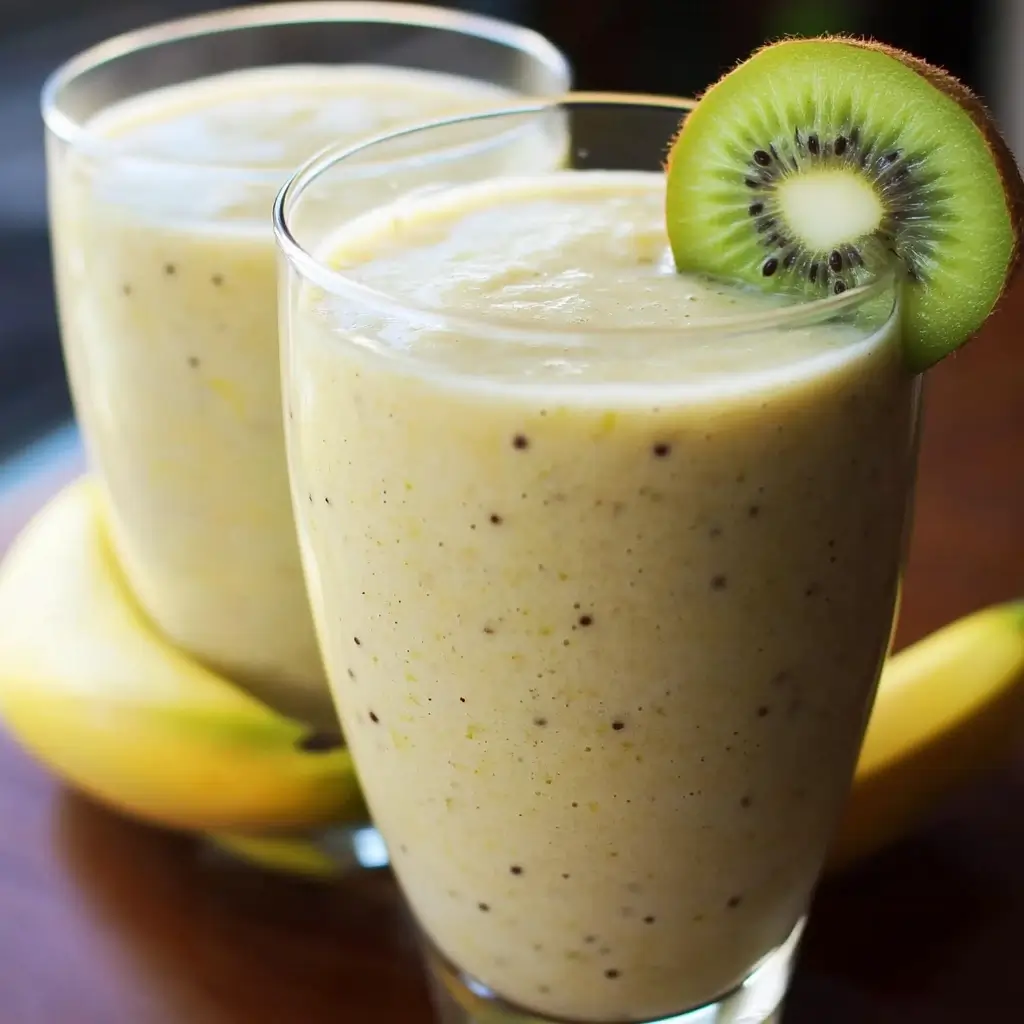
This Kiwi Banana Smoothie has become an absolute staple in our household, a vibrant green concoction that brings a smile to everyone’s face, from the pickiest little eater to the most health-conscious adult. I first stumbled upon this combination on a sweltering summer afternoon, craving something refreshing yet substantial. The result was a revelation! The tartness of the kiwi perfectly balances the creamy sweetness of the banana, creating a symphony of flavors that’s both invigorating and deeply satisfying. My kids, who usually turn their noses up at anything remotely “green,” actually ask for this “superhero smoothie” by name. It’s become our go-to for a quick breakfast, an energizing afternoon pick-me-up, or even a light dessert. The simplicity of the ingredients, coupled with its incredible taste and nutritional punch, makes it a winner every single time. I’ve tweaked it here and there, sometimes adding a handful of spinach for an extra health kick (they never notice!), or a dollop of Greek yogurt for added creaminess and protein. It’s more than just a smoothie; it’s a little cup of sunshine that brightens our day.
Ingredients: The Stars of Our Kiwi Banana Smoothie
To craft this delightful and nutritious smoothie, you’ll need a few simple, yet powerful ingredients. Each component plays a crucial role in achieving the perfect balance of flavor, texture, and health benefits. We’re aiming for a recipe that serves one generously or two smaller portions.
- Fresh Kiwis: 2 medium, ripe kiwis. Look for kiwis that yield slightly to gentle pressure, similar to a ripe peach or avocado. These will be sweeter and less acidic. Kiwis are the zesty heart of this smoothie, providing a wonderful tartness and a significant dose of Vitamin C. We’ll be peeling them to ensure a smooth texture.
- Ripe Banana: 1 medium, ripe banana. The riper the banana (think more brown spots!), the sweeter it will be, reducing or eliminating the need for additional sweeteners. Bananas lend a natural creaminess and sweetness, as well as a good serving of potassium. For an extra thick and frosty smoothie, you can use a frozen banana. Simply peel, slice, and freeze ripe bananas in a freezer-safe bag.
- Greek Yogurt (Optional but Recommended): 1/4 to 1/2 cup plain Greek yogurt. This adds a wonderful creamy texture, a protein boost, and a tangy counterpoint to the sweet fruits. If you prefer a dairy-free version, coconut yogurt or a plant-based protein powder can be substituted, or simply omit it.
- Liquid Base: 1/2 cup of your preferred milk. Options include:
- Dairy Milk: Whole, 2%, or skim milk all work well.
- Almond Milk: Unsweetened almond milk is a popular low-calorie choice.
- Soy Milk: Offers a good protein content.
- Oat Milk: Known for its creamy texture.
- Coconut Milk (from a carton): Adds a subtle tropical note.
- Water or Coconut Water: For a lighter, more hydrating smoothie. Adjust the amount based on your desired consistency.
- Sweetener (Optional): 1-2 teaspoons of honey, maple syrup, agave nectar, or a pitted Medjool date. This is entirely dependent on the ripeness of your fruit and your personal preference. Often, ripe bananas provide enough sweetness on their own.
- Ice Cubes (Optional): 3-5 ice cubes. If you’re not using frozen banana, ice cubes will help make your smoothie cold and thick. If you are using frozen banana, you might not need any ice.
- Optional Boosters:
- Spinach or Kale: 1 small handful (about 1 cup, loosely packed). A fantastic way to sneak in extra greens! The taste is usually masked by the fruit.
- Chia Seeds or Flax Seeds: 1 tablespoon. For added fiber, omega-3 fatty acids, and a thicker texture.
- Protein Powder: 1 scoop of your favorite plain or vanilla protein powder for an extra protein punch, perfect for a post-workout refreshment.
- Vanilla Extract: 1/4 teaspoon for a hint of warm flavor.
- Lime or Lemon Juice: A tiny squeeze (about 1/2 teaspoon) can brighten the flavors even more.
Gathering these ingredients is the first step towards a truly delicious and invigorating smoothie experience. The beauty of this recipe lies in its adaptability, so feel free to adjust quantities and ingredients based on what you have on hand and your personal taste preferences.
Instructions: Crafting Your Perfect Kiwi Banana Smoothie
Making this Kiwi Banana Smoothie is incredibly simple and quick, requiring just a few steps from start to finish. Follow these instructions for a perfectly blended, delicious, and nutritious treat.
- Prepare the Fruits:
- Kiwis: Wash the kiwis thoroughly. Using a vegetable peeler or a small paring knife, carefully peel the fuzzy brown skin from both kiwis. Once peeled, roughly chop them into chunks. This makes them easier for the blender to process. The core of the kiwi is edible and nutritious, so there’s no need to remove it unless you prefer.
- Banana: Peel the ripe banana. If it’s a large banana, you might want to break it into a few smaller pieces before adding it to the blender. If using a frozen banana, it should already be peeled and possibly sliced.
- Load the Blender:
- It’s generally recommended to add ingredients to the blender in a specific order for optimal blending, especially if your blender isn’t high-powered. Start with the liquid base: pour your chosen milk (or water/coconut water) into the blender jug first. This helps the blades move more freely when you start blending.
- Next, add the softer ingredients. Add the chopped kiwis and the banana pieces.
- If you’re using Greek yogurt, spoon it in now.
- If you’re including any optional boosters like spinach, chia seeds, flax seeds, or protein powder, add them at this stage. Spinach should go in before the frozen elements if you’re using it.
- Add Sweetener and Ice (If Using):
- If you’ve decided to use a sweetener (honey, maple syrup, etc.), drizzle it in.
- Finally, if you’re using ice cubes (and not a frozen banana, or if you want it extra icy), add them on top of the other ingredients.
- Blend to Perfection:
- Secure the lid tightly on the blender.
- Start blending on a low speed for about 10-15 seconds to break down the larger pieces. This prevents splashing and helps the ingredients combine more easily.
- Increase the speed to high and blend for another 30-60 seconds, or until the smoothie is completely smooth, creamy, and there are no remaining chunks of fruit or ice. If you’ve added spinach, ensure it’s fully incorporated and the smoothie has a uniform green color.
- You may need to stop the blender once or twice to scrape down the sides with a spatula if ingredients are sticking, ensuring everything gets evenly blended. Be sure to turn off the blender before doing this.
- Check Consistency and Taste:
- Once blended, pour a small amount into a glass or taste it directly from the blender (carefully!).
- Consistency: If the smoothie is too thick for your liking, add a little more liquid (milk, water) a tablespoon at a time and blend briefly. If it’s too thin, you can add a few more ice cubes, a bit more frozen banana (if you have it), or a tablespoon of chia seeds (let it sit for 5 minutes to thicken).
- Sweetness: If it’s not sweet enough, add a little more of your chosen sweetener and blend again for a few seconds.
- Serve Immediately:
- Pour the freshly blended Kiwi Banana Smoothie into a tall glass.
- Garnish if desired (see “How to Serve” section for ideas).
- Enjoy your delicious and healthy creation right away for the best taste and texture.
This straightforward process ensures a perfect smoothie every time. The key is to use ripe fruits and adjust to your personal preference for consistency and sweetness.
Nutrition Facts: A Healthy Powerhouse
This Kiwi Banana Smoothie isn’t just delicious; it’s also packed with beneficial nutrients. The exact nutritional values can vary based on the specific ingredients used (e.g., type of milk, addition of Greek yogurt, sweeteners, or boosters). However, here’s an approximate breakdown for one generous serving made with 2 kiwis, 1 banana, 1/2 cup unsweetened almond milk, and 1/4 cup plain Greek yogurt, without added sugar.
- Servings: This recipe makes approximately 1 large serving (about 16-20 ounces) or 2 smaller servings (about 8-10 ounces each).
- Calories per serving (approximate for one large serving): 280-350 calories.
Key Nutrient Highlights (Estimated):
- Vitamin C: Kiwis are exceptionally rich in Vitamin C, an essential antioxidant that supports the immune system, collagen production, and iron absorption. Two kiwis can provide well over 100% of the recommended daily intake.
- Potassium: Bananas are famous for their potassium content, which is vital for maintaining healthy blood pressure, nerve function, and muscle contractions.
- Dietary Fiber: Both kiwis and bananas, especially if you include optional chia or flax seeds, contribute a good amount of dietary fiber. Fiber aids digestion, promotes satiety (keeping you feeling full), and helps regulate blood sugar levels.
- Vitamin K: Kiwis are a good source of Vitamin K, important for blood clotting and bone health.
- Vitamin B6: Bananas provide Vitamin B6, which is involved in numerous metabolic processes, including brain development and immune function.
- Manganese: Found in both fruits, manganese is an essential mineral involved in bone formation, metabolism, and antioxidant defense.
- Protein: If you include Greek yogurt or protein powder, the protein content will be significantly boosted. Greek yogurt alone can add 10-15 grams of protein, aiding in muscle repair and satiety.
- Calcium: If using dairy milk or calcium-fortified plant-based milk and Greek yogurt, this smoothie can contribute to your daily calcium intake, essential for strong bones and teeth.
- Antioxidants: Kiwis and bananas contain various antioxidants that help combat oxidative stress and protect your cells from damage.
Considerations:
- Sugar Content: While the sugars in this smoothie come primarily from natural fruit sources (fructose), which are accompanied by fiber and nutrients, it’s still something to be mindful of, especially if you add extra sweeteners. Ripe fruits offer natural sweetness, often negating the need for added sugars.
- Customization Impact: Adding ingredients like honey or maple syrup will increase the calorie and sugar content. Conversely, adding spinach or kale will boost vitamins and minerals with minimal calorie increase. Protein powder will increase protein and potentially calories, depending on the type.
This Kiwi Banana Smoothie offers a fantastic way to get a concentrated dose of vitamins, minerals, and fiber in a delicious and easily digestible form. It’s a wholesome choice for breakfast, a snack, or a post-exercise recovery drink.
Preparation Time: Quick and Effortless
One of the best things about smoothies, and this Kiwi Banana Smoothie in particular, is how incredibly quick they are to prepare. From start to finish, you’re looking at a minimal time investment for a highly rewarding and nutritious outcome.
- Gathering Ingredients: 1-2 minutes
- This involves taking out the fruits, milk, yogurt, and any optional add-ins from your fridge or pantry.
- Washing and Prepping Fruit: 2-3 minutes
- Washing the kiwis.
- Peeling and chopping the kiwis.
- Peeling the banana (and breaking it into chunks if desired).
- Blending: 1-2 minutes
- Loading ingredients into the blender.
- Blending until smooth, which typically takes 30 seconds to 1.5 minutes depending on your blender’s power and the ingredients used (frozen fruit might take a bit longer).
- Tasting and Adjusting (Optional): 30 seconds – 1 minute
- A quick taste to check for sweetness or consistency, and a brief re-blend if adjustments are made.
- Pouring and Clean-up (Initial): 1 minute
- Pouring into a glass. Rinsing the blender immediately makes final clean-up much easier.
Total Estimated Preparation Time: Approximately 5 to 7 minutes.
This swift preparation makes the Kiwi Banana Smoothie an ideal choice for busy mornings when you need a quick and nutritious breakfast, or for those moments when you crave a healthy snack without a lot of fuss. If you’re really pressed for time, you can even pre-chop and freeze your fruits in individual smoothie packs, cutting down the prep time even further on the day of blending.
How to Serve: Elevating Your Smoothie Experience
Serving your Kiwi Banana Smoothie with a little flair can make it even more enjoyable. While it’s perfectly delicious straight from the blender into any glass, a few simple touches can enhance its visual appeal and overall experience.
- Glassware Choice:
- Tall Glasses: A classic choice for smoothies, allowing you to see the vibrant green color.
- Mason Jars: Offer a rustic, trendy look and are great if you’re taking your smoothie on the go (with a lid).
- Wide-Mouthed Glasses: Easier for thicker smoothies or smoothie bowls.
- Garnishes for Visual Appeal and Texture:
- Fresh Kiwi Slice: A thin slice of kiwi perched on the rim of the glass or floated on top adds a pop of color and hints at the flavor within.
- Banana Slices: A few thin banana slices on top can be a nice touch, especially if your smoothie is thick enough to support them.
- Fresh Mint Sprig: A sprig of fresh mint not only looks beautiful but also adds a subtle refreshing aroma.
- A Sprinkle of Seeds: Chia seeds, flax seeds, or hemp seeds sprinkled on top can add a pleasant textural contrast and boost nutrition.
- Coconut Flakes: Toasted or untoasted coconut flakes can add a tropical vibe and a slight crunch.
- A Drizzle of Honey or Maple Syrup: If you enjoy a sweeter touch, a very light drizzle over the top can look appealing (use sparingly).
- Edible Flowers: For a truly special occasion, a few edible flowers can make your smoothie look gourmet.
- Serving Occasions:
- Quick Breakfast: Serve in a commuter mug or a simple glass for an on-the-go start to your day.
- Healthy Snack: A smaller portion in a regular glass is perfect for an afternoon pick-me-up.
- Post-Workout Refuel: Serve immediately after exercise to replenish energy and nutrients. Adding protein powder makes it ideal for this.
- Light Dessert: Present in a slightly more elegant glass, perhaps with a sophisticated garnish, for a healthier dessert option.
- Smoothie Bowl: Make the smoothie extra thick (use less liquid, more frozen fruit or yogurt). Pour into a bowl and top generously with sliced fruits, granola, nuts, seeds, and a drizzle of nut butter. This turns it into a more substantial meal.
- Temperature and Tools:
- Serve Chilled: Smoothies are best enjoyed cold. If it’s not cold enough after blending, pop it in the freezer for 5-10 minutes (but don’t forget about it!).
- Straws: Reusable straws (metal, glass, or bamboo) are a great eco-friendly option for sipping your smoothie. Wider straws are better for thicker smoothies.
- For Kids:
- Serve in fun, colorful cups with a playful straw.
- Give it a fun name, like “Hulk Smoothie” or “Green Power Drink.”
- Let them help add the ingredients to the blender (with supervision).
By considering these serving suggestions, you can transform a simple Kiwi Banana Smoothie into a more engaging and enjoyable culinary experience for yourself and anyone you share it with.
Additional Tips: Mastering Your Kiwi Banana Smoothie
To ensure your Kiwi Banana Smoothie is consistently delicious and perfectly tailored to your preferences, here are five additional tips:
- Embrace Frozen Fruit for Creaminess:
For an incredibly thick, creamy, and ice-cold smoothie without diluting the flavor with too much ice, always opt for frozen banana slices. You can also freeze your kiwi chunks (peeled and chopped) for an even frostier result. Simply peel, slice ripe bananas, and lay them on a baking sheet lined with parchment paper. Freeze until solid, then transfer to a freezer-safe bag. This way, you’ll always have smoothie-ready fruit on hand. Using frozen fruit often means you can skip adding ice cubes altogether, resulting in a more intense fruit flavor. - Control the Sweetness Naturally:
The ripeness of your fruit, especially the banana, will significantly impact the smoothie’s natural sweetness. Very ripe bananas (with lots of brown spots) are much sweeter. Taste your smoothie before adding any extra sweeteners like honey or maple syrup. Often, you’ll find it’s sweet enough on its own. If you do need a touch more sweetness, start with a small amount (e.g., half a teaspoon) and blend again, tasting until it’s just right. Pitted Medjool dates are also a fantastic natural sweetener that adds fiber. - Layer Ingredients Wisely for Smoother Blending:
The order in which you add ingredients to your blender can make a difference, especially if you don’t have a high-powered blender. Start with liquids at the bottom (milk, water, yogurt). Then add soft fruits and leafy greens (like spinach). Follow with harder or frozen fruits, and finally, ice cubes or powders. This helps create a vortex and allows the blades to process everything more efficiently, preventing cavitation (air pockets around the blades) and ensuring a smoother result with less stopping and scraping. - Don’t Be Afraid to Go Green (Stealthily!):
Adding a handful of fresh spinach or mild kale is an excellent way to boost the nutritional value of your smoothie without significantly altering the taste. The sweetness of the banana and the tartness of the kiwi do a great job of masking the flavor of the greens. Start with a small amount if you’re hesitant, and gradually increase. It will change the color to a more vibrant green, but the delicious fruity taste will still shine through. This is a fantastic trick for getting more veggies into kids’ (and adults’) diets. - Prep Ahead for Ultra-Quick Smoothies:
If you love smoothies but are short on time in the mornings, create individual smoothie packs. In freezer-safe bags or containers, combine the pre-portioned chopped kiwi, banana slices (and any other fruits or greens like spinach you plan to use). When you’re ready for a smoothie, just grab a pack from the freezer, empty it into the blender, add your liquid base (milk, yogurt) and any other wet ingredients or powders, and blend. This cuts down preparation time to just a couple of minutes.
By keeping these tips in mind, you can elevate your smoothie-making game, ensuring each Kiwi Banana Smoothie you whip up is a perfect blend of flavor, texture, and nutrition.
FAQ Section: Your Kiwi Banana Smoothie Questions Answered
Here are answers to some frequently asked questions about making the perfect Kiwi Banana Smoothie:
Q1: Can I make this Kiwi Banana Smoothie vegan?
A1: Absolutely! This smoothie is very easy to make vegan. The primary adjustments involve the liquid base and any optional creamy additions.
* Milk: Instead of dairy milk, use any plant-based milk such as almond milk, soy milk, oat milk, coconut milk (from a carton), or even cashew milk. Unsweetened varieties work well to control the overall sugar content.
* Yogurt: If the recipe calls for Greek yogurt (which is dairy-based), substitute it with a plant-based yogurt. Coconut yogurt, almond yogurt, or soy yogurt are excellent choices and will still provide creaminess and a bit of tang. Alternatively, you can omit the yogurt altogether and perhaps add a bit more frozen banana or a tablespoon of chia seeds (let sit for 5-10 minutes to thicken) for creaminess.
* Sweetener: If you use honey, switch to a vegan sweetener like maple syrup, agave nectar, or date syrup/pitted dates.
The kiwis and bananas are naturally vegan, so with these simple swaps, you’ll have a delicious plant-based smoothie.
Q2: How can I make my smoothie thicker or thinner?
A2: Adjusting the consistency of your smoothie is quite simple:
* To Make it Thicker:
* Add More Frozen Ingredients: The easiest way is to add more frozen banana, frozen kiwi, or a few extra ice cubes.
* Use Less Liquid: Start with a slightly smaller amount of milk or water next time.
* Add Thickeners: A tablespoon of chia seeds or ground flax seeds will absorb liquid and thicken the smoothie (let it sit for 5-10 minutes after blending). A scoop of rolled oats (blend well) or a bit more Greek yogurt (or vegan alternative) can also help. Nut butter also adds thickness and flavor.
* To Make it Thinner:
* Add More Liquid: Gradually pour in a little more of your chosen liquid base (milk, water, coconut water) while the blender is on low speed, or add a tablespoon at a time and re-blend until you reach your desired consistency.
* Use Less Frozen Fruit: If you typically use a lot of frozen fruit, reduce the amount slightly.
Q3: Can I prepare the Kiwi Banana Smoothie in advance?
A3: While smoothies are always best enjoyed fresh right after blending (for optimal taste, texture, and nutrient retention), you can prepare it slightly in advance if necessary.
* Short-Term Storage (Few Hours to Overnight): Pour the smoothie into an airtight container (a mason jar with a lid works well), filling it as close to the top as possible to minimize air exposure (which can cause oxidation and discoloration). Store it in the refrigerator. It might separate a bit, so give it a good stir or a quick shake before drinking. The color might also dull slightly, especially from the banana. Adding a little lemon or lime juice during blending can help slow down oxidation.
* Freezing for Longer: You can freeze leftover smoothie in ice cube trays. Once frozen, transfer the smoothie cubes to a freezer bag. When ready to drink, blend the cubes with a little liquid. You can also freeze it in a freezer-safe container, then thaw it slightly in the fridge or at room temperature before stirring/re-blending. The texture might change slightly upon thawing.
* Smoothie Packs: As mentioned in the tips, prepping freezer packs with the solid ingredients is the best way to “prepare ahead” for fresh smoothies.
Q4: Are the black kiwi seeds edible? Should I try to remove them?
A4: Yes, the small black seeds in kiwis are completely edible and you do not need to remove them. In fact, they contribute to the fruit’s fiber content and contain some beneficial nutrients, including Vitamin E and omega-3 fatty acids (though in small amounts). When you blend the kiwi into a smoothie, the seeds will be pulverized along with the flesh, becoming virtually unnoticeable. Trying to remove them would be a tedious and unnecessary task. So, simply peel your kiwi, chop it, and toss it into the blender, seeds and all!
Q5: My kiwi is very tart. How can I balance the flavor in the smoothie?
A5: If your kiwis are on the tart side, there are several ways to balance the flavor and make your smoothie more palatable:
* Use a Riper Banana: Ensure your banana is very ripe (plenty of brown spots). Ripe bananas are significantly sweeter and will help counteract the kiwi’s tartness. You could even add an extra half of a ripe banana.
* Add a Natural Sweetener: A teaspoon or two of honey, maple syrup, agave nectar, or a pitted Medjool date can effectively balance the tartness. Add a little at a time and taste as you go.
* Include Creamy Elements: Adding more Greek yogurt (or a creamy plant-based yogurt like coconut yogurt) can help mellow out sharp flavors.
* A Different Liquid Base: Sometimes a creamier milk, like oat milk or full-fat coconut milk (from a carton, not can), can help balance tartness better than water or very light almond milk.
* Pinch of Salt: It sounds counterintuitive, but a tiny pinch of salt can sometimes enhance sweetness and reduce the perception of sourness. Use very, very sparingly.
* Complementary Fruits: Adding a small amount of another sweet fruit like mango, pineapple (which also has some tartness but a lot of sweetness), or a few sweet berries could also help balance the flavor profile.
Start by ensuring your banana is very ripe, then consider a touch of sweetener as your next step.
Kiwi Banana Smoothie Recipe
Ingredients
- Fresh Kiwis: 2 medium, ripe kiwis. Look for kiwis that yield slightly to gentle pressure, similar to a ripe peach or avocado. These will be sweeter and less acidic. Kiwis are the zesty heart of this smoothie, providing a wonderful tartness and a significant dose of Vitamin C. We’ll be peeling them to ensure a smooth texture.
- Ripe Banana: 1 medium, ripe banana. The riper the banana (think more brown spots!), the sweeter it will be, reducing or eliminating the need for additional sweeteners. Bananas lend a natural creaminess and sweetness, as well as a good serving of potassium. For an extra thick and frosty smoothie, you can use a frozen banana. Simply peel, slice, and freeze ripe bananas in a freezer-safe bag.
- Greek Yogurt (Optional but Recommended): 1/4 to 1/2 cup plain Greek yogurt. This adds a wonderful creamy texture, a protein boost, and a tangy counterpoint to the sweet fruits. If you prefer a dairy-free version, coconut yogurt or a plant-based protein powder can be substituted, or simply omit it.
- Liquid Base: 1/2 cup of your preferred milk. Options include:
- Dairy Milk: Whole, 2%, or skim milk all work well.
- Almond Milk: Unsweetened almond milk is a popular low-calorie choice.
- Soy Milk: Offers a good protein content.
- Oat Milk: Known for its creamy texture.
- Coconut Milk (from a carton): Adds a subtle tropical note.
- Water or Coconut Water: For a lighter, more hydrating smoothie. Adjust the amount based on your desired consistency.
- Sweetener (Optional): 1-2 teaspoons of honey, maple syrup, agave nectar, or a pitted Medjool date. This is entirely dependent on the ripeness of your fruit and your personal preference. Often, ripe bananas provide enough sweetness on their own.
- Ice Cubes (Optional): 3-5 ice cubes. If you’re not using frozen banana, ice cubes will help make your smoothie cold and thick. If you are using frozen banana, you might not need any ice.
- Optional Boosters:
- Spinach or Kale: 1 small handful (about 1 cup, loosely packed). A fantastic way to sneak in extra greens! The taste is usually masked by the fruit.
- Chia Seeds or Flax Seeds: 1 tablespoon. For added fiber, omega-3 fatty acids, and a thicker texture.
- Protein Powder: 1 scoop of your favorite plain or vanilla protein powder for an extra protein punch, perfect for a post-workout refreshment.
- Vanilla Extract: 1/4 teaspoon for a hint of warm flavor.
- Lime or Lemon Juice: A tiny squeeze (about 1/2 teaspoon) can brighten the flavors even more.
Instructions
- Prepare the Fruits:
- Kiwis: Wash the kiwis thoroughly. Using a vegetable peeler or a small paring knife, carefully peel the fuzzy brown skin from both kiwis. Once peeled, roughly chop them into chunks. This makes them easier for the blender to process. The core of the kiwi is edible and nutritious, so there’s no need to remove it unless you prefer.
- Banana: Peel the ripe banana. If it’s a large banana, you might want to break it into a few smaller pieces before adding it to the blender. If using a frozen banana, it should already be peeled and possibly sliced.
- Load the Blender:
- It’s generally recommended to add ingredients to the blender in a specific order for optimal blending, especially if your blender isn’t high-powered. Start with the liquid base: pour your chosen milk (or water/coconut water) into the blender jug first. This helps the blades move more freely when you start blending.
- Next, add the softer ingredients. Add the chopped kiwis and the banana pieces.
- If you’re using Greek yogurt, spoon it in now.
- If you’re including any optional boosters like spinach, chia seeds, flax seeds, or protein powder, add them at this stage. Spinach should go in before the frozen elements if you’re using it.
- Add Sweetener and Ice (If Using):
- If you’ve decided to use a sweetener (honey, maple syrup, etc.), drizzle it in.
- Finally, if you’re using ice cubes (and not a frozen banana, or if you want it extra icy), add them on top of the other ingredients.
- Blend to Perfection:
- Secure the lid tightly on the blender.
- Start blending on a low speed for about 10-15 seconds to break down the larger pieces. This prevents splashing and helps the ingredients combine more easily.
- Increase the speed to high and blend for another 30-60 seconds, or until the smoothie is completely smooth, creamy, and there are no remaining chunks of fruit or ice. If you’ve added spinach, ensure it’s fully incorporated and the smoothie has a uniform green color.
- You may need to stop the blender once or twice to scrape down the sides with a spatula if ingredients are sticking, ensuring everything gets evenly blended. Be sure to turn off the blender before doing this.
- Check Consistency and Taste:
- Once blended, pour a small amount into a glass or taste it directly from the blender (carefully!).
- Consistency: If the smoothie is too thick for your liking, add a little more liquid (milk, water) a tablespoon at a time and blend briefly. If it’s too thin, you can add a few more ice cubes, a bit more frozen banana (if you have it), or a tablespoon of chia seeds (let it sit for 5 minutes to thicken).
- Sweetness: If it’s not sweet enough, add a little more of your chosen sweetener and blend again for a few seconds.
- Serve Immediately:
- Pour the freshly blended Kiwi Banana Smoothie into a tall glass.
- Garnish if desired (see “How to Serve” section for ideas).
- Enjoy your delicious and healthy creation right away for the best taste and texture.
Nutrition
- Serving Size: One Normal Portion
- Calories: 280-350