


There are some desserts that just sing of sunshine and happiness, and for me, this Lemon Curd Tart is definitely one of them. From the moment the bright, tangy aroma of lemon zest fills the kitchen, to the first bite of the buttery, crumbly crust cradling the silky smooth, intensely lemony curd, this tart is a true delight. I first stumbled upon this recipe a few months ago, searching for a dessert that would be both impressive and refreshing for a summer gathering. Let me tell you, it was an absolute hit! My family, who are usually divided in their dessert preferences (chocolate lovers versus fruit fanatics!), unanimously declared this Lemon Curd Tart a winner. The perfect balance of sweet and tart, the satisfyingly crisp crust, and the vibrant yellow hue – it’s a feast for the senses. Since then, it’s become a regular feature in our dessert rotation, requested for birthdays, holidays, and just about any occasion that calls for a little bit of sunshine on a plate. Trust me, once you try this recipe, you’ll understand why we’re so obsessed. It’s surprisingly easy to make, and the rewards are immense – a truly show-stopping dessert that will impress your guests and leave them craving more. So, let’s dive into the magic of creating this delectable Lemon Curd Tart together!
Ingredients
This recipe uses simple, readily available ingredients to create a dessert that tastes far more complex than it is. Here’s what you’ll need to gather to embark on your Lemon Curd Tart adventure:
Crust:
- 3/4 cup butter, softened: Unsalted butter is recommended to control the salt level in your crust. Softened butter is crucial for easy mixing and a tender crust. Make sure it’s softened but not melted!
- 1/4 cup sugar: Granulated sugar adds sweetness to the crust and helps with browning. It also contributes to the overall texture.
- 2 cups Gold Medal™ all-purpose flour: All-purpose flour is the workhorse of baking, providing structure to the crust. Using Gold Medal™ flour, as specified in the original recipe, ensures consistent results, but any good quality all-purpose flour will work.
Filling:
- 1 cup sugar: Granulated sugar is the primary sweetener for the lemon curd, balancing the tartness of the lemon juice and creating that signature sweet-tangy flavor.
- 3 tablespoons cornstarch: Cornstarch is the thickening agent in the lemon curd. It creates that smooth, velvety texture without making the curd taste starchy.
- 1 cup water: Water is the liquid base for the lemon curd, helping to dissolve the sugar and cornstarch and create the right consistency.
- 1 1/2 teaspoons grated lemon zest: Lemon zest is where the real lemon flavor punch comes from! Make sure to only zest the yellow part of the lemon peel, avoiding the bitter white pith underneath. Fresh zest is always best for the brightest flavor.
- 1/4 cup fresh lemon juice: Freshly squeezed lemon juice is essential for that vibrant, tangy lemon flavor. Bottled lemon juice can be used in a pinch, but fresh juice will always taste superior.
- 2 egg yolks: Egg yolks add richness, color, and further thickening power to the lemon curd. They contribute to the creamy, luxurious texture that makes lemon curd so irresistible.
- 2 tablespoons butter, cut into pieces: Butter adds richness, shine, and a smooth, melt-in-your-mouth quality to the finished lemon curd. Adding it at the end ensures it emulsifies properly into the warm curd.
For Serving (Optional):
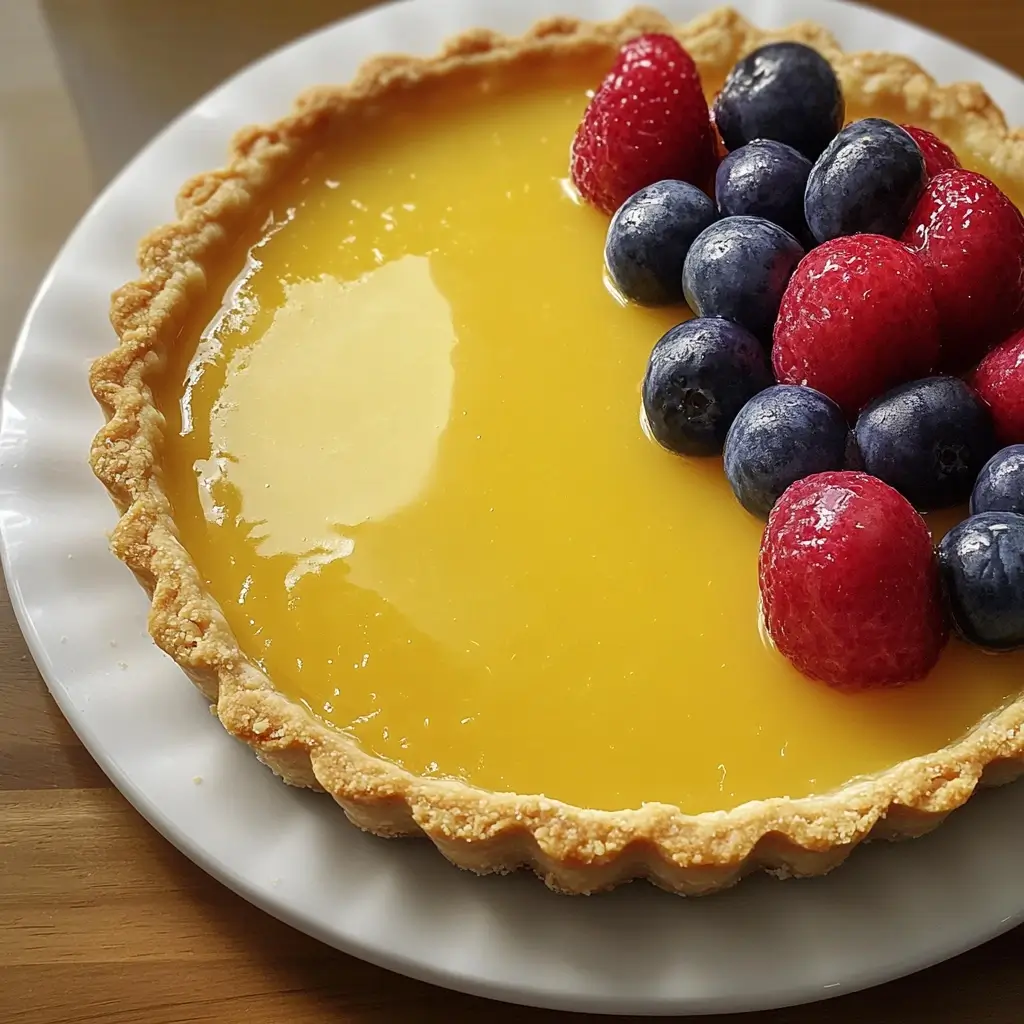
- Fresh assorted berries: Berries like raspberries, blueberries, strawberries, and blackberries complement the lemon flavor beautifully and add a pop of color and freshness.
- Sweetened whipped cream: A dollop of sweetened whipped cream provides a cool, creamy contrast to the tart lemon curd and adds a touch of elegance.
Instructions
Making this Lemon Curd Tart is a journey of simple steps that culminate in a truly impressive dessert. Follow these instructions carefully, and you’ll be rewarded with a tart that’s both beautiful and delicious.
Step 1: Preheat and Prep – Setting the Stage for Success
- Heat oven to 350°F (175°C). Preheating your oven is crucial for even baking and a perfectly golden crust. Make sure your oven reaches the correct temperature before you put the tart in.
- Spray a 9-inch tart pan with a 1-inch rim and removable bottom with cooking spray. Using a tart pan with a removable bottom makes it easy to release the finished tart without damaging it. Spraying with cooking spray ensures the crust doesn’t stick and comes out cleanly. If you don’t have a tart pan, a 9-inch pie dish can be used, but removing the tart will be more challenging.
Step 2: Crafting the Perfect Crust – Buttery, Crumbly Goodness
- In a large bowl, beat 3/4 cup softened butter and 1/4 cup sugar with a spoon until well mixed. Using a spoon or a spatula is perfectly fine for this step, no need for electric mixers! You just want to combine the butter and sugar until they are creamy and well incorporated. Don’t overmix at this stage.
- Stir in 2 cups flour until blended (dough will be crumbly but can be pressed together). Add the flour gradually and stir until just combined. The dough will appear crumbly, and that’s exactly what you want! Don’t overwork the dough, as this can lead to a tough crust. The key is to mix until the flour is just incorporated, and the dough holds together when pressed.
- Pat and press dough very firmly on the bottom and up the sides of the tart pan. This is where your hands come in! Take handfuls of the crumbly dough and press it firmly into the bottom and up the sides of the prepared tart pan. Work your way around, ensuring an even thickness. Press firmly and evenly to create a compact crust that won’t crumble when baked. Pay extra attention to the corners and edges to ensure they are well-formed.
- Bake for 14 to 18 minutes or until the crust is set in the center but still pale. Baking time can vary slightly depending on your oven. Keep an eye on the crust. You want it to be set and just starting to turn a light golden color around the edges. The center should still be pale, as it will continue to bake slightly as it cools. Baking it until just set prevents it from becoming overly browned and hard.
- Cool for 15 minutes. Allowing the crust to cool slightly before adding the filling helps it to firm up and prevents the hot filling from softening it too much. This also makes the crust easier to handle.
Step 3: Creating the Luscious Lemon Curd – Tangy and Silky Smooth
- In a 2-quart saucepan, mix 1 cup sugar and the cornstarch. Whisk together the sugar and cornstarch in the saucepan before adding any liquids. This helps to prevent lumps and ensures the cornstarch dissolves evenly.
- Gradually stir in water, lemon zest, and lemon juice until smooth. Slowly pour in the water, lemon zest, and lemon juice while whisking constantly to create a smooth mixture. Make sure there are no lumps of cornstarch remaining.
- Cook and stir over medium-high heat. Heat to boiling; boil for 1 minute, stirring constantly, until the mixture is bubbly and thickened. Place the saucepan over medium-high heat and cook, stirring constantly with a whisk. It’s important to stir continuously to prevent the mixture from sticking to the bottom of the pan and to ensure even thickening. The mixture will start to thicken as it heats up and will come to a boil. Once it boils, continue to boil for exactly 1 minute, still stirring constantly. This is crucial for activating the cornstarch and achieving the right consistency. You’ll notice the mixture becoming noticeably thicker and more translucent.
- Remove from heat. Once the curd has boiled for 1 minute and thickened, immediately remove the saucepan from the heat. It’s important to take it off the heat at this stage to prevent overcooking and curdling.
Step 4: Tempering the Egg Yolks and Finishing the Curd – Creamy Perfection
- In a small bowl, beat egg yolks with a whisk. In a separate small bowl, whisk the egg yolks until they are lightly beaten and slightly pale in color. This prepares them for tempering.
- Gradually beat about 1/2 cup of the hot mixture into the egg yolks. This is the crucial step of tempering the egg yolks. Take about 1/2 cup of the hot lemon mixture from the saucepan and slowly drizzle it into the beaten egg yolks while whisking constantly. This gradually warms the egg yolks and prevents them from scrambling when added to the hot mixture. Whisk vigorously and continuously to ensure the yolks are fully incorporated and don’t cook too quickly.
- Gradually stir the yolk mixture into the hot mixture in the saucepan. Pour the tempered egg yolk mixture back into the saucepan with the remaining hot lemon mixture. Stir constantly to combine everything smoothly.
- Cook over medium heat, stirring constantly, until the mixture starts to gently boil. Return the saucepan to medium heat and continue to cook, stirring constantly with a whisk. The mixture will thicken further as it cooks and will come to a gentle boil.
- Cook for 2 minutes longer, stirring constantly. Once the curd starts to gently boil, continue to cook for another 2 minutes, stirring constantly. This ensures the egg yolks are cooked through and the curd reaches its final thickness and stability. The curd should be thick enough to coat the back of a spoon.
- Remove from heat; stir in 2 tablespoons butter. Take the saucepan off the heat and immediately stir in the 2 tablespoons of butter, cut into pieces. Stir until the butter is completely melted and incorporated into the curd, giving it a glossy shine and richer flavor.
- Pour over cooled baked crust. Pour the hot lemon curd immediately over the cooled, baked tart crust. Spread it evenly to fill the crust completely.
- Cool at room temperature for 15 minutes; refrigerate for at least 3 hours until set. Allow the tart to cool at room temperature for about 15 minutes to start setting slightly. Then, refrigerate it for at least 3 hours, or preferably longer, until the lemon curd is completely set and firm. Chilling allows the curd to fully solidify and develop its perfect texture.
Step 5: Garnish and Serve – The Finishing Touches
- When ready to serve, sprinkle fresh berries on top. Just before serving, arrange fresh assorted berries on top of the lemon curd tart. This adds a beautiful visual appeal, fresh flavor, and a touch of sweetness and acidity that complements the lemon curd perfectly.
- Serve with whipped cream. A dollop of sweetened whipped cream is the classic accompaniment to lemon curd tart. It adds a cool, creamy element that balances the tartness and enhances the overall dessert experience.
- Store loosely covered in the refrigerator. Leftover lemon curd tart should be stored loosely covered in the refrigerator to maintain its freshness and prevent it from drying out. It will keep well for 3-4 days.
Nutrition Facts
- Servings: 12
- Calories per serving (estimated): Approximately 350-400 calories per serving.
Please note: This is an estimated calorie count and can vary based on specific ingredient brands and portion sizes. For precise nutritional information, use a calorie counting app and input the exact ingredients and quantities used. This estimate is based on standard ingredient values and assumes moderate portions of berries and whipped cream when served. The primary calorie contributors are the butter, sugar, and egg yolks in the recipe.
Preparation Time
- Prep Time: 30 minutes
- Total Time: 4 hours 20 minutes (includes baking, cooling, and chilling time)
While the active preparation time is only around 30 minutes, remember to factor in the baking time for the crust, cooling time, and the essential chilling time for the lemon curd to set properly. This chilling time is crucial for achieving the perfect texture and should not be rushed. Planning ahead and allowing ample chilling time will ensure the best results.
How to Serve
Lemon Curd Tart is a versatile dessert that can be served in various ways to suit different occasions and preferences. Here are some delightful serving suggestions:
- Classic Elegance:
- Serve chilled slices directly from the refrigerator for a refreshing and tangy treat.
- Garnish with a generous dollop of freshly whipped cream and a scattering of fresh berries like raspberries, blueberries, or strawberries.
- A dusting of powdered sugar adds a touch of sophistication.
- Berry Bliss:
- Create a vibrant berry topping by mixing a medley of fresh berries like blackberries, raspberries, blueberries, and strawberries.
- Lightly macerate the berries with a touch of sugar and lemon juice for extra flavor and shine.
- Arrange the berry mixture artfully over the lemon curd just before serving.
- Citrus Celebration:
- Enhance the lemon flavor by adding segments of other citrus fruits like oranges or grapefruit alongside the berries.
- Candied lemon zest or orange zest can add a beautiful and flavorful garnish.
- A sprinkle of chopped pistachios or almonds can provide a contrasting texture and nutty flavor.
- Warm Weather Delight:
- Serve slightly chilled on a warm day for a refreshing dessert.
- Pair with a scoop of vanilla bean ice cream or lemon sorbet for an extra cool and creamy element.
- Offer a light and refreshing beverage like iced tea, lemonade, or sparkling water alongside.
- Special Occasion Dessert:
- Elevate the presentation for special occasions by piping whipped cream around the edges of the tart.
- Create decorative patterns with berries or chocolate shavings.
- Serve individual tartlets for a more elegant and portion-controlled presentation.
- Casual Gatherings:
- Serve slices alongside other desserts for a dessert buffet.
- Offer a platter of fresh fruit for guests to add to their tart.
- Keep it simple and let the delicious flavor of the tart speak for itself!
No matter how you choose to serve it, Lemon Curd Tart is sure to be a crowd-pleaser. Its bright flavors and beautiful presentation make it a perfect dessert for any occasion.
Additional Tips for Lemon Curd Tart Perfection
To ensure your Lemon Curd Tart is a resounding success, here are five additional tips to keep in mind:
- Use Quality Ingredients, Especially Lemons: The star of this tart is the lemon curd, so using fresh, high-quality lemons is essential. Opt for lemons that are heavy for their size, indicating they are juicy. Freshly squeezed lemon juice and freshly grated zest will impart the brightest and most vibrant lemon flavor. Avoid using bottled lemon juice if possible, as it lacks the same fresh, zesty taste.
- Don’t Overwork the Crust Dough: When making the crust, be careful not to overmix the dough after adding the flour. Overmixing develops the gluten in the flour, resulting in a tough crust. Mix just until the flour is incorporated and the dough comes together. A crumbly dough is perfectly normal at this stage; it will come together when you press it into the tart pan.
- Temper the Egg Yolks Carefully: Tempering the egg yolks is a crucial step in making smooth, creamy lemon curd. Gradually whisk a small amount of the hot lemon mixture into the beaten egg yolks before adding the yolks to the rest of the hot mixture. This slowly raises the temperature of the yolks and prevents them from scrambling when they come into contact with the hot liquid. Whisk continuously and vigorously during this process.
- Cook the Curd to the Right Consistency: Cooking the lemon curd to the correct thickness is key. It should be thick enough to coat the back of a spoon and gently boil for a full minute to activate the cornstarch properly and cook the egg yolks through. Don’t be tempted to rush this step. However, be mindful not to overcook it, as it can become too thick or even curdle. Constant stirring is essential to prevent sticking and ensure even cooking.
- Chill Thoroughly for Best Texture: Chilling the Lemon Curd Tart for at least 3 hours, or preferably longer, is essential for the curd to set completely and achieve its signature smooth, firm texture. Resist the urge to cut into it too soon! The chilling time allows the cornstarch and egg yolks to fully set the curd, resulting in a sliceable tart with a perfect consistency. Chilling also enhances the flavors, allowing them to meld and deepen.
By following these tips, you’ll be well on your way to creating a truly exceptional Lemon Curd Tart that will impress everyone who tries it!
Frequently Asked Questions (FAQ) – Ingredients
Here are some frequently asked questions specifically related to the ingredients in this Lemon Curd Tart recipe:
Q1: Can I use bottled lemon juice instead of fresh lemon juice?
A: While fresh lemon juice is highly recommended for the best flavor, bottled lemon juice can be used in a pinch. However, be aware that bottled lemon juice often lacks the bright, zesty flavor of fresh juice and may have a slightly more acidic taste. If using bottled juice, opt for a good quality brand and consider adding a little extra lemon zest to boost the lemon flavor. Freshly squeezed juice will always result in a superior-tasting lemon curd.
Q2: Can I use margarine instead of butter in the crust?
A: For the best flavor and texture in the crust, butter is strongly recommended. Butter contributes a richness and flakiness that margarine cannot replicate. Margarine may also have a higher water content, which can affect the texture of the crust. If you must substitute, use a high-quality margarine with a high fat content, but be aware that the crust may not be as tender or flavorful as with butter.
Q3: Can I use a different type of flour instead of all-purpose flour?
A: All-purpose flour is the standard choice for tart crusts as it provides a good balance of structure and tenderness. While you could experiment with other flours, such as pastry flour for an even more tender crust, all-purpose flour is readily available and works perfectly well. Using whole wheat flour is not recommended as it will make the crust denser and less tender. For gluten-free options, you would need to use a specifically formulated gluten-free flour blend designed for baking.
Q4: Can I reduce the amount of sugar in the filling?
A: While you can slightly reduce the sugar in the lemon curd filling, be cautious about reducing it too much. Sugar not only provides sweetness but also contributes to the texture and stability of the curd. Reducing the sugar significantly may result in a curd that is too tart and less thick. You could try reducing the sugar by about 1/4 cup, but taste and adjust to your preference. Remember that the tartness of lemons can vary, so you may need to adjust the sugar accordingly.
Q5: Can I use whole eggs instead of just egg yolks in the filling?
A: This recipe specifically calls for egg yolks because they contribute richness, color, and a smooth, creamy texture to the lemon curd. Using whole eggs will result in a curd that is less rich and potentially more prone to being slightly eggy in flavor. Egg yolks are higher in fat and lecithin, which contribute to the luxurious texture of lemon curd. For the best results and the classic lemon curd texture, stick to using egg yolks as specified in the recipe. You can use the leftover egg whites for meringues or other recipes!
Print
Lemon Curd Tart Recipe
Ingredients
Crust:
- 3/4 cup butter, softened: Unsalted butter is recommended to control the salt level in your crust. Softened butter is crucial for easy mixing and a tender crust. Make sure it’s softened but not melted!
- 1/4 cup sugar: Granulated sugar adds sweetness to the crust and helps with browning. It also contributes to the overall texture.
- 2 cups Gold Medal™ all-purpose flour: All-purpose flour is the workhorse of baking, providing structure to the crust. Using Gold Medal™ flour, as specified in the original recipe, ensures consistent results, but any good quality all-purpose flour will work.
Filling:
- 1 cup sugar: Granulated sugar is the primary sweetener for the lemon curd, balancing the tartness of the lemon juice and creating that signature sweet-tangy flavor.
- 3 tablespoons cornstarch: Cornstarch is the thickening agent in the lemon curd. It creates that smooth, velvety texture without making the curd taste starchy.
- 1 cup water: Water is the liquid base for the lemon curd, helping to dissolve the sugar and cornstarch and create the right consistency.
- 1 1/2 teaspoons grated lemon zest: Lemon zest is where the real lemon flavor punch comes from! Make sure to only zest the yellow part of the lemon peel, avoiding the bitter white pith underneath. Fresh zest is always best for the brightest flavor.
- 1/4 cup fresh lemon juice: Freshly squeezed lemon juice is essential for that vibrant, tangy lemon flavor. Bottled lemon juice can be used in a pinch, but fresh juice will always taste superior.
- 2 egg yolks: Egg yolks add richness, color, and further thickening power to the lemon curd. They contribute to the creamy, luxurious texture that makes lemon curd so irresistible.
- 2 tablespoons butter, cut into pieces: Butter adds richness, shine, and a smooth, melt-in-your-mouth quality to the finished lemon curd. Adding it at the end ensures it emulsifies properly into the warm curd.
For Serving (Optional):
- Fresh assorted berries: Berries like raspberries, blueberries, strawberries, and blackberries complement the lemon flavor beautifully and add a pop of color and freshness.
- Sweetened whipped cream: A dollop of sweetened whipped cream provides a cool, creamy contrast to the tart lemon curd and adds a touch of elegance.
Instructions
Step 1: Preheat and Prep – Setting the Stage for Success
- Heat oven to 350°F (175°C). Preheating your oven is crucial for even baking and a perfectly golden crust. Make sure your oven reaches the correct temperature before you put the tart in.
- Spray a 9-inch tart pan with a 1-inch rim and removable bottom with cooking spray. Using a tart pan with a removable bottom makes it easy to release the finished tart without damaging it. Spraying with cooking spray ensures the crust doesn’t stick and comes out cleanly. If you don’t have a tart pan, a 9-inch pie dish can be used, but removing the tart will be more challenging.
Step 2: Crafting the Perfect Crust – Buttery, Crumbly Goodness
- In a large bowl, beat 3/4 cup softened butter and 1/4 cup sugar with a spoon until well mixed. Using a spoon or a spatula is perfectly fine for this step, no need for electric mixers! You just want to combine the butter and sugar until they are creamy and well incorporated. Don’t overmix at this stage.
- Stir in 2 cups flour until blended (dough will be crumbly but can be pressed together). Add the flour gradually and stir until just combined. The dough will appear crumbly, and that’s exactly what you want! Don’t overwork the dough, as this can lead to a tough crust. The key is to mix until the flour is just incorporated, and the dough holds together when pressed.
- Pat and press dough very firmly on the bottom and up the sides of the tart pan. This is where your hands come in! Take handfuls of the crumbly dough and press it firmly into the bottom and up the sides of the prepared tart pan. Work your way around, ensuring an even thickness. Press firmly and evenly to create a compact crust that won’t crumble when baked. Pay extra attention to the corners and edges to ensure they are well-formed.
- Bake for 14 to 18 minutes or until the crust is set in the center but still pale. Baking time can vary slightly depending on your oven. Keep an eye on the crust. You want it to be set and just starting to turn a light golden color around the edges. The center should still be pale, as it will continue to bake slightly as it cools. Baking it until just set prevents it from becoming overly browned and hard.
- Cool for 15 minutes. Allowing the crust to cool slightly before adding the filling helps it to firm up and prevents the hot filling from softening it too much. This also makes the crust easier to handle.
Step 3: Creating the Luscious Lemon Curd – Tangy and Silky Smooth
- In a 2-quart saucepan, mix 1 cup sugar and the cornstarch. Whisk together the sugar and cornstarch in the saucepan before adding any liquids. This helps to prevent lumps and ensures the cornstarch dissolves evenly.
- Gradually stir in water, lemon zest, and lemon juice until smooth. Slowly pour in the water, lemon zest, and lemon juice while whisking constantly to create a smooth mixture. Make sure there are no lumps of cornstarch remaining.
- Cook and stir over medium-high heat. Heat to boiling; boil for 1 minute, stirring constantly, until the mixture is bubbly and thickened. Place the saucepan over medium-high heat and cook, stirring constantly with a whisk. It’s important to stir continuously to prevent the mixture from sticking to the bottom of the pan and to ensure even thickening. The mixture will start to thicken as it heats up and will come to a boil. Once it boils, continue to boil for exactly 1 minute, still stirring constantly. This is crucial for activating the cornstarch and achieving the right consistency. You’ll notice the mixture becoming noticeably thicker and more translucent.
- Remove from heat. Once the curd has boiled for 1 minute and thickened, immediately remove the saucepan from the heat. It’s important to take it off the heat at this stage to prevent overcooking and curdling.
Step 4: Tempering the Egg Yolks and Finishing the Curd – Creamy Perfection
- In a small bowl, beat egg yolks with a whisk. In a separate small bowl, whisk the egg yolks until they are lightly beaten and slightly pale in color. This prepares them for tempering.
- Gradually beat about 1/2 cup of the hot mixture into the egg yolks. This is the crucial step of tempering the egg yolks. Take about 1/2 cup of the hot lemon mixture from the saucepan and slowly drizzle it into the beaten egg yolks while whisking constantly. This gradually warms the egg yolks and prevents them from scrambling when added to the hot mixture. Whisk vigorously and continuously to ensure the yolks are fully incorporated and don’t cook too quickly.
- Gradually stir the yolk mixture into the hot mixture in the saucepan. Pour the tempered egg yolk mixture back into the saucepan with the remaining hot lemon mixture. Stir constantly to combine everything smoothly.
- Cook over medium heat, stirring constantly, until the mixture starts to gently boil. Return the saucepan to medium heat and continue to cook, stirring constantly with a whisk. The mixture will thicken further as it cooks and will come to a gentle boil.
- Cook for 2 minutes longer, stirring constantly. Once the curd starts to gently boil, continue to cook for another 2 minutes, stirring constantly. This ensures the egg yolks are cooked through and the curd reaches its final thickness and stability. The curd should be thick enough to coat the back of a spoon.
- Remove from heat; stir in 2 tablespoons butter. Take the saucepan off the heat and immediately stir in the 2 tablespoons of butter, cut into pieces. Stir until the butter is completely melted and incorporated into the curd, giving it a glossy shine and richer flavor.
- Pour over cooled baked crust. Pour the hot lemon curd immediately over the cooled, baked tart crust. Spread it evenly to fill the crust completely.
- Cool at room temperature for 15 minutes; refrigerate for at least 3 hours until set. Allow the tart to cool at room temperature for about 15 minutes to start setting slightly. Then, refrigerate it for at least 3 hours, or preferably longer, until the lemon curd is completely set and firm. Chilling allows the curd to fully solidify and develop its perfect texture.
Step 5: Garnish and Serve – The Finishing Touches
- When ready to serve, sprinkle fresh berries on top. Just before serving, arrange fresh assorted berries on top of the lemon curd tart. This adds a beautiful visual appeal, fresh flavor, and a touch of sweetness and acidity that complements the lemon curd perfectly.
- Serve with whipped cream. A dollop of sweetened whipped cream is the classic accompaniment to lemon curd tart. It adds a cool, creamy element that balances the tartness and enhances the overall dessert experience.
- Store loosely covered in the refrigerator. Leftover lemon curd tart should be stored loosely covered in the refrigerator to maintain its freshness and prevent it from drying out. It will keep well for 3-4 days.
Nutrition
- Serving Size: One Normal Portion
- Calories: 350-400


