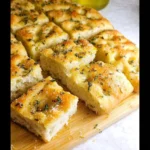
Of all the breads that have graced my kitchen, none bring the same level of anticipatory joy as a golden, dimpled sheet of focaccia. The process itself is a form of therapy—the gentle mixing, the patient waiting, the satisfying press of fingertips into the pillowy dough. But this Lemon Thyme Focaccia Bread recipe? It elevates the entire experience. The first time I baked it, the scent that filled my home was nothing short of transformative. It wasn’t just the warm, yeasty smell of baking bread; it was an entire Mediterranean afternoon captured in an aroma. The bright, zesty perfume of lemon zest mingled with the earthy, almost peppery notes of fresh thyme, all carried on the rich, fruity bouquet of warm olive oil. When it came out of the oven, my family gathered around the pan before I could even set it down properly. We tore off jagged, steaming pieces right there, burning our fingers slightly and not caring one bit. The magic is in the contrast: the shatteringly crisp, salty crust gives way to a tender, airy, and impossibly chewy crumb, with every bite bursting with sunshine and herbs. It’s more than just bread; it’s an event, a centerpiece, and a memory in the making.
The Ultimate Lemon Thyme Focaccia Bread Recipe
This recipe is designed to be forgiving for beginners while delivering professional, artisan-quality results. The key is a wet, sticky dough and two patient rising periods, which develop the complex flavor and signature open crumb structure.
For the Dough:
- Flour: 500 grams (about 4 cups) bread flour or all-purpose flour
- Water: 400 ml (about 1 ¾ cups) lukewarm water (around 105-110°F or 40-43°C)
- Yeast: 2 teaspoons (7 grams) instant or active dry yeast
- Honey or Sugar: 1 teaspoon
- Fine Sea Salt: 2 teaspoons
- Extra Virgin Olive Oil: 4 tablespoons, plus more for the bowl and pan
For the Topping:
- Extra Virgin Olive Oil: 3-4 tablespoons for drizzling
- Fresh Thyme: 2 tablespoons of fresh thyme leaves, removed from stems
- Lemon: Zest of 1 large lemon
- Flaky Sea Salt: 1-2 teaspoons for finishing (like Maldon or Jacobsen)
Step-by-Step Instructions for Perfect Focaccia
Follow these detailed steps carefully. Baking is a science, and the process is just as important as the ingredients. We’ll guide you through creating a light, airy, and flavor-packed focaccia.
Part 1: Making and Proofing the Dough
- Activate the Yeast: In a large mixing bowl, combine the lukewarm water, yeast, and honey (or sugar). Gently stir and let it sit for 5-10 minutes. You’ll know the yeast is active when the mixture becomes frothy and bubbly. If it doesn’t foam, your yeast may be old, and you should start over with fresh yeast. This step is crucial for a good rise.
- Combine the Ingredients: To the activated yeast mixture, add the 4 tablespoons of olive oil. In a separate bowl, whisk together the bread flour and fine sea salt. Add the dry ingredients to the wet ingredients in the large bowl.
- Mix the Dough: Using a spatula or a wooden spoon, mix until a wet, shaggy, and sticky dough forms. There’s no need for kneading! Just ensure there are no dry patches of flour remaining. The dough will look very wet and unmanageable at this stage—this is exactly what you want. A high-hydration dough is the secret to a light and airy focaccia crumb.
- The First Rise (Bulk Fermentation): Drizzle about a tablespoon of olive oil around the sides of the bowl. Use your spatula to turn the dough over a few times to coat it lightly in oil. Cover the bowl with a clean kitchen towel or plastic wrap. Place it in a warm, draft-free spot for 1.5 to 2 hours, or until the dough has at least doubled in size. You can create a warm environment by placing the bowl in an oven that is turned off but has the light on.
Part 2: Shaping and the Second Rise
- Prepare the Pan: Generously coat the bottom and sides of a 9×13-inch metal baking pan with 2-3 tablespoons of olive oil. Don’t be shy here; this oil is what will give your focaccia its signature crispy, almost-fried bottom crust.
- Transfer the Dough: Gently release the risen dough from the sides of the bowl with your spatula and pour it into the prepared baking pan. It will deflate slightly, which is normal.
- Stretch and Rest: With oiled hands, gently stretch and press the dough towards the corners of the pan. It may not reach all the way and might spring back. That’s okay. Cover the pan and let the dough rest for 20-30 minutes. This allows the gluten to relax.
- Final Stretch: After resting, uncover the pan and once again use oiled fingers to gently stretch the dough until it fills the pan, reaching all the corners.
- The Second Rise (Proofing): Cover the pan again and let the dough rise in a warm spot for another 45-60 minutes, or until it looks puffy and has risen noticeably.
Part 3: Dimpling and Baking
- Preheat the Oven: While the dough is on its second rise, preheat your oven to 425°F (220°C).
- Dimple the Dough: Uncover the proofed dough. Coat your fingertips with olive oil. Press your fingers straight down into the dough, all the way to the bottom of the pan, creating deep dimples all over the surface. This is a classic focaccia technique that creates pockets for the oil and toppings and prevents the bread from puffing up into one giant bubble.
- Add the Toppings: Drizzle the remaining 3-4 tablespoons of olive oil over the entire surface of the dough, letting it pool in the dimples you created. Sprinkle evenly with the fresh thyme leaves, the lemon zest, and a generous pinch of flaky sea salt.
- Bake to Perfection: Place the pan in the preheated oven and bake for 20-25 minutes. The focaccia is done when it’s a deep golden brown on top and the edges are crispy. If you lift a corner with a spatula, the bottom should also be golden and crisp.
- Cool and Serve: Remove the pan from the oven. Let the focaccia cool in the pan for about 5 minutes before using a spatula to carefully transfer it to a wire rack. This prevents the bottom from getting soggy. It’s best served warm, but it’s crucial to let it cool for at least 10-15 minutes before slicing to allow the crumb to set.
Nutrition Facts
- Servings: 12 slices
- Calories per serving: Approximately 220-250 kcal
Disclaimer: The nutritional information provided is an estimate and can vary based on the specific ingredients and brands used.
Preparation Time
- Active Time: 25 minutes
- Inactive Time (Rising): 2.5 – 3 hours
- Baking Time: 20-25 minutes
- Total Time: Approximately 3.5 hours
How to Serve Your Lemon Thyme Focaccia
This bread is incredibly versatile. It can be the star of the show or the perfect supporting actor in a larger meal. Here are some of our favorite ways to enjoy it:
- As an Appetizer:
- Serve it warm, cut into squares or strips, alongside a small bowl of high-quality extra virgin olive oil for dipping.
- Pair it with a charcuterie board featuring cured meats like prosciutto, salami, and a variety of cheeses (parmesan, goat cheese, and burrata are excellent choices).
- Offer it with dips like a creamy white bean and rosemary dip, a tangy tapenade, or a vibrant pesto.
- As a Side Dish:
- It’s the perfect companion for hearty soups and stews. Use it to soak up every last drop of a rustic tomato soup, a lentil stew, or a classic Italian minestrone.
- Serve it alongside a large, fresh salad. The bright lemon notes in the bread complement vinaigrette-dressed greens beautifully.
- Present it as the bread basket centerpiece for a pasta dinner.
- As a Sandwich Base:
- Slice the focaccia horizontally to create the ultimate sandwich bread.
- Fill it with grilled chicken or vegetables, fresh mozzarella, arugula, and a balsamic glaze.
- Create a simple but elegant sandwich with prosciutto, fig jam, and fresh basil.
- As a Simple Snack:
- Enjoy a warm square on its own, perhaps with a glass of crisp white wine. The rich flavor needs no accompaniment.
Additional Tips for Focaccia Mastery
- Flour is Key: While all-purpose flour works well, using bread flour will give your focaccia a noticeably chewier texture. Bread flour has a higher protein content, which develops stronger gluten strands, leading to that satisfying, bakery-quality chew.
- Don’t Skimp on Good Olive Oil: Focaccia is, at its heart, an olive oil bread. The flavor of the oil permeates every bite. Use a good quality, flavorful extra virgin olive oil for both the dough and the topping. The difference is remarkable.
- Patience with the Proof: The long, slow rising times are not optional. This is where the flavor develops and the air bubbles form. Rushing the rise will result in a denser, less flavorful bread. The “doubled in size” visual cue is more important than the clock.
- Embrace the Stickiness: A wet, sticky dough can be intimidating, but it’s the secret to a light, airy, and moist focaccia. Resist the temptation to add more flour to make it easier to handle. Keep your hands and spatula oiled to manage the dough without altering its hydration.
- Storing for Freshness: Focaccia is best eaten the day it’s made. If you have leftovers, store them in a paper bag or wrapped loosely in foil at room temperature for up to 2 days. To refresh it, spritz it lightly with water and warm it in a 350°F (175°C) oven for 5-7 minutes. For longer storage, you can freeze the entire slab or individual slices wrapped tightly in plastic wrap and then foil.
Frequently Asked Questions (FAQ)
1. Can I use dried thyme instead of fresh?
Yes, you can substitute dried thyme, but the flavor will be more concentrated and less nuanced. A general rule of thumb is to use one-third the amount of dried herbs as fresh. For this recipe, start with about 2 teaspoons of dried thyme. To get the most flavor out of it, “bloom” the dried thyme by mixing it with the olive oil for the topping and letting it sit for 15-20 minutes before drizzling it over the dough.
2. Why is my focaccia dense and not airy?
There are a few common culprits for dense focaccia:
- Inactive Yeast: Your yeast may have been old or the water was too hot, killing it. Always check for a bubbly, foamy mixture after proofing the yeast.
- Under-proofing: You may not have let the dough rise long enough in one or both of the rising stages. The dough needs to at least double in size during the first rise to develop the necessary air pockets.
- Adding Too Much Flour: If you found the dough too sticky and added extra flour, it would have lowered the hydration, resulting in a denser final product. Embrace the sticky dough!
3. Can I make the dough ahead of time?
Absolutely! This is a great technique for developing even more complex flavor. After mixing the dough (Step 3), cover the bowl and place it directly in the refrigerator for a slow, cold fermentation for up to 72 hours. The flavor will deepen significantly. When you’re ready to bake, take the dough out of the fridge, transfer it to the oiled pan, and let it come to room temperature and complete its second rise (this will take longer, perhaps 2-3 hours) before dimpling and baking.
4. What is the best type of pan to use for focaccia?
A dark metal 9×13-inch baking pan is the classic choice and highly recommended. Metal conducts heat efficiently, which is key to achieving that coveted crispy, golden-brown bottom crust. Glass or ceramic baking dishes will work, but they conduct heat more slowly, which can result in a softer, paler bottom. If using a glass dish, you may need to add a few extra minutes to the baking time.
5. How do I get a really crispy crust?
There are three secrets to a super crispy crust:
- Sufficient Oil: Be generous with the olive oil in the bottom of the pan. It essentially “fries” the bottom of the dough as it bakes.
- High Heat: The initial high heat of the 425°F (220°C) oven is crucial for creating a rapid “oven spring” and setting a crisp crust.
- Metal Pan: As mentioned above, a metal pan’s superior heat conduction is your best friend for a crispy bottom.
Lemon Thyme Focaccia Bread Recipe
Ingredients
For the Dough:
- Flour: 500 grams (about 4 cups) bread flour or all-purpose flour
- Water: 400 ml (about 1 ¾ cups) lukewarm water (around 105-110°F or 40-43°C)
- Yeast: 2 teaspoons (7 grams) instant or active dry yeast
- Honey or Sugar: 1 teaspoon
- Fine Sea Salt: 2 teaspoons
- Extra Virgin Olive Oil: 4 tablespoons, plus more for the bowl and pan
For the Topping:
- Extra Virgin Olive Oil: 3-4 tablespoons for drizzling
- Fresh Thyme: 2 tablespoons of fresh thyme leaves, removed from stems
- Lemon: Zest of 1 large lemon
- Flaky Sea Salt: 1-2 teaspoons for finishing (like Maldon or Jacobsen)
Instructions
Part 1: Making and Proofing the Dough
- Activate the Yeast: In a large mixing bowl, combine the lukewarm water, yeast, and honey (or sugar). Gently stir and let it sit for 5-10 minutes. You’ll know the yeast is active when the mixture becomes frothy and bubbly. If it doesn’t foam, your yeast may be old, and you should start over with fresh yeast. This step is crucial for a good rise.
- Combine the Ingredients: To the activated yeast mixture, add the 4 tablespoons of olive oil. In a separate bowl, whisk together the bread flour and fine sea salt. Add the dry ingredients to the wet ingredients in the large bowl.
- Mix the Dough: Using a spatula or a wooden spoon, mix until a wet, shaggy, and sticky dough forms. There’s no need for kneading! Just ensure there are no dry patches of flour remaining. The dough will look very wet and unmanageable at this stage—this is exactly what you want. A high-hydration dough is the secret to a light and airy focaccia crumb.
- The First Rise (Bulk Fermentation): Drizzle about a tablespoon of olive oil around the sides of the bowl. Use your spatula to turn the dough over a few times to coat it lightly in oil. Cover the bowl with a clean kitchen towel or plastic wrap. Place it in a warm, draft-free spot for 1.5 to 2 hours, or until the dough has at least doubled in size. You can create a warm environment by placing the bowl in an oven that is turned off but has the light on.
Part 2: Shaping and the Second Rise
- Prepare the Pan: Generously coat the bottom and sides of a 9×13-inch metal baking pan with 2-3 tablespoons of olive oil. Don’t be shy here; this oil is what will give your focaccia its signature crispy, almost-fried bottom crust.
- Transfer the Dough: Gently release the risen dough from the sides of the bowl with your spatula and pour it into the prepared baking pan. It will deflate slightly, which is normal.
- Stretch and Rest: With oiled hands, gently stretch and press the dough towards the corners of the pan. It may not reach all the way and might spring back. That’s okay. Cover the pan and let the dough rest for 20-30 minutes. This allows the gluten to relax.
- Final Stretch: After resting, uncover the pan and once again use oiled fingers to gently stretch the dough until it fills the pan, reaching all the corners.
- The Second Rise (Proofing): Cover the pan again and let the dough rise in a warm spot for another 45-60 minutes, or until it looks puffy and has risen noticeably.
Part 3: Dimpling and Baking
- Preheat the Oven: While the dough is on its second rise, preheat your oven to 425°F (220°C).
- Dimple the Dough: Uncover the proofed dough. Coat your fingertips with olive oil. Press your fingers straight down into the dough, all the way to the bottom of the pan, creating deep dimples all over the surface. This is a classic focaccia technique that creates pockets for the oil and toppings and prevents the bread from puffing up into one giant bubble.
- Add the Toppings: Drizzle the remaining 3-4 tablespoons of olive oil over the entire surface of the dough, letting it pool in the dimples you created. Sprinkle evenly with the fresh thyme leaves, the lemon zest, and a generous pinch of flaky sea salt.
- Bake to Perfection: Place the pan in the preheated oven and bake for 20-25 minutes. The focaccia is done when it’s a deep golden brown on top and the edges are crispy. If you lift a corner with a spatula, the bottom should also be golden and crisp.
- Cool and Serve: Remove the pan from the oven. Let the focaccia cool in the pan for about 5 minutes before using a spatula to carefully transfer it to a wire rack. This prevents the bottom from getting soggy. It’s best served warm, but it’s crucial to let it cool for at least 10-15 minutes before slicing to allow the crumb to set.
Nutrition
- Serving Size: One Normal Portion
- Calories: 220-250