
Of all the wild and wonderful treats that parade through our kitchen during the Halloween season, none disappear quite as fast as this Monster Popcorn. The first time I made it, I admit, it was a last-minute scramble for a school party. I grabbed a bag of popcorn, some vibrant green candy melts I had in the pantry, and a container of candy eyeballs that my kids insisted we buy “just in case.” What emerged from that chaotic kitchen session was nothing short of magic. My kids’ eyes went wide, not just at the ghoulish green color and the goofy googly eyes staring back at them, but at the sheer fun of it all. It wasn’t just a snack; it was an activity, a decoration, and the star of the party table. That giant bowl was scraped clean in minutes, with little hands, and even a few grown-up ones, reaching for just one more crunchy, sweet, and salty handful. It has since become our non-negotiable Halloween tradition, the official fuel for pumpkin carving, scary movie marathons, and costume preparations. It’s more than a recipe; it’s a bowl full of happy, spooky memories.
The Ultimate Monster Popcorn Recipe for a Spooktacular Celebration
This isn’t just popcorn; it’s a personality-packed snack that brings the fun and festive spirit of Halloween to life. It’s the perfect combination of salty, sweet, and crunchy, with a vibrant, monstrous look that’s impossible to resist. Whether you’re hosting a massive Halloween bash, looking for a fun classroom treat, or simply want to make a movie night extra special, this Monster Popcorn is your ticket to a ghoulishly good time. Its beauty lies in its simplicity and its infinite customizability. Prepare to create a monsterpiece!
Ingredients for Your Ghoulishly Good Popcorn
To bring this creature feature to life, you’ll need a few key components. We’ve broken them down into the base, the coating, and the all-important monstrous decorations.
For the Popcorn Base:
- 10 cups of popped popcorn: This is roughly equivalent to ½ cup of unpopped kernels. Using plain, unsalted, and unbuttered popcorn works best as it allows the sweet coating to be the star and helps it adhere better. Air-popped or stovetop popcorn is ideal.
- A large baking sheet: You’ll need one or two large, rimmed baking sheets to spread the popcorn out.
For the Monster Coating:
- 1 (12-ounce) bag of Green Candy Melts: Brands like Wilton or Ghirardelli are excellent choices. These are designed to melt smoothly and set up firm.
- 1 teaspoon of coconut oil or vegetable shortening (optional): This can help thin the candy melts if they feel too thick, making it easier to coat the popcorn evenly.
For the Spooky Mix-Ins:
- 1 cup of candy corn: The classic Halloween staple adds a chewy texture and iconic colors.
- ½ cup of assorted candy eyeballs: Use a mix of small and large sizes to give your monsters different personalities!
- ½ cup of Halloween-themed sprinkles: Think bats, ghosts, pumpkins, or a simple mix of black, orange, and purple jimmies or nonpareils.
Step-by-Step Instructions to Create Your Monster
Follow these simple steps to assemble your delicious monster mash. The key is to have all your ingredients prepped and ready to go, as you’ll need to work quickly once the candy melts are ready.
- Prepare Your Workspace: Line a large baking sheet (or two, if needed) with parchment paper or a silicone baking mat. This is a crucial step that prevents the popcorn from sticking and makes cleanup incredibly easy.
- Pop the Popcorn: Pop your popcorn using your preferred method (air-popper, stovetop, or a plain microwave variety). As you transfer the popped popcorn to a very large mixing bowl, take a moment to pick out any unpopped kernels. No one wants to bite down on a hard kernel!
- Melt the Candy Coating: Place the green candy melts in a microwave-safe bowl. Microwave in 30-second intervals, stirring well after each interval, until the melts are about 90% melted. Continue stirring outside the microwave until the residual heat melts the remaining pieces and the mixture is completely smooth. Be careful not to overheat, as this can cause the candy to “seize” and become thick and clumpy. If your melted candy seems too thick, stir in the optional teaspoon of coconut oil or shortening until it’s smooth and has a more fluid consistency.
- Coat the Popcorn: Pour the melted green candy coating all over the popcorn in the large bowl. Using two silicone spatulas, gently fold and toss the popcorn until it is evenly coated in the green mixture. Try to be gentle to avoid crushing the popcorn.
- Spread and Decorate: Immediately pour the coated popcorn onto your prepared baking sheet and spread it into a single, even layer. While the coating is still wet, sprinkle generously with the candy corn and Halloween sprinkles.
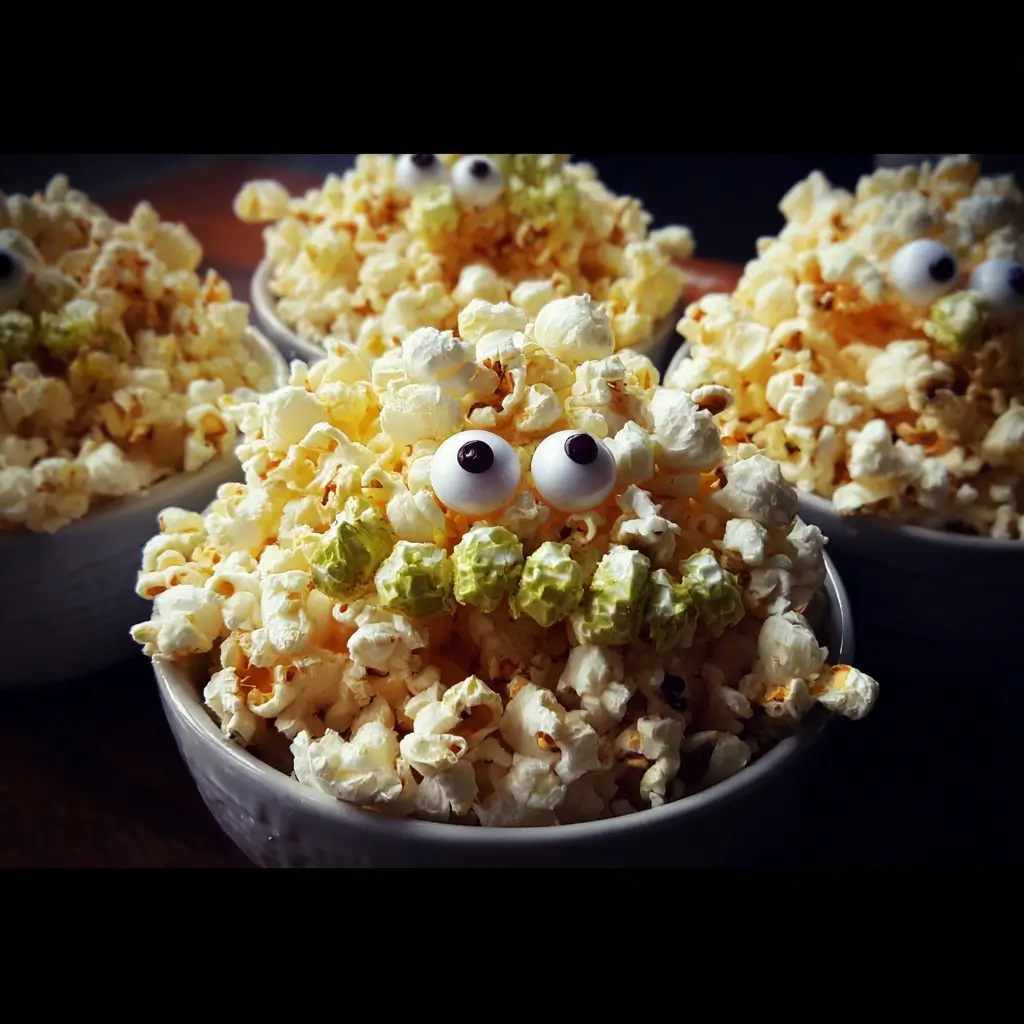
- Add the Eyes: Now for the most important part! Press the candy eyeballs all over the popcorn. Place them in clusters and scattered about to make it look like a crowd of little monsters are peering out from the bowl. This is a great step for kids to help with!
- Cool and Set: Let the Monster Popcorn sit at room temperature for about 30-45 minutes, or until the candy coating is completely firm to the touch. You can also place it in the refrigerator for 10-15 minutes to speed up the process.
- Break and Serve: Once the coating is fully set, gently break the popcorn apart into clusters of your desired size. Serve immediately in a large bowl or package it for gifts or party favors.
Nutritional Information (An Estimation)
- Servings: This recipe makes approximately 12 servings.
- Calories Per Serving: Approximately 280-320 calories per serving.
Disclaimer: The nutritional information provided is a rough estimate and can vary significantly based on the specific brands of ingredients used, the type of popcorn, and the quantity and type of additional mix-ins you choose to include.
Time Commitment
- Preparation Time: 15 minutes
- Cooling & Setting Time: 30 minutes
- Total Time: 45 minutes
Why You’ll Love This Monster Popcorn Recipe
Beyond being a delicious treat, there are so many reasons this recipe will become a go-to for all your festive occasions.
- Incredibly Easy and Quick: With no baking required and a total time of under an hour, this is the perfect recipe for busy parents and party planners. The steps are simple enough for even the most novice cooks to master.
- Visually Stunning Centerpiece: The vibrant green color, the pops of orange and yellow from the candy corn, and the comical googly eyes make this a true showstopper. It doubles as a decoration and a snack, instantly adding a dose of Halloween spirit to any table.
- Completely Customizable: This recipe is a fantastic template for your creativity. Don’t like green? Use purple, orange, or even black candy melts. Not a fan of candy corn? Swap it for Reese’s Pieces, Halloween-colored M&M’s, or chopped candy bars. The possibilities are endless!
- Perfect for Parties and Gifts: This recipe makes a large batch, perfect for feeding a crowd at a Halloween party or school event. It also packages beautifully in cellophane bags tied with festive ribbon, making for adorable and affordable party favors or gifts for neighbors and teachers.
- A Fun, Kid-Friendly Activity: This is a wonderful recipe to get the kids involved in the kitchen. They can help sprinkle the candies, place the eyeballs, and, of course, be the official taste-testers. It’s a great way to build fun family memories during the holiday season.
Choosing Your Ingredients: A Deep Dive for Monstrous Success
The quality and type of ingredients you choose can elevate your Monster Popcorn from good to ghoulishly great. Here’s a closer look at the key components and how to choose the best ones.
The Popcorn: The Canvas for Your Creation
The popcorn itself is the foundation of this recipe, so it’s worth a little extra attention.
- Kernel is King: For the best texture and flavor, start with popcorn kernels. You have complete control over how it’s prepared. Yellow kernels pop up larger and are more durable, making them great for holding up to the candy coating. White kernels are smaller and more tender.
- Popping Methods:
- Air-Popper: This is the best method as it produces light, fluffy popcorn with no added oil, which helps the candy coating stick perfectly.
- Stovetop: Popping popcorn in a large pot with a little neutral oil (like coconut or canola) is a classic method that yields fantastic results. Just be sure to shake the pot frequently to prevent burning.
- Microwave: If you use microwave popcorn, opt for a plain, unbuttered, and unsalted variety. The additives and artificial butter flavor in movie-style popcorn can clash with the sweet coating.
- The Kernel Cull: Always remember to remove the unpopped kernels, also known as “old maids.” They are dental hazards and can ruin the otherwise delightful texture of your snack mix. A simple trick is to place a cooling rack over your bowl and gently shake; the smaller, unpopped kernels will fall through.
The Candy Melts: Bringing the Color to Life
Candy melts are the secret weapon for this recipe’s vibrant color and easy application.
- What Are Candy Melts? Candy melts (also called confectionery coating or melting wafers) are made with sugar, milk solids, vegetable oils, and flavorings. Unlike real chocolate, they don’t contain cocoa butter, which means they melt easily without the need for tempering and set up hard and shiny at room temperature.
- Melting Techniques: The microwave is fast and effective, but the key is low power and short intervals. A double boiler offers a gentler, more controlled heat source. If you use a double boiler, ensure that absolutely no water or steam gets into the candy melts, as even a tiny drop can cause them to seize into a grainy, unusable mass.
- Color Variations: While green is classic for a monster theme, don’t be afraid to experiment!
- Purple: Perfect for a “Purple People Eater” theme.
- Orange: A great base for a pumpkin or general fall theme.
- Black: Creates a spooky, dark-as-night popcorn.
- Multiple Colors: Divide your popcorn into batches and coat them in different colors, then gently mix them together for a vibrant “Monster Mash” look.
The Mix-Ins: Unleashing Your Inner Mad Scientist
This is where you can truly personalize your popcorn. Think about adding different colors, textures, and flavors.
- Salty & Sweet: For a more complex flavor profile, add a salty component. Crushed pretzels, salted nuts, or even potato chips can be a fantastic counterpoint to the sweet candy coating.
- Chocolate Lovers: Add mini chocolate chips, M&M’s, or Reese’s Pieces. Wait until the green coating has partially set before adding them, otherwise, they might melt and streak.
- Texture is Everything: Add mini marshmallows for a soft, chewy element. Crushed Oreos can add a dark, crunchy texture.
- Beyond Candy Corn: If candy corn isn’t your favorite, try gummy worms, sour patch kids, or chopped-up candy bars like Twix or Kit Kats.
How to Serve Your Monstrous Creation
Presentation is half the fun! Here are some creative ways to serve your Monster Popcorn that will wow your guests.
- The Classic Cauldron: Find a large, black plastic cauldron from a party store and fill it to the brim with your popcorn. It serves as a perfect, on-theme centerpiece for your food table.
- Individual Treat Bags: Portion the popcorn into clear cellophane bags. Tie each bag with a festive orange, black, or purple ribbon. You can even add a custom “Happy Halloween” tag for a personal touch. These are perfect for school parties or as take-home favors.
- Monster-Faced Cups: Use clear plastic cups and a black permanent marker to draw silly or spooky monster faces on the outside. Fill each cup with popcorn for easy, single-serving portions that kids will love.
- A “Build-Your-Own-Monster” Popcorn Bar: Start with a big bowl of the basic green popcorn. Set out smaller bowls with a variety of extra toppings: different colored sprinkles, mini chocolate chips, gummy worms, extra candy eyeballs, and mini marshmallows. Let your guests customize their own personal monster mix.
- Popcorn Boxes: Use classic striped popcorn boxes, which you can find in various colors online or at party stores. They add a fun, carnival-like feel to the experience.
Pro Tips for Perfect Monster Popcorn Every Time
Follow these five expert tips to ensure your popcorn-making process is smooth and the results are flawless.
- Parchment Paper is Your Best Friend: Do not skip this step! Lining your baking sheets with parchment paper or a silicone mat is essential. It guarantees that your candy-coated popcorn won’t stick to the pan, making the “breaking apart” step and the cleanup process a breeze.
- The Two-Spatula Technique: When mixing the melted candy with the popcorn, use two large silicone spatulas. Use a “lifting and folding” motion, bringing the popcorn from the bottom of the bowl up and over the top. This method coats the popcorn evenly and is much gentler than stirring, which can crush the delicate popped kernels.
- Master the Melt: The number one rule for melting candy melts is to avoid water at all costs. Ensure your bowl and spatula are bone dry. The second rule is to avoid overheating. Microwaving in short bursts and stirring in between is the safest way to prevent the candy from burning and seizing.
- Strategic Sprinkling: Timing is everything when adding your mix-ins. Add the heavier items like candy corn immediately after spreading the popcorn on the baking sheet so they adhere well. Add lighter items like sprinkles and the candy eyeballs right after. For delicate items like chocolate chips that might melt, wait 5-10 minutes for the coating to cool slightly before adding them.
- Work in Batches if Necessary: If you are doubling the recipe or if your mixing bowl isn’t quite large enough, it’s better to work in two separate batches. Melt half the candy, coat half the popcorn, and spread it on a sheet. Then repeat with the second half. This prevents the candy from hardening in the bowl before you have a chance to properly coat all the popcorn.
Frequently Asked Questions (FAQ)
Here are answers to some common questions you might have about making this spooktacular treat.
1. Can I use white chocolate instead of candy melts?
Yes, you absolutely can, but there are a few important differences. White chocolate contains cocoa butter and needs to be melted more carefully to avoid scorching. More importantly, to color it, you must use an oil-based or powder-based food coloring specifically designed for chocolate. Standard water-based food coloring will cause the white chocolate to seize and become a clumpy mess. Candy melts are generally easier for this type of recipe.
2. How do I store leftover Monster Popcorn?
Store any leftovers in a completely airtight container at room temperature. A large Tupperware container or a sealable Ziploc bag will work perfectly. It will stay fresh and crunchy for up to 5-7 days. Avoid storing it in the refrigerator, as the condensation can make the popcorn become soft and stale.
3. My candy melts seized up and got thick! What did I do wrong?
This is a common issue! Seizing is when the candy melt mixture becomes thick, grainy, and unworkable. It’s almost always caused by one of two things: a tiny amount of water (from a wet bowl or spatula) getting into the melts, or overheating. To prevent this, make sure all your equipment is completely dry and melt the candy slowly and gently, stirring frequently.
4. Can I make this recipe ahead of time for a party?
Yes, this is a great make-ahead recipe! You can prepare it up to 3 days in advance. Just be sure to store it in a sealed, airtight container in a cool, dry place to maintain its freshness and crunch. This frees you up to focus on other party preparations on the day of the event.
5. Is this recipe gluten-free?
It can be! Popcorn itself is naturally gluten-free. However, you must check the labels on all your other ingredients. Most major brands of candy melts, candy corn, and candy eyeballs are gluten-free, but cross-contamination can sometimes be an issue in manufacturing facilities. Always double-check the packaging to be certain if you are serving someone with a serious gluten allergy or celiac disease.

Monster Popcorn Recipe
Ingredients
For the Popcorn Base:
- 10 cups of popped popcorn: This is roughly equivalent to ½ cup of unpopped kernels. Using plain, unsalted, and unbuttered popcorn works best as it allows the sweet coating to be the star and helps it adhere better. Air-popped or stovetop popcorn is ideal.
- A large baking sheet: You’ll need one or two large, rimmed baking sheets to spread the popcorn out.
For the Monster Coating:
- 1 (12-ounce) bag of Green Candy Melts: Brands like Wilton or Ghirardelli are excellent choices. These are designed to melt smoothly and set up firm.
- 1 teaspoon of coconut oil or vegetable shortening (optional): This can help thin the candy melts if they feel too thick, making it easier to coat the popcorn evenly.
For the Spooky Mix-Ins:
- 1 cup of candy corn: The classic Halloween staple adds a chewy texture and iconic colors.
- ½ cup of assorted candy eyeballs: Use a mix of small and large sizes to give your monsters different personalities!
- ½ cup of Halloween-themed sprinkles: Think bats, ghosts, pumpkins, or a simple mix of black, orange, and purple jimmies or nonpareils.
Instructions
- Prepare Your Workspace: Line a large baking sheet (or two, if needed) with parchment paper or a silicone baking mat. This is a crucial step that prevents the popcorn from sticking and makes cleanup incredibly easy.
- Pop the Popcorn: Pop your popcorn using your preferred method (air-popper, stovetop, or a plain microwave variety). As you transfer the popped popcorn to a very large mixing bowl, take a moment to pick out any unpopped kernels. No one wants to bite down on a hard kernel!
- Melt the Candy Coating: Place the green candy melts in a microwave-safe bowl. Microwave in 30-second intervals, stirring well after each interval, until the melts are about 90% melted. Continue stirring outside the microwave until the residual heat melts the remaining pieces and the mixture is completely smooth. Be careful not to overheat, as this can cause the candy to “seize” and become thick and clumpy. If your melted candy seems too thick, stir in the optional teaspoon of coconut oil or shortening until it’s smooth and has a more fluid consistency.
- Coat the Popcorn: Pour the melted green candy coating all over the popcorn in the large bowl. Using two silicone spatulas, gently fold and toss the popcorn until it is evenly coated in the green mixture. Try to be gentle to avoid crushing the popcorn.
- Spread and Decorate: Immediately pour the coated popcorn onto your prepared baking sheet and spread it into a single, even layer. While the coating is still wet, sprinkle generously with the candy corn and Halloween sprinkles.
- Add the Eyes: Now for the most important part! Press the candy eyeballs all over the popcorn. Place them in clusters and scattered about to make it look like a crowd of little monsters are peering out from the bowl. This is a great step for kids to help with!
- Cool and Set: Let the Monster Popcorn sit at room temperature for about 30-45 minutes, or until the candy coating is completely firm to the touch. You can also place it in the refrigerator for 10-15 minutes to speed up the process.
- Break and Serve: Once the coating is fully set, gently break the popcorn apart into clusters of your desired size. Serve immediately in a large bowl or package it for gifts or party favors.
Nutrition
- Serving Size: One Normal Portion
- Calories: 280-320