

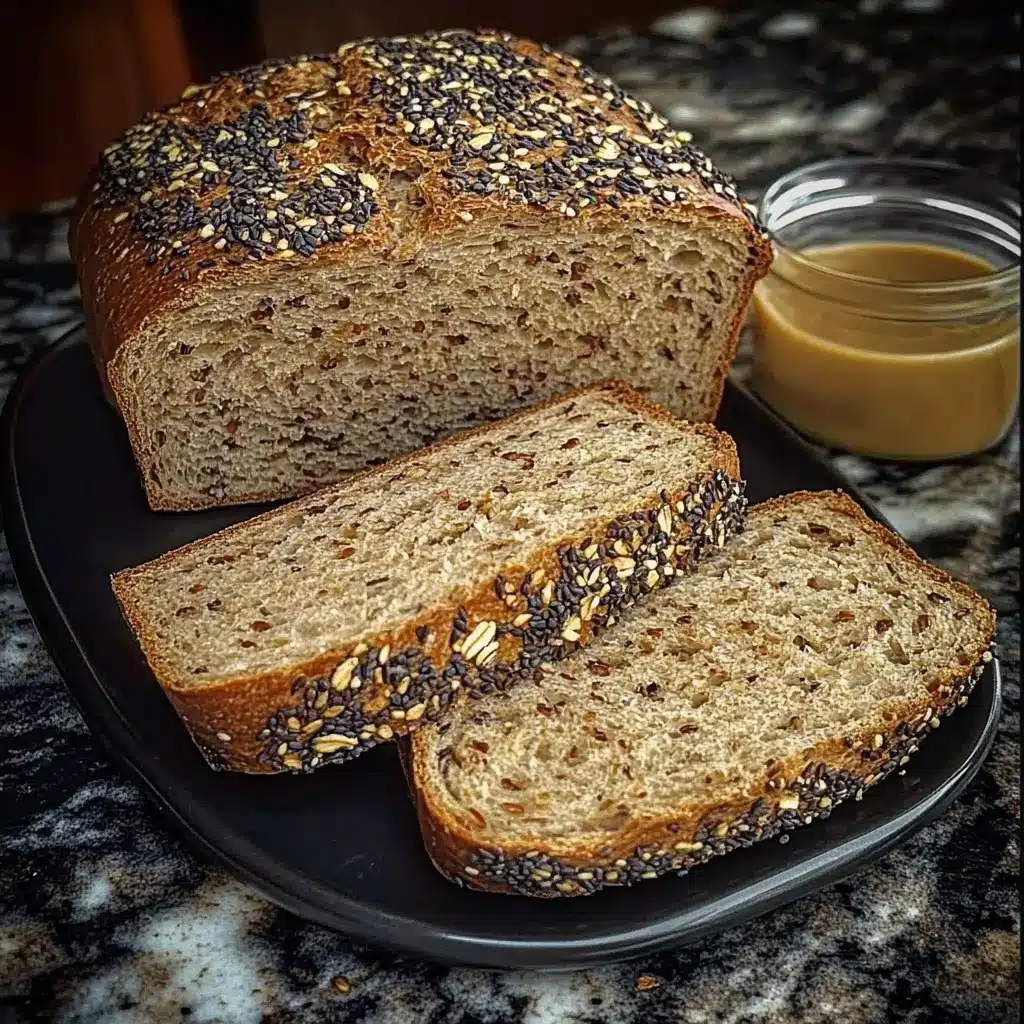

There’s something uniquely satisfying about the aroma of freshly baked bread wafting through the house, a scent that promises warmth, comfort, and deliciousness. For years, I searched for that perfect multigrain seeded bread recipe – one that wasn’t too complicated, delivered on flavour and texture, and packed a nutritional punch. After much experimenting, this recipe was born, and it quickly became a family favourite. The kids, initially skeptical of “healthy bread,” now ask for it specifically for their school sandwiches, and my partner and I love it toasted for breakfast or alongside a hearty soup. The combination of wholesome flours and the delightful crunch of various seeds creates a loaf that is not only incredibly tasty but also wonderfully versatile. It has a beautifully soft crumb, a delightfully chewy crust, and a complex, nutty flavour that store-bought bread simply can’t replicate. Baking this bread has become a weekend ritual, a small act of creation that brings so much joy and nourishment to our table.
The Ultimate Multigrain Seeded Bread: A Recipe for Wholesome Delight
This recipe guides you through creating a sensational loaf of multigrain seeded bread from scratch. It’s designed to be straightforward enough for enthusiastic beginners while yielding results that will impress seasoned bakers. Prepare to fill your home with the irresistible scent of baking and your table with a truly superior bread.
Ingredients for Your Homemade Multigrain Masterpiece
Gathering high-quality ingredients is the first step towards a phenomenal loaf. Here’s what you’ll need:
For the Seed Soaker:
- ¼ cup (40g) flax seeds (linseeds)
- ¼ cup (35g) sunflower seeds
- ¼ cup (30g) pumpkin seeds (pepitas)
- 2 tablespoons (20g) sesame seeds
- 2 tablespoons (15g) poppy seeds
- ½ cup (120ml) boiling water
For the Dough:
- 1 ½ cups (360ml) lukewarm water (around 105-115°F or 40-46°C)
- 2 ¼ teaspoons (7g, or 1 standard packet) active dry yeast or instant yeast
- 2 tablespoons (40g) honey or maple syrup
- 2 cups (280g) strong bread flour (high protein flour)
- 1 ½ cups (180g) whole wheat flour
- ½ cup (60g) rye flour (or spelt flour, or more whole wheat/bread flour)
- 2 tablespoons (30ml) olive oil or melted unsalted butter
- 1 ½ teaspoons (9g) fine sea salt
For Topping (Optional):
- 1 tablespoon mixed seeds (leftover from soaker blend, or your choice)
- 1 egg white, lightly beaten with 1 tsp water (for shine and seed adhesion), or a spray of water
Step-by-Step Instructions to Baking Perfection
Follow these instructions carefully for a loaf that boasts a perfect crumb, crust, and flavour.
1. Prepare the Seed Soaker (Autolyse for Seeds):
In a medium bowl, combine all the seeds for the soaker (flax, sunflower, pumpkin, sesame, poppy). Pour the ½ cup of boiling water over them. Stir well, cover, and let it sit for at least 1 hour, or even overnight in the refrigerator. This step softens the seeds, makes them easier to incorporate, and prevents them from drawing too much moisture from the dough later. Drain any excess water before adding to the dough, though most should be absorbed.
2. Activate the Yeast (Bloom if using Active Dry Yeast):
In a large mixing bowl (or the bowl of your stand mixer), pour in the 1 ½ cups of lukewarm water. Sprinkle the yeast over the water, then stir in the honey or maple syrup. Let it stand for 5-10 minutes until the mixture becomes foamy. This indicates the yeast is active. If using instant yeast, you can skip this specific blooming step and add it directly to the dry ingredients, but blooming with the warm water and sweetener still gives it a good start.
3. Combine Dry Ingredients:
In a separate large bowl, whisk together the bread flour, whole wheat flour, rye flour (or chosen alternative), and salt. This ensures the salt is evenly distributed and doesn’t directly contact the yeast initially, which can inhibit its activity.
4. Mix the Dough:
Once the yeast is foamy, add the olive oil (or melted butter) and the drained seed soaker to the yeast mixture. Stir to combine.
Gradually add the mixed dry ingredients to the wet ingredients. If using a stand mixer, use the dough hook attachment and mix on low speed until a shaggy dough forms. If mixing by hand, use a sturdy wooden spoon or spatula to bring the ingredients together.
5. Knead the Dough:
- By Stand Mixer: Increase the speed to medium-low and knead for 7-10 minutes. The dough should become smooth, elastic, and pull away from the sides of the bowl. It will be slightly tacky due to the whole grains and seeds but shouldn’t be overly sticky. If it’s too wet, add a tablespoon of bread flour at a time. If too dry, a teaspoon of water.
- By Hand: Turn the shaggy dough out onto a lightly floured surface. Knead for 10-15 minutes. Fold the dough over itself, push it away with the heel of your hand, rotate, and repeat. Continue until the dough is smooth, elastic, and passes the “windowpane test” (a small piece can be stretched thin enough to see light through it without tearing easily).
6. First Rise (Bulk Fermentation):
Lightly oil the mixing bowl (or a clean large bowl). Form the kneaded dough into a ball and place it in the oiled bowl, turning it once to coat the entire surface with oil. This prevents a crust from forming.
Cover the bowl tightly with plastic wrap or a damp kitchen towel. Let the dough rise in a warm, draft-free place for 1.5 to 2 hours, or until it has doubled in size. The exact time will depend on the ambient temperature.
7. Shape the Loaf:
Gently punch down the risen dough to release the air. Turn it out onto a lightly floured work surface.
Gently flatten the dough into a rough rectangle. To shape it into a traditional loaf (for a loaf pan):
* Fold the top third of the rectangle down towards the center and press to seal.
* Fold the bottom third up over the first fold and press to seal.
* Rotate the dough 90 degrees. Starting from one of the shorter ends, tightly roll the dough into a log, pinching the seam closed with each turn and at the end. Pinch the ends of the log as well and tuck them slightly under.
Ensure the surface tension is good – the loaf should feel taut.
8. Second Rise (Proofing):
Grease and lightly flour a standard 9×5 inch (23×13 cm) loaf pan. Carefully place the shaped dough, seam-side down, into the prepared pan.
Cover the pan loosely with oiled plastic wrap or a damp kitchen towel. Let it rise again in a warm, draft-free place for 45-75 minutes, or until it has risen about 1-1.5 inches above the rim of the pan and looks puffy. It shouldn’t quite double this time. You can test if it’s ready by gently poking it with a floured finger; if the indentation springs back slowly and leaves a slight mark, it’s ready. If it springs back immediately, it needs more time. If it collapses, it’s over-proofed.
9. Preheat Oven & Prepare for Baking:
About 20-30 minutes before the second rise is complete, preheat your oven to 400°F (200°C). If you have a baking stone, place it in the oven to preheat.
For a crispier crust, you can create steam in your oven. Place an empty metal baking pan (not glass) on the bottom rack of the oven while it preheats. Just before putting the bread in, you’ll pour about 1 cup of hot water into this pan.
10. Score and Bake the Bread:
If desired, brush the top of the loaf very gently with the egg white wash (or spray with water) and sprinkle with the optional topping seeds.
Using a very sharp knife, lame, or clean razor blade, make one decisive slash (about ½ inch deep) down the center of the loaf, or a few diagonal slashes. This allows the bread to expand controllably during baking.
Carefully place the loaf pan into the preheated oven (on the baking stone if using). If creating steam, quickly pour the hot water into the preheated pan on the bottom rack and immediately close the oven door to trap the steam.
Bake for 35-45 minutes. After the first 20 minutes, you can reduce the oven temperature to 375°F (190°C) if the crust is browning too quickly.
The bread is done when it’s deeply golden brown and sounds hollow when tapped on the bottom. For precision, an instant-read thermometer inserted into the center should register 190-210°F (88-99°C).
11. Cool the Bread:
Immediately remove the bread from the loaf pan and transfer it to a wire cooling rack. This is crucial to prevent a soggy bottom and allows air to circulate.
Resist the urge to slice into it right away! Let the bread cool completely, for at least 1-2 hours, before slicing. It’s still cooking internally as it cools, and slicing too early can result in a gummy texture.
Nutrition Facts (Estimated)
- Servings: This recipe makes 1 standard loaf, approximately 14-16 slices.
- Calories per serving (1 slice, assuming 14 slices per loaf): Approximately 190-230 calories.
Note: This is an estimation. Actual nutritional values can vary based on specific brands of ingredients used, precise serving sizes, and any modifications made to the recipe. This bread is a good source of dietary fiber, protein, and healthy fats from the seeds.
Preparation & Baking Time Breakdown
Understanding the time commitment helps in planning your baking day:
- Seed Soaking Time: At least 1 hour (can be done ahead)
- Active Preparation Time (Mixing, Kneading, Shaping): Approximately 30-40 minutes
- First Rise (Bulk Fermentation): 1.5 – 2 hours
- Second Rise (Proofing): 45 – 75 minutes
- Baking Time: 35 – 45 minutes
- Cooling Time: At least 1-2 hours (essential)
- Total Estimated Time (excluding seed soaking if done ahead): Approximately 4.5 – 6 hours (largely inactive rising time)
How to Serve Your Glorious Multigrain Seeded Bread
This versatile bread can be enjoyed in countless ways. Here are some ideas:
- Classic Toast:
- Serve warm, toasted slices with a generous spread of butter.
- Top with your favourite jam, marmalade, or honey.
- Enjoy with peanut butter or almond butter and sliced banana.
- Savory Sandwiches:
- The perfect base for hearty sandwiches – think turkey and avocado, classic BLT, or a gourmet grilled cheese.
- Great for open-faced sandwiches with hummus and roasted vegetables.
- Accompaniment to Meals:
- Serve alongside hearty soups, stews, or chilis for dipping.
- A wonderful partner to salads.
- Use it to make garlic bread.
- Breakfast Delights:
- Make exceptional avocado toast, topped with a sprinkle of everything bagel seasoning or red pepper flakes.
- Use slightly older slices to make delicious French toast.
- Creative Uses:
- Cut into cubes, toss with olive oil and herbs, and bake to make homemade croutons.
- Process stale slices into breadcrumbs for cooking.
Additional Tips for Multigrain Bread Success
Elevate your bread-making game with these professional insights:
- Flour Power & Quality: The type and quality of flour significantly impact your bread. Bread flour has a higher protein content (typically 12-14%), which forms more gluten, leading to a stronger, chewier structure ideal for yeast breads. Whole wheat flour adds fiber and a nutty taste but can make the bread denser if used exclusively. The rye flour adds a lovely earthy complexity. Don’t be afraid to experiment with other whole grains like spelt or oat flour (substituting a portion of the whole wheat). Always use fresh flour; old flour can affect yeast activity and flavour.
- The Importance of the Seed Soaker: Don’t skip soaking the seeds! Seeds, especially flax, are thirsty. If added dry, they will absorb moisture from your dough, potentially making it too dry and stiff, resulting in a dense loaf. Soaking plumps them up, makes their nutrients more bioavailable, and ensures they integrate well without compromising dough hydration. Toasting some seeds (like sunflower or pumpkin) lightly before soaking can also enhance their nutty flavour.
- Hydration Heroics: Whole grain flours absorb more liquid than white flour. This recipe is formulated for a good balance, but environmental factors like humidity can affect dough consistency. Don’t be afraid to adjust slightly. If your dough feels excessively sticky after initial mixing (beyond the typical tackiness of whole grain dough), add bread flour one tablespoon at a time. If it feels too stiff and dry, add lukewarm water one teaspoon at a time. The goal is a soft, pliable, slightly tacky dough that is manageable.
- Kneading Know-How & The Windowpane Test: Proper kneading is vital for developing the gluten network that gives bread its structure and chew. Whether by hand or machine, ensure you knead until the dough is smooth and elastic. The “windowpane test” is your best indicator: take a small piece of dough and gently stretch it between your fingers. If you can stretch it thin enough to see light through it without it tearing easily (like a windowpane), the gluten is well-developed. If it tears quickly, it needs more kneading.
- Baking & Cooling Precision: Using an oven thermometer ensures your oven is at the correct temperature, as many ovens can be inaccurate. Creating steam in the oven for the first 10-15 minutes of baking helps the bread achieve a better oven spring (rise) and a crispier, shinier crust. The most reliable way to check for doneness is with an instant-read thermometer – aim for an internal temperature of 190-210°F (88-99°C). And finally, the hardest part: patience during cooling. Cooling on a wire rack allows steam to escape, preventing a soggy bottom and allowing the crumb structure to set properly.
Frequently Asked Questions (FAQ)
Q1: Can I use different types of seeds or nuts in this recipe?
A: Absolutely! Feel free to customize the seed blend. Chia seeds (use sparingly as they absorb a lot of water), hemp seeds, or even finely chopped walnuts or pecans can be great additions. If adding nuts, you might want to lightly toast them first for enhanced flavour. Just aim for a similar total volume of add-ins as specified for the seeds to maintain dough balance.
Q2: Can I make this multigrain seeded bread recipe vegan?
A: Yes, easily! Simply use maple syrup or agave nectar instead of honey. If the recipe called for dairy milk (which this one doesn’t for the main dough), you would substitute it with a plant-based milk like almond, soy, or oat milk. Ensure your chosen fat is plant-based (like olive oil, which is already an option, or a vegan butter alternative). For the optional egg wash, you can use a plant-based milk wash or just a spray of water.
Q3: How should I store my homemade multigrain bread to keep it fresh?
A: Once completely cooled, store your bread in a bread box, a paper bag, or a loosely sealed plastic bag at room temperature for 2-3 days. A paper bag helps maintain a crispier crust, while a plastic bag will keep it softer but may make the crust less crisp. For longer storage, slice the completely cooled loaf, wrap it tightly in plastic wrap and then in foil or place it in a freezer-safe bag, and freeze for up to 3 months. Thaw slices at room temperature or toast directly from frozen.
Q4: My bread came out dense. What did I do wrong?
A: Several factors can lead to dense bread:
* Under-proofing: The dough didn’t rise enough during either the first or second rise.
* Not enough kneading: Insufficient gluten development means the dough can’t trap a_nd hold the gases produced by the yeast.
* Old or inactive yeast: Your yeast might not have been potent enough. Always check the expiration date and bloom active dry yeast to ensure it’s foamy.
* Too much flour: Adding too much flour during kneading can dry out the dough.
* Killing the yeast: Water that was too hot or adding salt directly to the yeast can kill it.
* Incorrect oven temperature: An oven that’s too cool might not provide enough initial heat for good oven spring.
Q5: Can I make this recipe using only whole wheat flour?
A: You can, but the result will be a significantly denser and heavier loaf. Bread flour provides the high gluten content necessary for a lighter, chewier texture. If you want to increase the whole grain content, you could try using all whole wheat flour for the “whole wheat” and “rye” portions, but keep the bread flour for structure. Or, if using 100% whole wheat, consider adding vital wheat gluten (about 1 tablespoon per cup of whole wheat flour) to improve elasticity and rise. You might also need to slightly increase the hydration, as 100% whole wheat doughs are often thirstier.
Multigrain Seeded Bread Recipe
Ingredients
For the Seed Soaker:
- ¼ cup (40g) flax seeds (linseeds)
- ¼ cup (35g) sunflower seeds
- ¼ cup (30g) pumpkin seeds (pepitas)
- 2 tablespoons (20g) sesame seeds
- 2 tablespoons (15g) poppy seeds
- ½ cup (120ml) boiling water
For the Dough:
- 1 ½ cups (360ml) lukewarm water (around 105-115°F or 40-46°C)
- 2 ¼ teaspoons (7g, or 1 standard packet) active dry yeast or instant yeast
- 2 tablespoons (40g) honey or maple syrup
- 2 cups (280g) strong bread flour (high protein flour)
- 1 ½ cups (180g) whole wheat flour
- ½ cup (60g) rye flour (or spelt flour, or more whole wheat/bread flour)
- 2 tablespoons (30ml) olive oil or melted unsalted butter
- 1 ½ teaspoons (9g) fine sea salt
Instructions
1. Prepare the Seed Soaker (Autolyse for Seeds):
In a medium bowl, combine all the seeds for the soaker (flax, sunflower, pumpkin, sesame, poppy). Pour the ½ cup of boiling water over them. Stir well, cover, and let it sit for at least 1 hour, or even overnight in the refrigerator. This step softens the seeds, makes them easier to incorporate, and prevents them from drawing too much moisture from the dough later. Drain any excess water before adding to the dough, though most should be absorbed.
2. Activate the Yeast (Bloom if using Active Dry Yeast):
In a large mixing bowl (or the bowl of your stand mixer), pour in the 1 ½ cups of lukewarm water. Sprinkle the yeast over the water, then stir in the honey or maple syrup. Let it stand for 5-10 minutes until the mixture becomes foamy. This indicates the yeast is active. If using instant yeast, you can skip this specific blooming step and add it directly to the dry ingredients, but blooming with the warm water and sweetener still gives it a good start.
3. Combine Dry Ingredients:
In a separate large bowl, whisk together the bread flour, whole wheat flour, rye flour (or chosen alternative), and salt. This ensures the salt is evenly distributed and doesn’t directly contact the yeast initially, which can inhibit its activity.
4. Mix the Dough:
Once the yeast is foamy, add the olive oil (or melted butter) and the drained seed soaker to the yeast mixture. Stir to combine.
Gradually add the mixed dry ingredients to the wet ingredients. If using a stand mixer, use the dough hook attachment and mix on low speed until a shaggy dough forms. If mixing by hand, use a sturdy wooden spoon or spatula to bring the ingredients together.
5. Knead the Dough:
- By Stand Mixer: Increase the speed to medium-low and knead for 7-10 minutes. The dough should become smooth, elastic, and pull away from the sides of the bowl. It will be slightly tacky due to the whole grains and seeds but shouldn’t be overly sticky. If it’s too wet, add a tablespoon of bread flour at a time. If too dry, a teaspoon of water.
- By Hand: Turn the shaggy dough out onto a lightly floured surface. Knead for 10-15 minutes. Fold the dough over itself, push it away with the heel of your hand, rotate, and repeat. Continue until the dough is smooth, elastic, and passes the “windowpane test” (a small piece can be stretched thin enough to see light through it without tearing easily).
6. First Rise (Bulk Fermentation):
Lightly oil the mixing bowl (or a clean large bowl). Form the kneaded dough into a ball and place it in the oiled bowl, turning it once to coat the entire surface with oil. This prevents a crust from forming.
Cover the bowl tightly with plastic wrap or a damp kitchen towel. Let the dough rise in a warm, draft-free place for 1.5 to 2 hours, or until it has doubled in size. The exact time will depend on the ambient temperature.
7. Shape the Loaf:
Gently punch down the risen dough to release the air. Turn it out onto a lightly floured work surface.
Gently flatten the dough into a rough rectangle. To shape it into a traditional loaf (for a loaf pan):
* Fold the top third of the rectangle down towards the center and press to seal.
* Fold the bottom third up over the first fold and press to seal.
* Rotate the dough 90 degrees. Starting from one of the shorter ends, tightly roll the dough into a log, pinching the seam closed with each turn and at the end. Pinch the ends of the log as well and tuck them slightly under.
Ensure the surface tension is good – the loaf should feel taut.
8. Second Rise (Proofing):
Grease and lightly flour a standard 9×5 inch (23×13 cm) loaf pan. Carefully place the shaped dough, seam-side down, into the prepared pan.
Cover the pan loosely with oiled plastic wrap or a damp kitchen towel. Let it rise again in a warm, draft-free place for 45-75 minutes, or until it has risen about 1-1.5 inches above the rim of the pan and looks puffy. It shouldn’t quite double this time. You can test if it’s ready by gently poking it with a floured finger; if the indentation springs back slowly and leaves a slight mark, it’s ready. If it springs back immediately, it needs more time. If it collapses, it’s over-proofed.
9. Preheat Oven & Prepare for Baking:
About 20-30 minutes before the second rise is complete, preheat your oven to 400°F (200°C). If you have a baking stone, place it in the oven to preheat.
For a crispier crust, you can create steam in your oven. Place an empty metal baking pan (not glass) on the bottom rack of the oven while it preheats. Just before putting the bread in, you’ll pour about 1 cup of hot water into this pan.
10. Score and Bake the Bread:
If desired, brush the top of the loaf very gently with the egg white wash (or spray with water) and sprinkle with the optional topping seeds.
Using a very sharp knife, lame, or clean razor blade, make one decisive slash (about ½ inch deep) down the center of the loaf, or a few diagonal slashes. This allows the bread to expand controllably during baking.
Carefully place the loaf pan into the preheated oven (on the baking stone if using). If creating steam, quickly pour the hot water into the preheated pan on the bottom rack and immediately close the oven door to trap the steam.
Bake for 35-45 minutes. After the first 20 minutes, you can reduce the oven temperature to 375°F (190°C) if the crust is browning too quickly.
The bread is done when it’s deeply golden brown and sounds hollow when tapped on the bottom. For precision, an instant-read thermometer inserted into the center should register 190-210°F (88-99°C).
11. Cool the Bread:
Immediately remove the bread from the loaf pan and transfer it to a wire cooling rack. This is crucial to prevent a soggy bottom and allows air to circulate.
Resist the urge to slice into it right away! Let the bread cool completely, for at least 1-2 hours, before slicing. It’s still cooking internally as it cools, and slicing too early can result in a gummy texture.
Nutrition
- Serving Size: One Normal Portion
- Calories: 190-230


